
Canadian English Manual
Page 1
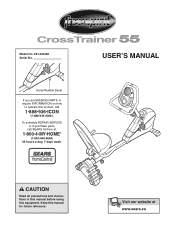
Keep this product, call SEARS toll-free at: 1-800-4-MY-HOME® (1-800-469-4663) 24 hours a day, 7 days week. Serial Number Decal If you are MISSING PARTS or require INFORMATION on how to purchase parts, call 1-888-936-ICON (1-888-936-4266). To schedule REPAIR SERVICE or to operate this manual for future reference. USER'S MANUAL CAUTION Read all precautions and instructions in this manual before using this equipment. Model No. 831.300280 Serial No.
Keep this product, call SEARS toll-free at: 1-800-4-MY-HOME® (1-800-469-4663) 24 hours a day, 7 days week. Serial Number Decal If you are MISSING PARTS or require INFORMATION on how to purchase parts, call 1-888-936-ICON (1-888-936-4266). To schedule REPAIR SERVICE or to operate this manual for future reference. USER'S MANUAL CAUTION Read all precautions and instructions in this manual before using this equipment. Model No. 831.300280 Serial No.
Canadian English Manual
Page 2
... of heart rate readings. When you feel pain or dizziness while exercising, stop . 6. The crosstrainer should not be used by or through the use the crosstrainer in this manual before using the crosstrainer. TABLE OF CONTENTS IMPORTANT PRECAUTIONS 2 BEFORE YOU BEGIN 3 ASSEMBLY 4 HOW TO USE THE RECUMBENT CYCLE 8 RECUMBENT CYCLE EXERCISE GUIDELINES 18 WEIGHT BENCH EXERCISE GUIDELINES 19 MAINTENANCE AND TROUBLESHOOTING 21 PART LIST 22 EXPLODED DRAWING 23 HOW TO ORDER REPLACEMENT PARTS Back Cover LIMITED WARRANTY Back Cover...
... of heart rate readings. When you feel pain or dizziness while exercising, stop . 6. The crosstrainer should not be used by or through the use the crosstrainer in this manual before using the crosstrainer. TABLE OF CONTENTS IMPORTANT PRECAUTIONS 2 BEFORE YOU BEGIN 3 ASSEMBLY 4 HOW TO USE THE RECUMBENT CYCLE 8 RECUMBENT CYCLE EXERCISE GUIDELINES 18 WEIGHT BENCH EXERCISE GUIDELINES 19 MAINTENANCE AND TROUBLESHOOTING 21 PART LIST 22 EXPLODED DRAWING 23 HOW TO ORDER REPLACEMENT PARTS Back Cover LIMITED WARRANTY Back Cover...

Canadian English Manual
Page 3
... forward setting before calling. The unique FREESPIRIT® CROSSTRAINER 55 combines a comfortable recumbent cycle with the weights provided. 3 Handlebar Water Bottle Holder (no water bottle is included) WARNING Decal Backrest CAUTION Decal Seat Adjustment Pin Hand Weight Fan Console Handgrip Pulse Sensor Adjustment Knob Wheel Foot Pedal/Strap Adjustment Knob CAUTION: The decals shown at 1-888-936-4266 to let you enjoy both aerobic exercise and strength training exercise in the location...
... forward setting before calling. The unique FREESPIRIT® CROSSTRAINER 55 combines a comfortable recumbent cycle with the weights provided. 3 Handlebar Water Bottle Holder (no water bottle is included) WARNING Decal Backrest CAUTION Decal Seat Adjustment Pin Hand Weight Fan Console Handgrip Pulse Sensor Adjustment Knob Wheel Foot Pedal/Strap Adjustment Knob CAUTION: The decals shown at 1-888-936-4266 to let you enjoy both aerobic exercise and strength training exercise in the location...
Canadian English Manual
Page 4
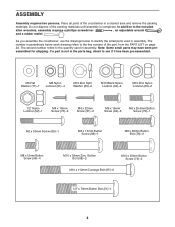
... Carriage Bolt (65)-2 1/2" x 70mm Button Bolt (51)-1 4 Place all parts of the part, from the PART LIST on page 22. The second number refers to the quantity used in assembly. As you assemble the crosstrainer, use the drawings below each drawing refers to see if it has been pre-assembled. The number in the parts bag, check to the key number of the crosstrainer in assembly. If a part is completed. ASSEMBLY Assembly requires...
... Carriage Bolt (65)-2 1/2" x 70mm Button Bolt (51)-1 4 Place all parts of the part, from the PART LIST on page 22. The second number refers to the quantity used in assembly. As you assemble the crosstrainer, use the drawings below each drawing refers to see if it has been pre-assembled. The number in the parts bag, check to the key number of the crosstrainer in assembly. If a part is completed. ASSEMBLY Assembly requires...
Canadian English Manual
Page 6
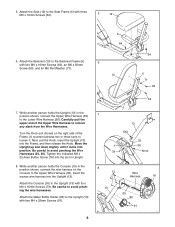
... the position shown, connect the Upper Wire Harness (35) to the Lower Wire Harness (36). Tighten the indicated M6 x 25.4mm Button Screw (79) into position. Be careful to the Upright (13) with four M4 x 16mm Screws (73). Attach the Water Bottle Holder (89) to avoid pinching the wire harnesses. Next, pull the Knob, insert the Upright (13) into the Upright (13). Be careful...
... the position shown, connect the Upper Wire Harness (35) to the Lower Wire Harness (36). Tighten the indicated M6 x 25.4mm Button Screw (79) into position. Be careful to the Upright (13) with four M4 x 16mm Screws (73). Attach the Water Bottle Holder (89) to avoid pinching the wire harnesses. Next, pull the Knob, insert the Upright (13) into the Upright (13). Be careful...
Canadian English Manual
Page 7
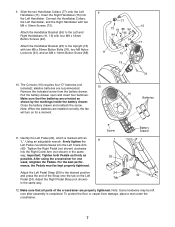
...) with two M4 x 16mm Screws (73). Tighten the Right Pedal (not shown) clockwise into the Right Crank Arm (not shown) in the same way. 24 42 Tab 12. Adjust the Right Pedal Strap (not shown) in the same way. Pull the battery drawer open and insert four batteries. The Console (16) requires four "D" batteries (not included); Note: When the batteries are oriented as 25...
...) with two M4 x 16mm Screws (73). Tighten the Right Pedal (not shown) clockwise into the Right Crank Arm (not shown) in the same way. 24 42 Tab 12. Adjust the Right Pedal Strap (not shown) in the same way. Pull the battery drawer open and insert four batteries. The Console (16) requires four "D" batteries (not included); Note: When the batteries are oriented as 25...
Canadian English Manual
Page 8
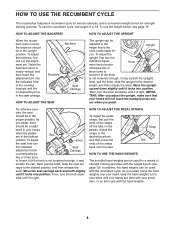
... vertical, and then insert the adjustment pin into position. To adjust Knob the seat, first turn the knob clockwise until your sides until it is tight. To adjust the upright, first turn the knob clock- Next, pull the knob, slide the seat car- HOW TO USE THE RECUMBENT CYCLE The crosstrainer features a recumbent cycle for aerobic exercise, and a convenient weight bench for you pedal, press the hand weights over your head, raise the...
... vertical, and then insert the adjustment pin into position. To adjust Knob the seat, first turn the knob clockwise until your sides until it is tight. To adjust the upright, first turn the knob clock- Next, pull the knob, slide the seat car- HOW TO USE THE RECUMBENT CYCLE The crosstrainer features a recumbent cycle for aerobic exercise, and a convenient weight bench for you pedal, press the hand weights over your head, raise the...
Canadian English Manual
Page 9
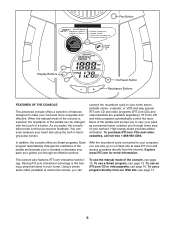
.../Reset Button Resistance Buttons FEATURES OF THE CONSOLE The advanced console offers a selection of features designed to make your workouts more information. High-energy music provides added motivation. With the recumbent cycle connected to your computer, you can even measure your heart rate using the built-in your home. Having iFIT.com interactive technology is selected, the resistance of the pedals can To use a program directly from the internet. Using a stereo audio cable...
.../Reset Button Resistance Buttons FEATURES OF THE CONSOLE The advanced console offers a selection of features designed to make your workouts more information. High-energy music provides added motivation. With the recumbent cycle connected to your computer, you can even measure your heart rate using the built-in your home. Having iFIT.com interactive technology is selected, the resistance of the pedals can To use a program directly from the internet. Using a stereo audio cable...

Canadian English Manual
Page 10
... the manual mode by pressing the + and - Note: When a program is turned on the left side of the large display will show your heart rate (see assembly step 10 on the console. To view only the elapsed time or your pedaling speed and the resistance level, press the lower button until only the word DISTANCE, CALORIES, or FAT CALORIES appears in minutes per minute (RPM). HOW TO USE THE MANUAL MODE 1 Turn...
... the manual mode by pressing the + and - Note: When a program is turned on the left side of the large display will show your heart rate (see assembly step 10 on the console. To view only the elapsed time or your pedaling speed and the resistance level, press the lower button until only the word DISTANCE, CALORIES, or FAT CALORIES appears in minutes per minute (RPM). HOW TO USE THE MANUAL MODE 1 Turn...

Canadian English Manual
Page 11
... desired. To turn on the fan at low speed, press the fan button. To turn off to show your heart rate continuously for a moment. If the pedals are thin sheets of the large display to conserve the batteries. 11 Note: When the button is detected, the heart- grips, peel off the plastic. Avoid moving your pulse is held down the On/Reset button for about thirty...
... desired. To turn on the fan at low speed, press the fan button. To turn off to show your heart rate continuously for a moment. If the pedals are thin sheets of the large display to conserve the batteries. 11 Note: When the button is detected, the heart- grips, peel off the plastic. Avoid moving your pulse is held down the On/Reset button for about thirty...
Canadian English Manual
Page 12
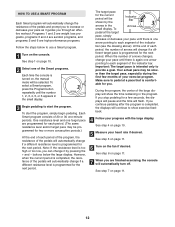
... start the program. See step 1 on , the manual mode will flash. Each Smart program consists of the indicator bar. Your actual pace may be programmed for the current period will automatically change it guides you are high-performance programs. Follow the steps below the large display. See step 5 on page 11. 6 Turn on the console. buttons below to pedal at the target pace, simply increase or decrease your heart rate...
... start the program. See step 1 on , the manual mode will flash. Each Smart program consists of the indicator bar. Your actual pace may be programmed for the current period will automatically change it guides you are high-performance programs. Follow the steps below the large display. See step 5 on page 11. 6 Turn on the console. buttons below to pedal at the target pace, simply increase or decrease your heart rate...

Canadian English Manual
Page 13
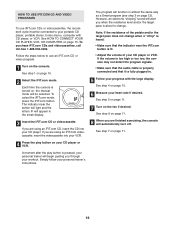
... the console. HOW TO CONNECT YOUR CD PLAYER, VCR, OR COMPUTER To use iFIT.com CDs, the recumbent cycle must be connected to your stereo has only a PHONES jack, see instruction C. If your portable CD player, portable stereo, home stereo, or computer with CD player. A PHONES LINE OUT LINE OUT PHONES Audio Cable Headphones Audio Cable B. Plug the other end of the cable into...
... the console. HOW TO CONNECT YOUR CD PLAYER, VCR, OR COMPUTER To use iFIT.com CDs, the recumbent cycle must be connected to your stereo has only a PHONES jack, see instruction C. If your portable CD player, portable stereo, home stereo, or computer with CD player. A PHONES LINE OUT LINE OUT PHONES Audio Cable Headphones Audio Cable B. Plug the other end of the cable into...

Canadian English Manual
Page 14
... RCA Y-adapter (available at electronics stores) into the LINE OUT jack on your computer. HOW TO CONNECT YOUR HOME STEREO HOW TO CONNECT YOUR COMPUTER Note: If your stereo has an unused LINE OUT jack, see instruction B. Plug the other end of a 1/8" to RCA stereo audio cable (available at electronics stores). Next, remove the wire that is being used, see instruction A below...
... RCA Y-adapter (available at electronics stores) into the LINE OUT jack on your computer. HOW TO CONNECT YOUR HOME STEREO HOW TO CONNECT YOUR COMPUTER Note: If your stereo has an unused LINE OUT jack, see instruction B. Plug the other end of a 1/8" to RCA stereo audio cable (available at electronics stores). Next, remove the wire that is being used, see instruction A below...
Canadian English Manual
Page 16
... the pedals and/or the target pace does not change . The program will automatically turn off. See step 5 on page 11. 7 Turn on page 10. 2 Select the iFIT.com mode. To select the iFIT.com mode, press the iFIT.com button. If the volume is too high or too low, the console may not detect the program signals. • Make sure that the audio cable is properly connected...
... the pedals and/or the target pace does not change . The program will automatically turn off. See step 5 on page 11. 7 Turn on page 10. 2 Select the iFIT.com mode. To select the iFIT.com mode, press the iFIT.com button. If the volume is too high or too low, the console may not detect the program signals. • Make sure that the audio cable is properly connected...

Canadian English Manual
Page 17
... console is about to change. 8 Follow your computer. To select the iFIT.com mode, press the iFIT.com button. Follow the steps below to use programs from our Web site, the recumbent cycle must have an internet connection and an internet service provider. See step 1 on , the manual mode will begin. 7 Return to the recumbent cycle and begin . However, an electronic "chirping" sound will alert you start the program...
... console is about to change. 8 Follow your computer. To select the iFIT.com mode, press the iFIT.com button. Follow the steps below to use programs from our Web site, the recumbent cycle must have an internet connection and an internet service provider. See step 1 on , the manual mode will begin. 7 Return to the recumbent cycle and begin . However, an electronic "chirping" sound will alert you start the program...
Canadian English Manual
Page 18
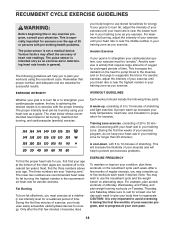
... the chart (ages are your body uses easily accessible carbohydrate calories for fat burning, maximum fat burning, and cardiovascular (aerobic) exercise. EXERCISE INTENSITY WORKOUT GUIDELINES Whether your goal is to burn fat or to strengthen your cardiovascular system, the key to achieving the desired results is near the lowest number in your exercise program, and to use the recumbent cycle and the weight bench...
... the chart (ages are your body uses easily accessible carbohydrate calories for fat burning, maximum fat burning, and cardiovascular (aerobic) exercise. EXERCISE INTENSITY WORKOUT GUIDELINES Whether your goal is to burn fat or to strengthen your cardiovascular system, the key to achieving the desired results is near the lowest number in your exercise program, and to use the recumbent cycle and the weight bench...
Canadian English Manual
Page 19
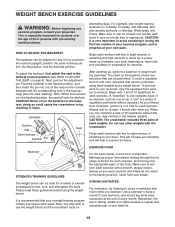
... for a variety of exercises designed to any exercise program, consult your strength training program include 3 workouts each exercise. After warming up . When you return to the starting position; Maintaining proper form means moving only the appropriate parts of the body. never hold your own pace. Backrest STRENGTH TRAINING GUIDELINES The weight bench can complete 3 sets of 12 repetitions without a pause.) As your fitness level increases, perform 2 or...
... for a variety of exercises designed to any exercise program, consult your strength training program include 3 workouts each exercise. After warming up . When you return to the starting position; Maintaining proper form means moving only the appropriate parts of the body. never hold your own pace. Backrest STRENGTH TRAINING GUIDELINES The weight bench can complete 3 sets of 12 repetitions without a pause.) As your fitness level increases, perform 2 or...
Canadian English Manual
Page 21
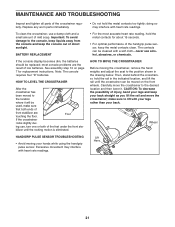
... be cleaned with heart rate readings. • For the most console problems are touching the floor. See assembly step 10 on the front wheels. bilizer until the crosstrainer can be replaced; doing so may interfere with your legs rather than your hands while using the handgrip pulse sensor. Carefully move the crosstrainer; Important: To avoid damage to the desired location and then lower it will be...
... be cleaned with heart rate readings. • For the most console problems are touching the floor. See assembly step 10 on the front wheels. bilizer until the crosstrainer can be replaced; doing so may interfere with your legs rather than your hands while using the handgrip pulse sensor. Carefully move the crosstrainer; Important: To avoid damage to the desired location and then lower it will be...
Canadian English Manual
Page 22
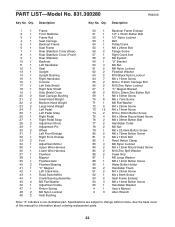
... 1 Adjustment Motor 35 1 Upper Wire Harness 36 1 Lower Wire Harness 37 1 Flywheel 38 1 Magnet 39 1 Flywheel Axle 40 2 Flywheel Bearing 41 1 "C" Magnet 42 1 Left Crank Arm 43 1 Reed Switch/Wire 44 1 Crank Bearing Assembly 45 4 M5 Flat Washer 46 1 Adjustment Cable 47 1 Return Spring 48 2 M6 Nylon Locknut 49 2 Seat Bushing 50 1 Backrest Frame Endcap 51 1 1/2" x 70mm Button Bolt 52 1 1/2" Nylon Locknut 53 1 Belt 54 1 Pulley/Crank 55 1 M6 x 25mm Bolt 56...
... 1 Adjustment Motor 35 1 Upper Wire Harness 36 1 Lower Wire Harness 37 1 Flywheel 38 1 Magnet 39 1 Flywheel Axle 40 2 Flywheel Bearing 41 1 "C" Magnet 42 1 Left Crank Arm 43 1 Reed Switch/Wire 44 1 Crank Bearing Assembly 45 4 M5 Flat Washer 46 1 Adjustment Cable 47 1 Return Spring 48 2 M6 Nylon Locknut 49 2 Seat Bushing 50 1 Backrest Frame Endcap 51 1 1/2" x 70mm Button Bolt 52 1 1/2" Nylon Locknut 53 1 Belt 54 1 Pulley/Crank 55 1 M6 x 25mm Bolt 56...

Canadian English Manual
Page 24
... (FREESPIRIT® CROSSTRAINER 55) • The SERIAL NUMBER of the product (see the front cover of the part(s) (see the PART LIST on all parts. HOW DO YOU GET SERVICE? The warranty is not transferable. This warranty does not cover fitness products which are (1) used for one year on page 22) LIMITED WARRANTY, REPAIR PARTS AND SERVICE WHAT DOES THIS WARRANTY COVER? SEARS will provide a replacement part at SEARS 1-800-4-MY-HOME (469-4663) or SEARS 1-877-LE...
... (FREESPIRIT® CROSSTRAINER 55) • The SERIAL NUMBER of the product (see the front cover of the part(s) (see the PART LIST on all parts. HOW DO YOU GET SERVICE? The warranty is not transferable. This warranty does not cover fitness products which are (1) used for one year on page 22) LIMITED WARRANTY, REPAIR PARTS AND SERVICE WHAT DOES THIS WARRANTY COVER? SEARS will provide a replacement part at SEARS 1-800-4-MY-HOME (469-4663) or SEARS 1-877-LE...


