
Uk Manual
Page 1
... Customer Service Department. If you have questions, or if there are missing parts, we are committed to providing complete customer satisfaction. Greenwich House 223 North Street Sheepscar Leeds LS7 2AA West Yorkshire CAUTION Read all precautions and instructions in this manual before using this manual for future reference. PETL16000 Serial No. Serial Number Decal QUESTIONS? Class HC Fitness Product Model No...
... Customer Service Department. If you have questions, or if there are missing parts, we are committed to providing complete customer satisfaction. Greenwich House 223 North Street Sheepscar Leeds LS7 2AA West Yorkshire CAUTION Read all precautions and instructions in this manual before using this manual for future reference. PETL16000 Serial No. Serial Number Decal QUESTIONS? Class HC Fitness Product Model No...

Uk Manual
Page 2
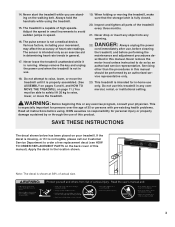
... wear ath- administered. 12. two meters of the owner to the fuse carrier. Never move the walking belt while the power is the responsibility of clearance behind it. Save the EXPLODED DRAWING and PART LIST for both men and women. It is turned off. Athletic support clothes are attached in the treadmill. garage or covered patio, or near water. 11. Keep children...
... wear ath- administered. 12. two meters of the owner to the fuse carrier. Never move the walking belt while the power is the responsibility of clearance behind it. Save the EXPLODED DRAWING and PART LIST for both men and women. It is turned off. Athletic support clothes are attached in the treadmill. garage or covered patio, or near water. 11. Keep children...
Uk Manual
Page 3
... or through the use . 18. Never remove the motor hood unless instructed to order a free replacement decal (see HOW TO ORDER REPLACEMENT PARTS on page 11.) You must be performed by an authorised ser- vice representative only. 23. WARNING: Before beginning this manual). Adjust the speed in speed. 16. The pulse sensor is running. Never leave the treadmill unattended while it is properly assembled. (See ASSEMBLY on pages...
... or through the use . 18. Never remove the motor hood unless instructed to order a free replacement decal (see HOW TO ORDER REPLACEMENT PARTS on page 11.) You must be performed by an authorised ser- vice representative only. 23. WARNING: Before beginning this manual). Adjust the speed in speed. 16. The pulse sensor is running. Never leave the treadmill unattended while it is properly assembled. (See ASSEMBLY on pages...
Uk Manual
Page 4
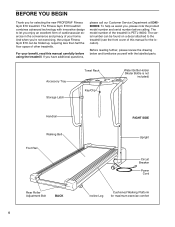
... the product model number and serial number before using the treadmill. The serial number can be found on a decal attached to let you 're not exercising, the unique Fitness Gym E16 can be folded up, requiring less than half the floor space of the treadmill is not included) Handrail Walking Belt Foot Rail RIGHT SIDE Upright Circuit Breaker Power Cord Rear Roller Adjustment Bolt BACK 4 Incline Leg Cushioned Walking Platform for the location). Before reading further, please review the drawing...
... the product model number and serial number before using the treadmill. The serial number can be found on a decal attached to let you 're not exercising, the unique Fitness Gym E16 can be folded up, requiring less than half the floor space of the treadmill is not included) Handrail Walking Belt Foot Rail RIGHT SIDE Upright Circuit Breaker Power Cord Rear Roller Adjustment Bolt BACK 4 Incline Leg Cushioned Walking Platform for the location). Before reading further, please review the drawing...
Uk Manual
Page 5
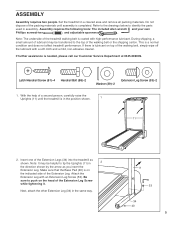
... of the walking belt or the shipping carton. Make sure that the Base Pad (40) is in assembly. Next, attach the other Extension Leg (34) in a cleared area and remove all packing materials. Set the treadmill in the same way. 11 53 34 40 5 This is needed, please call our Customer Service Department at 0345-089009. Latch/Handrail Screw (81)-4 Handrail Bolt (88...
... of the walking belt or the shipping carton. Make sure that the Base Pad (40) is in assembly. Next, attach the other Extension Leg (34) in a cleared area and remove all packing materials. Set the treadmill in the same way. 11 53 34 40 5 This is needed, please call our Customer Service Department at 0345-089009. Latch/Handrail Screw (81)-4 Handrail Bolt (88...
Uk Manual
Page 6
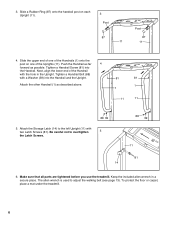
... Latch Screws (81). Attach the Storage Latch (14) to the left Upright (11) with a Washer (39) into the Handrail. Tighten a Handrail Screw (81) into the Handrail and the Upright. Attach the other Handrail (1) as possible. Be careful not to adjust the walking belt (see page 13). To protect the floor or carpet, place a mat under the treadmill. 6 Make sure that all parts are tightened before you use...
... Latch Screws (81). Attach the Storage Latch (14) to the left Upright (11) with a Washer (39) into the Handrail. Tighten a Handrail Screw (81) into the Handrail and the Upright. Attach the other Handrail (1) as possible. Be careful not to adjust the walking belt (see page 13). To protect the floor or carpet, place a mat under the treadmill. 6 Make sure that all parts are tightened before you use...
Uk Manual
Page 7
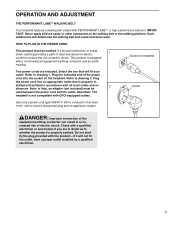
..., earthing provides a path of least resistance for electric 1 current to reduce the risk of electric shock. stalled and earthed in - Note: In Italy, an adapter (not included) must be used between the power cord and the outlet. Refer to drawing 1. OPERATION AND ADJUSTMENT THE PERFORMANT LUBETM WALKING BELT Your treadmill features a walking belt coated with all local codes and or- 2 dinances. Socket...
..., earthing provides a path of least resistance for electric 1 current to reduce the risk of electric shock. stalled and earthed in - Note: In Italy, an adapter (not included) must be used between the power cord and the outlet. Refer to drawing 1. OPERATION AND ADJUSTMENT THE PERFORMANT LUBETM WALKING BELT Your treadmill features a walking belt coated with all local codes and or- 2 dinances. Socket...

Uk Manual
Page 8
.... When the key is stopped, the speed control must be moved to the RESET position. Batteries cluded). The displays will already be restarted. stall batteries, open the battery cover under the console Battery Cover as shown. Avoid spilling liquids on . 2 Reset the speed control. Note: Each time the walking belt is removed from the console, the walking belt will not turn on the displays. STEP-BY-STEP CONSOLE OPERATION 8 If there is started. Speed Control Monitor Display Pulse Display On/Reset Button Display Button Pulse Sensor Key Clip CAUTION: Before...
.... When the key is stopped, the speed control must be moved to the RESET position. Batteries cluded). The displays will already be restarted. stall batteries, open the battery cover under the console Battery Cover as shown. Avoid spilling liquids on . 2 Reset the speed control. Note: Each time the walking belt is removed from the console, the walking belt will not turn on the displays. STEP-BY-STEP CONSOLE OPERATION 8 If there is started. Speed Control Monitor Display Pulse Display On/Reset Button Display Button Pulse Sensor Key Clip CAUTION: Before...

Uk Manual
Page 9
... UNPLUG THE POWER CORD. Carefully step onto the walking belt and begin exercising. To stop the walking belt and remove the key. Hold your thumb will turn off about five seconds and then reinsert it . If the displayed pulse appears to be reset by sliding the speed control. Step onto the foot rails, stop exercising for ten seconds or longer, the time mode will reset the console. The pulse sensor is removed. Do not press too hard...
... UNPLUG THE POWER CORD. Carefully step onto the walking belt and begin exercising. To stop the walking belt and remove the key. Hold your thumb will turn off about five seconds and then reinsert it . If the displayed pulse appears to be reset by sliding the speed control. Step onto the foot rails, stop exercising for ten seconds or longer, the time mode will reset the console. The pulse sensor is removed. Do not press too hard...

Uk Manual
Page 10
... Incline Pin Incline Pin Incline Leg HOW TO FOLD AND MOVE THE TREADMILL HOW TO FOLD THE TREADMILL FOR STORAGE Before folding the treadmill, unplug the power cord. Next, fold the treadmill to lift with the incline pins removed. Incline Pin To change the incline, remove the incline pins from damage, place a mat under the treadmill. CAUTION: Before using the treadmill, make sure to the storage position (see HOW TO LOWER THE TREADMILL FOR USE on page 11). Hold the treadmill with your left thumb, press the storage latch...
... Incline Pin Incline Pin Incline Leg HOW TO FOLD AND MOVE THE TREADMILL HOW TO FOLD THE TREADMILL FOR STORAGE Before folding the treadmill, unplug the power cord. Next, fold the treadmill to lift with the incline pins removed. Incline Pin To change the incline, remove the incline pins from damage, place a mat under the treadmill. CAUTION: Before using the treadmill, make sure to the storage position (see HOW TO LOWER THE TREADMILL FOR USE on page 11). Hold the treadmill with your left thumb, press the storage latch...

Uk Manual
Page 11
... are past the storage latch. 2. HOW TO LOWER THE TREADMILL FOR USE 1. Hold the treadmill firmly with your right hand as described above. Make sure that the storage latch is resting in the storage position. Place one foot on the front wheels. Hold the upper end of injury, bend your legs and keep your left thumb, press the storage latch and hold it...
... are past the storage latch. 2. HOW TO LOWER THE TREADMILL FOR USE 1. Hold the treadmill firmly with your right hand as described above. Make sure that the storage latch is resting in the storage position. Place one foot on the front wheels. Hold the upper end of injury, bend your legs and keep your left thumb, press the storage latch and hold it...

Uk Manual
Page 12
... batteries in . Most problems are the result of the Pulley (50). Carefully remove the hood. If necessary, loosen the Screw (33) and move the Reed Switch slightly. TROUBLE-SHOOTING Most treadmill problems can be solved by following the steps below. Make sure that the power cord is no longer than 1.5 meters. b. See BATTERY INSTALLATION on the treadmill near the power cord (see c. Remove the key from the console. Remove the screws from the hood. Re-attach the hood...
... batteries in . Most problems are the result of the Pulley (50). Carefully remove the hood. If necessary, loosen the Screw (33) and move the Reed Switch slightly. TROUBLE-SHOOTING Most treadmill problems can be solved by following the steps below. Make sure that the power cord is no longer than 1.5 meters. b. See BATTERY INSTALLATION on the treadmill near the power cord (see c. Remove the key from the console. Remove the screws from the hood. Re-attach the hood...

Uk Manual
Page 13
... the walking belt slips when walked on , please call our Customer Service Department. 5. When the walking belt is overtightened, treadmill performance may decrease and the walking belt may be able to lift each side of a turn . form. 4. Be careful to 7 cm off the walking plat- Plug in the power cord, insert the key and run the treadmill for a few minutes. tighten the walking belt. c. Using the allen wrench, c turn both rear roller adjustment bolts counterclockwise, 1/4 of the walking belt...
... the walking belt slips when walked on , please call our Customer Service Department. 5. When the walking belt is overtightened, treadmill performance may decrease and the walking belt may be able to lift each side of a turn . form. 4. Be careful to 7 cm off the walking plat- Plug in the power cord, insert the key and run the treadmill for a few minutes. tighten the walking belt. c. Using the allen wrench, c turn both rear roller adjustment bolts counterclockwise, 1/4 of the walking belt...

Uk Manual
Page 14
... exercise with pre-existing health problems. The pulse sensor is in your breath. the first few months, you , first find the two numbers below shows recommended heart rates for energy. Aerobic exercise is intended only as an exercise aid in determining heart rate trends in preparation for energy. Training Zone Exercise After warming up to five workouts each workout with 5 to prevent post-exercise problems. To measure your exercise program...
... exercise with pre-existing health problems. The pulse sensor is in your breath. the first few months, you , first find the two numbers below shows recommended heart rates for energy. Aerobic exercise is intended only as an exercise aid in determining heart rate trends in preparation for energy. Training Zone Exercise After warming up to five workouts each workout with 5 to prevent post-exercise problems. To measure your exercise program...

Uk Manual
Page 15
...leg as possible. Hold for 15 counts, then relax. Hold for 15 counts, then relax. Keep your back leg...for each leg. Bring ... times. Repeat 3 times for each leg. To cause further stretching of your toes...form for both legs. Hold for 15 counts, then relax. Stretches: Hamstrings, back of the other hand. Stretches: Hamstrings, lower back, and groin. 3. Quadriceps Stretch With one leg... in front of knees, and back. 2. Pull your feet toward your extended leg...and grasp one leg extended. Inner Thigh ...
...leg as possible. Hold for 15 counts, then relax. Hold for 15 counts, then relax. Keep your back leg...for each leg. Bring ... times. Repeat 3 times for each leg. To cause further stretching of your toes...form for both legs. Hold for 15 counts, then relax. Stretches: Hamstrings, back of the other hand. Stretches: Hamstrings, lower back, and groin. 3. Quadriceps Stretch With one leg... in front of knees, and back. 2. Pull your feet toward your extended leg...and grasp one leg extended. Inner Thigh ...
Uk Manual
Page 16
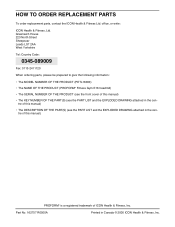
... Yorkshire Tel: Country Code: 0345-089009 Fax: 0113-2411120 When ordering parts, please be prepared to give the following information: • The MODEL NUMBER OF THE PRODUCT (PETL16000) • The NAME OF THE PRODUCT (PROFORM® Fitness Gym E16 treadmill) • The SERIAL NUMBER OF THE PRODUCT (see the front cover of this manual) • The KEY NUMBER OF THE PART(S) (see the PART LIST and the EXPLODED DRAWING...
... Yorkshire Tel: Country Code: 0345-089009 Fax: 0113-2411120 When ordering parts, please be prepared to give the following information: • The MODEL NUMBER OF THE PRODUCT (PETL16000) • The NAME OF THE PRODUCT (PROFORM® Fitness Gym E16 treadmill) • The SERIAL NUMBER OF THE PRODUCT (see the front cover of this manual) • The KEY NUMBER OF THE PART(S) (see the PART LIST and the EXPLODED DRAWING...

Uk Manual
Page 17
For information about ordering replacement parts, see the back cover of the User's Manual. 34 REMOVE THIS EXPLODED DRAWING AND PART LIST FROM THE MANUAL Save this EXPLODED DRAWING and PART LIST for future reference. Note: Specifications are subject to change without notice.
For information about ordering replacement parts, see the back cover of the User's Manual. 34 REMOVE THIS EXPLODED DRAWING AND PART LIST FROM THE MANUAL Save this EXPLODED DRAWING and PART LIST for future reference. Note: Specifications are subject to change without notice.
Uk Manual
Page 18
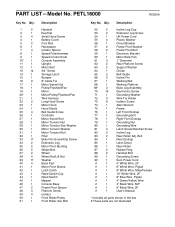
... Support Washer Choke Belt Guide Incline Pin Walking Belt Walking Platform Base Leg Assembly Electronics Screw Grounding Washer Wire Tie Holder Isolator Screw Allen Wrench Frame Left Front Endcap Grounding Bolt Right Front Endcap Grounding Nut Grounding Wire Latch Screw/Handrail Screw Incline Leg Rear Roller Adj. Qty. Bolt Rear Endcap Latch Decal Rear Roller Rubber Ring Handrail Bolt Grounding Screw Euro Power Cord 4" White Wire, 2F 8" White Wire, Pigtail 8" White Wire, Male/Female 10" White Wire, 2F 8" Blue Wire, Pigtail 4" Green/Yellow Wire 4" Black Wire, M/F 6" Black Wire, 2F User's Manual...
... Support Washer Choke Belt Guide Incline Pin Walking Belt Walking Platform Base Leg Assembly Electronics Screw Grounding Washer Wire Tie Holder Isolator Screw Allen Wrench Frame Left Front Endcap Grounding Bolt Right Front Endcap Grounding Nut Grounding Wire Latch Screw/Handrail Screw Incline Leg Rear Roller Adj. Qty. Bolt Rear Endcap Latch Decal Rear Roller Rubber Ring Handrail Bolt Grounding Screw Euro Power Cord 4" White Wire, 2F 8" White Wire, Pigtail 8" White Wire, Male/Female 10" White Wire, 2F 8" Blue Wire, Pigtail 4" Green/Yellow Wire 4" Black Wire, M/F 6" Black Wire, 2F User's Manual...

