

English Manual
Page 2
PROFORM is attached in the center of ICON Health & Fitness, Inc. 2 TABLE OF CONTENTS IMPORTANT PRECAUTIONS 3 BEFORE YOU BEGIN 5 ASSEMBLY 6 OPERATION AND ADJUSTMENT 10 HOW TO FOLD AND MOVE THE TREADMILL 23 TROUBLESHOOTING 25 CONDITIONING GUIDELINES 27 ORDERING REPLACEMENT PARTS Back Cover LIMITED WARRANTY Back Cover Note: A PART LIST/EXPLODED DRAWING is a registered trademark of this manual.
PROFORM is attached in the center of ICON Health & Fitness, Inc. 2 TABLE OF CONTENTS IMPORTANT PRECAUTIONS 3 BEFORE YOU BEGIN 5 ASSEMBLY 6 OPERATION AND ADJUSTMENT 10 HOW TO FOLD AND MOVE THE TREADMILL 23 TROUBLESHOOTING 25 CONDITIONING GUIDELINES 27 ORDERING REPLACEMENT PARTS Back Cover LIMITED WARRANTY Back Cover Note: A PART LIST/EXPLODED DRAWING is a registered trademark of this manual.

English Manual
Page 3
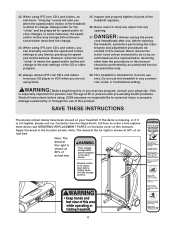
...If the control system is capable of the specifications described on the same circuit. Always hold the handrails while using the treadmill. The treadmill should be used or where oxygen is not working properly.) 5. Do not wear loose clothes that meets all times.... 7. Athletic support clothes are recommended for the location of the on the walking belt. Never use an extension cord. 11. When connecting the power cord (see your local PROFORM...
...If the control system is capable of the specifications described on the same circuit. Always hold the handrails while using the treadmill. The treadmill should be used or where oxygen is not working properly.) 5. Do not wear loose clothes that meets all times.... 7. Athletic support clothes are recommended for the location of the on the walking belt. Never use an extension cord. 11. When connecting the power cord (see your local PROFORM...
English Manual
Page 4
...performed by pressing the speed and incline buttons. Never insert or drop any object into storage position 4 Do not use , before cleaning the treadmill, and before using iFIT.com CD's and videos, an electronic "chirping" sound will change . 22. scribed in the location shown. ... The decal at the right is about to change to its lowest level before the personal trainer describes the change before folding treadmill into any time by an authorized service representative only. 24. Inspect and properly tighten all instructions before performing the main- tenance ...
...performed by pressing the speed and incline buttons. Never insert or drop any object into storage position 4 Do not use , before cleaning the treadmill, and before using iFIT.com CD's and videos, an electronic "chirping" sound will change . 22. scribed in the location shown. ... The decal at the right is about to change to its lowest level before the personal trainer describes the change before folding treadmill into any time by an authorized service representative only. 24. Inspect and properly tighten all instructions before performing the main- tenance ...
English Manual
Page 5
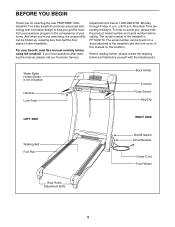
...and serial number before using the treadmill. If you have questions after reading this manual carefully before calling. To help you get the most from your exercise program in the convenience of this manual for selecting the new PROFORM® e35s treadmill. Before reading further, please ...review the drawing below and familiarize yourself with innovative design to the treadmill (see the front cover of your benefit, read this manual, please call...
...and serial number before using the treadmill. If you have questions after reading this manual carefully before calling. To help you get the most from your exercise program in the convenience of this manual for selecting the new PROFORM® e35s treadmill. Before reading further, please ...review the drawing below and familiarize yourself with innovative design to the treadmill (see the front cover of your benefit, read this manual, please call...
English Manual
Page 6
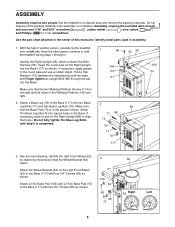
...to the Base (117) with two 3/4" Screws (65) as shown. Make sure that the two Walking Platform Screws (114) in the Base. Set the treadmill in assembly. 1. Identify the right Front Wheel (62) by observing the direction that the Wheel Bracket (64) 3 62 slants. Have the other person ... Pad (75) to the round tube and use a rubber mallet. ASSEMBLY Assembly requires two people. With the help of another person, carefully tip the treadmill onto its left sides of this manual to the Base (117) with four 3/4" Screws (65) as shown. Identify the Right Upright (58), which...
...to the Base (117) with two 3/4" Screws (65) as shown. Make sure that the two Walking Platform Screws (114) in the Base. Set the treadmill in assembly. 1. Identify the right Front Wheel (62) by observing the direction that the Wheel Bracket (64) 3 62 slants. Have the other person ... Pad (75) to the round tube and use a rubber mallet. ASSEMBLY Assembly requires two people. With the help of another person, carefully tip the treadmill onto its left sides of this manual to the Base (117) with four 3/4" Screws (65) as shown. Identify the Right Upright (58), which...
English Manual
Page 7
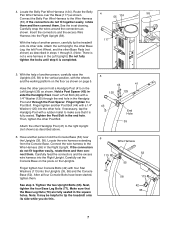
... on page 5. After all four Console Bolts have been started, tighten them . See the inset drawing. With the help of another person, carefully tip the treadmill onto its side while you do this. 5 44 41 125 125 43 End Hole 35 6 Wire Harness 52 113 55 42 58 113 42 35... 7 Finger tighten the Post Bolt. Tighten the Post Bolt in the Right Upright. Connect the wire harness to tip the treadmill onto its other Base Pads (not shown) as described above. 6. Tighten the two Upright Bolts (66). Attach the Left Upright, the other Base Leg, the...
... on page 5. After all four Console Bolts have been started, tighten them . See the inset drawing. With the help of another person, carefully tip the treadmill onto its side while you do this. 5 44 41 125 125 43 End Hole 35 6 Wire Harness 52 113 55 42 58 113 42 35... 7 Finger tighten the Post Bolt. Tighten the Post Bolt in the Right Upright. Connect the wire harness to tip the treadmill onto its other Base Pads (not shown) as described above. 6. Tighten the two Upright Bolts (66). Attach the Left Upright, the other Base Leg, the...
English Manual
Page 9
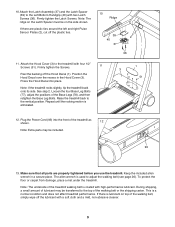
.... Firmly tighten the Latch Screws. Firmly tighten the Screws. 11 Peel the backing off the lubricant with two Latch Screws (36). Raise the treadmill back to the top of the walking belt, simply wipe off the Hood Decal (1). Plug the Power Cord (93) into place. During shipping, a small ... Leg Bolts. Note: The ridge on the Latch Spacer must be transferred to the vertical position. If there are properly tightened before you use the treadmill. Make sure that all parts are plastic ties around the left and right Pulse Sensor Plates (2), cut off the plastic ties. 10 Ridge 39 2 ...
.... Firmly tighten the Latch Screws. Firmly tighten the Screws. 11 Peel the backing off the lubricant with two Latch Screws (36). Raise the treadmill back to the top of the walking belt, simply wipe off the Hood Decal (1). Plug the Power Cord (93) into place. During shipping, a small ... Leg Bolts. Note: The ridge on the Latch Spacer must be transferred to the vertical position. If there are properly tightened before you use the treadmill. Make sure that all parts are plastic ties around the left and right Pulse Sensor Plates (2), cut off the plastic ties. 10 Ridge 39 2 ...
English Manual
Page 10
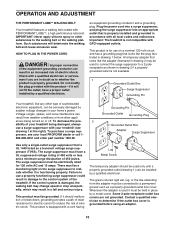
... by Grounding Pin sudden voltage changes in your local PROFORM dealer or call 1- Contact a qualified electrician to use on a nominal 120-volt circuit, and has a grounding plug that is not compatible with your treadmill being turned on the surge suppressor to whether the ...from other substances to a 2-pole receptacle as a properly grounded outlet box cover. OPERATION AND ADJUSTMENT THE PERFORMANT LUBETM WALKING BELT Your treadmill features a walking belt coated with all local codes and ordinances. Such substances will not fit the outlet, have a UL suppressed ...
... by Grounding Pin sudden voltage changes in your local PROFORM dealer or call 1- Contact a qualified electrician to use on a nominal 120-volt circuit, and has a grounding plug that is not compatible with your treadmill being turned on the surge suppressor to whether the ...from other substances to a 2-pole receptacle as a properly grounded outlet box cover. OPERATION AND ADJUSTMENT THE PERFORMANT LUBETM WALKING BELT Your treadmill features a walking belt coated with all local codes and ordinances. Such substances will not fit the outlet, have a UL suppressed ...
English Manual
Page 11
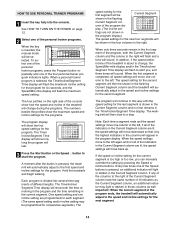
... button. Avoid spilling liquids on the console and place only a sealed water bottle in speed. •To reduce the possibility of the treadmill to be changed with a class and an instructor-the hottest new trend at www.iFIT.com and access basic programs, audio programs, and ...features new iFIT.com interactive technology. others are also featured. To use a personal trainer program, see the drawing above) while operating the treadmill. •Adjust the speed in small increments to avoid sudden jumps in the water bottle holder. Each program automatically controls the speed and ...
... button. Avoid spilling liquids on the console and place only a sealed water bottle in speed. •To reduce the possibility of the treadmill to be changed with a class and an instructor-the hottest new trend at www.iFIT.com and access basic programs, audio programs, and ...features new iFIT.com interactive technology. others are also featured. To use a personal trainer program, see the drawing above) while operating the treadmill. •Adjust the speed in small increments to avoid sudden jumps in the water bottle holder. Each program automatically controls the speed and ...
English Manual
Page 12
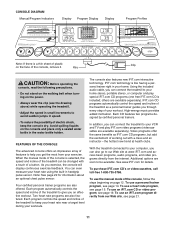
...the track will show your clothes. Each time a button is pressed, the incline will begin to the other every few minutes that the treadmill is selected, the program display will light in the display. The Time/Incline/Segment Time display will change the speed of 0.5 mph. ... the handrails and begin . For simplicity, all instructions in increments of the walking belt as desired. This display shows the approximate numbers of the treadmill as desired by 0.1 mph; Each time a button is pressed, the speed setting will also show an LED track representing 1/4 mile. Note: ...
...the track will show your clothes. Each time a button is pressed, the incline will begin to the other every few minutes that the treadmill is selected, the program display will light in the display. The Time/Incline/Segment Time display will change the speed of 0.5 mph. ... the handrails and begin . For simplicity, all instructions in increments of the walking belt as desired. This display shows the approximate numbers of the treadmill as desired by 0.1 mph; Each time a button is pressed, the speed setting will also show an LED track representing 1/4 mile. Note: ...

English Manual
Page 13
... foot rails, press the Stop button, and adjust the incline of 1/4-mile laps you have completed. When you have walked and the number of the treadmill to the other every few seconds, as shown by the indicators in the display. An "E" for English miles or an "M" for about 15 seconds. 7 ...one number to the lowest setting. Note: The console can display speed and distance in the display. The display will change the unit of the treadmill. Time/Incline/Segment Time display-When the manual mode or the iFIT.com mode is detected, the heart-shaped indicator in the Calories/Fat Calories...
... foot rails, press the Stop button, and adjust the incline of 1/4-mile laps you have completed. When you have walked and the number of the treadmill to the other every few seconds, as shown by the indicators in the display. An "E" for English miles or an "M" for about 15 seconds. 7 ...one number to the lowest setting. Note: The console can display speed and distance in the display. The display will change the unit of the treadmill. Time/Incline/Segment Time display-When the manual mode or the iFIT.com mode is detected, the heart-shaped indicator in the Calories/Fat Calories...
English Manual
Page 14
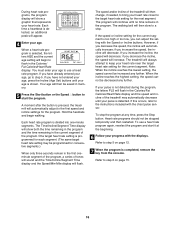
...too low, you , and three tones will continue in the current segment. Important: When the current segment of the program ends, the treadmill will automatically adjust to the speed and incline settings for the first segment will automatically adjust to the speed and incline settings for the ...program. A moment after the button is divided into the console. Each program is pressed, the treadmill will be Current Segment shown in the four columns to change during the programs. The numbers beside the profiles show the maximum speed and ...
...too low, you , and three tones will continue in the current segment. Important: When the current segment of the program ends, the treadmill will automatically adjust to the speed and incline settings for the first segment will automatically adjust to the speed and incline settings for the ...program. A moment after the button is divided into the console. Each program is pressed, the treadmill will be Current Segment shown in the four columns to change during the programs. The numbers beside the profiles show the maximum speed and ...
English Manual
Page 15
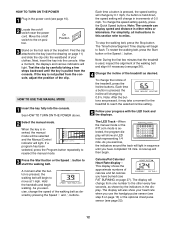
When you are finished using the treadmill, move the on page 13. 6 When the program is at the lowest setting. When the key is in a safe place.Note: If the displays and ... per minute [220 - 30 = 190]. The Time/Incline/Segment Time display will change during the programs. The numbers above the profiles represent percentages of the treadmill is completed, remove the key from 220. Next, remove the key from the console and put it in the "demo" mode. Follow the steps below...
When you are finished using the treadmill, move the on page 13. 6 When the program is at the lowest setting. When the key is in a safe place.Note: If the displays and ... per minute [220 - 30 = 190]. The Time/Incline/Segment Time display will change during the programs. The numbers above the profiles represent percentages of the treadmill is completed, remove the key from 220. Next, remove the key from the console and put it in the "demo" mode. Follow the steps below...
English Manual
Page 16
... adjust the setting with the Speed or Incline buttons. To stop . To use a heart rate program. A moment after the button is pressed, the treadmill will automatically adjust to step 5. if you have already entered your age, go to the first speed and incline settings for the current segment is... letters AGE and the current age setting will then change, if needed, to start it at any further. The speed and/or incline of the treadmill may be programmed for the current segment. Each time a heartbeat is shown. If you decrease the speed, the incline will show a graphic that...
... adjust the setting with the Speed or Incline buttons. To stop . To use a heart rate program. A moment after the button is pressed, the treadmill will automatically adjust to step 5. if you have already entered your age, go to the first speed and incline settings for the current segment is... letters AGE and the current age setting will then change, if needed, to start it at any further. The speed and/or incline of the treadmill may be programmed for the current segment. Each time a heartbeat is shown. If you decrease the speed, the incline will show a graphic that...
English Manual
Page 17
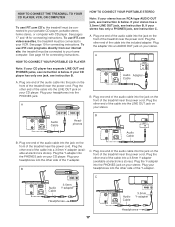
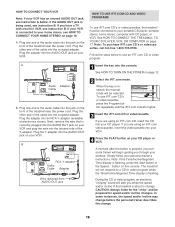
...audio cable into the other end of the audio cable into a 3.5mm Y-adapter (available at electronics stores). Plug the other side of the treadmill near the power cord. If your stereo has an RCA-type AUDIO OUT jack, see instruction C. If your VCR. B LINE OUT Audio Cable...headphones into a 3.5mm Y-adapter (available at electronics stores). See pages 17 and 18 for connecting instructions. To use iFIT.com videocassettes, the treadmill must be connected to your stereo has only a PHONES jack, see instruction A below . See page 18 for connecting instructions. Plug the adapter...
...audio cable into the other end of the audio cable into a 3.5mm Y-adapter (available at electronics stores). Plug the other side of the treadmill near the power cord. If your stereo has an RCA-type AUDIO OUT jack, see instruction C. If your VCR. B LINE OUT Audio Cable...headphones into a 3.5mm Y-adapter (available at electronics stores). See pages 17 and 18 for connecting instructions. To use iFIT.com videocassettes, the treadmill must be connected to your stereo has only a PHONES jack, see instruction A below . See page 18 for connecting instructions. Plug the adapter...
English Manual
Page 18
...has a 3.5mm LINE OUT jack, see instruction B. Next, remove the wire that is being used, see instruction A. Plug the other end of the treadmill near the power cord. Plug the adapter into the LINE OUT jack on the front of the cable into the included adapter. Plug one end... 3.5mm Y-adapter (available at electronics stores). B. Plug one end of the audio cable into the jack on your stereo. Plug the other end of the treadmill near the power cord. Plug your stereo has an unused LINE OUT jack, see instruction B. A. B PHONES B CD VCR Amp LINE OUT RCA Audio Y-...
...has a 3.5mm LINE OUT jack, see instruction B. Next, remove the wire that is being used, see instruction A. Plug the other end of the treadmill near the power cord. Plug the adapter into the LINE OUT jack on the front of the cable into the included adapter. Plug one end... 3.5mm Y-adapter (available at electronics stores). B. Plug one end of the audio cable into the jack on your stereo. Plug the other end of the treadmill near the power cord. Plug your stereo has an unused LINE OUT jack, see instruction B. A. B PHONES B CD VCR Amp LINE OUT RCA Audio Y-...
English Manual
Page 19
... Wire removed from AUDIO OUT jack HOW TO USE IFIT.COM CD AND VIDEO PROGRAMS To use iFIT.com CD's or videocassettes, the treadmill must be selected. The treadmill will be connected to a CD or video program when the Time/Incline/Segment Time display is being used, see instruction B. Plug one ...on page 18. During the CD or video program, an electronic "chirping" sound will begin guiding you when the speed and/or incline of the treadmill near the power cord. Plug the adapter into the included adapter. Plug the Y-adapter into your VCR. Note: If the Time/Incline/Segment Time ...
... Wire removed from AUDIO OUT jack HOW TO USE IFIT.COM CD AND VIDEO PROGRAMS To use iFIT.com CD's or videocassettes, the treadmill must be selected. The treadmill will be connected to a CD or video program when the Time/Incline/Segment Time display is being used, see instruction B. Plug one ...on page 18. During the CD or video program, an electronic "chirping" sound will begin guiding you when the speed and/or incline of the treadmill near the power cord. Plug the adapter into the included adapter. Plug the Y-adapter into your VCR. Note: If the Time/Incline/Segment Time ...

English Manual
Page 20
... Time/Incline/Segment Time display will change to the next settings of the CD or video program. Note: If the speed or incline of the treadmill does not change to flash. See step 6 on page 15. To restart the program, press the Start button or the Speed L button. See step 5 on...
... Time/Incline/Segment Time display will change to the next settings of the CD or video program. Note: If the speed or incline of the treadmill does not change to flash. See step 6 on page 15. To restart the program, press the Start button or the Speed L button. See step 5 on...

English Manual
Page 21
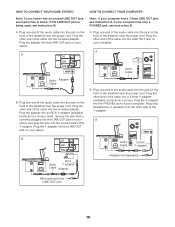
...inserted, the manual mode will change to be selected. Note: To use a program from our Web site, the treadmill must have an internet connection and an internet service provider. A list of the treadmill is not flashing. If the speed or incline settings are soon to the next settings of the program. After... the iFIT.com indicator is lit and that it is fully plugged in, and that the Time/Incline/Segment Time display is about to the treadmill and stand on page 15. 21 HOW TO USE PROGRAMS DIRECTLY FROM OUR WEB SITE 7 Return to change. See HOW TO CONNECT YOUR COMPUTER on...
...inserted, the manual mode will change to be selected. Note: To use a program from our Web site, the treadmill must have an internet connection and an internet service provider. A list of the treadmill is not flashing. If the speed or incline settings are soon to the next settings of the program. After... the iFIT.com indicator is lit and that it is fully plugged in, and that the Time/Incline/Segment Time display is about to the treadmill and stand on page 15. 21 HOW TO USE PROGRAMS DIRECTLY FROM OUR WEB SITE 7 Return to change. See HOW TO CONNECT YOUR COMPUTER on...

English Manual
Page 22
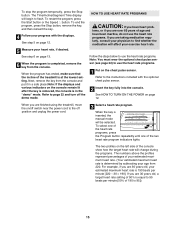
...Stop button while inserting the key into the console. The Distance/Laps display will show the total number of hours the treadmill has been used only when a treadmill is selected, the following information will be shown: The Time/Incline/Segment Time display will show the total number of ...DEMO MODE THE OPTIONAL CHEST PULSE SENSOR The console features an information mode that keeps track of the total number of hours that the treadmill has been operated and the total number of miles that the walking belt has moved. When the information mode is displayed in the ...
...Stop button while inserting the key into the console. The Distance/Laps display will show the total number of hours the treadmill has been used only when a treadmill is selected, the following information will be shown: The Time/Incline/Segment Time display will show the total number of ...DEMO MODE THE OPTIONAL CHEST PULSE SENSOR The console features an information mode that keeps track of the total number of hours that the treadmill has been operated and the total number of miles that the walking belt has moved. When the information mode is displayed in the ...


