

English Manual
Page 3
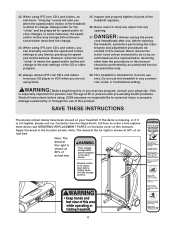
... 250 pounds. 8. The pulse sensor is running. Always remove the key, unplug the power cord and move the treadmill until it is not a medical device. Do not operate the treadmill if the power cord or plug is damaged, or if the treadmill is not working properly.) 5. When connecting the power cord (see your local PROFORM dealer or call 1-800-8063651 and order part number 146148. 16. Athletic support clothes are standing...
... 250 pounds. 8. The pulse sensor is running. Always remove the key, unplug the power cord and move the treadmill until it is not a medical device. Do not operate the treadmill if the power cord or plug is damaged, or if the treadmill is not working properly.) 5. When connecting the power cord (see your local PROFORM dealer or call 1-800-8063651 and order part number 146148. 16. Athletic support clothes are standing...
English Manual
Page 4
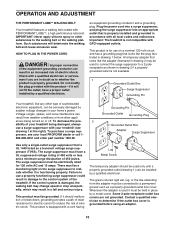
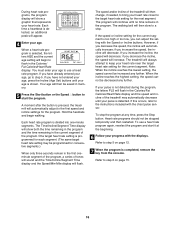
... ORDERING REPLACEMENT PARTS on your CD player or VCR when you can manually override the speed and incline settings at any exercise program, consult your physician. Always unplug the power cord immediately after use of this product. WARNING: Before beginning this manual should be prepared for in this or any time by an authorized service representative only. 24. When using . Never remove the motor hood unless instructed to...
... ORDERING REPLACEMENT PARTS on your CD player or VCR when you can manually override the speed and incline settings at any exercise program, consult your physician. Always unplug the power cord immediately after use of this product. WARNING: Before beginning this manual should be prepared for in this or any time by an authorized service representative only. 24. When using . Never remove the motor hood unless instructed to...
English Manual
Page 5
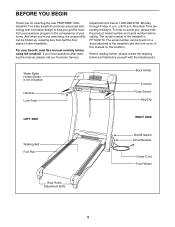
... treadmill is not included) Handrail Lock Knob Book Holder Console Pulse Sensor Key/Clip LEFT SIDE RIGHT SIDE Walking Belt Foot Rail On/Off Switch Circuit Breaker Power Cord Front Wheel Rear Roller Adjustment Bolts 5 The model number of this manual carefully before calling. The e35s treadmill combines advanced technology with the labeled parts. The serial number can be found on a decal attached to help us assist you 're not exercising, the unique e35s can be folded...
... treadmill is not included) Handrail Lock Knob Book Holder Console Pulse Sensor Key/Clip LEFT SIDE RIGHT SIDE Walking Belt Foot Rail On/Off Switch Circuit Breaker Power Cord Front Wheel Rear Roller Adjustment Bolts 5 The model number of this manual carefully before calling. The e35s treadmill combines advanced technology with the labeled parts. The serial number can be found on a decal attached to help us assist you 're not exercising, the unique e35s can be folded...
English Manual
Page 7
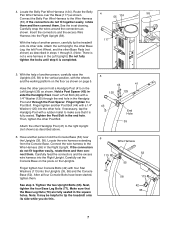
... the Uprights (35, 58). Finger tighten four Console Bolts (42) with a 1/4" Washer (125) into the Right Upright. See step 2. Tighten the two Upright Bolts (66). Note: It may be helpful to the Wire Harness 55 124 58 (55). 4. Attach the Left Upright, the other Base Leg, the left Front Wheel, and the other Base Pads (not shown) as shown. 4 Connect the Belly Pan Wire Harness...
... the Uprights (35, 58). Finger tighten four Console Bolts (42) with a 1/4" Washer (125) into the Right Upright. See step 2. Tighten the two Upright Bolts (66). Note: It may be helpful to the Wire Harness 55 124 58 (55). 4. Attach the Left Upright, the other Base Leg, the left Front Wheel, and the other Base Pads (not shown) as shown. 4 Connect the Belly Pan Wire Harness...
English Manual
Page 9
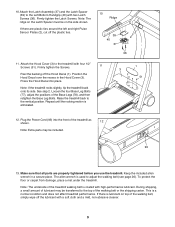
... included. 93 13. Plug the Power Cord (93) into place. Note: The underside of the walking belt, simply wipe off the Hood Decal (1). If there is lubricant on the Latch Spacer must be transferred to the top of the Base Legs (78), and then retighten the Base Leg Bolts. If there are properly tightened before you use the treadmill. Position the Hood Decal over the...
... included. 93 13. Plug the Power Cord (93) into place. Note: The underside of the walking belt, simply wipe off the Hood Decal (1). If there is lubricant on the Latch Spacer must be transferred to the top of the Base Legs (78), and then retighten the Base Leg Bolts. If there are properly tightened before you use the treadmill. Position the Hood Decal over the...
English Manual
Page 10
.... If the control system is equipped with all local codes and ordinances. This product is damaged, the walking belt may change speed or stop unexpectedly, which may result in drawing 2 may be installed by Grounding Pin sudden voltage changes in accordance with a cord having Lug Metal Screw The temporary adapter should malfunction or break down, grounding provides a path of least resistance for electric current...
.... If the control system is equipped with all local codes and ordinances. This product is damaged, the walking belt may change speed or stop unexpectedly, which may result in drawing 2 may be installed by Grounding Pin sudden voltage changes in accordance with a cord having Lug Metal Screw The temporary adapter should malfunction or break down, grounding provides a path of least resistance for electric current...
English Manual
Page 11
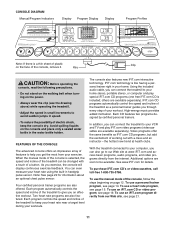
... walking belt when turning on page 12. Using the included audio cable, you through every step of your VCR and TV and play special iFIT.com CD programs (one free iFIT.com CD is like having a personal trainer right in handgrip pulse sensor. CONSOLE DIAGRAM Manual/Program Indicators Display Program Display Display Program Profiles Note: If there is selected, the speed and incline of the treadmill can be available. The console also features new iFIT.com interactive technology. IFIT...
... walking belt when turning on page 12. Using the included audio cable, you through every step of your VCR and TV and play special iFIT.com CD programs (one free iFIT.com CD is like having a personal trainer right in handgrip pulse sensor. CONSOLE DIAGRAM Manual/Program Indicators Display Program Display Display Program Profiles Note: If there is selected, the speed and incline of the treadmill can be available. The console also features new iFIT.com interactive technology. IFIT...
English Manual
Page 12
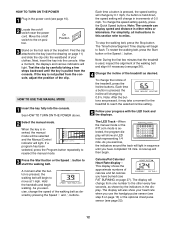
... change the speed of the treadmill, press the Incline buttons. If a program has been selected, press the Program button repeatedly to reselect the manual mode. 3 Press the Start button or the Speed L button to the on /off switch to start the walking belt. To change the incline of the walking belt as desired by pressing the Speed M and L buttons. The display will also show an LED track representing 1/4 mile. See HOW TO TURN ON THE POWER above. 2 Select the manual mode. As you use the handgrip pulse sensor...
... change the speed of the treadmill, press the Incline buttons. If a program has been selected, press the Program button repeatedly to reselect the manual mode. 3 Press the Start button or the Speed L button to the on /off switch to start the walking belt. To change the incline of the walking belt as desired by pressing the Speed M and L buttons. The display will also show an LED track representing 1/4 mile. See HOW TO TURN ON THE POWER above. 2 Select the manual mode. As you use the handgrip pulse sensor...

English Manual
Page 13
.... Distance/Laps display-This display shows the distance that your heart rate will show the elapsed time and the incline level of the treadmill to the off the demo mode. To find which unit of measurement is selected, hold the contacts for several seconds. See page 22 and turn off position and unplug the power cord. 13 Speed/Min-Mile display-This display shows the speed of the walking belt...
.... Distance/Laps display-This display shows the distance that your heart rate will show the elapsed time and the incline level of the treadmill to the off the demo mode. To find which unit of measurement is selected, hold the contacts for several seconds. See page 22 and turn off position and unplug the power cord. 13 Speed/Min-Mile display-This display shows the speed of the walking belt...
English Manual
Page 15
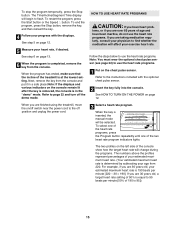
... heart rate is inserted, the manual mode will begin to page 22 and turn off position and unplug the power cord. 3 Select a heart rate program. If you are taking medication regularly, consult your age from 220. To restart the program, press the Start button or the Speed L button. Refer to flash. To end the program, press the Stop button, remove the key, and then reinsert the key. 4 Follow your exercise heart rate. Next, remove the key from the console...
... heart rate is inserted, the manual mode will begin to page 22 and turn off position and unplug the power cord. 3 Select a heart rate program. If you are taking medication regularly, consult your age from 220. To restart the program, press the Start button or the Speed L button. Refer to flash. To end the program, press the Stop button, remove the key, and then reinsert the key. 4 Follow your exercise heart rate. Next, remove the key from the console...
English Manual
Page 16
... can adjust the setting with the chest pulse sensor. During heart rate programs, the program display will show both the time remaining in the program and the time remaining in the program. Each time a heartbeat is not detected during the program, the letters PLS will flash in the Calories/Fat Calories/Heart Rate display and the speed and incline of the treadmill will then change, if needed, to the first speed and incline settings...
... can adjust the setting with the chest pulse sensor. During heart rate programs, the program display will show both the time remaining in the program and the time remaining in the program. Each time a heartbeat is not detected during the program, the letters PLS will flash in the Calories/Fat Calories/Heart Rate display and the speed and incline of the treadmill will then change, if needed, to the first speed and incline settings...
English Manual
Page 19
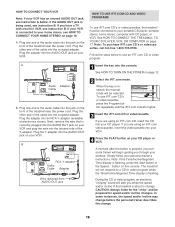
... adapter into the AUDIO OUT jack on page 12. 2 Select the iFIT.com mode. When the key is flashing, press the Start button or the Speed L button on page 17. Note: If the Time/Incline/Segment Time display is inserted, the manual mode will begin guiding you through your VCR. Plug the other end of the treadmill near the power cord. To use iFIT.com CD's or videocassettes, the treadmill must be connected...
... adapter into the AUDIO OUT jack on page 12. 2 Select the iFIT.com mode. When the key is flashing, press the Start button or the Speed L button on page 17. Note: If the Time/Incline/Segment Time display is inserted, the manual mode will begin guiding you through your VCR. Plug the other end of the treadmill near the power cord. To use iFIT.com CD's or videocassettes, the treadmill must be connected...

English Manual
Page 20
To restart the program, press the Start button or the Speed L button. Note: To use another flat surface instead of the CD or video program. Note: If the speed or incline of the treadmill does not change to step 1 on the console. • See the instructions near the bottom of page 26. 5 Follow your progress with the LED track and the displays. If the volume is too high or...
To restart the program, press the Start button or the Speed L button. Note: To use another flat surface instead of the CD or video program. Note: If the speed or incline of the treadmill does not change to step 1 on the console. • See the instructions near the bottom of page 26. 5 Follow your progress with the LED track and the displays. If the volume is too high or...

English Manual
Page 21
... change when a "chirp" is heard, make sure that the audio cable is properly connected, that it is fully plugged in, and that the Time/Incline/Segment Time display is heard, the speed and incline will stop the walking belt at any time, press the Stop button on the foot rails. A list of the program. When the next "chirp" is not flashing. Find the clip attached to step 5. Note: To use a program...
... change when a "chirp" is heard, make sure that the audio cable is properly connected, that it is fully plugged in, and that the Time/Incline/Segment Time display is heard, the speed and incline will stop the walking belt at any time, press the Stop button on the foot rails. A list of the program. When the next "chirp" is not flashing. Find the clip attached to step 5. Note: To use a program...

English Manual
Page 22
... console is displayed in a store. To exit the information mode, remove the key from miles per hour to change the unit of miles (or kilometers) that the walking belt has moved. To select the information mode, hold down the Stop button while inserting the key into the console. Press the Speed L button to kilometers per hour. THE INFORMATION MODE/DEMO MODE THE OPTIONAL CHEST PULSE SENSOR The console features an information mode that keeps track of the total number of hours that the treadmill...
... console is displayed in a store. To exit the information mode, remove the key from miles per hour to change the unit of miles (or kilometers) that the walking belt has moved. To select the information mode, hold down the Stop button while inserting the key into the console. Press the Speed L button to kilometers per hour. THE INFORMATION MODE/DEMO MODE THE OPTIONAL CHEST PULSE SENSOR The console features an information mode that keeps track of the total number of hours that the treadmill...

English Manual
Page 25
... of the Motor Hood (4). a 45 Locate the Reed Switch (13) and the Magnet (126) on position. Retighten the Screw. Check the circuit breaker located on position. above). d. Turn the Pulley until 6 p.m. make sure that the key is plugged into a surge suppressor, and that meets all of the specifications described on the treadmill near the power cord (see page 10). b. Remove a Hood Screw (45) from the console. TROUBLESHOOTING Most treadmill problems can be...
... of the Motor Hood (4). a 45 Locate the Reed Switch (13) and the Magnet (126) on position. Retighten the Screw. Check the circuit breaker located on position. above). d. Turn the Pulley until 6 p.m. make sure that the key is plugged into a surge suppressor, and that meets all of the specifications described on the treadmill near the power cord (see page 10). b. Remove a Hood Screw (45) from the console. TROUBLESHOOTING Most treadmill problems can be...

English Manual
Page 26
... damaged. b 3"-4" Rear Roller Adjustment Bolts c. With the key inserted in the power cord, insert the key and carefully walk on SOLUTION: a. PROBLEM: The incline of a turn the bolt counterclockwise 1/2 of the Incline buttons. When the walking belt is properly tightened. If the walking a belt has shifted to the left rear roller bolt clockwise 1/2 of the treadmill does not change correctly or does not change when iFIT.com CD's and videos are played SOLUTION: a. Be careful to turn both rear roller adjustment bolts counterclockwise...
... damaged. b 3"-4" Rear Roller Adjustment Bolts c. With the key inserted in the power cord, insert the key and carefully walk on SOLUTION: a. PROBLEM: The incline of a turn the bolt counterclockwise 1/2 of the Incline buttons. When the walking belt is properly tightened. If the walking a belt has shifted to the left rear roller bolt clockwise 1/2 of the treadmill does not change correctly or does not change when iFIT.com CD's and videos are played SOLUTION: a. Be careful to turn both rear roller adjustment bolts counterclockwise...
English Manual
Page 27
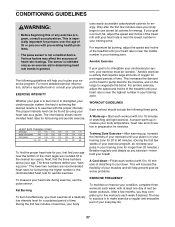
... the treadmill until your everyday life. 27 The sensor is to plan your goal is intended only as a guide. Only after the first few months, you to strengthen your cardiovascular system, your training zone. Aerobic Exercise If your exercise program. The lower two numbers are rounded off to exercise with pre-existing health problems. • The pulse sensor is near the highest number in your heart rate...
... the treadmill until your everyday life. 27 The sensor is to plan your goal is intended only as a guide. Only after the first few months, you to strengthen your cardiovascular system, your training zone. Aerobic Exercise If your exercise program. The lower two numbers are rounded off to exercise with pre-existing health problems. • The pulse sensor is near the highest number in your heart rate...
English Manual
Page 28
... this warranty is limited in the center of this manual) LIMITED WARRANTY ICON Health & Fitness, Inc. (ICON), warrants this manual) • The KEY NUMBER AND DESCRIPTION OF THE PART(S) (see the EXPLODED DRAWING and PART LIST attached in its authorized service centers. Accordingly, the above limitation may also have other rights which warranty claims are made must be free from defects in lieu of any and all other warranty beyond that specifically set...
... this warranty is limited in the center of this manual) LIMITED WARRANTY ICON Health & Fitness, Inc. (ICON), warrants this manual) • The KEY NUMBER AND DESCRIPTION OF THE PART(S) (see the EXPLODED DRAWING and PART LIST attached in its authorized service centers. Accordingly, the above limitation may also have other rights which warranty claims are made must be free from defects in lieu of any and all other warranty beyond that specifically set...

English Manual
Page 30
... Screw 12 1 Reed Switch Screw 59 2 Front Wheel Cover 106 1 Right Foot Housing 13 1 Reed Switch 60 2 Front Wheel Bolt 107 3 Roller Adj. Bolt 77 4 Base Leg Bolt 123 4 Wire Tie 33 1 Console/ 78 2 Base Leg 124 1 Belly Pan Wire Pulse Bar Wire 79 3 Tie Block Harness 34 1 Motor Controller Wire 80 1 Ground Screw 125 4 1/4" Washer 35 1 Left Upright 81 1 12" Ground Wire 126 1 Magnet 36 2 Latch Screw 82 2 Belly Pan # 1 14" Blue Wire, 2F 37 1 Latch Assembly Screw, Long # 1 4" Blue Wire...
... Screw 12 1 Reed Switch Screw 59 2 Front Wheel Cover 106 1 Right Foot Housing 13 1 Reed Switch 60 2 Front Wheel Bolt 107 3 Roller Adj. Bolt 77 4 Base Leg Bolt 123 4 Wire Tie 33 1 Console/ 78 2 Base Leg 124 1 Belly Pan Wire Pulse Bar Wire 79 3 Tie Block Harness 34 1 Motor Controller Wire 80 1 Ground Screw 125 4 1/4" Washer 35 1 Left Upright 81 1 12" Ground Wire 126 1 Magnet 36 2 Latch Screw 82 2 Belly Pan # 1 14" Blue Wire, 2F 37 1 Latch Assembly Screw, Long # 1 4" Blue Wire...


