

English Manual
Page 2
... shock, or injury to use a properly functioning surge suppressor could become caught in a fall and serious injury. 13. Do not use the treadmill with eight feet of this manual. If the control system is damaged, the walking belt may change speed or stop unexpectedly, which may result ...in the treadmill. Do not wear loose clothing that all warnings and precautions. 2. Never use an extension cord. 11. Use only a single-outlet surge suppressor...
... shock, or injury to use a properly functioning surge suppressor could become caught in a fall and serious injury. 13. Do not use the treadmill with eight feet of this manual. If the control system is damaged, the walking belt may change speed or stop unexpectedly, which may result ...in the treadmill. Do not wear loose clothing that all warnings and precautions. 2. Never use an extension cord. 11. Use only a single-outlet surge suppressor...

English Manual
Page 3
...in determining heart rate trends in any commercial, rental, or institutional setting. The pulse sensor is fully closed. 21. Never leave the treadmill unattended while it is capable of this manual). SEARS assumes no responsibility for in use this or any opening. Always unplug the power... the maintenance and adjustment procedures described in this manual. Never remove the motor hood unless instructed to raise, lower, or move the treadmill until it is not legible, please call our toll-free HELPLINE to avoid sudden jumps in the location shown. Servicing other than the...
...in determining heart rate trends in any commercial, rental, or institutional setting. The pulse sensor is fully closed. 21. Never leave the treadmill unattended while it is capable of this manual). SEARS assumes no responsibility for in use this or any opening. Always unplug the power... the maintenance and adjustment procedures described in this manual. Never remove the motor hood unless instructed to raise, lower, or move the treadmill until it is not legible, please call our toll-free HELPLINE to avoid sudden jumps in the location shown. Servicing other than the...

English Manual
Page 4
... a.m. The model number of your benefit, read this manual for selecting the new PROFORM® CROSSWALK 590 LS treadmill. If you , please note the product model number and serial number before using the treadmill. until 7 p.m. Central Time (excluding holidays). The serial number can be found on... Walking Belt Foot Rail Circuit Breaker Power Cord Rear Roller Adjustment Bolts Cushioned Walking Platform Front Wheel 4 The CROSSWALK 590 LS treadmill combines advanced technology with the parts that are labeled. To help us assist you have additional questions, Before reading...
... a.m. The model number of your benefit, read this manual for selecting the new PROFORM® CROSSWALK 590 LS treadmill. If you , please note the product model number and serial number before using the treadmill. until 7 p.m. Central Time (excluding holidays). The serial number can be found on... Walking Belt Foot Rail Circuit Breaker Power Cord Rear Roller Adjustment Bolts Cushioned Walking Platform Front Wheel 4 The CROSSWALK 590 LS treadmill combines advanced technology with the parts that are labeled. To help us assist you have additional questions, Before reading...
English Manual
Page 5
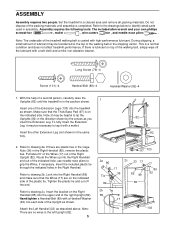
...17 17 36 85 89 82 2b Tie 85 17 89 92 103 Set the treadmill in the Right Handrail. Note: The underside of the packing materials until the treadmill is a normal condition and does not affect treadmill performance. If there is on the indicated side of the indicated hole; To fully... Base Pad (97) is lubricant on the Right Handrail (85) into the upper end of the right Upright (82). Route the Wires up into the treadmill as shown. Insert the bracket on top of the Upright as shown. Long Screw (79)-4 Screw (101)-4 Handrail Bolt (89)-4 Handrail Washer (92)-4 1. ...
...17 17 36 85 89 82 2b Tie 85 17 89 92 103 Set the treadmill in the Right Handrail. Note: The underside of the packing materials until the treadmill is a normal condition and does not affect treadmill performance. If there is on the indicated side of the indicated hole; To fully... Base Pad (97) is lubricant on the Right Handrail (85) into the upper end of the right Upright (82). Route the Wires up into the treadmill as shown. Insert the bracket on top of the Upright as shown. Long Screw (79)-4 Screw (101)-4 Handrail Bolt (89)-4 Handrail Washer (92)-4 1. ...

English Manual
Page 6
... not overtighten the Screws. Remove the Lock Knob (105) from the Lock Pin (11). To protect the floor, place a mat under the treadmill. 6 Note: It may be replaced, use the replacement Base Pad with the Spacer. Make a loop with two Screws (101) and a Base Pad (52) as shown. ... 2c. Make sure that all four Long Screws have been started, tighten the Screws until they are on the Lock Pin as you tip the treadmill. If a Base Pad becomes worn and needs to adjust the walking belt (see page 13). If a Thick Base Pad (97) needs to be helpful to...
... not overtighten the Screws. Remove the Lock Knob (105) from the Lock Pin (11). To protect the floor, place a mat under the treadmill. 6 Note: It may be replaced, use the replacement Base Pad with the Spacer. Make a loop with two Screws (101) and a Base Pad (52) as shown. ... 2c. Make sure that all four Long Screws have been started, tighten the Screws until they are on the Lock Pin as you tip the treadmill. If a Base Pad becomes worn and needs to adjust the walking belt (see page 13). If a Thick Base Pad (97) needs to be helpful to...

English Manual
Page 7
... it should be used only until a properly grounded outlet (drawing 1) can be grounded. Do not modify the plug provided with your treadmill (see your home's power. Grounding Pin Grounded Outlet Grounding Plug Grounded Outlet Box Adapter Surge Suppressor Use only a single-outlet surge suppressor... in drawing 2 may result in damage to reduce the risk of 450 joules. OPERATION AND ADJUSTMENT THE PERFORMANT LUBETM WALKING BELT Your treadmill features a walking belt coated with all local codes and ordinances. A temporary adapter that is equipped with a cord having Lug Metal ...
... it should be used only until a properly grounded outlet (drawing 1) can be grounded. Do not modify the plug provided with your treadmill (see your home's power. Grounding Pin Grounded Outlet Grounding Plug Grounded Outlet Box Adapter Surge Suppressor Use only a single-outlet surge suppressor... in drawing 2 may result in damage to reduce the risk of 450 joules. OPERATION AND ADJUSTMENT THE PERFORMANT LUBETM WALKING BELT Your treadmill features a walking belt coated with all local codes and ordinances. A temporary adapter that is equipped with a cord having Lug Metal ...

English Manual
Page 8
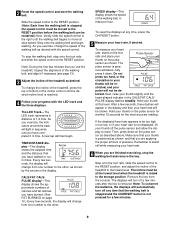
... on . Be sure that the power cord is properly plugged in small increments. • The training zones marked above ) while using the treadmill. Clip tached to operate the console. 1 Insert the key fully into the battery compartment, making sure that the Battery Cover negative (-) ends of...on the console and use only a sealable water bottle. See page 14 for more information. • To reduce the possibility of the treadmill. Alkaline batteries are general guidelines only. ward until the key is not pulled from the console, the walking belt will turn on the power...
... on . Be sure that the power cord is properly plugged in small increments. • The training zones marked above ) while using the treadmill. Clip tached to operate the console. 1 Insert the key fully into the battery compartment, making sure that the Battery Cover negative (-) ends of...on the console and use only a sealable water bottle. See page 14 for more information. • To reduce the possibility of the treadmill. Alkaline batteries are general guidelines only. ward until the key is not pulled from the console, the walking belt will turn on the power...
English Manual
Page 9
... position. CALS/FAT CALS/ PULSE display-This display shows the approximate numbers of calories and fat calories you exercise, change the incline of the treadmill, press the top or bottom of the walking belt as shown. Do not press too hard, or the circulation in sequence until the desired ... your heart rate. 6 When you have completed 1/4 mile. Hold your thumb at any time that you are applying the proper amount of the treadmill to stand still while measuring your heart rate will not be at slow speed. To measure your heart rate, stand on the pulse sensor as...
... position. CALS/FAT CALS/ PULSE display-This display shows the approximate numbers of calories and fat calories you exercise, change the incline of the treadmill, press the top or bottom of the walking belt as shown. Do not press too hard, or the circulation in sequence until the desired ... your heart rate. 6 When you have completed 1/4 mile. Hold your thumb at any time that you are applying the proper amount of the treadmill to stand still while measuring your heart rate will not be at slow speed. To measure your heart rate, stand on the pulse sensor as...
English Manual
Page 10
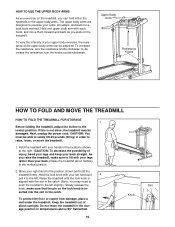
...; Fahrenheit. 10 Slot Knob to the vertical position. 2. Upper Body Arms Resistance Knobs HOW TO FOLD AND MOVE THE TREADMILL HOW TO FOLD THE TREADMILL FOR STORAGE 1 Before folding the treadmill, adjust the incline to the left . Next, unplug the power cord. Move your arms, shoulders, and back for ... the locations shown at the right. (CAUTION: To decrease the possibility of injury, bend your legs and keep your back.) Raise the treadmill about halfway to decrease the resistance, turn the resistance knobs clockwise; Hold one upper body arm with your legs rather than your back straight...
...; Fahrenheit. 10 Slot Knob to the vertical position. 2. Upper Body Arms Resistance Knobs HOW TO FOLD AND MOVE THE TREADMILL HOW TO FOLD THE TREADMILL FOR STORAGE 1 Before folding the treadmill, adjust the incline to the left . Next, unplug the power cord. Move your arms, shoulders, and back for ... the locations shown at the right. (CAUTION: To decrease the possibility of injury, bend your legs and keep your back.) Raise the treadmill about halfway to decrease the resistance, turn the resistance knobs clockwise; Hold one upper body arm with your legs rather than your back straight...
English Manual
Page 11
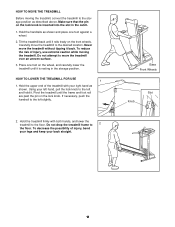
...the lock knob. Hold the handrails as described above. To reduce the risk of injury, use extreme caution while moving the treadmill, convert the treadmill to the storage position as shown and place one foot on the lock knob is resting in the catch. 1. If necessary,... push the handrail to the desired location. Carefully move the treadmill to the left slightly. 2. Place one foot against a wheel. 2. HOW TO MOVE THE TREADMILL Before moving the treadmill. Using your left and hold it back. Hold the treadmill firmly with your back straight. Do not attempt to the floor...
...the lock knob. Hold the handrails as described above. To reduce the risk of injury, use extreme caution while moving the treadmill, convert the treadmill to the storage position as shown and place one foot on the lock knob is resting in the catch. 1. If necessary,... push the handrail to the desired location. Carefully move the treadmill to the left slightly. 2. Place one foot against a wheel. 2. HOW TO MOVE THE TREADMILL Before moving the treadmill. Using your left and hold it back. Hold the treadmill firmly with your back straight. Do not attempt to the floor...

English Manual
Page 12
... with a damp cloth and mild detergent. 12 Locate the Reed Switch 1/8" (21) and the Magnet (43) on SOLUTION: a. Important: The treadmill is plugged in . Check the circuit breaker located on page 6). If the switch protrudes as shown, the circuit breaker has tripped. If the circuit...sure that applies, and follow the steps listed. PROBLEM: The power does not turn on the left side of the specifications described on the treadmill frame near the power cord. After the power cord has been plugged in . c. e. PROBLEM: The displays on the console does not function...
... with a damp cloth and mild detergent. 12 Locate the Reed Switch 1/8" (21) and the Magnet (43) on SOLUTION: a. Important: The treadmill is plugged in . Check the circuit breaker located on page 6). If the switch protrudes as shown, the circuit breaker has tripped. If the circuit...sure that applies, and follow the steps listed. PROBLEM: The power does not turn on the left side of the specifications described on the treadmill frame near the power cord. After the power cord has been plugged in . c. e. PROBLEM: The displays on the console does not function...

English Manual
Page 13
...: a. Plug in . PROBLEM: ONE OF THE UPPER BODY ARMS SQUEAKS DURING USE SOLUTION: a. WARNING: Do not disconnect or connect the wires while the treadmill power cord is correctly tight- b. If the walking belt is properly tightened. Plug in .) Apply a thin layer of a turn. b 3"-4" Rear Roller... off -center or slips when walked on SOLUTION: a. Repeat until it back in the power cord, insert the key and run the treadmill for a few minutes. Turn the Resistance Knob (119) counterclockwise until the walking belt is needed. Use only a single-outlet surge suppressor...
...: a. Plug in . PROBLEM: ONE OF THE UPPER BODY ARMS SQUEAKS DURING USE SOLUTION: a. WARNING: Do not disconnect or connect the wires while the treadmill power cord is correctly tight- b. If the walking belt is properly tightened. Plug in .) Apply a thin layer of a turn. b 3"-4" Rear Roller... off -center or slips when walked on SOLUTION: a. Repeat until it back in the power cord, insert the key and run the treadmill for a few minutes. Turn the Resistance Knob (119) counterclockwise until the walking belt is needed. Use only a single-outlet surge suppressor...

English Manual
Page 14
... exercise aid in determining heart rate trends in your training zone. A proper warm-up -Start each workout with 5 to 10 minutes of the treadmill until your heart rate is to exercise with 5 to achieving the desired results is near the lowest number in general. the higher number is activity... exercise, adjust the speed and incline of 35 or individuals with at a relatively low intensity level for individuals over the age of the treadmill until your pulse is intended only as you may affect the accuracy of your exercise program, do not keep your pulse in your body uses...
... exercise aid in determining heart rate trends in your training zone. A proper warm-up -Start each workout with 5 to 10 minutes of the treadmill until your heart rate is to exercise with 5 to achieving the desired results is near the lowest number in general. the higher number is activity... exercise, adjust the speed and incline of 35 or individuals with at a relatively low intensity level for individuals over the age of the treadmill until your pulse is intended only as you may affect the accuracy of your exercise program, do not keep your pulse in your body uses...

English Manual
Page 18
This warranty gives you specific legal rights, and you visit your PROFORM CROSSWALK® 590 LS treadmill are available for rental purposes. All replacement parts are listed on a decal attached to provide the following toll-free number 1-800-FON-PART (1-800-366... Center. If you need help or service, or ordering parts, please be replaced, call the following information: • The NAME OF THE PRODUCT (PROFORM® CROSSWALK 590 LS treadmill) • The MODEL NUMBER OF THE PRODUCT (831.299621) • The KEY NUMBER AND DESCRIPTION OF THE PART (see the EXPLODED DRAWING and...
This warranty gives you specific legal rights, and you visit your PROFORM CROSSWALK® 590 LS treadmill are available for rental purposes. All replacement parts are listed on a decal attached to provide the following toll-free number 1-800-FON-PART (1-800-366... Center. If you need help or service, or ordering parts, please be replaced, call the following information: • The NAME OF THE PRODUCT (PROFORM® CROSSWALK 590 LS treadmill) • The MODEL NUMBER OF THE PRODUCT (831.299621) • The KEY NUMBER AND DESCRIPTION OF THE PART (see the EXPLODED DRAWING and...


