

English Manual
Page 1
Visit our website at www.proform.com new products, prizes, fitness tips, and much more! Write the serial number in this manual before using this manual for future reference. Model No. 831.299621 Serial No. Serial Number Decal USER'S MANUAL SEARS, ROEBUCK AND CO. Save this equipment. HOFFMAN ESTATES, IL 60179 CAUTION Read all precautions and instructions in the space above for future reference.
Visit our website at www.proform.com new products, prizes, fitness tips, and much more! Write the serial number in this manual before using this manual for future reference. Model No. 831.299621 Serial No. Serial Number Decal USER'S MANUAL SEARS, ROEBUCK AND CO. Save this equipment. HOFFMAN ESTATES, IL 60179 CAUTION Read all precautions and instructions in the space above for future reference.

English Manual
Page 2
... any air openings. Always wear athletic shoes. Never use an extension cord. 11. Do not use the treadmill with eight feet of this treadmill are used only by persons weighing 250 pounds or less. 8. If the control system is turned off. Never move the walking belt while the power is damaged, the walking belt may change speed or stop unexpectedly, which may result in a garage or covered patio, or...
... any air openings. Always wear athletic shoes. Never use an extension cord. 11. Do not use the treadmill with eight feet of this treadmill are used only by persons weighing 250 pounds or less. 8. If the control system is turned off. Never move the walking belt while the power is damaged, the walking belt may change speed or stop unexpectedly, which may result in a garage or covered patio, or...

English Manual
Page 3
... or property damage sustained by an authorized service representative. Adjust the speed in speed. 17. rized service representative only. 24. Apply the decal in general. 18. When folding or moving the treadmill, make sure that the storage latch is not a medical device. Always unplug the power cord immediately after use of this product. Never remove the motor hood unless instructed to avoid sudden jumps in small increments...
... or property damage sustained by an authorized service representative. Adjust the speed in speed. 17. rized service representative only. 24. Apply the decal in general. 18. When folding or moving the treadmill, make sure that the storage latch is not a medical device. Always unplug the power cord immediately after use of this product. Never remove the motor hood unless instructed to avoid sudden jumps in small increments...

English Manual
Page 4
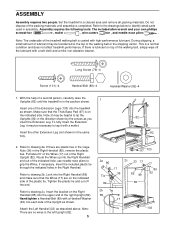
...) Book Holder Upper Body Arms Console Storage Latch LEFT SIDE Key/Clip Handrail RIGHT SIDE Walking Belt Foot Rail Circuit Breaker Power Cord Rear Roller Adjustment Bolts Cushioned Walking Platform Front Wheel 4 The serial number can be found on a decal attached to help us assist you, please note the product model number and serial number before using the treadmill. Central Time (excluding holidays). The CROSSWALK 590 LS treadmill combines advanced technology with the parts that are labeled...
...) Book Holder Upper Body Arms Console Storage Latch LEFT SIDE Key/Clip Handrail RIGHT SIDE Walking Belt Foot Rail Circuit Breaker Power Cord Rear Roller Adjustment Bolts Cushioned Walking Platform Front Wheel 4 The serial number can be found on a decal attached to help us assist you, please note the product model number and serial number before using the treadmill. Central Time (excluding holidays). The CROSSWALK 590 LS treadmill combines advanced technology with the parts that are labeled...
English Manual
Page 5
...-nose pliers . Tighten the plastic tie and cut off the lubricant with high-performance lubricant. Set the treadmill in the same way. 82 82 2. Insert the bracket on the indicated side. If there is on the Right Handrail (85) into the Right Handrail and out of the walking belt or the shipping carton. Route the Wires up into the...
...-nose pliers . Tighten the plastic tie and cut off the lubricant with high-performance lubricant. Set the treadmill in the same way. 82 82 2. Insert the bracket on the indicated side. If there is on the Right Handrail (85) into the Right Handrail and out of the walking belt or the shipping carton. Route the Wires up into the...

English Manual
Page 6
...) as you tighten the Screws. Remove the Lock Knob (105) from the Lock Pin (11). Make sure that the Extension Legs are on the Handrails (85, 23). The allen wrench is plugged in a secure place. With the help of the two Wires to connect them to place a foot on the Uprights as shown. Note: It may be replaced, use the replacement Base Pad...
...) as you tighten the Screws. Remove the Lock Knob (105) from the Lock Pin (11). Make sure that the Extension Legs are on the Handrails (85, 23). The allen wrench is plugged in a secure place. With the help of the two Wires to connect them to place a foot on the Uprights as shown. Note: It may be replaced, use the replacement Base Pad...

English Manual
Page 7
... cover is properly installed and grounded in a fall and serious injury. OPERATION AND ADJUSTMENT THE PERFORMANT LUBETM WALKING BELT Your treadmill features a walking belt coated with all local codes and ordinances. Such substances will not fit the outlet, have a UL suppressed voltage rating of 400 volts or less and a minimum surge dissipation of electric shock. A temporary adapter that is grounded before using an adapter...
... cover is properly installed and grounded in a fall and serious injury. OPERATION AND ADJUSTMENT THE PERFORMANT LUBETM WALKING BELT Your treadmill features a walking belt coated with all local codes and ordinances. Such substances will not fit the outlet, have a UL suppressed voltage rating of 400 volts or less and a minimum surge dissipation of electric shock. A temporary adapter that is grounded before using an adapter...

English Manual
Page 8
... the key is removed from the console. Note: If you just installed batteries, the displays will not turn on when the ON/RESET button is pressed or when the walking belt is not pulled from the console, adjust the posi- Key CAUTION: Before operating the console, read the following precautions. • Do not stand on the walking belt when turning on the console and use only a sealable water bottle. Open the battery cover as needed...
... the key is removed from the console. Note: If you just installed batteries, the displays will not turn on when the ON/RESET button is pressed or when the walking belt is not pulled from the console, adjust the posi- Key CAUTION: Before operating the console, read the following precautions. • Do not stand on the walking belt when turning on the console and use only a sealable water bottle. Open the battery cover as needed...
English Manual
Page 9
... displayed, lift your heart rate is positioned as shown, and that you exercise, change from the console. As you use the treadmill, inspect the alignment of the treadmill as described above. To measure your heart rate, stand on the pulse sensor as desired. Then, press down . The incline must be moved to reset. Note: To conserve the batteries, the displays will automatically turn off any time, press the ON/RESET button. 5 Measure your heart rate...
... displayed, lift your heart rate is positioned as shown, and that you exercise, change from the console. As you use the treadmill, inspect the alignment of the treadmill as described above. To measure your heart rate, stand on the pulse sensor as desired. Then, press down . The incline must be moved to reset. Note: To conserve the batteries, the displays will automatically turn off any time, press the ON/RESET button. 5 Measure your heart rate...
English Manual
Page 10
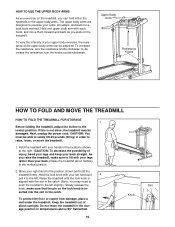
Upper Body Arms Resistance Knobs HOW TO FOLD AND MOVE THE TREADMILL HOW TO FOLD THE TREADMILL FOR STORAGE 1 Before folding the treadmill, adjust the incline to decrease the resistance, turn the resistance knobs clockwise; Hold the treadmill with your back straight. Hold the lock knob with your hands in the locations shown at the right. (CAUTION: To decrease the possibility of the upper body arms can hold the treadmill firmly. serted into the slot...
Upper Body Arms Resistance Knobs HOW TO FOLD AND MOVE THE TREADMILL HOW TO FOLD THE TREADMILL FOR STORAGE 1 Before folding the treadmill, adjust the incline to decrease the resistance, turn the resistance knobs clockwise; Hold the treadmill with your back straight. Hold the lock knob with your hands in the locations shown at the right. (CAUTION: To decrease the possibility of the upper body arms can hold the treadmill firmly. serted into the slot...
English Manual
Page 11
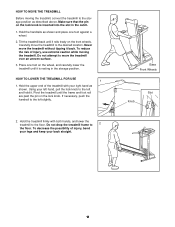
...treadmill with both hands, and lower the treadmill to the floor. Using your back straight. If necessary, push the handrail to the desired location. Base Front Wheels Slot Knob 11 HOW TO MOVE THE TREADMILL Before moving the treadmill. Carefully move the treadmill to the left slightly. 2. To reduce the risk of injury, bend your legs... LOWER THE TREADMILL FOR USE 1 1. Never move the treadmill over an uneven surface. 3. To decrease the possibility of injury, use extreme caution while moving the treadmill, convert the treadmill to the left hand, pull the lock knob to the storage ...
...treadmill with both hands, and lower the treadmill to the floor. Using your back straight. If necessary, push the handrail to the desired location. Base Front Wheels Slot Knob 11 HOW TO MOVE THE TREADMILL Before moving the treadmill. Carefully move the treadmill to the left slightly. 2. To reduce the risk of injury, bend your legs... LOWER THE TREADMILL FOR USE 1 1. Never move the treadmill over an uneven surface. 3. To decrease the possibility of injury, use extreme caution while moving the treadmill, convert the treadmill to the left hand, pull the lock knob to the storage ...

English Manual
Page 12
... the pulse sensor with GFCI-equipped outlets. Find the symptom that the gap between 21 43 the Magnet and the Reed Switch is fully inserted into the console. c Tripped Reset PROBLEM: The power turns off during use SOLUTION: a. b. Remove the screws from the console. Retighten the Screw. d. PROBLEM: The displays on page 7. Turn the Pulley until 7 p.m. f. Remove the key from the console and unplug the a power cord. b. Check the circuit breaker located on the treadmill...
... the pulse sensor with GFCI-equipped outlets. Find the symptom that the gap between 21 43 the Magnet and the Reed Switch is fully inserted into the console. c Tripped Reset PROBLEM: The power turns off during use SOLUTION: a. b. Remove the screws from the console. Retighten the Screw. d. PROBLEM: The displays on page 7. Turn the Pulley until 7 p.m. f. Remove the key from the console and unplug the a power cord. b. Check the circuit breaker located on the treadmill...

English Manual
Page 13
... walking belt 3 to assembly step 4 on page 6). Plug in the power cord, insert the key and carefully walk on SOLUTION: a. Use only a single-outlet surge suppressor that the two wires under the console are fully plugged in (refer to 4 inches off -center or slips when walked on the treadmill for a few minutes. b 3"-4" Rear Roller Adjustment Bolts c. If the walking belt is properly tightened, you should be able to lift each side of a turn ; b. PROBLEM: The incline...
... walking belt 3 to assembly step 4 on page 6). Plug in the power cord, insert the key and carefully walk on SOLUTION: a. Use only a single-outlet surge suppressor that the two wires under the console are fully plugged in (refer to 4 inches off -center or slips when walked on the treadmill for a few minutes. b 3"-4" Rear Roller Adjustment Bolts c. If the walking belt is properly tightened, you should be able to lift each side of a turn ; b. PROBLEM: The incline...

English Manual
Page 14
... near the middle number in your training zone for you exercise-never hold your heart rate as a guide. To find the proper heart rate for 20 to burn fat, adjust the speed and incline of the chart (ages are recommended heart rates for energy. During the first few weeks of stretching and light exercise. For aerobic exercise, adjust the speed and incline of the treadmill until your heart rate is near the...
... near the middle number in your training zone for you exercise-never hold your heart rate as a guide. To find the proper heart rate for 20 to burn fat, adjust the speed and incline of the chart (ages are recommended heart rates for energy. During the first few weeks of stretching and light exercise. For aerobic exercise, adjust the speed and incline of the treadmill until your heart rate is near the...

English Manual
Page 15
... Resistance Knob Console Base Screw Foot Rail Cap (Right) 8" White Wire, Pigtail 8" Green Wire, 2 Ring User's Manual * Includes all parts shown in the center of this manual. Description Key No. Bolt Motor Latch Decal Rear Platform Screw Latch Catch Screw Latch Catch Walking Platform 8" Cable Tie Interface Bracket Motor Tension Bolt Foot Rail Insert Reed Switch Screw/ Belly Pan Screw Storage Latch Bracket Extension Leg Assembly Long Screw Wire Cover Motor Star Washer Upright Incline Leg Pivot Bolt Motor Tension Washer Right Handrail Wheel Bolt Console Base Console Assembly Handrail Bolt Key...
... Resistance Knob Console Base Screw Foot Rail Cap (Right) 8" White Wire, Pigtail 8" Green Wire, 2 Ring User's Manual * Includes all parts shown in the center of this manual. Description Key No. Bolt Motor Latch Decal Rear Platform Screw Latch Catch Screw Latch Catch Walking Platform 8" Cable Tie Interface Bracket Motor Tension Bolt Foot Rail Insert Reed Switch Screw/ Belly Pan Screw Storage Latch Bracket Extension Leg Assembly Long Screw Wire Cover Motor Star Washer Upright Incline Leg Pivot Bolt Motor Tension Washer Right Handrail Wheel Bolt Console Base Console Assembly Handrail Bolt Key...

English Manual
Page 16
EXPLODED DRAWING-Model No. 831.299621 92 65 58 12 92 65 75 69 70 68 49 45 44 16 46 47 59 60 64 68 57 58 67 63 59 101 60 61 1 2 3 39 40 41 32 45 44 46 71 4* 37 66 5 3 8 7 6 29 18 76 62 21 22 33 39 43 41 75 42 15 121 38 16 106 44 15 19 29 74 34 29 24 29 84 48 5 15 81 35 15 31 29 33 18 15 32 51 76 76 27 29 28 26 25 44 55 45 46 76 73 73 47 46 47 45 49 16 76 76 47 54 29 53 R0202A To identify the parts shown on this exploded drawing, refer to the PART LIST on page 15 of the USER'S MANUAL.
EXPLODED DRAWING-Model No. 831.299621 92 65 58 12 92 65 75 69 70 68 49 45 44 16 46 47 59 60 64 68 57 58 67 63 59 101 60 61 1 2 3 39 40 41 32 45 44 46 71 4* 37 66 5 3 8 7 6 29 18 76 62 21 22 33 39 43 41 75 42 15 121 38 16 106 44 15 19 29 74 34 29 24 29 84 48 5 15 81 35 15 31 29 33 18 15 32 51 76 76 27 29 28 26 25 44 55 45 46 76 73 73 47 46 47 45 49 16 76 76 47 54 29 53 R0202A To identify the parts shown on this exploded drawing, refer to the PART LIST on page 15 of the USER'S MANUAL.

English Manual
Page 17
10 9 109 110 23 92 89 105 76 77 89 92 102 56 13 11 30* 14 82 85 36 17 36 79 92 89 89 92 88* 90 87 93 120 120 50 120 120 80 102 36 79 83 109 120 104 111 92 92 81 108 107 117 112 113 114 116 118 119 108 20 78* 103 29 97 101 96 52 101 86 97 95 15 101 107 101 17 99 115 91 29 29 101 83 104 119 94 97 101 114 113 98 78* 20 15 72 103 52 100 101 108 118 116 117 108 81 112 111 97 95 86 101 29 29 R0202A EXPLODED DRAWING-Model No. 831.299621
10 9 109 110 23 92 89 105 76 77 89 92 102 56 13 11 30* 14 82 85 36 17 36 79 92 89 89 92 88* 90 87 93 120 120 50 120 120 80 102 36 79 83 109 120 104 111 92 92 81 108 107 117 112 113 114 116 118 119 108 20 78* 103 29 97 101 96 52 101 86 97 95 15 101 107 101 17 99 115 91 29 29 101 83 104 119 94 97 101 114 113 98 78* 20 15 72 103 52 100 101 108 118 116 117 108 81 112 111 97 95 86 101 29 29 R0202A EXPLODED DRAWING-Model No. 831.299621

English Manual
Page 18
... repair or replace the TREADMILL EXERCISER, free of your nearest SEARS Service Center. This warranty does not apply when the TREADMILL EXERCISER is missing • or you need to be prepared to the frame. All replacement parts are listed on a decal attached to provide the following toll-free number 1-800-FON-PART (1-800-366-7278) The model number and serial number of charge. When requesting help assembling or operating the PROFORM® CROSSWALK 590 LS treadmill...
... repair or replace the TREADMILL EXERCISER, free of your nearest SEARS Service Center. This warranty does not apply when the TREADMILL EXERCISER is missing • or you need to be prepared to the frame. All replacement parts are listed on a decal attached to provide the following toll-free number 1-800-FON-PART (1-800-366-7278) The model number and serial number of charge. When requesting help assembling or operating the PROFORM® CROSSWALK 590 LS treadmill...

