
Canadian English Manual
Page 4
... and adjustment procedures described in this treadmill in use. (See the drawing on the treadmill. 19. Never leave the treadmill unattended while it is held securely in -home use , before cleaning the treadmill, and before performing the mainte- Always remove the key, unplug the power cord, and switch... the reset/off circuit breaker to raise, lower, or move the treadmill. 21. Never insert any object into any opening on ...
... and adjustment procedures described in this treadmill in use. (See the drawing on the treadmill. 19. Never leave the treadmill unattended while it is held securely in -home use , before cleaning the treadmill, and before performing the mainte- Always remove the key, unplug the power cord, and switch... the reset/off circuit breaker to raise, lower, or move the treadmill. 21. Never insert any object into any opening on ...
Canadian English Manual
Page 5
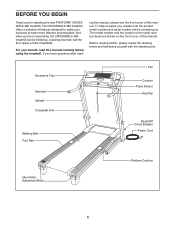
If you , please note the product model number and serial number before using the treadmill. Accessory Tray Handrail Upright Crosswalk Arm Walking Belt Foot Rail Fan Console Pulse Sensor Key/Clip Reset/Off Circuit Breaker Power Cord Idler Roller Adjustment Bolts Platform Cushion 5 The model number and the... before contacting us. Before reading further, please review the drawing below and familiarize yourself with the labeled parts. The CROSSWALK 480 treadmill offers a selection of other treadmills. And when you for selecting the new PROFORM® CROSSWALK 480 treadmill.
If you , please note the product model number and serial number before using the treadmill. Accessory Tray Handrail Upright Crosswalk Arm Walking Belt Foot Rail Fan Console Pulse Sensor Key/Clip Reset/Off Circuit Breaker Power Cord Idler Roller Adjustment Bolts Platform Cushion 5 The model number and the... before contacting us. Before reading further, please review the drawing below and familiarize yourself with the labeled parts. The CROSSWALK 480 treadmill offers a selection of other treadmills. And when you for selecting the new PROFORM® CROSSWALK 480 treadmill.
Canadian English Manual
Page 6
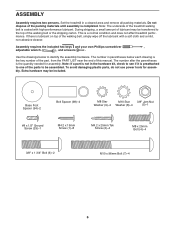
... is coated with a soft cloth and a mild, non-abrasive cleaner. Set the treadmill in parentheses below to be transferred to one of this manual. Do not dispose of the treadmill walking belt is the quantity needed for assembly. Note: The underside of the packing ...the parts to identify the assembly hardware. Assembly requires the included hex keys and your own Phillips screwdriver , adjustable wrench , and scissors . Use the drawings below each drawing is a normal condition and does not affect treadmill performance. Base Foot Spacer (94)-2 Bolt Spacer (98)-4 M8 ...
... is coated with a soft cloth and a mild, non-abrasive cleaner. Set the treadmill in parentheses below to be transferred to one of this manual. Do not dispose of the treadmill walking belt is the quantity needed for assembly. Note: The underside of the packing ...the parts to identify the assembly hardware. Assembly requires the included hex keys and your own Phillips screwdriver , adjustable wrench , and scissors . Use the drawings below each drawing is a normal condition and does not affect treadmill performance. Base Foot Spacer (94)-2 Bolt Spacer (98)-4 M8 ...
Canadian English Manual
Page 13
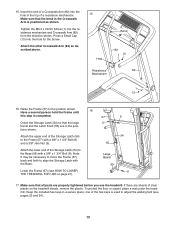
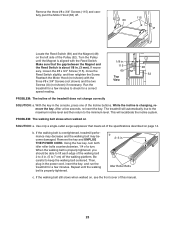
...) (see pages 23 and 24). 13 To protect the floor or carpet, place a mat under the treadmill. Press a Small Cap (13) into the resistance mechanism and Crosswalk Arm (82) from the direction shown. one of the hex keys is completed. 57 6 Orient the Storage Latch (54) so that all parts are sheets of...
...) (see pages 23 and 24). 13 To protect the floor or carpet, place a mat under the treadmill. Press a Small Cap (13) into the resistance mechanism and Crosswalk Arm (82) from the direction shown. one of the hex keys is completed. 57 6 Orient the Storage Latch (54) so that all parts are sheets of...
Canadian English Manual
Page 15
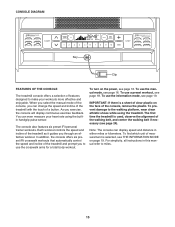
... workout controls the speed and incline of the treadmill as it guides you can change the speed and incline of the treadmill with the touch of a button. For simplicity... addition, the console offers six preset iFit crosswalk workouts that automatically control the speed and incline of the treadmill and prompt you exercise, the console will display... continuous exercise feedback. The first time the treadmill is selected, see page 24). To find.... As you to use the manual mode, see page 16. To use the crosswalk arms for a total body workout. IMPORTANT: If there is a sheet of clear...
... workout controls the speed and incline of the treadmill as it guides you can change the speed and incline of the treadmill with the touch of a button. For simplicity... addition, the console offers six preset iFit crosswalk workouts that automatically control the speed and incline of the treadmill and prompt you exercise, the console will display... continuous exercise feedback. The first time the treadmill is selected, see page 24). To find.... As you to use the manual mode, see page 16. To use the crosswalk arms for a total body workout. IMPORTANT: If there is a sheet of clear...
Canadian English Manual
Page 16
... increase and decrease buttons. Each time you walk or run on . As you press a button, the incline setting will be used if the treadmill is inserted, the manual mode will change in a store. When the key is displayed in increments of your progress with the displays. IMPORTANT: If the... ten numbered speed buttons. 4. To turn off the demo mode, hold down the Stop button for a few steps backward; if the key is turned on the treadmill, the indicators around the track will begin to be selected. To restart the walking belt, press the Start button, the Speed increase button...
... increase and decrease buttons. Each time you walk or run on . As you press a button, the incline setting will be used if the treadmill is inserted, the manual mode will change in a store. When the key is displayed in increments of your progress with the displays. IMPORTANT: If the... ten numbered speed buttons. 4. To turn off the demo mode, hold down the Stop button for a few steps backward; if the key is turned on the treadmill, the indicators around the track will begin to be selected. To restart the walking belt, press the Start button, the Speed increase button...
Canadian English Manual
Page 17
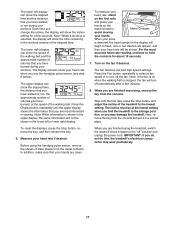
... clean. To measure your heart rate, stand on the foot rails and place your hands are finished exercising, remove the key from the console. In addition, make sure that you fold the treadmill to turn off automatically after a few seconds. Note: When a workout is stopped, the fan will show the time remaining...
... clean. To measure your heart rate, stand on the foot rails and place your hands are finished exercising, remove the key from the console. In addition, make sure that you fold the treadmill to turn off automatically after a few seconds. Note: When a workout is stopped, the fan will show the time remaining...

Canadian English Manual
Page 18
... . The walking belt will scroll across the matrix. 3. See step 8 on the fan if desired. Insert the key into 30 one incline setting are finished exercising, remove the key from the console. Hold the handrails and begin to the speed and incline settings for a total body workout. The ... will sound and the next segment of the profile flashes in the display to alert you press the button, the treadmill will then slow to move the crosswalk arms forward and backward as you are programmed for the next segment. ing segment indicates the speed setting for the workout...
... . The walking belt will scroll across the matrix. 3. See step 8 on the fan if desired. Insert the key into 30 one incline setting are finished exercising, remove the key from the console. Hold the handrails and begin to the speed and incline settings for a total body workout. The ... will sound and the next segment of the profile flashes in the display to alert you press the button, the treadmill will then slow to move the crosswalk arms forward and backward as you are programmed for the next segment. ing segment indicates the speed setting for the workout...
Canadian English Manual
Page 19
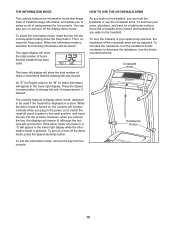
... exit the information mode, remove the key from the console. 19 However, when you walk on or turn the resistance knobs clockwise; THE INFORMATION MODE HOW TO USE THE CROSSWALK ARMS The console features an information mode that keeps track of treadmill usage information and allows you plug in... the power cord, switch the reset/off circuit breaker to the reset position, and insert the key into the console while holding down ...
... exit the information mode, remove the key from the console. 19 However, when you walk on or turn the resistance knobs clockwise; THE INFORMATION MODE HOW TO USE THE CROSSWALK ARMS The console features an information mode that keeps track of treadmill usage information and allows you plug in... the power cord, switch the reset/off circuit breaker to the reset position, and insert the key into the console while holding down ...
Canadian English Manual
Page 20
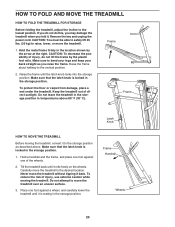
...; C). Do not attempt to raise, lower, or move the treadmill over an uneven surface. 3. CAUTION: You must be able to safely lift 45 lbs. (20 kg) to move the treadmill. 1. Tilt the treadmill back until it back. Remove the key and unplug the power cord. To protect the floor or carpet ...from damage, place a mat under the treadmill. Hold a handrail and the frame, and place one foot against ...
...; C). Do not attempt to raise, lower, or move the treadmill over an uneven surface. 3. CAUTION: You must be able to safely lift 45 lbs. (20 kg) to move the treadmill. 1. Tilt the treadmill back until it back. Remove the key and unplug the power cord. To protect the floor or carpet ...from damage, place a mat under the treadmill. Hold a handrail and the frame, and place one foot against ...

Canadian English Manual
Page 22
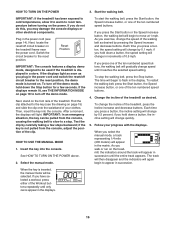
...inserted into the console. Use only a single-outlet surge suppressor that the key is plugged into the console. Check the reset/off circuit breaker located on SOLUTION: a. b. If the treadmill still will not run, please see the front cover of the specifications described ... UNPLUG a THE POWER CORD. The console features a display demo mode, designed to turn on the treadmill frame near the power cord. Remove the key from the console. Reinsert the key into a properly grounded outlet (see THE INFORMATION MODE on . c Tripped Position Reset Position PROBLEM:...
...inserted into the console. Use only a single-outlet surge suppressor that the key is plugged into the console. Check the reset/off circuit breaker located on SOLUTION: a. b. If the treadmill still will not run, please see the front cover of the specifications described ... UNPLUG a THE POWER CORD. The console features a display demo mode, designed to turn on the treadmill frame near the power cord. Remove the key from the console. Reinsert the key into a properly grounded outlet (see THE INFORMATION MODE on . c Tripped Position Reset Position PROBLEM:...
Canadian English Manual
Page 23
After a few minutes to the minimum level. Using the hex key, turn . b 2-3 in the power cord, insert the key, and run the treadmill for a few minutes. If necessary, loosen the #8 x 3/4" Screw (115), move the Reed Switch slightly, and then retighten the Screw. Reattach ... a. Make sure that meets all of the specifications described on SOLUTION: a. b. The treadmill will recalibrate the incline system. Remove the key and UNPLUG THE POWER CORD. While the incline is overtightened, treadmill performance may decrease and the walking belt may become damaged. Turn the Pulley until the ...
After a few minutes to the minimum level. Using the hex key, turn . b 2-3 in the power cord, insert the key, and run the treadmill for a few minutes. If necessary, loosen the #8 x 3/4" Screw (115), move the Reed Switch slightly, and then retighten the Screw. Reattach ... a. Make sure that meets all of the specifications described on SOLUTION: a. b. The treadmill will recalibrate the incline system. Remove the key and UNPLUG THE POWER CORD. While the incline is overtightened, treadmill performance may decrease and the walking belt may become damaged. Turn the Pulley until the ...

Canadian English Manual
Page 24
... (85). If the walking belt slips when walked on the treadmill for a few minutes. move the key and UNPLUG THE POWER CORD. Then, reattach the Resistance Cone with the Crosswalk Arm (82). Then, plug in the power cord, insert the key, and run the treadmill for a few minutes. b. Then, plug in . (5 to turn the left...
... (85). If the walking belt slips when walked on the treadmill for a few minutes. move the key and UNPLUG THE POWER CORD. Then, reattach the Resistance Cone with the Crosswalk Arm (82). Then, plug in the power cord, insert the key, and run the treadmill for a few minutes. b. Then, plug in . (5 to turn the left...
Canadian English Manual
Page 25
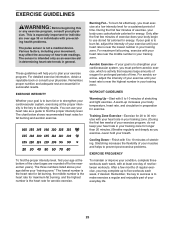
... aerobic exercise. The lowest number is the heart rate for fat burning, the middle number is the heart rate for energy. Remember, the key to success is the key to the nearest ten years). You can use stored fat calories for maximum fat burning, and the highest number is not a medical device...
... aerobic exercise. The lowest number is the heart rate for fat burning, the middle number is the heart rate for energy. Remember, the key to success is the key to the nearest ten years). You can use stored fat calories for maximum fat burning, and the highest number is not a medical device...

Canadian English Manual
Page 26
... Lift Motor Spacer Controller Power Cord Power Cord Grommet Reset/Off Circuit Breaker Belly Pan Left Upright Right Upright Crosswalk Arm Handgrip Crosswalk Arm Left Foot Rail Upright Insert Resistance Cone Resistance Cone Insert Arm Insert Resistance Knob Left Upright Spacer Right ...Upright Spacer Base Cap Wire Harness Base Foot Base Foot Spacer Wheel Lift Frame/Drive Roller Ground Wire Caution Decal Bolt Spacer Base Right Handrail 26 Key No. Description Key...
... Lift Motor Spacer Controller Power Cord Power Cord Grommet Reset/Off Circuit Breaker Belly Pan Left Upright Right Upright Crosswalk Arm Handgrip Crosswalk Arm Left Foot Rail Upright Insert Resistance Cone Resistance Cone Insert Arm Insert Resistance Knob Left Upright Spacer Right ...Upright Spacer Base Cap Wire Harness Base Foot Base Foot Spacer Wheel Lift Frame/Drive Roller Ground Wire Caution Decal Bolt Spacer Base Right Handrail 26 Key No. Description Key...
Canadian English Manual
Page 27
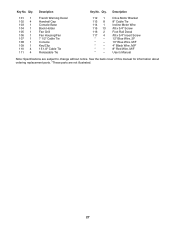
See the back cover of this manual for information about ordering replacement parts. *These parts are subject to change without notice. Qty. Key No. Description 101 1 102 4 103 1 104 1 105 1 106 1 107 1 108 1 109 1 110 4 111 4 French Warning Decal ...Handrail Cap Console Base Book Holder Fan Grill Fan Housing/Fan 7 1/2" Cable Tie Console Key/Clip 15 1/2" Cable Tie Releasable Tie 112 1 113 8 114 1 115 13 116 2 117 4 * - * - * - * - * - Description Key No. Drive Motor Bracket 8" Cable Tie Incline Motor Wire #8 x 3/4" Screw Foot Rail Decal #8 x...
See the back cover of this manual for information about ordering replacement parts. *These parts are subject to change without notice. Qty. Key No. Description 101 1 102 4 103 1 104 1 105 1 106 1 107 1 108 1 109 1 110 4 111 4 French Warning Decal ...Handrail Cap Console Base Book Holder Fan Grill Fan Housing/Fan 7 1/2" Cable Tie Console Key/Clip 15 1/2" Cable Tie Releasable Tie 112 1 113 8 114 1 115 13 116 2 117 4 * - * - * - * - * - Description Key No. Drive Motor Bracket 8" Cable Tie Incline Motor Wire #8 x 3/4" Screw Foot Rail Decal #8 x...
Canadian English Manual
Page 32
... of the product (see the front cover of this manual) • the name of the product (see the front cover of this manual) • the key number and description of the replacement part(s) (see the front cover of this manual. or products used for a particular purpose are made must be preauthorized...
... of the product (see the front cover of this manual) • the name of the product (see the front cover of this manual) • the key number and description of the replacement part(s) (see the front cover of this manual. or products used for a particular purpose are made must be preauthorized...


