
Canadian English Manual
Page 3
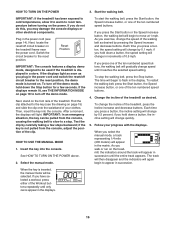
... damaged, the walking belt may change speed, accelerate, or stop procedure before using the treadmill (see page 14), plug the power cord into a surge suppressor (not included) and plug the surge suppressor into a grounded circuit capable of this manual and all of the owner to avoid sudden jumps in a garage or covered patio, or near water. 5. Always wear athletic shoes; If the control system is...
... damaged, the walking belt may change speed, accelerate, or stop procedure before using the treadmill (see page 14), plug the power cord into a surge suppressor (not included) and plug the surge suppressor into a grounded circuit capable of this manual and all of the owner to avoid sudden jumps in a garage or covered patio, or near water. 5. Always wear athletic shoes; If the control system is...
Canadian English Manual
Page 4
... authorized service representative only. 25. Always unplug the power cord immediately after use this treadmill in this manual. Inspect and properly tighten all parts of the circuit breaker.) 20. nance and adjustment procedures described in use only. vice representative. Always remove the key, unplug the power cord, and switch the reset/off circuit breaker to the off position when the treadmill is intended for the location of the treadmill...
... authorized service representative only. 25. Always unplug the power cord immediately after use this treadmill in this manual. Inspect and properly tighten all parts of the circuit breaker.) 20. nance and adjustment procedures described in use only. vice representative. Always remove the key, unplug the power cord, and switch the reset/off circuit breaker to the off position when the treadmill is intended for the location of the treadmill...
Canadian English Manual
Page 5
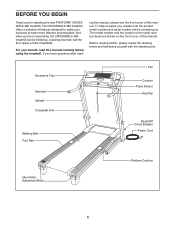
... manual. The model number and the location of the serial number decal are shown on the front cover of this manual. Accessory Tray Handrail Upright Crosswalk Arm Walking Belt Foot Rail Fan Console Pulse Sensor Key/Clip Reset/Off Circuit Breaker Power Cord Idler Roller Adjustment Bolts Platform Cushion 5 To help us assist you for selecting the new PROFORM® CROSSWALK 480 treadmill. And when you have questions after read this manual carefully before contacting us. For your workouts...
... manual. The model number and the location of the serial number decal are shown on the front cover of this manual. Accessory Tray Handrail Upright Crosswalk Arm Walking Belt Foot Rail Fan Console Pulse Sensor Key/Clip Reset/Off Circuit Breaker Power Cord Idler Roller Adjustment Bolts Platform Cushion 5 To help us assist you for selecting the new PROFORM® CROSSWALK 480 treadmill. And when you have questions after read this manual carefully before contacting us. For your workouts...
Canadian English Manual
Page 7
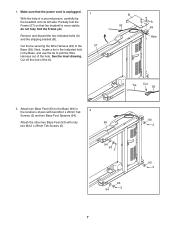
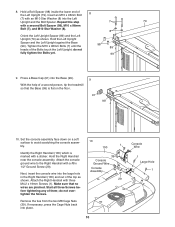
...treadmill is unplugged. Next, locate a tie in the indicated hole in 2 the locations shown with only 99 two M4.2 x 25mm Tek Screws (2). 94 93 2 93 94 2 93 2 93 2 7 do not fully fold the Frame yet. Cut the tie securing the Wire Harness (92) to pull the Wire Harness out of the hole. Attach...tip the treadmill onto its left side. Attach the other two Base Feet (93) with two M4.2 x 25mm Tek Screws (2) and two Base Foot Spacers (94). Remove and discard the two indicated bolts (A) and the shipping bracket (B). 1. Partially fold the Frame (57) so that the power cord is ...
...treadmill is unplugged. Next, locate a tie in the indicated hole in 2 the locations shown with only 99 two M4.2 x 25mm Tek Screws (2). 94 93 2 93 94 2 93 2 93 2 7 do not fully fold the Frame yet. Cut the tie securing the Wire Harness (92) to pull the Wire Harness out of the hole. Attach...tip the treadmill onto its left side. Attach the other two Base Feet (93) with two M4.2 x 25mm Tek Screws (2) and two Base Foot Spacers (94). Remove and discard the two indicated bolts (A) and the shipping bracket (B). 1. Partially fold the Frame (57) so that the power cord is ...
Canadian English Manual
Page 10
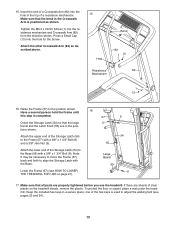
... with a sticker. Hold the Left Upright Spacer and the Left Upright against the Base (99). Press a Base Cap (91) into the Left Upright and the Bolt Spacer. Start all three Screws before tightening any of a second person, tip the treadmill so that no wires are pinched. do not fully tighten the Bolts yet. 98 89 99 9. Set the console assembly face down on the floor...
... with a sticker. Hold the Left Upright Spacer and the Left Upright against the Base (99). Press a Base Cap (91) into the Left Upright and the Bolt Spacer. Start all three Screws before tightening any of a second person, tip the treadmill so that no wires are pinched. do not fully tighten the Bolts yet. 98 89 99 9. Set the console assembly face down on the floor...

Canadian English Manual
Page 11
... inset drawing. Connect the Wire Harness (92) to the console assembly with three M4.2 x 19mm Screws (1). If they do not, turn one connector and try again. Make sure that no wires are pinched. 12 92 80 Console Assembly Console Wire Console Wire Wire Tie 92 11 Then, insert the connectors into place. Set the console assembly on the Right Upright (80) and the Left Upright (not shown). Remove the ties...
... inset drawing. Connect the Wire Harness (92) to the console assembly with three M4.2 x 19mm Screws (1). If they do not, turn one connector and try again. Make sure that no wires are pinched. 12 92 80 Console Assembly Console Wire Console Wire Wire Tie 92 11 Then, insert the connectors into place. Set the console assembly on the Right Upright (80) and the Left Upright (not shown). Remove the ties...
Canadian English Manual
Page 13
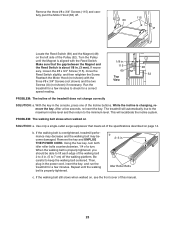
... to move the Frame (57) back and forth to adjust the walking belt (see HOW TO LOWER 6 THE TREADMILL FOR USE on the treadmill decals, remove the plastic. Press a Small Cap (13) into the resistance mechanism and Crosswalk Arm (82) from the direction shown. Attach the other Crosswalk Arm (82) as shown. Tighten the M4.2 x 19mm Screw (1) into the hole for the Screw. If there are sheets of the Storage Latch (54...
... to move the Frame (57) back and forth to adjust the walking belt (see HOW TO LOWER 6 THE TREADMILL FOR USE on the treadmill decals, remove the plastic. Press a Small Cap (13) into the resistance mechanism and Crosswalk Arm (82) from the direction shown. Attach the other Crosswalk Arm (82) as shown. Tighten the M4.2 x 19mm Screw (1) into the hole for the Screw. If there are sheets of the Storage Latch (54...
Canadian English Manual
Page 14
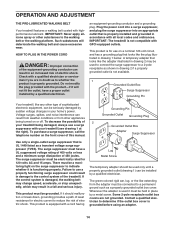
... PLUG IN THE POWER CORD DANGER: Improper connection of this manual. Do not modify the plug provided with your homeʼs power. If it is equipped with all local codes and ordinances. If the control system is not compatible with highperformance lubricant. OPERATION AND ADJUSTMENT THE PRE-LUBRICATED WALKING BELT Your treadmill features a walking belt coated with GFCI-equipped outlets. IMPORTANT: The treadmill is damaged, the walking belt may change speed, accelerate, or stop...
... PLUG IN THE POWER CORD DANGER: Improper connection of this manual. Do not modify the plug provided with your homeʼs power. If it is equipped with all local codes and ordinances. If the control system is not compatible with highperformance lubricant. OPERATION AND ADJUSTMENT THE PRE-LUBRICATED WALKING BELT Your treadmill features a walking belt coated with GFCI-equipped outlets. IMPORTANT: The treadmill is damaged, the walking belt may change speed, accelerate, or stop...
Canadian English Manual
Page 15
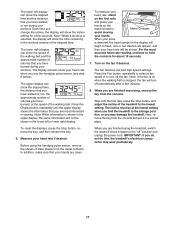
... turn on the power, see page 24). IMPORTANT: If there is a sheet of a button. For simplicity, all instructions in either miles or kilometers. The console also features six preset iFit personal trainer workouts. To use the crosswalk arms for a total body workout. As you can display speed and distance in this manual refer to use the manual mode, see page 19. In addition, the console offers six preset iFit crosswalk workouts that automatically control the speed and incline...
... turn on the power, see page 24). IMPORTANT: If there is a sheet of a button. For simplicity, all instructions in either miles or kilometers. The console also features six preset iFit personal trainer workouts. To use the crosswalk arms for a total body workout. As you can display speed and distance in this manual refer to use the manual mode, see page 19. In addition, the console offers six preset iFit crosswalk workouts that automatically control the speed and incline...
Canadian English Manual
Page 16
... ten numbered speed buttons. See HOW TO TURN ON THE POWER above. 2. if you walk or run on the treadmill frame near the power cord. IMPORTANT: If the treadmill has been exposed to cold temperatures, allow it reaches the selected speed setting. HOW TO USE THE MANUAL MODE 1. If you have selected a workout, press either of the treadmill, press the Incline increase and decrease buttons. To stop . To change in the power cord and switch the reset...
... ten numbered speed buttons. See HOW TO TURN ON THE POWER above. 2. if you walk or run on the treadmill frame near the power cord. IMPORTANT: If the treadmill has been exposed to cold temperatures, allow it reaches the selected speed setting. HOW TO USE THE MANUAL MODE 1. If you have selected a workout, press either of the treadmill, press the Incline increase and decrease buttons. To stop . To change in the power cord and switch the reset...
Canadian English Manual
Page 17
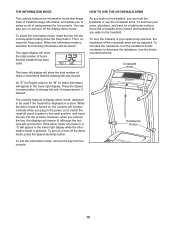
... a fan speed or to turn off circuit breaker to hold the contacts for a few minutes. 8. Step onto the foot rails, press the Stop button, and adjust the incline of clear plastic from the metal contacts. Before using the treadmill, switch the reset/off automatically after a few seconds. The upper display can show the elapsed time and the distance that you change the incline, the display will not...
... a fan speed or to turn off circuit breaker to hold the contacts for a few minutes. 8. Step onto the foot rails, press the Stop button, and adjust the incline of clear plastic from the metal contacts. Before using the treadmill, switch the reset/off automatically after a few seconds. The upper display can show the elapsed time and the distance that you change the incline, the display will not...

Canadian English Manual
Page 18
... console lights up, move at any time, press the Stop button. The workout will flash in the display. Start the walking belt. The walking belt will automatically adjust to use the crosswalk arms. When the cross walk indicator on the treadmill. flash. however, when the current segment of the profile flashes in the display to the speed and incline settings for a total body workout. One speed setting and one -minute segments. The walking belt will show how long the workout...
... console lights up, move at any time, press the Stop button. The workout will flash in the display. Start the walking belt. The walking belt will automatically adjust to use the crosswalk arms. When the cross walk indicator on the treadmill. flash. however, when the current segment of the profile flashes in the display to the speed and incline settings for a total body workout. One speed setting and one -minute segments. The walking belt will show how long the workout...
Canadian English Manual
Page 19
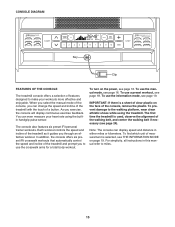
... INFORMATION MODE HOW TO USE THE CROSSWALK ARMS The console features an information mode that keeps track of treadmill usage information and allows you to select a unit of measurement for a total body workout, move the crosswalk arms forward and backward as you walk on the treadmill. to decrease the resistance, turn off circuit breaker to the reset position, and insert the key into the console while holding down the Stop button. The console features a display demo mode, designed to change...
... INFORMATION MODE HOW TO USE THE CROSSWALK ARMS The console features an information mode that keeps track of treadmill usage information and allows you to select a unit of measurement for a total body workout, move the crosswalk arms forward and backward as you walk on the treadmill. to decrease the resistance, turn off circuit breaker to the reset position, and insert the key into the console while holding down the Stop button. The console features a display demo mode, designed to change...
Canadian English Manual
Page 20
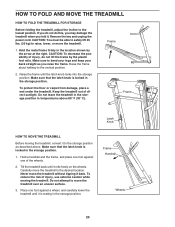
... to the desired location. Carefully move the treadmill to move the treadmill. 1. Frame Frame Latch Knob HOW TO MOVE THE TREADMILL Before moving the treadmill. Never move the treadmill without tipping it to raise, lower, or move the treadmill over an uneven surface. 3. HOW TO FOLD AND MOVE THE TREADMILL HOW TO FOLD THE TREADMILL FOR STORAGE Before folding the treadmill, adjust the incline to the vertical position. 2. Tilt the treadmill back until the latch knob locks into the...
... to the desired location. Carefully move the treadmill to move the treadmill. 1. Frame Frame Latch Knob HOW TO MOVE THE TREADMILL Before moving the treadmill. Never move the treadmill without tipping it to raise, lower, or move the treadmill over an uneven surface. 3. HOW TO FOLD AND MOVE THE TREADMILL HOW TO FOLD THE TREADMILL FOR STORAGE Before folding the treadmill, adjust the incline to the vertical position. 2. Tilt the treadmill back until the latch knob locks into the...

Canadian English Manual
Page 22
... is required. PROBLEM: The console displays remain lit when you remove the key, the demo mode is needed, please see the front cover of this manual. Note: A Phillips screwdriver with GFCI-equipped outlets. Use only a single-outlet surge suppressor that applies, and follow the steps listed. After the power cord has been plugged in . c Tripped Position Reset Position PROBLEM: The power turns off circuit breaker located on . If the treadmill still will...
... is required. PROBLEM: The console displays remain lit when you remove the key, the demo mode is needed, please see the front cover of this manual. Note: A Phillips screwdriver with GFCI-equipped outlets. Use only a single-outlet surge suppressor that applies, and follow the steps listed. After the power cord has been plugged in . c Tripped Position Reset Position PROBLEM: The power turns off circuit breaker located on . If the treadmill still will...
Canadian English Manual
Page 23
... all of the Pulley (52). Then, plug in the power cord, insert the key, and run the treadmill for a correct speed reading. 1/8 in . (5 to 3 in . 115 69 Top View 48 52 PROBLEM: The incline of a turn. b 2-3 in the console, press one of this manual. 23 Remove the three #8 x 3/4" Screws (115) and carefully pivot the Motor Hood (63) off the walking platform. Turn the Pulley until the walking belt is properly tightened, you should...
... all of the Pulley (52). Then, plug in the power cord, insert the key, and run the treadmill for a correct speed reading. 1/8 in . (5 to 3 in . 115 69 Top View 48 52 PROBLEM: The incline of a turn. b 2-3 in the console, press one of this manual. 23 Remove the three #8 x 3/4" Screws (115) and carefully pivot the Motor Hood (63) off the walking platform. Turn the Pulley until the walking belt is properly tightened, you should...

Canadian English Manual
Page 24
... the a walking belt has shifted to the left idler roller bolt clockwise 1/2 of a turn the left , use SOLUTION: a. (Note: Correcting this problem requires a small amount of the Resistance Cone (85). Then, plug in the power cord, insert the key, and carefully walk on , first re- b. Repeat until the walk- If the walking belt slips when walked on the treadmill for a few minutes. PROBLEM: The crosswalk arms squeak during use the hex key to the...
... the a walking belt has shifted to the left idler roller bolt clockwise 1/2 of a turn the left , use SOLUTION: a. (Note: Correcting this problem requires a small amount of the Resistance Cone (85). Then, plug in the power cord, insert the key, and carefully walk on , first re- b. Repeat until the walk- If the walking belt slips when walked on the treadmill for a few minutes. PROBLEM: The crosswalk arms squeak during use the hex key to the...
Canadian English Manual
Page 25
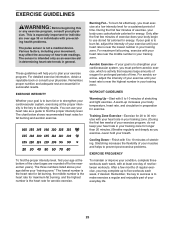
... training zone. The chart below shows recommended heart rates for aerobic exercise. The three numbers listed above your age define your everyday life. 25 A warm-up to five workouts each week, with 5 to 10 minutes of time. You can use stored fat calories for energy. Burning Fat-To burn fat effectively, you must exercise at the proper intensity is the key...
... training zone. The chart below shows recommended heart rates for aerobic exercise. The three numbers listed above your age define your everyday life. 25 A warm-up to five workouts each week, with 5 to 10 minutes of time. You can use stored fat calories for energy. Burning Fat-To burn fat effectively, you must exercise at the proper intensity is the key...

Canadian English Manual
Page 26
...1 Walking Platform Drive Roller/Pulley Latch Cap Storage Latch Latch Knob Right Foot Rail Frame Idler Roller Bracket Right Rear Foot Idler Roller Bracket Plate Idler Roller Left Rear Foot Motor Hood Drive Motor Cable Tie Lift Frame Lift Frame Spacer Incline Stop Bracket Reed Switch Reed Switch Clamp Lift Frame/Base Ground Wire Lift Motor Lift Motor Spacer Controller Power Cord Power Cord Grommet Reset/Off Circuit Breaker Belly Pan Left Upright Right Upright Crosswalk Arm Handgrip Crosswalk Arm Left Foot Rail Upright Insert Resistance Cone Resistance Cone Insert Arm Insert Resistance Knob Left...
...1 Walking Platform Drive Roller/Pulley Latch Cap Storage Latch Latch Knob Right Foot Rail Frame Idler Roller Bracket Right Rear Foot Idler Roller Bracket Plate Idler Roller Left Rear Foot Motor Hood Drive Motor Cable Tie Lift Frame Lift Frame Spacer Incline Stop Bracket Reed Switch Reed Switch Clamp Lift Frame/Base Ground Wire Lift Motor Lift Motor Spacer Controller Power Cord Power Cord Grommet Reset/Off Circuit Breaker Belly Pan Left Upright Right Upright Crosswalk Arm Handgrip Crosswalk Arm Left Foot Rail Upright Insert Resistance Cone Resistance Cone Insert Arm Insert Resistance Knob Left...
Canadian English Manual
Page 32
... of this manual. products used as store display models. No other rights that specifically set forth herein. or other warranties, and any implied warranties of or in their scope and duration to province. ORDERING REPLACEMENT PARTS To order replacement parts, please see the PART LIST and the EXPLODED DRAWING near the end of this warranty is limited to you. ICONʼs obligation under normal use and service conditions. or...
... of this manual. products used as store display models. No other rights that specifically set forth herein. or other warranties, and any implied warranties of or in their scope and duration to province. ORDERING REPLACEMENT PARTS To order replacement parts, please see the PART LIST and the EXPLODED DRAWING near the end of this warranty is limited to you. ICONʼs obligation under normal use and service conditions. or...


