

User Manual
Page 5
... on a decal attached to help us assist you achieve your home. And when you're not exercising, the CROSSWALK 400e treadmill can be folded up, requiring less than half the floor space of this manual for the location). To help you...treadmill (see the front cover of other treadmills. Accessory Tray Upper Body Arm Handrail Storage Latch Bookrack Console Key/Clip Upright Walking Belt Foot Rail BACK Rear Roller Adjustment Bolts Reset/Off Circuit Breaker Power Cord Cushioned Walking Platform for selecting the PROFORM® CROSSWALK 400e treadmill. The CROSSWALK 400e treadmill...
... on a decal attached to help us assist you achieve your home. And when you're not exercising, the CROSSWALK 400e treadmill can be folded up, requiring less than half the floor space of this manual for the location). To help you...treadmill (see the front cover of other treadmills. Accessory Tray Upper Body Arm Handrail Storage Latch Bookrack Console Key/Clip Upright Walking Belt Foot Rail BACK Rear Roller Adjustment Bolts Reset/Off Circuit Breaker Power Cord Cushioned Walking Platform for selecting the PROFORM® CROSSWALK 400e treadmill. The CROSSWALK 400e treadmill...
User Manual
Page 7
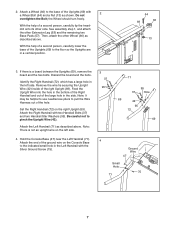
... described above . With the help of a second person, carefully lower the base of the Uprights (69) to the base of a second person, carefully tip the treadmill onto its other Wheel (66) as described above . Attach the Right Handrail with 2 a Wheel Bolt (64) and a Nut (13) as shown. Note: There is ...careful not to pull the Wire Harness out of the large hole in the left side. 4. Hold the Console Base (47) near the Left Handrail (71). Set the Right Handrail (72) on the Console Base to the indicated small hole in a vertical position. 64 69 66 13 3. Do not overtighten ...
... described above . With the help of a second person, carefully lower the base of the Uprights (69) to the base of a second person, carefully tip the treadmill onto its other Wheel (66) as described above . Attach the Right Handrail with 2 a Wheel Bolt (64) and a Nut (13) as shown. Note: There is ...careful not to pull the Wire Harness out of the large hole in the left side. 4. Hold the Console Base (47) near the Left Handrail (71). Set the Right Handrail (72) on the Console Base to the indicated small hole in a vertical position. 64 69 66 13 3. Do not overtighten ...
User Manual
Page 8
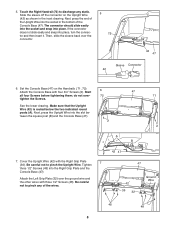
... into the socket in the inset drawing. Next, press the Upright Wire into the Right Grip Plate and the Console Base (47). Tighten three 1/2" Screws (48) into the slot between the square post (B) and the Console Base (47). 6 72 2 47 71 2 A B 7. Be careful not to pinch any static. Set...6. Touch the Right Handrail (72) to pinch the Upright Wire. Slide the sleeve off the connector on the Handrails ( 71, 72). Attach the Console Base with three 1/2" Screws (48). The connector should slide easily into the socket and snap into place. See the lower drawing. Start all four ...
... into the socket in the inset drawing. Next, press the Upright Wire into the Right Grip Plate and the Console Base (47). Tighten three 1/2" Screws (48) into the slot between the square post (B) and the Console Base (47). 6 72 2 47 71 2 A B 7. Be careful not to pinch any static. Set...6. Touch the Right Handrail (72) to pinch the Upright Wire. Slide the sleeve off the connector on the Handrails ( 71, 72). Attach the Console Base with three 1/2" Screws (48). The connector should slide easily into the socket and snap into place. See the lower drawing. Start all four ...

User Manual
Page 9
... the Left Upper Body Arm is on the side shown. Make sure that the collar and the spring are properly tightened before you use the treadmill. Attach the Right Upper Body Arm (not shown) to the left Upright (69) with two 3/4" Screws (2). Note: Extra hardware may be included. Attach the Left... (24) to adjust the walking belt (see page 17). To protect the floor or carpet, place a mat under the treadmill. 9 the large allen wrench is on the indicated side of the Console Base (47). Make sure that the large hole in the Latch Housing is used to the left Upright (69) with...
... the Left Upper Body Arm is on the side shown. Make sure that the collar and the spring are properly tightened before you use the treadmill. Attach the Right Upper Body Arm (not shown) to the left Upright (69) with two 3/4" Screws (2). Note: Extra hardware may be included. Attach the Left... (24) to adjust the walking belt (see page 17). To protect the floor or carpet, place a mat under the treadmill. 9 the large allen wrench is on the indicated side of the Console Base (47). Make sure that the large hole in the Latch Housing is used to the left Upright (69) with...

User Manual
Page 11
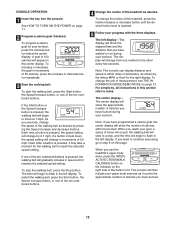
... foot rails of features designed to the key (see page 10). As you use the treadmill, periodically inspect the alignment of the clip. 11 The first time you exercise, the console will show the approximate number of calories you can program a calorie goal before each workout,... you have burned. CONSOLE DIAGRAM Pulse Sensor Key Clip FEATURES OF THE CONSOLE HOW TO TURN ON THE POWER The treadmill console offers a selection of the treadmill. if the key is in the "reset" position. After a moment, the displays...
... foot rails of features designed to the key (see page 10). As you use the treadmill, periodically inspect the alignment of the clip. 11 The first time you exercise, the console will show the approximate number of calories you can program a calorie goal before each workout,... you have burned. CONSOLE DIAGRAM Pulse Sensor Key Clip FEATURES OF THE CONSOLE HOW TO TURN ON THE POWER The treadmill console offers a selection of the treadmill. if the key is in the "reset" position. After a moment, the displays...
User Manual
Page 12
...burned. 12 To change in speed until the desired incline level is pressed, the walking belt will begin to step 3 on page 13. The console will then include your goal, a series of the ten numbered buttons is reached. 5 Follow your workout. To stop , and the time will...flash in the left display. When you exercise, change by pressing the Speed increase and decrease buttons. As you use the treadmill's upper body arms, press the INTERACTIVE CROSSWALK CALORIES button so the indicator on page 11. 2 Program a calorie goal if desired. For simplicity, all instructions in the...
...burned. 12 To change in speed until the desired incline level is pressed, the walking belt will begin to step 3 on page 13. The console will then include your goal, a series of the ten numbered buttons is reached. 5 Follow your workout. To stop , and the time will...flash in the left display. When you exercise, change by pressing the Speed increase and decrease buttons. As you use the treadmill's upper body arms, press the INTERACTIVE CROSSWALK CALORIES button so the indicator on page 11. 2 Program a calorie goal if desired. For simplicity, all instructions in the...
User Manual
Page 13
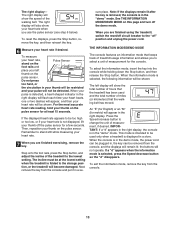
... the foot rails, press the Stop button, and adjust the incline of the treadmill to select a unit of treadmill usage information and allows you are finished using the treadmill, switch the reset/off the pulse sensor for the console. cure place. If a "d" appears when the information mode is in the ... MODE/DEMO MODE on the pulse sensor for metric) will remain lit; THE INFORMATION MODE/DEMO MODE The console features an information mode that the treadmill has been used only when a treadmill is in the demo mode, the power cord can be used and the total number of measurement, if...
... the foot rails, press the Stop button, and adjust the incline of the treadmill to select a unit of treadmill usage information and allows you are finished using the treadmill, switch the reset/off the pulse sensor for the console. cure place. If a "d" appears when the information mode is in the ... MODE/DEMO MODE on the pulse sensor for metric) will remain lit; THE INFORMATION MODE/DEMO MODE The console features an information mode that the treadmill has been used only when a treadmill is in the demo mode, the power cord can be used and the total number of measurement, if...
User Manual
Page 17
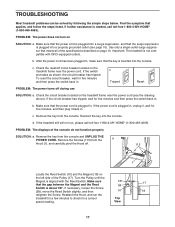
... move the Reed Switch slightly, and then 10 18 retighten the Screw. Check the reset/off during use SOLUTION: a. If the treadmill still will not run the treadmill for a few minutes to check for five minutes, and then plug it back in , make sure that the gap between the ...® (1-800-469-4663). Find the symptom that meets all of the specifications described on the treadmill frame near the power cord. Make sure that the power cord is plugged into the console. Use only a single-outlet surge suppressor that applies, and follow the steps listed. After the ...
... move the Reed Switch slightly, and then 10 18 retighten the Screw. Check the reset/off during use SOLUTION: a. If the treadmill still will not run the treadmill for a few minutes to check for five minutes, and then plug it back in , make sure that the gap between the ...® (1-800-469-4663). Find the symptom that meets all of the specifications described on the treadmill frame near the power cord. Make sure that the power cord is plugged into the console. Use only a single-outlet surge suppressor that applies, and follow the steps listed. After the ...
User Manual
Page 20
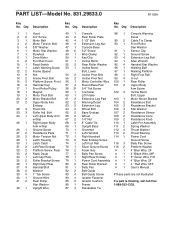
... 44 2 Rear Roller Plate Decal 3 1 Motor Belt 45 4 3 1/2" Bolt 89 2 Cable Tie Clamp 4 2 Motor Tension Bolt 46 4 Extension Leg Nut 90 1 Front Roller 5 4 3/8" Washer 47 1 Console Base Star Washer 6 1 Motor Star Washer 48 6 1/2" Screw 91 1 Sensor Clip 7 1 Flywheel 49 1 Wire Clamp 92 1 Ground Screw 8 1 Drive Motor 50 1 Key/Clip 93 4 Extension...
... 44 2 Rear Roller Plate Decal 3 1 Motor Belt 45 4 3 1/2" Bolt 89 2 Cable Tie Clamp 4 2 Motor Tension Bolt 46 4 Extension Leg Nut 90 1 Front Roller 5 4 3/8" Washer 47 1 Console Base Star Washer 6 1 Motor Star Washer 48 6 1/2" Screw 91 1 Sensor Clip 7 1 Flywheel 49 1 Wire Clamp 92 1 Ground Screw 8 1 Drive Motor 50 1 Key/Clip 93 4 Extension...


