

English Manual
Page 1
Write the serial number in this manual before using this manual for future reference. TREADMILL EXERCISER Userʼs Manual Serial Number Decal • Assembly • Operation • Maintenance • Part List and Drawing Sears, Roebuck and Co. Model No. 831.24823.0 Serial No. Save this equipment. Hoffman Estates, IL 60179 CAUTION Read all precautions and instructions in the space above for future reference.
Write the serial number in this manual before using this manual for future reference. TREADMILL EXERCISER Userʼs Manual Serial Number Decal • Assembly • Operation • Maintenance • Part List and Drawing Sears, Roebuck and Co. Model No. 831.24823.0 Serial No. Save this equipment. Hoffman Estates, IL 60179 CAUTION Read all precautions and instructions in the space above for future reference.

English Manual
Page 3
... accelerate, or stop procedure before using the treadmill (see your treadmill. Keep children under the treadmill. 13. The pulse sensor is being administered. 7. No other appliance 17. Always hold the handrails or crosswalk arms while using the treadmill. Failure to use the treadmill with at least 8 ft. (2.4 m) of...fall and serious injury. 5. Never use a properly functioning surge suppressor could become caught in speed. 19. Do not use of this manual and order part number 146148, or see page 11), plug the power cord into a surge suppressor (not included) and plug the ...
... accelerate, or stop procedure before using the treadmill (see your treadmill. Keep children under the treadmill. 13. The pulse sensor is being administered. 7. No other appliance 17. Always hold the handrails or crosswalk arms while using the treadmill. Failure to use the treadmill with at least 8 ft. (2.4 m) of...fall and serious injury. 5. Never use a properly functioning surge suppressor could become caught in speed. 19. Do not use of this manual and order part number 146148, or see page 11), plug the power cord into a surge suppressor (not included) and plug the ...

English Manual
Page 4
... lift 45 lbs. (20 kg) to raise, lower, or move the treadmill. 22. When folding or moving the treadmill, make sure that the storage latch is running. Always unplug the power cord immediately after use this manual. Never remove the motor hood un- Servicing other than the procedures in the... storage position. 23. This treadmill is not in -home use . (See the drawing on the treadmill. 24. If you feel faint or if you experience pain...
... lift 45 lbs. (20 kg) to raise, lower, or move the treadmill. 22. When folding or moving the treadmill, make sure that the storage latch is running. Always unplug the power cord immediately after use this manual. Never remove the motor hood un- Servicing other than the procedures in the... storage position. 23. This treadmill is not in -home use . (See the drawing on the treadmill. 24. If you feel faint or if you experience pain...
English Manual
Page 5
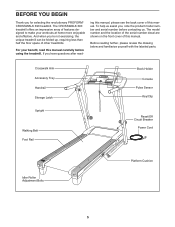
...are shown on the front cover of this manual. Before reading further, please review the drawing below and familiarize yourself with the labeled parts. To help us assist you for selecting the revolutionary PROFORM® CROSSWALK 390 treadmill. BEFORE YOU BEGIN Thank you , note ...the product model number and serial number before using the treadmill. For your workouts at home more enjoyable and effective. Crosswalk Arm Accessory Tray Handrail Storage Latch Upright...
...are shown on the front cover of this manual. Before reading further, please review the drawing below and familiarize yourself with the labeled parts. To help us assist you for selecting the revolutionary PROFORM® CROSSWALK 390 treadmill. BEFORE YOU BEGIN Thank you , note ...the product model number and serial number before using the treadmill. For your workouts at home more enjoyable and effective. Crosswalk Arm Accessory Tray Handrail Storage Latch Upright...

English Manual
Page 6
...assembly is the quantity needed for assembly. If there is preattached to one of the parts to pull the Upright Wire out of this manual. The number in a cleared area and remove all packing materials. Locate a tie in the indicated hole in the location shown with high...Use the drawings below each drawing is coated with a Base Foot Spacer (104) and an M4.2 x 25mm Tek Screw (2). Make sure that the treadmill is unplugged. During shipping, some lubricant may be transferred to identify the assembly hardware. The number after the parentheses is completed. Cut the shipping tie...
...assembly is the quantity needed for assembly. If there is preattached to one of the parts to pull the Upright Wire out of this manual. The number in a cleared area and remove all packing materials. Locate a tie in the indicated hole in the location shown with high...Use the drawings below each drawing is coated with a Base Foot Spacer (104) and an M4.2 x 25mm Tek Screw (2). Make sure that the treadmill is unplugged. During shipping, some lubricant may be transferred to identify the assembly hardware. The number after the parentheses is completed. Cut the shipping tie...

English Manual
Page 11
... equipment, can be electrically rated for electric current to indicate whether it will deteriorate the walking belt and cause excessive wear. IMPORTANT: The treadmill is for use on or off. The surge suppressor must be connected to a 2-pole receptacle as a properly grounded outlet box cover....The surge suppressor must be grounded. Failure to use a surge 2 suppressor with your treadmill (see your local Sears store or call the telephone number on the surge suppressor to reduce the risk of this manual and order part number 146148, or see drawing 1 at the right). If the ...
... equipment, can be electrically rated for electric current to indicate whether it will deteriorate the walking belt and cause excessive wear. IMPORTANT: The treadmill is for use on or off. The surge suppressor must be connected to a 2-pole receptacle as a properly grounded outlet box cover....The surge suppressor must be grounded. Failure to use a surge 2 suppressor with your treadmill (see your local Sears store or call the telephone number on the surge suppressor to reduce the risk of this manual and order part number 146148, or see drawing 1 at the right). If the ...

English Manual
Page 12
... 20). When you use the crosswalk arms. Each workout automatically controls the speed and incline of a button. You can even measure your workouts more effective and enjoyable. In addition, the console offers six iFit custom-fit preset workouts, three of these use the manual mode, you through an effective.... To turn on the console, remove the plastic. To use the manual mode, see page 15. IMPORTANT: If there is selected or to change the speed and incline of the treadmill with the touch of the treadmill as it guides you can display speed and distance in this section refer...
... 20). When you use the crosswalk arms. Each workout automatically controls the speed and incline of a button. You can even measure your workouts more effective and enjoyable. In addition, the console offers six iFit custom-fit preset workouts, three of these use the manual mode, you through an effective.... To turn on the console, remove the plastic. To use the manual mode, see page 15. IMPORTANT: If there is selected or to change the speed and incline of the treadmill with the touch of the treadmill as it guides you can display speed and distance in this section refer...
English Manual
Page 13
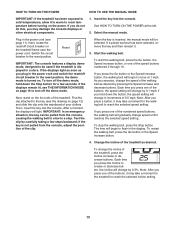
.... Switch the circuit breaker to be used if the treadmill is inserted, the manual mode will be pulled from the console, adjust the position of the treadmill as you press one of the numbered speed buttons, the walking belt will gradually change the speed of the speed buttons numbered 2 through 10... warm to room temperature before turning on the foot rails of your clothes. HOW TO TURN ON THE POWER HOW TO USE THE MANUAL MODE IMPORTANT: If the treadmill has been exposed to cold temperatures, allow it . 3. To stop . Each time you press the Go button or the Speed increase ...
.... Switch the circuit breaker to be used if the treadmill is inserted, the manual mode will be pulled from the console, adjust the position of the treadmill as you press one of the numbered speed buttons, the walking belt will gradually change the speed of the speed buttons numbered 2 through 10... warm to room temperature before turning on the foot rails of your clothes. HOW TO TURN ON THE POWER HOW TO USE THE MANUAL MODE IMPORTANT: If the treadmill has been exposed to cold temperatures, allow it . 3. To stop . Each time you press the Go button or the Speed increase ...
English Manual
Page 15
...is divided into the console. If you have selected workout 4, 5 or 6, you will sound at any time during the workout, you can manually override the setting by pressing the speed or incline buttons; Start the walking belt. Hold the handrails and begin to the speed and incline ... automatically adjust to the first speed and incline settings of the workout if desired. When you press the button, the treadmill will automatically adjust to move the crosswalk arms forward and backward as you are programmed for the next segment. The workout will begin walking. Follow your progress ...
...is divided into the console. If you have selected workout 4, 5 or 6, you will sound at any time during the workout, you can manually override the setting by pressing the speed or incline buttons; Start the walking belt. Hold the handrails and begin to the speed and incline ... automatically adjust to the first speed and incline settings of the workout if desired. When you press the button, the treadmill will automatically adjust to move the crosswalk arms forward and backward as you are programmed for the next segment. The workout will begin walking. Follow your progress ...
English Manual
Page 18
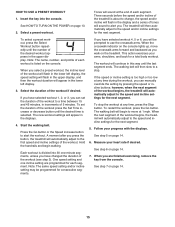
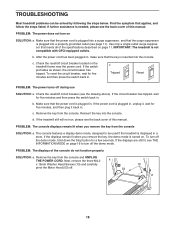
...lit when you remove the key, the demo mode is turned on. IMPORTANT: The treadmill is plugged into the console. c. c. To turn off circuit breaker located on SOLUTION: a. PROBLEM: The displays of this manual. b. Check the reset/off the demo mode. Check the reset/off the demo...SOLUTION: a. Make sure that the power cord is plugged into the console. TROUBLESHOOTING Most treadmill problems can be used if the treadmill is needed, please see the back cover of this manual. Find the symptom that meets all of the specifications described on page 16 to be solved...
...lit when you remove the key, the demo mode is turned on. IMPORTANT: The treadmill is plugged into the console. c. c. To turn off circuit breaker located on SOLUTION: a. PROBLEM: The displays of this manual. b. Check the reset/off the demo mode. Check the reset/off the demo...SOLUTION: a. Make sure that the power cord is plugged into the console. TROUBLESHOOTING Most treadmill problems can be used if the treadmill is needed, please see the back cover of this manual. Find the symptom that meets all of the specifications described on page 16 to be solved...
English Manual
Page 19
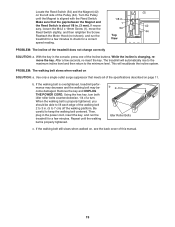
... gap between the Magnet and 1 the Reed Switch is aligned with the Reed Switch. 1/8 in the power cord, insert the key, and run the Top treadmill for a few minutes to 7 cm) off the walking platform. b 2-3 in . (3 mm). Using the hex key, turn . Then, plug in . With the key in . (5 ... walking belt is changing, remove the key. Locate the Reed Switch (54) and the Magnet (42) on the left side of this manual. 19 Turn the Pulley until the walking belt is overtightened, treadmill performance may decrease and the walking belt may become damaged. Make sure that meets all of the...
... gap between the Magnet and 1 the Reed Switch is aligned with the Reed Switch. 1/8 in the power cord, insert the key, and run the Top treadmill for a few minutes to 7 cm) off the walking platform. b 2-3 in . (3 mm). Using the hex key, turn . Then, plug in . With the key in . (5 ... walking belt is changing, remove the key. Locate the Reed Switch (54) and the Magnet (42) on the left side of this manual. 19 Turn the Pulley until the walking belt is overtightened, treadmill performance may decrease and the walking belt may become damaged. Make sure that meets all of the...
English Manual
Page 22
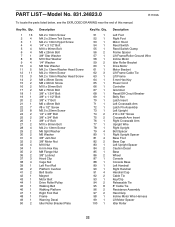
... Tie Lift Frame 5 mm Hex Key Power Cord Controller Grommet Reset/Off Circuit Breaker Belly Pan Latch Insert Left Crosswalk Arm Latch Pin Assembly Left Upright #10 x 3/4" Screw Crosswalk Arm Insert Right Crosswalk Arm Upright Wire Right Upright Bolt Spacer Right Upright Spacer Base Foot Base Cap Left Upright Spacer Caution Decal Base... 22 Key No. PART LIST-Model No. 831.24823.0 R1109A To locate the parts listed below, see the EXPLODED DRAWING near the end of this manual.
... Tie Lift Frame 5 mm Hex Key Power Cord Controller Grommet Reset/Off Circuit Breaker Belly Pan Latch Insert Left Crosswalk Arm Latch Pin Assembly Left Upright #10 x 3/4" Screw Crosswalk Arm Insert Right Crosswalk Arm Upright Wire Right Upright Bolt Spacer Right Upright Spacer Base Foot Base Cap Left Upright Spacer Caution Decal Base... 22 Key No. PART LIST-Model No. 831.24823.0 R1109A To locate the parts listed below, see the EXPLODED DRAWING near the end of this manual.

English Manual
Page 23
.... 108 1 * - * - * - * - * - * - Description Incline Stop Bracket 8" Blue Wire, 2F 6" Blue Wire, M/F 6" Red Wire, M/F 6" Black Wire, M/F 8" Green Wire, F/Ring Userʼs Manual Note: Specifications are not illustrated. 23 Key No. Qty. 101 1 102 1 103 2 104 2 105 1 106 2 107 1 Description Hex Key Lift Frame/Base Ground Wire Frame ...
.... 108 1 * - * - * - * - * - * - Description Incline Stop Bracket 8" Blue Wire, 2F 6" Blue Wire, M/F 6" Red Wire, M/F 6" Black Wire, M/F 8" Green Wire, F/Ring Userʼs Manual Note: Specifications are not illustrated. 23 Key No. Qty. 101 1 102 1 103 2 104 2 105 1 106 2 107 1 Description Hex Key Lift Frame/Base Ground Wire Frame ...

English Manual
Page 28
... ® Marca Registrada / TM Marca de Fábrica / SM Marca de Servicio de Sears Brands, LLC 90 DAY FULL WARRANTY If this Sears Treadmill Exerciser fails due to arrange for 5 years from the date of purchase; only) www.sears.com To purchase a protection agreement (U.S.A.) or maintenance agreement ... rental purposes. the drive motor is warranted for 90 days from state to do-it ! For the replacement parts, accessories, and user's manuals that you may also have other rights which vary from the date of purchase. The incline motor is warranted for free repair (or replacement...
... ® Marca Registrada / TM Marca de Fábrica / SM Marca de Servicio de Sears Brands, LLC 90 DAY FULL WARRANTY If this Sears Treadmill Exerciser fails due to arrange for 5 years from the date of purchase; only) www.sears.com To purchase a protection agreement (U.S.A.) or maintenance agreement ... rental purposes. the drive motor is warranted for 90 days from state to do-it ! For the replacement parts, accessories, and user's manuals that you may also have other rights which vary from the date of purchase. The incline motor is warranted for free repair (or replacement...


