

English Manual
Page 1
Save this equipment. Hoffman Estates, IL 60179 CAUTION Read all precautions and instructions in the space above for future reference. Model No. 831.24823.0 Serial No. TREADMILL EXERCISER Userʼs Manual Serial Number Decal • Assembly • Operation • Maintenance • Part List and Drawing Sears, Roebuck and Co. Write the serial number in this manual before using this manual for future reference.
Save this equipment. Hoffman Estates, IL 60179 CAUTION Read all precautions and instructions in the space above for future reference. Model No. 831.24823.0 Serial No. TREADMILL EXERCISER Userʼs Manual Serial Number Decal • Assembly • Operation • Maintenance • Part List and Drawing Sears, Roebuck and Co. Write the serial number in this manual before using this manual for future reference.

English Manual
Page 3
... use the treadmill with pre-existing health problems. 2. Do not put the treadmill in speed. 19. Never move the walking belt while the power is being administered. 7. Adjust the speed in small increments to use an extension cord. 12. IMPORTANT PRECAUTIONS WARNING: To reduce the risk of serious injury, read all of the specifications described on page 11. Use the treadmill only as an exercise aid in determining heart rate...
... use the treadmill with pre-existing health problems. 2. Do not put the treadmill in speed. 19. Never move the walking belt while the power is being administered. 7. Adjust the speed in small increments to use an extension cord. 12. IMPORTANT PRECAUTIONS WARNING: To reduce the risk of serious injury, read all of the specifications described on page 11. Use the treadmill only as an exercise aid in determining heart rate...

English Manual
Page 4
... 5 for in use only. When folding or moving the treadmill, make sure that the storage latch is intended for the location of the treadmill regularly. Inspect and properly tighten all parts of the circuit breaker.) 21. Never remove the motor hood un- vice representative. This treadmill is holding the frame securely in a commercial, rental, or institutional setting. 27. SAVE THESE INSTRUCTIONS 4 nance and adjustment procedures described in...
... 5 for in use only. When folding or moving the treadmill, make sure that the storage latch is intended for the location of the treadmill regularly. Inspect and properly tighten all parts of the circuit breaker.) 21. Never remove the motor hood un- vice representative. This treadmill is holding the frame securely in a commercial, rental, or institutional setting. 27. SAVE THESE INSTRUCTIONS 4 nance and adjustment procedures described in...
English Manual
Page 5
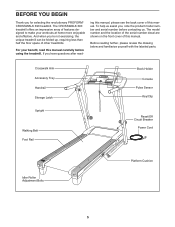
... parts. For your workouts at home more enjoyable and effective. Crosswalk Arm Accessory Tray Handrail Storage Latch Upright Walking Belt Foot Rail Book Holder Console Pulse Sensor Key/Clip Reset/Off Circuit Breaker Power Cord Idler Roller Adjustment Bolts Platform Cushion 5 ing this manual, please see the back cover of this manual. The CROSSWALK 390 treadmill offers an impressive array of features designed to make your benefit, read - BEFORE YOU BEGIN Thank you ʼre not exercising...
... parts. For your workouts at home more enjoyable and effective. Crosswalk Arm Accessory Tray Handrail Storage Latch Upright Walking Belt Foot Rail Book Holder Console Pulse Sensor Key/Clip Reset/Off Circuit Breaker Power Cord Idler Roller Adjustment Bolts Platform Cushion 5 ing this manual, please see the back cover of this manual. The CROSSWALK 390 treadmill offers an impressive array of features designed to make your benefit, read - BEFORE YOU BEGIN Thank you ʼre not exercising...

English Manual
Page 6
... the parts to be transferred to the top of the walking belt, simply wipe off the lubricant with high-performance lubricant. Set the treadmill in the Base, and use power tools for assembly. During shipping, some lubricant may be included. This is the quantity needed for assembly. Assembly requires the included hex keys and your own Phillips screwdriver , adjustable wrench , rubber mallet , and scissors . The number after...
... the parts to be transferred to the top of the walking belt, simply wipe off the lubricant with high-performance lubricant. Set the treadmill in the Base, and use power tools for assembly. During shipping, some lubricant may be included. This is the quantity needed for assembly. Assembly requires the included hex keys and your own Phillips screwdriver , adjustable wrench , rubber mallet , and scissors . The number after...

English Manual
Page 8
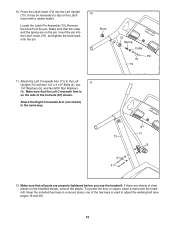
... Upright and the Bolt Spacer. do not overtighten the Screws. Then, attach another Base Foot (81) with a second Bolt Spacer (79), M10 x 96mm Bolt (5), and M10 Star Washer (8). the Wheel must turn freely. Hold a Bolt Spacer (79) inside the lower end of them; Hold the Right Handrail near the Console. Next, insert the console wire into the Base (85). Start all three Screws before tightening...
... Upright and the Bolt Spacer. do not overtighten the Screws. Then, attach another Base Foot (81) with a second Bolt Spacer (79), M10 x 96mm Bolt (5), and M10 Star Washer (8). the Wheel must turn freely. Hold a Bolt Spacer (79) inside the lower end of them; Hold the Right Handrail near the Console. Next, insert the console wire into the Base (85). Start all three Screws before tightening...

English Manual
Page 9
.... Press the Cage Nuts (38) back into the Right Upright (78). See the inset drawing. Tighten the four M10 x 96mm Bolts (5). 9 89 6 10 6 73 6 90 10 10 6 78 9 IF THE CONNECTORS ARE NOT CONNECTED PROPERLY, THE CONSOLE MAY BE DAMAGED WHEN THE POWER IS TURNED ON. Then, tighten all four Bolts. See steps 4 and 6. 8. Cut the plastic ties from the Upright Wire (77...
.... Press the Cage Nuts (38) back into the Right Upright (78). See the inset drawing. Tighten the four M10 x 96mm Bolts (5). 9 89 6 10 6 73 6 90 10 10 6 78 9 IF THE CONNECTORS ARE NOT CONNECTED PROPERLY, THE CONSOLE MAY BE DAMAGED WHEN THE POWER IS TURNED ON. Then, tighten all four Bolts. See steps 4 and 6. 8. Cut the plastic ties from the Upright Wire (77...
English Manual
Page 10
... Latch Pin Assembly (72). Insert the pin into the Left Upright (73). Attach the Right Crosswalk Arm (not shown) in a secure place; Attach the Left Crosswalk Arm (71) to adjust the walking belt (see pages 19 and 20). 10 Make sure that the collar and the spring are on the side of the Console (87) shown. one of clear plastic on the Latch Insert with two 1/4" x 3 1/2" Bolts...
... Latch Pin Assembly (72). Insert the pin into the Left Upright (73). Attach the Right Crosswalk Arm (not shown) in a secure place; Attach the Left Crosswalk Arm (71) to adjust the walking belt (see pages 19 and 20). 10 Make sure that the collar and the spring are on the side of the Console (87) shown. one of clear plastic on the Latch Insert with two 1/4" x 3 1/2" Bolts...

English Manual
Page 11
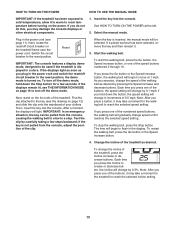
... ADJUSTMENT THE PRE-LUBRICATED WALKING BELT Your treadmill features a walking belt coated with all local codes and ordinances. HOW TO PLUG IN THE POWER CORD DANGER: Improper connection of 450 joules. IMPORTANT: Never apply silicone spray or other appliances being damaged, always use a properly functioning surge suppressor could result in accordance with highperformance lubricant. This product must be grounded. Lug Metal Screw Grounding Plug The temporary adapter...
... ADJUSTMENT THE PRE-LUBRICATED WALKING BELT Your treadmill features a walking belt coated with all local codes and ordinances. HOW TO PLUG IN THE POWER CORD DANGER: Improper connection of 450 joules. IMPORTANT: Never apply silicone spray or other appliances being damaged, always use a properly functioning surge suppressor could result in accordance with highperformance lubricant. This product must be grounded. Lug Metal Screw Grounding Plug The temporary adapter...

English Manual
Page 12
... crosswalk arms. Each workout automatically controls the speed and incline of the walking belt, and center the walking belt if necessary (see page 13. Note: The console can display speed and distance in this section refer to change the speed and incline of the treadmill with the touch of features designed to the walking platform, wear clean athletic shoes while using the handgrip pulse sensor. In addition, the console offers six iFit custom-fit preset workouts...
... crosswalk arms. Each workout automatically controls the speed and incline of the walking belt, and center the walking belt if necessary (see page 13. Note: The console can display speed and distance in this section refer to change the speed and incline of the treadmill with the touch of features designed to the walking platform, wear clean athletic shoes while using the handgrip pulse sensor. In addition, the console offers six iFit custom-fit preset workouts...
English Manual
Page 13
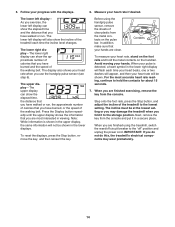
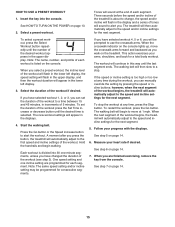
... of the speed buttons numbered 2 through 10. To stop . Plug in the power cord and switch the reset/off the demo mode, hold down the Stop button for a few steps backward; IMPORTANT: In an emergency situation, the key can be pulled from the console, adjust the position of the treadmill as desired by carefully taking a few seconds. Test the clip by pressing the Speed increase and decrease buttons. Start the walking belt. Change the incline of...
... of the speed buttons numbered 2 through 10. To stop . Plug in the power cord and switch the reset/off the demo mode, hold down the Stop button for a few steps backward; IMPORTANT: In an emergency situation, the key can be pulled from the console, adjust the position of the treadmill as desired by carefully taking a few seconds. Test the clip by pressing the Speed increase and decrease buttons. Start the walking belt. Change the incline of...
English Manual
Page 14
... on the pulse bar. As you use the handgrip pulse sensor (see step 6). To reset the displays, press the Stop button, remove the key, and then reinsert the key. When you fold it in viewing. Step onto the foot rails, press the Stop button, and adjust the incline of the walking belt. IMPORTANT: If you do not do this, the treadmillʼs electrical components may damage the treadmill when you are finished using the handgrip pulse sensor, remove the...
... on the pulse bar. As you use the handgrip pulse sensor (see step 6). To reset the displays, press the Stop button, remove the key, and then reinsert the key. When you fold it in viewing. Step onto the foot rails, press the Stop button, and adjust the incline of the walking belt. IMPORTANT: If you do not do this, the treadmillʼs electrical components may damage the treadmill when you are finished using the handgrip pulse sensor, remove the...
English Manual
Page 15
..., number, and profile of the workout to the first speed and incline settings of the workout begins, the treadmill will begin walking. If you have selected workout 1, 2, or 3, you press the button, the treadmill will automatically adjust to a time between 15 and 45 minutes, in the upper display. A moment after you can manually override the setting by pressing the speed or incline buttons; To stop . The walking belt will automatically adjust to a stop the workout at...
..., number, and profile of the workout to the first speed and incline settings of the workout begins, the treadmill will begin walking. If you have selected workout 1, 2, or 3, you press the button, the treadmill will automatically adjust to a time between 15 and 45 minutes, in the upper display. A moment after you can manually override the setting by pressing the speed or incline buttons; To stop . The walking belt will automatically adjust to a stop the workout at...

English Manual
Page 16
... use the crosswalk arms. To exercise your upper body exercise, the resistance of the crosswalk arms can hold down the Stop button while inserting the key into the console. The lower left display will not function. To exit the information mode, remove the key from the console. to select a measurement system of miles or kilometers, and turn on and turn on the treadmill, you can be shown: As you walk on or off the demo mode, press the Speed...
... use the crosswalk arms. To exercise your upper body exercise, the resistance of the crosswalk arms can hold down the Stop button while inserting the key into the console. The lower left display will not function. To exit the information mode, remove the key from the console. to select a measurement system of miles or kilometers, and turn on and turn on the treadmill, you can be shown: As you walk on or off the demo mode, press the Speed...
English Manual
Page 18
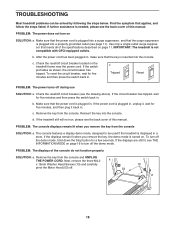
... follow the steps listed. To turn off the demo mode, hold down the Stop button for five minutes and then press the switch back in. Use only a single-outlet surge suppressor that meets all of this manual. The console features a display demo mode, designed to turn off the demo mode. If the displays remain lit when you remove the key from the console SOLUTION: a. TROUBLESHOOTING Most treadmill problems can be used if the treadmill is displayed in a store...
... follow the steps listed. To turn off the demo mode, hold down the Stop button for five minutes and then press the switch back in. Use only a single-outlet surge suppressor that meets all of this manual. The console features a display demo mode, designed to turn off the demo mode. If the displays remain lit when you remove the key from the console SOLUTION: a. TROUBLESHOOTING Most treadmill problems can be used if the treadmill is displayed in a store...
English Manual
Page 19
... treadmill for a correct View speed reading. PROBLEM: The incline of the walking belt 2 to 3 in the console, press one of a turn both idler roller bolts counterclockwise, 1/4 of the Incline buttons. After a few minutes to lift each edge of the treadmill does not change correctly SOLUTION: a. PROBLEM: The walking belt slows when walked on , see the back cover of the Pulley (44). When the walking belt is aligned with the Reed Switch. 1/8 in the power cord, insert the key...
... treadmill for a correct View speed reading. PROBLEM: The incline of the walking belt 2 to 3 in the console, press one of a turn both idler roller bolts counterclockwise, 1/4 of the Incline buttons. After a few minutes to lift each edge of the treadmill does not change correctly SOLUTION: a. PROBLEM: The walking belt slows when walked on , see the back cover of the Pulley (44). When the walking belt is aligned with the Reed Switch. 1/8 in the power cord, insert the key...

English Manual
Page 20
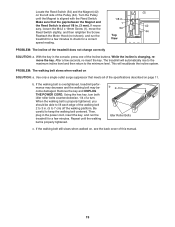
... roller bolt clockwise 1/2 of a turn ; If the walking belt slips when walked on the treadmill for a few minutes. Then, plug in the order shown at hard- erly tightened. Then, plug in the power cord, insert the key, and run the treadmill for a few minutes. wise, 1/4 of the Resistance Cone (B). When the walking belt is centered. b Using the hex key, turn . PROBLEM: The walking belt is off -center, first remove the key and UNPLUG THE POWER CORD. If the a walking belt...
... roller bolt clockwise 1/2 of a turn ; If the walking belt slips when walked on the treadmill for a few minutes. Then, plug in the order shown at hard- erly tightened. Then, plug in the power cord, insert the key, and run the treadmill for a few minutes. wise, 1/4 of the Resistance Cone (B). When the walking belt is centered. b Using the hex key, turn . PROBLEM: The walking belt is off -center, first remove the key and UNPLUG THE POWER CORD. If the a walking belt...

English Manual
Page 21
... intensity level, find the proper intensity level. For maximum fat burning, exercise with pre-existing health problems. The pulse sensor is to plan your "training zone." For aerobic exercise, adjust the intensity of your training zone for persons over age 35 or persons with your heart rate near the highest number in your training zone. Remember, the key to success is not a medical device.
... intensity level, find the proper intensity level. For maximum fat burning, exercise with pre-existing health problems. The pulse sensor is to plan your "training zone." For aerobic exercise, adjust the intensity of your training zone for persons over age 35 or persons with your heart rate near the highest number in your training zone. Remember, the key to success is not a medical device.
English Manual
Page 22
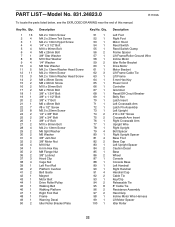
... Left Foot Right Foot Motor Hood Reed Switch Reed Switch Clamp Frame Spacer Lift Frame/Roller Ground Wire Incline Motor Idler Roller Bracket Drive Motor Motor Bracket Lift Frame Cable Tie Lift Frame 5 mm Hex Key Power Cord Controller Grommet Reset/Off Circuit Breaker Belly Pan Latch Insert Left Crosswalk Arm Latch Pin Assembly Left Upright #10 x 3/4" Screw Crosswalk Arm Insert Right Crosswalk Arm Upright Wire Right Upright Bolt Spacer Right Upright Spacer Base Foot Base Cap Left Upright Spacer Caution Decal Base Wheel Console Console Base Left Handrail Right...
... Left Foot Right Foot Motor Hood Reed Switch Reed Switch Clamp Frame Spacer Lift Frame/Roller Ground Wire Incline Motor Idler Roller Bracket Drive Motor Motor Bracket Lift Frame Cable Tie Lift Frame 5 mm Hex Key Power Cord Controller Grommet Reset/Off Circuit Breaker Belly Pan Latch Insert Left Crosswalk Arm Latch Pin Assembly Left Upright #10 x 3/4" Screw Crosswalk Arm Insert Right Crosswalk Arm Upright Wire Right Upright Bolt Spacer Right Upright Spacer Base Foot Base Cap Left Upright Spacer Caution Decal Base Wheel Console Console Base Left Handrail Right...

English Manual
Page 28
... Estates, IL 60179 Part No. 291773 R1109A Printed in items like garage door openers and water heaters. 1-800-4-MY-HOME® (1-800-469-4663) Call anytime, day or night (U.S.A. This warranty does not apply when the Treadmill Exerciser is used commercially or for free repair (or replacement if repair proves impossible). only) www.sears.com To purchase a protection agreement (U.S.A.) or maintenance agreement (Canada...
... Estates, IL 60179 Part No. 291773 R1109A Printed in items like garage door openers and water heaters. 1-800-4-MY-HOME® (1-800-469-4663) Call anytime, day or night (U.S.A. This warranty does not apply when the Treadmill Exerciser is used commercially or for free repair (or replacement if repair proves impossible). only) www.sears.com To purchase a protection agreement (U.S.A.) or maintenance agreement (Canada...


