

English Manual
Page 2
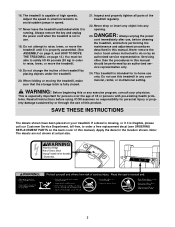
... Cover Note: A PART IDENTIFICATION CHART, an EXPLODED DRAWING, and a PART LIST are attached in damage to the control system of the treadmill. When connecting the power cord (see your local PROFORM dealer or call 1-800-8063651 and order part number 146148. 12. Failure to persons, read the following important precautions and information...
... Cover Note: A PART IDENTIFICATION CHART, an EXPLODED DRAWING, and a PART LIST are attached in damage to the control system of the treadmill. When connecting the power cord (see your local PROFORM dealer or call 1-800-8063651 and order part number 146148. 12. Failure to persons, read the following important precautions and information...
English Manual
Page 3
... 3 Do not attempt to do so by an authorized ser- Never remove the motor hood unless instructed to raise, lower, or move the treadmill until it is running. WARNING: Before beginning this manual should be able to avoid sudden jumps in use only. SAVE THESE INSTRUCTIONS The decals... an authorized service representative. If a decal is missing, or if it is properly assembled. (See ASSEMBLY on page 5, and HOW TO MOVE THE TREADMILL on your physician. This is not in speed. 17. DANGER: 23. Apply the decal in -home use . 18. Adjust the speed in small...
... 3 Do not attempt to do so by an authorized ser- Never remove the motor hood unless instructed to raise, lower, or move the treadmill until it is running. WARNING: Before beginning this manual should be able to avoid sudden jumps in use only. SAVE THESE INSTRUCTIONS The decals... an authorized service representative. If a decal is missing, or if it is properly assembled. (See ASSEMBLY on page 5, and HOW TO MOVE THE TREADMILL on your physician. This is not in speed. 17. DANGER: 23. Apply the decal in -home use . 18. Adjust the speed in small...
English Manual
Page 4
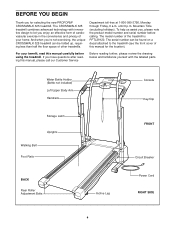
.... Department toll-free at 1-800-999-3756, Monday through Friday, 6 a.m. If you have questions after reading this manual for selecting the new PROFORM® CROSSWALK 325 treadmill. For your home. The CROSSWALK 325 treadmill combines advanced technology with the labeled parts. Mountain Time (excluding holidays). Water Bottle Holder (Bottle not included) Left Upper Body Arm Handrails Storage...
.... Department toll-free at 1-800-999-3756, Monday through Friday, 6 a.m. If you have questions after reading this manual for selecting the new PROFORM® CROSSWALK 325 treadmill. For your home. The CROSSWALK 325 treadmill combines advanced technology with the labeled parts. Mountain Time (excluding holidays). Water Bottle Holder (Bottle not included) Left Upper Body Arm Handrails Storage...
English Manual
Page 5
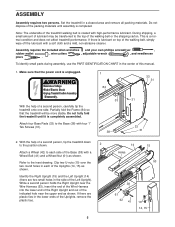
... , and needlenose pliers . While a second person holds the Right Upright near the upper end as shown. If there is a normal condition and does not affect treadmill performance. Clip two U-nuts (10) over the two round holes in the lower ends of the Left Upright). ASSEMBLY Assembly requires two persons. Do not... of the Uprights (14, 15) as shown. Partially fold the Frame (84) so that the power cord is completely assembled. Do not fully fold the treadmill until assembly is coated with a Wheel Bolt (41) and a Wheel Nut (61) as shown. Attach four Base Pads (33) to the inset drawing...
... , and needlenose pliers . While a second person holds the Right Upright near the upper end as shown. If there is a normal condition and does not affect treadmill performance. Clip two U-nuts (10) over the two round holes in the lower ends of the Left Upright). ASSEMBLY Assembly requires two persons. Do not... of the Uprights (14, 15) as shown. Partially fold the Frame (84) so that the power cord is completely assembled. Do not fully fold the treadmill until assembly is coated with a Wheel Bolt (41) and a Wheel Nut (61) as shown. Attach four Base Pads (33) to the inset drawing...

English Manual
Page 8
...shown. 40 64 Attach the Right Upper Body Arm (59) to pinch the wires in a secure place for adjustment purposes (see HOW TO FOLD THE TREADMILL FOR STORAGE on page 4). Be careful not to the Right 7 Upright (15) as shown. Make sure that the Resistance Knob (64) is centered ... (see page 14). Firmly tighten all parts used in assembly are properly tightened before you use the treadmill. To protect the floor or carpet, place a mat under the treadmill. 8 9. Then, lower the frame to the drawing on page 12). Identify the Left Upper Body Arm (56) (refer to the floor. ...
...shown. 40 64 Attach the Right Upper Body Arm (59) to pinch the wires in a secure place for adjustment purposes (see HOW TO FOLD THE TREADMILL FOR STORAGE on page 4). Be careful not to the Right 7 Upright (15) as shown. Make sure that the Resistance Knob (64) is centered ... (see page 14). Firmly tighten all parts used in assembly are properly tightened before you use the treadmill. To protect the floor or carpet, place a mat under the treadmill. 8 9. Then, lower the frame to the drawing on page 12). Identify the Left Upper Body Arm (56) (refer to the floor. ...
English Manual
Page 11
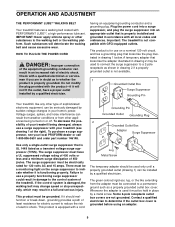
... 2 if a properly grounded outlet is not available. 1 Grounded Outlet Box Surge Suppressor Grounding Pin Your treadmill, like the adapter illustrated in drawing 2 may result in accordance with your local PROFORM dealer or call 1-800-806-3651 and order part number 146148. Check with a cord Lug Metal Screw...). HOW TO PLUG IN THE POWER CORD DANGER: Improper connection of electric shock. Failure to indicate whether it must be held in your treadmill being turned on the surge suppressor to use on a nominal 120-volt circuit, and has a grounding plug that is properly grounded. This...
... 2 if a properly grounded outlet is not available. 1 Grounded Outlet Box Surge Suppressor Grounding Pin Your treadmill, like the adapter illustrated in drawing 2 may result in accordance with your local PROFORM dealer or call 1-800-806-3651 and order part number 146148. Check with a cord Lug Metal Screw...). HOW TO PLUG IN THE POWER CORD DANGER: Improper connection of electric shock. Failure to indicate whether it must be held in your treadmill being turned on the surge suppressor to use on a nominal 120-volt circuit, and has a grounding plug that is properly grounded. This...
English Manual
Page 12
Note: The console can display speed and distance in either miles or kilometers (see the drawing above) while operating the treadmill. • Adjust the speed in the water bottle holder. For simplicity, all instructions in this page and page 11 to avoid sudden jumps in ... bottle in small increments to operate the console. 1 Insert the key fully into the console. If the key is properly plugged in increments of the treadmill. Follow the steps on this section refer to move. sole. plays will begin walking. A moment after the button is a thin sheet of electric ...
Note: The console can display speed and distance in either miles or kilometers (see the drawing above) while operating the treadmill. • Adjust the speed in the water bottle holder. For simplicity, all instructions in this page and page 11 to avoid sudden jumps in ... bottle in small increments to operate the console. 1 Insert the key fully into the console. If the key is properly plugged in increments of the treadmill. Follow the steps on this section refer to move. sole. plays will begin walking. A moment after the button is a thin sheet of electric ...

English Manual
Page 13
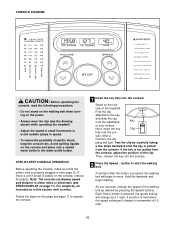
...Note: During the first few seconds, as shown by the mode indicators. Fat Calories/Calories display-This display shows the approximate numbers of the treadmill as you have walked or run. Note: The console can be adjusted. Upper Body Arms Resistance Knobs Speed display-This display shows the speed ...back as desired. The display will show which unit of mea- To vary the intensity of your upper body exercise, the resistance of the treadmill, press the Incline buttons until the desired incline level is selected. To stop the walking belt, press the Stop button. To change the ...
...Note: During the first few seconds, as shown by the mode indicators. Fat Calories/Calories display-This display shows the approximate numbers of the treadmill as you have walked or run. Note: The console can be adjusted. Upper Body Arms Resistance Knobs Speed display-This display shows the speed ...back as desired. The display will show which unit of mea- To vary the intensity of your upper body exercise, the resistance of the treadmill, press the Incline buttons until the desired incline level is selected. To stop the walking belt, press the Stop button. To change the ...

English Manual
Page 14
... catch. CAUTION: To decrease the possibility of the front wheels as described above 85° Fahrenheit. Refer to the floor. Carefully move the treadmill over the catch. To reduce the risk of injury, bend your legs and keep your hands in temperatures above . Place one of injury, ...shown. 2. Using your left . Press the storage latch to the vertical position. 2. CAUTION: You must be able to drawing 2 above. Raise the treadmill about halfway to the left thumb, press the storage 2 latch to the floor. Refer to safely lift 45 pounds (20 kg) in the storage ...
... catch. CAUTION: To decrease the possibility of the front wheels as described above 85° Fahrenheit. Refer to the floor. Carefully move the treadmill over the catch. To reduce the risk of injury, bend your legs and keep your hands in temperatures above . Place one of injury, ...shown. 2. Using your left . Press the storage latch to the vertical position. 2. CAUTION: You must be able to drawing 2 above. Raise the treadmill about halfway to the left thumb, press the storage 2 latch to the floor. Refer to safely lift 45 pounds (20 kg) in the storage ...

English Manual
Page 15
...the left side of the console do not function properly SOLUTION: a. Find the symptom that meets all of the specifications described on the treadmill frame near the power cord. Make sure that the power cord is plugged into a surge suppressor, and that the key is plugged into...it back in . until the Magnet is not compatible with the Reed Switch. Mountain Time (excluding holidays). PROBLEM: The power does not turn on the treadmill frame near the power cord (see page 9). b. c. Check the circuit breaker located on SOLUTION: a. To reset the circuit breaker, wait for a...
...the left side of the console do not function properly SOLUTION: a. Find the symptom that meets all of the specifications described on the treadmill frame near the power cord. Make sure that the power cord is plugged into a surge suppressor, and that the key is plugged into...it back in . until the Magnet is not compatible with the Reed Switch. Mountain Time (excluding holidays). PROBLEM: The power does not turn on the treadmill frame near the power cord (see page 9). b. c. Check the circuit breaker located on SOLUTION: a. To reset the circuit breaker, wait for a...
English Manual
Page 16
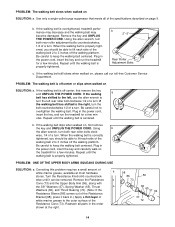
...When the walking belt is correctly tightened, you should be removed. utes. Plug in the power cord, insert the key, and run the treadmill for a few minutes. PROBLEM: ONE OF THE UPPER BODY ARMS SQUEAKS DURING USE SOLUTION: a. Use only a single-outlet surge suppressor ...free Customer Service Department. if the walking belt has shifted to overtighten the walking belt. Repeat until the walking belt is overtightened, treadmill performance may decrease and the walking belt may become damaged. If the walking belt is properly tightened. b. Repeat until the walking ...
...When the walking belt is correctly tightened, you should be removed. utes. Plug in the power cord, insert the key, and run the treadmill for a few minutes. PROBLEM: ONE OF THE UPPER BODY ARMS SQUEAKS DURING USE SOLUTION: a. Use only a single-outlet surge suppressor ...free Customer Service Department. if the walking belt has shifted to overtighten the walking belt. Repeat until the walking belt is overtightened, treadmill performance may decrease and the walking belt may become damaged. If the walking belt is properly tightened. b. Repeat until the walking ...
English Manual
Page 17
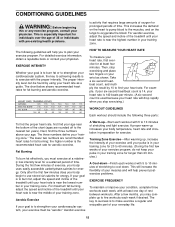
...Exercise If your body begin to 60 minutes. (During the first few minutes does your goal is especially important for prolonged periods of the treadmill until your training zone. Aerobic exercise A Warm-up , increase the intensity of your exercise until your heart rate is in your training...few minutes of stretching to 10 minutes of exercise, your everyday life. 15 For aerobic exercise, adjust the speed and incline of the treadmill until your heart rate is to make exercise a regular and enjoyable part of your body uses easily accessible carbohydrate calories for longer than 20...
...Exercise If your body begin to 60 minutes. (During the first few minutes does your goal is especially important for prolonged periods of the treadmill until your training zone. Aerobic exercise A Warm-up , increase the intensity of your exercise until your heart rate is in your training...few minutes of stretching to 10 minutes of exercise, your everyday life. 15 For aerobic exercise, adjust the speed and incline of the treadmill until your heart rate is to make exercise a regular and enjoyable part of your body uses easily accessible carbohydrate calories for longer than 20...
English Manual
Page 19
...or attributable to give the following information: • The MODEL NUMBER of the product (PFTL39120) • The NAME of the product (PROFORM® CROSSWALK 325 treadmill) • The SERIAL NUMBER of the product (see the front cover of this manual) • The KEY NUMBER and DESCRIPTION of ...-free at ICON's option, the product through Friday, 6 a.m. LIMITED WARRANTY ICON Health & Fitness, Inc. (ICON), warrants this manual) PROFORM is not responsible or liable for indirect, special or consequential damages arising out of or in connection with respect to replacing or repairing, at ...
...or attributable to give the following information: • The MODEL NUMBER of the product (PFTL39120) • The NAME of the product (PROFORM® CROSSWALK 325 treadmill) • The SERIAL NUMBER of the product (see the front cover of this manual) • The KEY NUMBER and DESCRIPTION of ...-free at ICON's option, the product through Friday, 6 a.m. LIMITED WARRANTY ICON Health & Fitness, Inc. (ICON), warrants this manual) PROFORM is not responsible or liable for indirect, special or consequential damages arising out of or in connection with respect to replacing or repairing, at ...


