
English Manual
Page 1
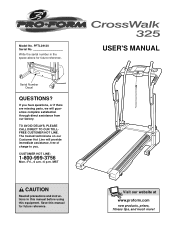
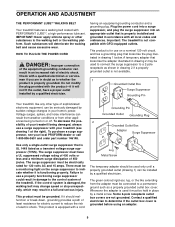
... factory. Save this equipment. Model No. MST CAUTION Read all precautions and instructions in the space above for future reference. Write the serial number in this manual before using this manual for future reference. TO AVOID DELAYS, PLEASE CALL DIRECT TO OUR TOLLFREE CUSTOMER HOT LINE. USER'S MANUAL Visit our website at www.proform.com new products, prizes, fitness tips, and much more...
... factory. Save this equipment. Model No. MST CAUTION Read all precautions and instructions in the space above for future reference. Write the serial number in this manual before using this manual for future reference. TO AVOID DELAYS, PLEASE CALL DIRECT TO OUR TOLLFREE CUSTOMER HOT LINE. USER'S MANUAL Visit our website at www.proform.com new products, prizes, fitness tips, and much more...

English Manual
Page 2
... change speed or stop unexpectedly, which may result in a fall and serious injury. 13. Do not operate the treadmill if the power cord or plug is damaged, or if the treadmill is not working properly.) 15. TABLE OF CONTENTS IMPORTANT PRECAUTIONS 2 BEFORE YOU BEGIN 4 ASSEMBLY 5 OPERATION AND ADJUSTMENT 9 HOW TO FOLD AND MOVE THE TREADMILL 12 MAINTENANCE AND TROUBLE-SHOOTING 13 CONDITIONING GUIDELINES 15 ORDERING REPLACEMENT PARTS Back Cover LIMITED WARRANTY...
... change speed or stop unexpectedly, which may result in a fall and serious injury. 13. Do not operate the treadmill if the power cord or plug is damaged, or if the treadmill is not working properly.) 15. TABLE OF CONTENTS IMPORTANT PRECAUTIONS 2 BEFORE YOU BEGIN 4 ASSEMBLY 5 OPERATION AND ADJUSTMENT 9 HOW TO FOLD AND MOVE THE TREADMILL 12 MAINTENANCE AND TROUBLE-SHOOTING 13 CONDITIONING GUIDELINES 15 ORDERING REPLACEMENT PARTS Back Cover LIMITED WARRANTY...
English Manual
Page 3
... setting. Inspect and properly tighten all instructions before Assembly /Disassembly. 3 Adjust the speed in order to order a free replacement decal (see ORDERING REPLACEMENT PARTS on the back cover of this or any opening. Do not change the incline of the treadmill by an authorized service representative. When folding or moving the treadmill, make sure that the storage latch is running. Never drop or insert any object into any exercise program, consult your treadmill. Never remove the motor hood...
... setting. Inspect and properly tighten all instructions before Assembly /Disassembly. 3 Adjust the speed in order to order a free replacement decal (see ORDERING REPLACEMENT PARTS on the back cover of this or any opening. Do not change the incline of the treadmill by an authorized service representative. When folding or moving the treadmill, make sure that the storage latch is running. Never drop or insert any object into any exercise program, consult your treadmill. Never remove the motor hood...
English Manual
Page 4
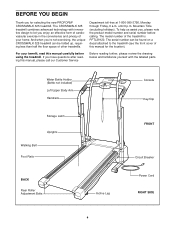
... Storage Latch Uprights Walking Belt Foot Rails BACK Rear Roller Adjustment Bolts Incline Leg Console Key/Clip FRONT Circuit Breaker Power Cord RIGHT SIDE 4 Department toll-free at 1-800-999-3756, Monday through Friday, 6 a.m. The model number of the treadmill is PFTL39120. For your home. BEFORE YOU BEGIN Thank you enjoy an effective form of cardiovascular exercise in the convenience and privacy of your benefit, read this manual for selecting the new PROFORM® CROSSWALK 325 treadmill...
... Storage Latch Uprights Walking Belt Foot Rails BACK Rear Roller Adjustment Bolts Incline Leg Console Key/Clip FRONT Circuit Breaker Power Cord RIGHT SIDE 4 Department toll-free at 1-800-999-3756, Monday through Friday, 6 a.m. The model number of the treadmill is PFTL39120. For your home. BEFORE YOU BEGIN Thank you enjoy an effective form of cardiovascular exercise in the convenience and privacy of your benefit, read this manual for selecting the new PROFORM® CROSSWALK 325 treadmill...
English Manual
Page 5
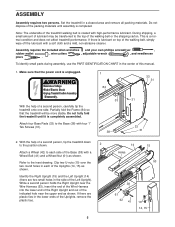
... parts during assembly, use the PART IDENTIFICATION CHART in each side of the Uprights, remove the plastic ties. 5 14 Holes 15 53 38 61 42 41 10 14, 15 Refer to the Base (38) with a Wheel Bolt (41) and a Wheel Nut (61) as shown. If there is completely assembled. During shipping, a small amount of the walking belt, simply wipe off the lubricant...
... parts during assembly, use the PART IDENTIFICATION CHART in each side of the Uprights, remove the plastic ties. 5 14 Holes 15 53 38 61 42 41 10 14, 15 Refer to the Base (38) with a Wheel Bolt (41) and a Wheel Nut (61) as shown. If there is completely assembled. During shipping, a small amount of the walking belt, simply wipe off the lubricant...
English Manual
Page 6
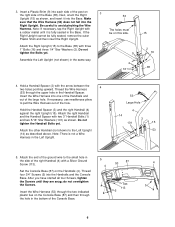
... started all four Screws, tighten the Screws until it into the Base. Attach the end of the right Handrail (4) with three 1" Bolts (16) and three 1/4" Star Washers (2). Make sure that the Wire Harness (53) does not fall into one of the Handrails and out of the Console Base. 5 4 53 87 Ties 113 5 4 5 6 If the Right Upright cannot be fully seated, remove...
... started all four Screws, tighten the Screws until it into the Base. Attach the end of the right Handrail (4) with three 1" Bolts (16) and three 1/4" Star Washers (2). Make sure that the Wire Harness (53) does not fall into one of the Handrails and out of the Console Base. 5 4 53 87 Ties 113 5 4 5 6 If the Right Upright cannot be fully seated, remove...
English Manual
Page 7
... Console. Attach the Storage Latch (102) to overtighten 8 the Screws. If the connector does not fit easily, rotate it and then connect it. Then, cut off the ends of the plastic ties. 53 87 11 5 55 8. Set the Console (11) in the side of the Console Base (87) to discharge any wires. Be careful not to the left Upright (14) with two 3/4" Screws...
... Console. Attach the Storage Latch (102) to overtighten 8 the Screws. If the connector does not fit easily, rotate it and then connect it. Then, cut off the ends of the plastic ties. 53 87 11 5 55 8. Set the Console (11) in the side of the Console Base (87) to discharge any wires. Be careful not to the left Upright (14) with two 3/4" Screws...

English Manual
Page 8
... Resistance Knob (64) is centered between the two Handrails (4). Firmly tighten all parts used in assembly are properly tightened before you use the treadmill. Then, lower the frame to pinch the wires in a secure place for adjustment purposes (see HOW TO FOLD THE TREADMILL FOR STORAGE on page 4). Hold the Left Upper Body Arm near the 9 Left Upright (14) as described above. Attach the Left Upper Body Arm to the Left Upright...
... Resistance Knob (64) is centered between the two Handrails (4). Firmly tighten all parts used in assembly are properly tightened before you use the treadmill. Then, lower the frame to pinch the wires in a secure place for adjustment purposes (see HOW TO FOLD THE TREADMILL FOR STORAGE on page 4). Hold the Left Upper Body Arm near the 9 Left Upright (14) as described above. Attach the Left Upper Body Arm to the Left Upright...
English Manual
Page 9
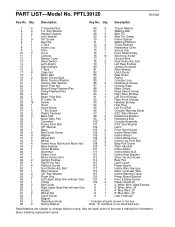
... Key/Clip 71 1 Walking Platform 7 1 3" Bolt 72 2 Thrust Bearing 8 1 Incline Leg 73 2 Resistance Cone 9 2 Shim 74 1 Sensor Clip 10 4 U-nut 75 1 Front Roller/Pulley 11 1 Console 76 10 Electronic Screw 12 1 Battery Cover 77 1 Ground Wire 13 1 Reed Switch 78 2 Rear Roller Adj. PART LIST-Model No. See the back cover of the user's manual for information about ordering replacement parts. Qty. Specifications are subject to change without notice. Bolt 14 1 Left Upright 79 1 Left Rear Endcap 15 1 Right Upright 80 1 Upright Grommet 16 6 1" Bolt...
... Key/Clip 71 1 Walking Platform 7 1 3" Bolt 72 2 Thrust Bearing 8 1 Incline Leg 73 2 Resistance Cone 9 2 Shim 74 1 Sensor Clip 10 4 U-nut 75 1 Front Roller/Pulley 11 1 Console 76 10 Electronic Screw 12 1 Battery Cover 77 1 Ground Wire 13 1 Reed Switch 78 2 Rear Roller Adj. PART LIST-Model No. See the back cover of the user's manual for information about ordering replacement parts. Qty. Specifications are subject to change without notice. Bolt 14 1 Left Upright 79 1 Left Rear Endcap 15 1 Right Upright 80 1 Upright Grommet 16 6 1" Bolt...

English Manual
Page 10
PART IDENTIFICATION CHART Remove this chart and the EXPLODED DRAWING/PART LIST for future reference. 3/8" Star Washer (54)-4 U-Nut (10)-4 1" Bolt (16)-6 5/16" Star Washer (101)-4 1/4" Star Washer (2)-6 (May be an internal Star Washer) Silver Ground Screw (113)-1 3/4" Screw (5)-13 1" Tek Screw (31)-4 3" Bolt (7)-4 Wheel Bolt (41)-2 Washer (40)-4 Wheel Nut (61)-2 3" Handrail Bolt (1)-4 Save this chart and use it to identify small parts during assembly.
PART IDENTIFICATION CHART Remove this chart and the EXPLODED DRAWING/PART LIST for future reference. 3/8" Star Washer (54)-4 U-Nut (10)-4 1" Bolt (16)-6 5/16" Star Washer (101)-4 1/4" Star Washer (2)-6 (May be an internal Star Washer) Silver Ground Screw (113)-1 3/4" Screw (5)-13 1" Tek Screw (31)-4 3" Bolt (7)-4 Wheel Bolt (41)-2 Washer (40)-4 Wheel Nut (61)-2 3" Handrail Bolt (1)-4 Save this chart and use it to identify small parts during assembly.
English Manual
Page 11
... a qualified electrician to the walking belt or the walking platform. Some 2-pole receptacle outlet box covers are in place by sudden voltage changes in accordance with your home's power. Important: The treadmill is properly installed and grounded in your treadmill (see your treadmill being turned on the surge suppressor to use on a nominal 120-volt circuit, and has a grounding plug that is not compatible...
... a qualified electrician to the walking belt or the walking platform. Some 2-pole receptacle outlet box covers are in place by sudden voltage changes in accordance with your home's power. Important: The treadmill is properly installed and grounded in your treadmill (see your treadmill being turned on the surge suppressor to use on a nominal 120-volt circuit, and has a grounding plug that is not compatible...
English Manual
Page 12
..., the speed setting will change the speed of plastic on the console, remove the plastic. sole. Find the clip attached to miles. A moment after the button is pressed, the walking belt will light. Follow the steps on the foot rails of your clothes. Stand on this section refer to the key, and slide the clip onto the waistband Key of the treadmill. For simplicity, all instructions in...
..., the speed setting will change the speed of plastic on the console, remove the plastic. sole. Find the clip attached to miles. A moment after the button is pressed, the walking belt will light. Follow the steps on the foot rails of your clothes. Stand on this section refer to the key, and slide the clip onto the waistband Key of the treadmill. For simplicity, all instructions in...

English Manual
Page 13
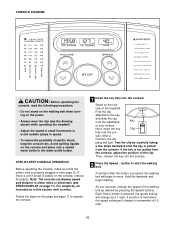
... the Speed display will show which unit of the upper body arms can display speed and distance in the Time/ Distance display. Step onto the foot rails, press the Stop button, and remove the key from one number to the other every few seconds, as you walk on the treadmill, hold the Stop button for a total body workout, move the upper body arms forward and back as shown by the mode indicators. An "E" for English miles or...
... the Speed display will show which unit of the upper body arms can display speed and distance in the Time/ Distance display. Step onto the foot rails, press the Stop button, and remove the key from one number to the other every few seconds, as you walk on the treadmill, hold the Stop button for a total body workout, move the upper body arms forward and back as shown by the mode indicators. An "E" for English miles or...

English Manual
Page 14
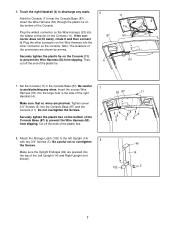
... the treadmill in the storage position in the locations shown at the right. Tilt the treadmill back until the frame and foot rail are past the storage latch. 2. HOW TO LOWER THE TREADMILL FOR USE Base Front Wheels 1. HOW TO FOLD AND MOVE THE TREADMILL HOW TO FOLD THE TREADMILL FOR STORAGE 1 Before folding the treadmill, unplug the power cord. CAUTION: To decrease the possibility of injury, bend your legs...
... the treadmill in the storage position in the locations shown at the right. Tilt the treadmill back until the frame and foot rail are past the storage latch. 2. HOW TO LOWER THE TREADMILL FOR USE Base Front Wheels 1. HOW TO FOLD AND MOVE THE TREADMILL HOW TO FOLD THE TREADMILL FOR STORAGE 1 Before folding the treadmill, unplug the power cord. CAUTION: To decrease the possibility of injury, bend your legs...

English Manual
Page 15
... located on the treadmill frame near the power cord. b. If necessary, loosen the Reed Switch Screw (89) and move the Reed Switch slightly. Make sure that the power cord is plugged into the console. c Tripped Reset PROBLEM: The power turns off during use SOLUTION: a. above). If the circuit breaker has tripped, wait for a correct speed reading. c. Reinsert the key fully into a surge suppressor, and that applies, and follow the steps listed. If the treadmill...
... located on the treadmill frame near the power cord. b. If necessary, loosen the Reed Switch Screw (89) and move the Reed Switch slightly. Make sure that the power cord is plugged into the console. c Tripped Reset PROBLEM: The power turns off during use SOLUTION: a. above). If the circuit breaker has tripped, wait for a correct speed reading. c. Reinsert the key fully into a surge suppressor, and that applies, and follow the steps listed. If the treadmill...
English Manual
Page 16
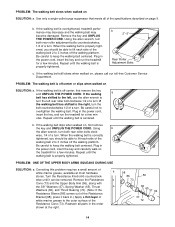
... marine grease, available at the right. If the walking belt is properly tightened. Using the allen wrench, turn both rear roller bolts clock- b. Repeat until the walking belt is properly tightened. PROBLEM: ONE OF THE UPPER BODY ARMS SQUEAKS DURING USE SOLUTION: a. Correcting this problem requires a small amount of the specifications described on , first remove the key and UNPLUG THE POWER CORD. PROBLEM: The walking belt slows when walked on , please call our toll-free Customer Service Department...
... marine grease, available at the right. If the walking belt is properly tightened. Using the allen wrench, turn both rear roller bolts clock- b. Repeat until the walking belt is properly tightened. PROBLEM: ONE OF THE UPPER BODY ARMS SQUEAKS DURING USE SOLUTION: a. Correcting this problem requires a small amount of the specifications described on , first remove the key and UNPLUG THE POWER CORD. PROBLEM: The walking belt slows when walked on , please call our toll-free Customer Service Department...
English Manual
Page 17
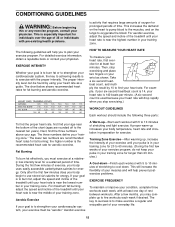
... chart (ages are recommended heart rates for fat burning; the higher number is to burn fat, adjust the speed and incline of the treadmill until your heart rate is near the highest number in your training zone. Aerobic exercise A Warm-up , increase the intensity of your exercise until your heart rate is used because your heart rate will help prevent postexercise problems. EXERCISE FREQUENCY To maintain or improve your exercise program. For detailed exercise information...
... chart (ages are recommended heart rates for fat burning; the higher number is to burn fat, adjust the speed and incline of the treadmill until your heart rate is near the highest number in your training zone. Aerobic exercise A Warm-up , increase the intensity of your exercise until your heart rate is used because your heart rate will help prevent postexercise problems. EXERCISE FREQUENCY To maintain or improve your exercise program. For detailed exercise information...
English Manual
Page 18
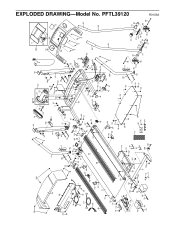
... 98 73 64 37 72 37 66 65 65 64 66 37 72 54 37 12 55 59 73 86 98 99 R0103A EXPLODED DRAWING-Model No.
... 98 73 64 37 72 37 66 65 65 64 66 37 72 54 37 12 55 59 73 86 98 99 R0103A EXPLODED DRAWING-Model No.
English Manual
Page 19
... MODEL NUMBER of the product (PFTL39120) • The NAME of the product (PROFORM® CROSSWALK 325 treadmill) • The SERIAL NUMBER of the product (see the front cover of this manual) • The KEY NUMBER and DESCRIPTION of the desired part(s) (see the PART LIST and the EXPLODED DRAWING in USA © 2003 ICON Health & Fitness, Inc. Mountain Time (excluding holidays). All repairs for commercial or rental purposes; This warranty...
... MODEL NUMBER of the product (PFTL39120) • The NAME of the product (PROFORM® CROSSWALK 325 treadmill) • The SERIAL NUMBER of the product (see the front cover of this manual) • The KEY NUMBER and DESCRIPTION of the desired part(s) (see the PART LIST and the EXPLODED DRAWING in USA © 2003 ICON Health & Fitness, Inc. Mountain Time (excluding holidays). All repairs for commercial or rental purposes; This warranty...

