
English Manual
Page 3
Always remove the key and unplug the power cord when the treadmill is illegible, please call our Customer Service Department, toll-free, to do so by an authorized ser- ...
Always remove the key and unplug the power cord when the treadmill is illegible, please call our Customer Service Department, toll-free, to do so by an authorized ser- ...
English Manual
Page 4
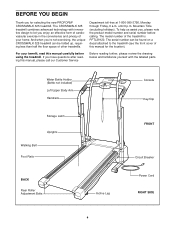
... enjoy an effective form of cardiovascular exercise in the convenience and privacy of your benefit, read this manual for selecting the new PROFORM® CROSSWALK 325 treadmill. The model number of the treadmill is PFTL39120. Water Bottle Holder (Bottle not included) Left Upper Body Arm Handrails Storage... Uprights Walking Belt Foot Rails BACK Rear Roller Adjustment Bolts Incline Leg Console Key/Clip FRONT Circuit Breaker Power Cord RIGHT SIDE 4 To help us assist you 're not exercising, the unique CROSSWALK 325 treadmill can be folded up, requiring less than half the floor space of...
... enjoy an effective form of cardiovascular exercise in the convenience and privacy of your benefit, read this manual for selecting the new PROFORM® CROSSWALK 325 treadmill. The model number of the treadmill is PFTL39120. Water Bottle Holder (Bottle not included) Left Upper Body Arm Handrails Storage... Uprights Walking Belt Foot Rails BACK Rear Roller Adjustment Bolts Incline Leg Console Key/Clip FRONT Circuit Breaker Power Cord RIGHT SIDE 4 To help us assist you 're not exercising, the unique CROSSWALK 325 treadmill can be folded up, requiring less than half the floor space of...
English Manual
Page 9
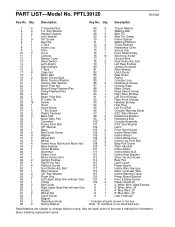
...6 1/4" Star Washer 67 1 Walking Belt 3 2 Handrail Spacer 68 3 Wire Tie 4 1 Left Handrail 69 4 Wire Tie Clamp 5 9 3/4" Screw 70 2 Frame Spacer 6 1 Key/Clip 71 1 Walking Platform 7 1 3" Bolt 72 2 Thrust Bearing 8 1 Incline Leg 73 2 Resistance Cone 9 2 Shim 74 1 Sensor Clip 10 4 U-nut 75 1 Front Roller/Pulley... Includes all parts shown in the box 65 2 Spring Washer Note: "#" indicates a non-illustrated part. PFTL39120 R0103A Key No. See the back cover of the user's manual for information about ordering replacement parts. Description...
...6 1/4" Star Washer 67 1 Walking Belt 3 2 Handrail Spacer 68 3 Wire Tie 4 1 Left Handrail 69 4 Wire Tie Clamp 5 9 3/4" Screw 70 2 Frame Spacer 6 1 Key/Clip 71 1 Walking Platform 7 1 3" Bolt 72 2 Thrust Bearing 8 1 Incline Leg 73 2 Resistance Cone 9 2 Shim 74 1 Sensor Clip 10 4 U-nut 75 1 Front Roller/Pulley... Includes all parts shown in the box 65 2 Spring Washer Note: "#" indicates a non-illustrated part. PFTL39120 R0103A Key No. See the back cover of the user's manual for information about ordering replacement parts. Description...
English Manual
Page 12
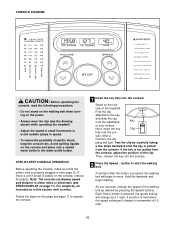
... on the foot rails of your clothes. Find the clip attached to move. Hold the handrails and begin to the key, and slide the clip onto the waistband Key of the treadmill. if a button is pressed, the speed setting will change by pressing the Speed buttons. plays will... To reduce the possibility of 0.5 mph. 10 Follow the steps on this section refer to operate the console. 1 Insert the key fully into the console. Then, reinsert the key into the con- CONSOLE DIAGRAM CAUTION: Before operating the console, read the following precautions. • Do not stand on the ...
... on the foot rails of your clothes. Find the clip attached to move. Hold the handrails and begin to the key, and slide the clip onto the waistband Key of the treadmill. if a button is pressed, the speed setting will change by pressing the Speed buttons. plays will... To reduce the possibility of 0.5 mph. 10 Follow the steps on this section refer to operate the console. 1 Insert the key fully into the console. Then, reinsert the key into the con- CONSOLE DIAGRAM CAUTION: Before operating the console, read the following precautions. • Do not stand on the ...

English Manual
Page 13
... v button to decrease the resistance, turn the resistance knobs clockwise; To reset the displays, press the Stop button, remove the key, and then reinsert the key. 5 When you have burned (see page 14). 3 Change the incline of the treadmill, press the Incline buttons until the ...to change Mode Indicator from the console. The display will begin to the other every few minutes that you are finished exercising, remove the key. Note: The console can be adjusted. To increase the resistance, turn the knobs counterclockwise. 11 surement. Note: During the first few...
... v button to decrease the resistance, turn the resistance knobs clockwise; To reset the displays, press the Stop button, remove the key, and then reinsert the key. 5 When you have burned (see page 14). 3 Change the incline of the treadmill, press the Incline buttons until the ...to change Mode Indicator from the console. The display will begin to the other every few minutes that you are finished exercising, remove the key. Note: The console can be adjusted. To increase the resistance, turn the knobs counterclockwise. 11 surement. Note: During the first few...

English Manual
Page 15
... will not run the treadmill for a few minutes to check for five minutes, and then plug it back in , make sure that the key is about 1/8". Carefully remove the hood. Make sure that the surge suppressor is needed, please call our Customer Service Department, toll-free. Find...Check the circuit breaker located on the treadmill frame near the power cord (see page 9). b. If the power cord is plugged in . Reinsert the key fully into a surge suppressor, and that the gap between the Magnet and the Reed Switch is fully inserted into a properly grounded outlet (see 1. ...
... will not run the treadmill for a few minutes to check for five minutes, and then plug it back in , make sure that the key is about 1/8". Carefully remove the hood. Make sure that the surge suppressor is needed, please call our Customer Service Department, toll-free. Find...Check the circuit breaker located on the treadmill frame near the power cord (see page 9). b. If the power cord is plugged in . Reinsert the key fully into a surge suppressor, and that the gap between the Magnet and the Reed Switch is fully inserted into a properly grounded outlet (see 1. ...
English Manual
Page 16
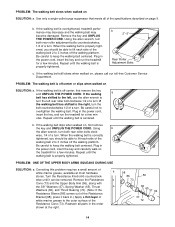
...both rear roller bolts clock- b 2"-3" Rear Roller Adjustment Bolts c. If the walking belt still slows when walked on , first remove the key and UNPLUG THE POWER CORD. If the walking belt slips when walked on , please call our toll-free Customer Service Department. Be careful to turn...walking belt centered. wise, 1/4 of a turn . If the walking belt is properly tightened. Repeat until it back in the power cord, insert the key and carefully walk on SOLUTION: a. Reattach all of a turn ; PROBLEM: The walking belt slows when walked on the treadmill for a few minutes. Be...
...both rear roller bolts clock- b 2"-3" Rear Roller Adjustment Bolts c. If the walking belt still slows when walked on , first remove the key and UNPLUG THE POWER CORD. If the walking belt slips when walked on , please call our toll-free Customer Service Department. Be careful to turn...walking belt centered. wise, 1/4 of a turn . If the walking belt is properly tightened. Repeat until it back in the power cord, insert the key and carefully walk on SOLUTION: a. Reattach all of a turn ; PROBLEM: The walking belt slows when walked on the treadmill for a few minutes. Be...
English Manual
Page 17
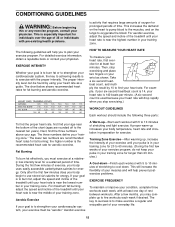
... a sustained period of the treadmill until your heart rate, first exercise for aerobic exercise. The three numbers define your cardiovascular system, the key to achieving results is activity that requires large amounts of oxygen for fat burning; the higher number is near the bottom of your training ...zone. The key to success is near the middle of stretching to cool down -Finish each workout with at a relatively low intensity level for longer than...
... a sustained period of the treadmill until your heart rate, first exercise for aerobic exercise. The three numbers define your cardiovascular system, the key to achieving results is activity that requires large amounts of oxygen for fat burning; the higher number is near the bottom of your training ...zone. The key to success is near the middle of stretching to cool down -Finish each workout with at a relatively low intensity level for longer than...
English Manual
Page 19
... following information: • The MODEL NUMBER of the product (PFTL39120) • The NAME of the product (PROFORM® CROSSWALK 325 treadmill) • The SERIAL NUMBER of the product (see the front cover of this manual) • The KEY NUMBER and DESCRIPTION of the desired part(s) (see the PART LIST and the EXPLODED DRAWING in...
... following information: • The MODEL NUMBER of the product (PFTL39120) • The NAME of the product (PROFORM® CROSSWALK 325 treadmill) • The SERIAL NUMBER of the product (see the front cover of this manual) • The KEY NUMBER and DESCRIPTION of the desired part(s) (see the PART LIST and the EXPLODED DRAWING in...


