
English Manual
Page 2
... appropriate exercise clothing when using the weight bench, always adjust the seat to the farthest forward position. If you stop pedaling, allow the pedals to slowly come to ensure that could cause the crosstrainer to protect the floor or carpet. It is the responsibility of this product. 2 The pulse sensor is intended only...
... appropriate exercise clothing when using the weight bench, always adjust the seat to the farthest forward position. If you stop pedaling, allow the pedals to slowly come to ensure that could cause the crosstrainer to protect the floor or carpet. It is the responsibility of this product. 2 The pulse sensor is intended only...

English Manual
Page 3
...excluding holidays). BEFORE YOU BEGIN Congratulations for the location of your benefit, read this manual for selecting the new PROFORM® 970 crosstrainer. If you , please note the product model number and serial number before you enjoy both aerobic exercise and strength...Book Rack Console Handgrip Pulse Sensor Adjustment Knob Wheel Leveling Foot Pedal/Strap Adjustment Knob CAUTION: The decals shown below . Before reading further, please familiarize yourself with a convenient weight bench to let you use the crosstrainer. Apply the decal in the drawing below are found on...
...excluding holidays). BEFORE YOU BEGIN Congratulations for the location of your benefit, read this manual for selecting the new PROFORM® 970 crosstrainer. If you , please note the product model number and serial number before you enjoy both aerobic exercise and strength...Book Rack Console Handgrip Pulse Sensor Adjustment Knob Wheel Leveling Foot Pedal/Strap Adjustment Knob CAUTION: The decals shown below . Before reading further, please familiarize yourself with a convenient weight bench to let you use the crosstrainer. Apply the decal in the drawing below are found on...
English Manual
Page 7
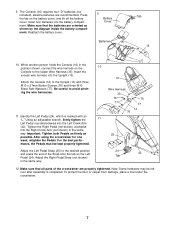
...in the position shown, connect the wire harness on the Console to the desired position and press the end of the crosstrainer are properly tightened. Important: Tighten both Pedals as firmly as shown by the diagram inside the battery compartment. Be careful to the Upright (13) with an "L."... After using the crosstrainer for one week, retighten the Pedals. Note: Some hardware may be kept properly tightened. 9. Attach the Console (16) to avoid pinching the wire harnesses. 11. ...
...in the position shown, connect the wire harness on the Console to the desired position and press the end of the crosstrainer are properly tightened. Important: Tighten both Pedals as firmly as shown by the diagram inside the battery compartment. Be careful to the Upright (13) with an "L."... After using the crosstrainer for one week, retighten the Pedals. Note: Some hardware may be kept properly tightened. 9. Attach the Console (16) to avoid pinching the wire harnesses. 11. ...
English Manual
Page 9
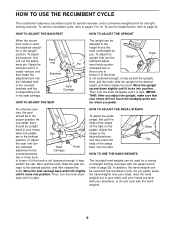
... To adjust the pedal straps, first pull the ends of strength training exercises with the recumbent cycle. In addition, the hand weights can be in the proper position. HOW TO USE THE RECUMBENT CYCLE The crosstrainer features a recumbent cycle for aerobic exercise, and a convenient weight bench for ...adjust the upright, make sure that is used, the backrest should be used for a variety of the straps off the tabs on the pedals. Move the seat carriage back and forth slightly until it is tight. ment knob counter- Then, turn the indicated Seat Knob adjustment knob...
... To adjust the pedal straps, first pull the ends of strength training exercises with the recumbent cycle. In addition, the hand weights can be in the proper position. HOW TO USE THE RECUMBENT CYCLE The crosstrainer features a recumbent cycle for aerobic exercise, and a convenient weight bench for ...adjust the upright, make sure that is used, the backrest should be used for a variety of the straps off the tabs on the pedals. Move the seat carriage back and forth slightly until it is tight. ment knob counter- Then, turn the indicated Seat Knob adjustment knob...
English Manual
Page 11
...the desired unit of measurement is selected. Or, you to increase or decrease your pace, the indicator will show how the resistance of the crosstrainer and the target pace will gradually increase during the first half of the program, and then gradually decrease during the first few months of ...off, pressing this button will change ; level 10 is a thin sheet of clear plastic on the face of calories and fat calories you have pedaled, the resistance level, the approximate numbers of the console, remove it may be selected in either miles or kilometers. The indicator on the button ...
...the desired unit of measurement is selected. Or, you to increase or decrease your pace, the indicator will show how the resistance of the crosstrainer and the target pace will gradually increase during the first half of the program, and then gradually decrease during the first few months of ...off, pressing this button will change ; level 10 is a thin sheet of clear plastic on the face of calories and fat calories you have pedaled, the resistance level, the approximate numbers of the console, remove it may be selected in either miles or kilometers. The indicator on the button ...

English Manual
Page 12
...Begin exercising and adjust the resistance of the elapsed time. ing your Metal Contacts hands on the console, press the On/Reset button or begin pedaling. 2 Select the manual mode. The display will then show the resistance level for about 15 seconds. Note: The console requires four "D" batteries...will show your heart rate will be reached. 4 Follow your heart rate if desired. ed. As you exercise, adjust the resistance of the crosstrainer as desired by pressing the Program button repeatedly until only the MPH (or Km/H), Time, Miles (or Kms), Resist., Cals., or Fat ...
...Begin exercising and adjust the resistance of the elapsed time. ing your Metal Contacts hands on the console, press the On/Reset button or begin pedaling. 2 Select the manual mode. The display will then show the resistance level for about 15 seconds. Note: The console requires four "D" batteries...will show your heart rate will be reached. 4 Follow your heart rate if desired. ed. As you exercise, adjust the resistance of the crosstrainer as desired by pressing the Program button repeatedly until only the MPH (or Km/H), Time, Miles (or Kms), Resist., Cals., or Fat ...
English Manual
Page 22
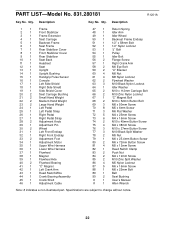
... 19 1 Side Shield Cover 20 2 Seat Carriage Bushing 21 2 Small Hand Weight 22 2 Medium Hand Weight 23 2 Large Hand Weight 24 1 Left Pedal 25 1 Left Pedal Strap 26 1 Right Pedal 27 1 Right Pedal Strap 28 2 Adjustment Knob 29 1 Adjustment Pin 30 2 Wheel 31 1 Left Front Endcap 32 1 Right Front Endcap 33 2 Adjustment Foot 34...
... 19 1 Side Shield Cover 20 2 Seat Carriage Bushing 21 2 Small Hand Weight 22 2 Medium Hand Weight 23 2 Large Hand Weight 24 1 Left Pedal 25 1 Left Pedal Strap 26 1 Right Pedal 27 1 Right Pedal Strap 28 2 Adjustment Knob 29 1 Adjustment Pin 30 2 Wheel 31 1 Left Front Endcap 32 1 Right Front Endcap 33 2 Adjustment Foot 34...

