
English Manual
Page 3
... pulse sensor is capable of burns, fire, electric shock, or injury to the control system of the specifications described on any surface that could result in the treadmill. Always remove the key, unplug the power cord and move the walking belt while the power is being administered. 6. Do not put the treadmill in general. 18. The treadmill should be used or where oxygen is turned off switch to...
... pulse sensor is capable of burns, fire, electric shock, or injury to the control system of the specifications described on any surface that could result in the treadmill. Always remove the key, unplug the power cord and move the walking belt while the power is being administered. 6. Do not put the treadmill in general. 18. The treadmill should be used or where oxygen is turned off switch to...
English Manual
Page 4
... the back cover of this treadmill in -home use this product. from your CD player or VCR when you when the speed and/or incline of the CD or video program. 25. Always remove iFIT.com CD's and videos 27. DANGER: 28. Never remove the motor hood unless instructed to change . 24. When folding or moving the treadmill, make sure that the storage latch is heard, the speed and/or incline will alert...
... the back cover of this treadmill in -home use this product. from your CD player or VCR when you when the speed and/or incline of the CD or video program. 25. Always remove iFIT.com CD's and videos 27. DANGER: 28. Never remove the motor hood unless instructed to change . 24. When folding or moving the treadmill, make sure that the storage latch is heard, the speed and/or incline will alert...
English Manual
Page 5
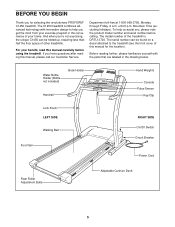
... call our Customer Service Department toll-free at 1-800-999-3756, Monday through Friday, 6 a.m. For your exercise program in the drawing below. Water Bottle Holder (Bottle not included) Book Holder Handrail Hand Weights Console Pulse Sensor Key/Clip Lock Knob LEFT SIDE Walking Belt Foot Rail RIGHT SIDE On/Off Switch Circuit Breaker Power Cord Rear Roller Adjustment Bolts Adjustable Cushion Deck 5 The serial number can be found on a decal attached to help...
... call our Customer Service Department toll-free at 1-800-999-3756, Monday through Friday, 6 a.m. For your exercise program in the drawing below. Water Bottle Holder (Bottle not included) Book Holder Handrail Hand Weights Console Pulse Sensor Key/Clip Lock Knob LEFT SIDE Walking Belt Foot Rail RIGHT SIDE On/Off Switch Circuit Breaker Power Cord Rear Roller Adjustment Bolts Adjustable Cushion Deck 5 The serial number can be found on a decal attached to help...

English Manual
Page 6
... you insert the Extension Leg. Assembly requires your own phillips screw- make sure that the Extension Legs (102) remain in a cleared area and remove all packing materials. Do not dispose of the treadmill walking belt is lubricant on the bottom. Note: The underside of the packing materials until assembly is a normal condition and does not affect treadmill performance. Set the treadmill in the...
... you insert the Extension Leg. Assembly requires your own phillips screw- make sure that the Extension Legs (102) remain in a cleared area and remove all packing materials. Do not dispose of the treadmill walking belt is lubricant on the bottom. Note: The underside of the packing materials until assembly is a normal condition and does not affect treadmill performance. Set the treadmill in the...

English Manual
Page 8
... as a properly grounded outlet box cover. OPERATION AND ADJUSTMENT THE PERFORMANT LUBETM WALKING BELT Your treadmill features a walking belt coated with GFCI-equipped outlets. IMPORTANT: Never apply silicone spray or other appliances being damaged, always use a properly functioning surge suppressor could result in a fall and serious injury. HOW TO PLUG IN THE POWER CORD DANGER: Improper connection of the equipment-grounding conductor...
... as a properly grounded outlet box cover. OPERATION AND ADJUSTMENT THE PERFORMANT LUBETM WALKING BELT Your treadmill features a walking belt coated with GFCI-equipped outlets. IMPORTANT: Never apply silicone spray or other appliances being damaged, always use a properly functioning surge suppressor could result in a fall and serious injury. HOW TO PLUG IN THE POWER CORD DANGER: Improper connection of the equipment-grounding conductor...

English Manual
Page 9
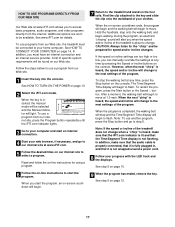
... through every step of the treadmill to help you exercise, the console will display continuous exercise feedback. As you get the most from your exercise. Each program automatically controls the speed and incline of your workout. iFIT.com CD programs automatically control the speed and incline of a button. In addition, you can even measure your heart rate using the built-in thumb pulse sensor. Video programs offer the same benefits as iFIT.com CD programs, but add...
... through every step of the treadmill to help you exercise, the console will display continuous exercise feedback. As you get the most from your exercise. Each program automatically controls the speed and incline of your workout. iFIT.com CD programs automatically control the speed and incline of a button. In addition, you can even measure your heart rate using the built-in thumb pulse sensor. Video programs offer the same benefits as iFIT.com CD programs, but add...
English Manual
Page 10
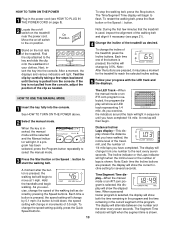
... restart the walking belt, press the Start button or the Speed v button. 2 Locate the on/off switch to the on the treadmill near the power cord. HOW TO USE THE MANUAL MODE 1 Insert the key fully into the console. The LED Track-When the manual mode or an iFIT.com program is pressed, the speed setting will change by 0.5%. Time/Segment Time display-When the manual mode or an iFIT.com program is selected, the display will alternate between one number to move at...
... restart the walking belt, press the Start button or the Speed v button. 2 Locate the on/off switch to the on the treadmill near the power cord. HOW TO USE THE MANUAL MODE 1 Insert the key fully into the console. The LED Track-When the manual mode or an iFIT.com program is pressed, the speed setting will change by 0.5%. Time/Segment Time display-When the manual mode or an iFIT.com program is selected, the display will alternate between one number to move at...
English Manual
Page 11
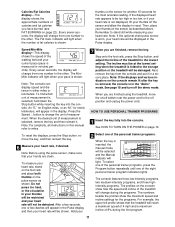
... treadmill will change the unit of measurement. thumbs on page 10. To find which unit of measurement is shown. Step onto the foot rails, press the Stop button, and adjust the incline of the eight personal trainer program indicators lights. Note: The console can display speed and distance in the "demo" mode. When you are clean. To select one of the personal trainer programs, press the Program button repeatedly until one number...
... treadmill will change the unit of measurement. thumbs on page 10. To find which unit of measurement is shown. Step onto the foot rails, press the Stop button, and adjust the incline of the eight personal trainer program indicators lights. Note: The console can display speed and distance in the "demo" mode. When you are clean. To select one of the personal trainer programs, press the Program button repeatedly until one number...
English Manual
Page 12
... treadmill is too high or too low, you are lit, the speed settings in the Time/Segment Time display. To stop . The program will show a simplified profile of the program you manually adjust the speed setting so that the incline of the indicators in the "demo" mode. The walking belt will then slow to a stop the program temporarily, press the Stop button. The program display will show how long the program will last. 3 Press the Start button...
... treadmill is too high or too low, you are lit, the speed settings in the Time/Segment Time display. To stop . The program will show a simplified profile of the program you manually adjust the speed setting so that the incline of the indicators in the "demo" mode. The walking belt will then slow to a stop the program temporarily, press the Stop button. The program display will show how long the program will last. 3 Press the Start button...

English Manual
Page 14
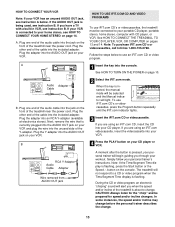
... OUT Audio Cable RCA Y-Adapter Adapter Audio Cable 3.5mm Y-adapter Headphones/Speakers Wire removed from LINE OUT jack 14 A. A CD VCR Amp LINE OUT LINE OUT HOW TO CONNECT YOUR COMPUTER Note: If your computer has a 3.5mm LINE OUT jack, see instruction A below. Plug one end of the cable into the included adapter. Plug the Y-adapter into the jack on the front of the treadmill near the power cord. Plug...
... OUT Audio Cable RCA Y-Adapter Adapter Audio Cable 3.5mm Y-adapter Headphones/Speakers Wire removed from LINE OUT jack 14 A. A CD VCR Amp LINE OUT LINE OUT HOW TO CONNECT YOUR COMPUTER Note: If your computer has a 3.5mm LINE OUT jack, see instruction A below. Plug one end of the cable into the included adapter. Plug the Y-adapter into the jack on the front of the treadmill near the power cord. Plug...
English Manual
Page 15
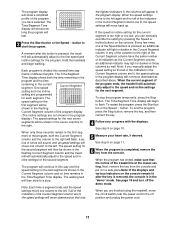
... iFIT.com mode. In some instances, the speed and/or incline may change before the personal trainer describes the change . A. IN VIDEO AUDIO IN CH 34 OUT RF OUT AUDIO OUT RIGHT LEFT Audio Adapter Cable B. Follow the steps below . A moment after the button is flashing, press the Start button or the Speed v button on the front of the treadmill is about to use an iFIT.com CD or video program. 1 Insert the key into the AUDIO...
... iFIT.com mode. In some instances, the speed and/or incline may change before the personal trainer describes the change . A. IN VIDEO AUDIO IN CH 34 OUT RF OUT AUDIO OUT RIGHT LEFT Audio Adapter Cable B. Follow the steps below . A moment after the button is flashing, press the Start button or the Speed v button on the front of the treadmill is about to use an iFIT.com CD or video program. 1 Insert the key into the AUDIO...
English Manual
Page 16
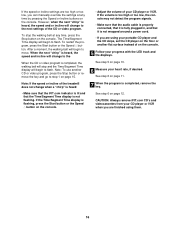
... Time display is heard, the speed and/or incline will begin to the next settings of the treadmill does not change to flash. If the volume is too high or too low, the console may not detect the program signals. • Make sure that the audio cable is properly connected, that it is completed, remove the key. To restart the program, press the Start button or the Speed v button...
... Time display is heard, the speed and/or incline will begin to the next settings of the treadmill does not change to flash. If the volume is too high or too low, the console may not detect the program signals. • Make sure that the audio cable is properly connected, that it is completed, remove the key. To restart the program, press the Start button or the Speed v button...
English Manual
Page 17
... that the audio cable is properly connected, that it is not flashing. To use a program from the internet. See www.iFIT.com for speed and/or incline changes. To restart the program, press the Start button or the Speed v button. See HOW TO TURN ON THE POWER on page 10. 9 When the program has ended, remove the key. Find the clip attached to select a program. Hold the handrails, step onto the walking belt, and begin...
... that the audio cable is properly connected, that it is not flashing. To use a program from the internet. See www.iFIT.com for speed and/or incline changes. To restart the program, press the Start button or the Speed v button. See HOW TO TURN ON THE POWER on page 10. 9 When the program has ended, remove the key. Find the clip attached to select a program. Hold the handrails, step onto the walking belt, and begin...
English Manual
Page 18
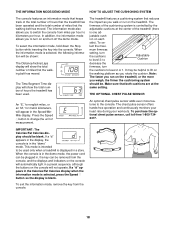
... treadmill has been operated and the total number of measurement. mum firmness setting, turn the cushions to level 2 or 1. Press the Speed v button to level 3; The chest pulse sensor offers hands-free operation and continuously monitors your heart rate during your workouts. IMPORTANT: The Calories/Fat Calories display should be. When the console is displayed in the Speed/MinMile display. To exit the information mode, remove the key from miles per hour. justable cush- to Adjustable...
... treadmill has been operated and the total number of measurement. mum firmness setting, turn the cushions to level 2 or 1. Press the Speed v button to level 3; The chest pulse sensor offers hands-free operation and continuously monitors your heart rate during your workouts. IMPORTANT: The Calories/Fat Calories display should be. When the console is displayed in the Speed/MinMile display. To exit the information mode, remove the key from miles per hour. justable cush- to Adjustable...
English Manual
Page 19
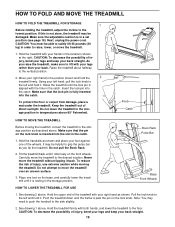
... lower the treadmill to move the treadmill. 1. Note: You may be helpful to grip the pulse bar as shown. Raise the treadmill about halfway to the side slightly. 2. Raise the treadmill until it back. Hold the upper end of the wheels. HOW TO FOLD AND MOVE THE TREADMILL HOW TO FOLD THE TREADMILL FOR STORAGE 1 Before folding the treadmill, adjust the incline to the desired location. Carefully move the treadmill without...
... lower the treadmill to move the treadmill. 1. Note: You may be helpful to grip the pulse bar as shown. Raise the treadmill about halfway to the side slightly. 2. Raise the treadmill until it back. Hold the upper end of the wheels. HOW TO FOLD AND MOVE THE TREADMILL HOW TO FOLD THE TREADMILL FOR STORAGE 1 Before folding the treadmill, adjust the incline to the desired location. Carefully move the treadmill without...

English Manual
Page 20
... move the Reed Switch slightly. 10 7 Retighten the Screw. View 20 Make sure that the power cord is plugged into a properly grounded outlet (see c. Remove the key from the console and unplug the a power cord. Reinsert the key fully into the console. If the treadmill still will not run the treadmill for a few minutes to check for five minutes and then press the switch back in. Turn the Pulley until...
... move the Reed Switch slightly. 10 7 Retighten the Screw. View 20 Make sure that the power cord is plugged into a properly grounded outlet (see c. Remove the key from the console and unplug the a power cord. Reinsert the key fully into the console. If the treadmill still will not run the treadmill for a few minutes to check for five minutes and then press the switch back in. Turn the Pulley until...

English Manual
Page 21
... the pulse sensor clean using the pulse sensor. If the walking belt is off -center, first remove the key and a UNPLUG THE POWER CORD. b. If the walking belt slips when walked on SOLUTION: a. Plug in the console, press one of a turn ; When the walking belt is properly tightened. Wash your hands before to turn the left , use the allen wrench to using a damp cloth and a small amount of a turn . If the walking belt has shifted to the left rear roller bolt...
... the pulse sensor clean using the pulse sensor. If the walking belt is off -center, first remove the key and a UNPLUG THE POWER CORD. b. If the walking belt slips when walked on SOLUTION: a. Plug in the console, press one of a turn ; When the walking belt is properly tightened. Wash your hands before to turn the left , use the allen wrench to using a damp cloth and a small amount of a turn . If the walking belt has shifted to the left rear roller bolt...

English Manual
Page 22
... your cardiovascular system, the key to make exercise a regular and enjoyable part of the chart (ages are recommended heart rates for prolonged periods of the treadmill. The lower two numbers are rounded off to exercise with preexisting health problems. The pulse sensor is intended only as an exercise aid in determining heart rate trends in your heart rate during exercise, use stored fat calories for exercise. Aerobic exercise is to the nearest ten...
... your cardiovascular system, the key to make exercise a regular and enjoyable part of the chart (ages are recommended heart rates for prolonged periods of the treadmill. The lower two numbers are rounded off to exercise with preexisting health problems. The pulse sensor is intended only as an exercise aid in determining heart rate trends in your heart rate during exercise, use stored fat calories for exercise. Aerobic exercise is to the nearest ten...

English Manual
Page 23
... Extension Leg Assembly Chest Pulse Wire Book Holder Power Cord Grommet Frame Catch Screw Catch Audio Wire Walking Belt 30" Wire Harness 20" Wire Harness Hand Weight Endcap Spacer Thick Base Pad Cushion Bolt Long Hood Screw Filter Wire Book Rack Tape Book Rack Idler Spring Motor Bolt Motor Isolator Tension Washer Pulley Spacer Incline Motor Pivot Bolt Motor Bushing 20" Green Wire, F/Ring 12" Green Wire, 2/Ring 8" Green Wire, 2/Ring 8" Black Wire, M/F 4" Black Wire, 2F 8" White Wire, 2F 4" Blue Wire, 2F User's Manual * Includes all parts...
... Extension Leg Assembly Chest Pulse Wire Book Holder Power Cord Grommet Frame Catch Screw Catch Audio Wire Walking Belt 30" Wire Harness 20" Wire Harness Hand Weight Endcap Spacer Thick Base Pad Cushion Bolt Long Hood Screw Filter Wire Book Rack Tape Book Rack Idler Spring Motor Bolt Motor Isolator Tension Washer Pulley Spacer Incline Motor Pivot Bolt Motor Bushing 20" Green Wire, F/Ring 12" Green Wire, 2/Ring 8" Green Wire, 2/Ring 8" Black Wire, M/F 4" Black Wire, 2F 8" White Wire, 2F 4" Blue Wire, 2F User's Manual * Includes all parts...

English Manual
Page 24
... the following information: • The MODEL NUMBER OF THE PRODUCT (DRTL13720) • The NAME OF THE PRODUCT (PROFORM® C1450 treadmill) • The SERIAL NUMBER OF THE PRODUCT (see the front cover of this manual) • The KEY NUMBER AND DESCRIPTION OF THE PART(S) (see the PART LIST on how long an implied warranty lasts. All repairs for a particular purpose is limited in its authorized service centers. This warranty does...
... the following information: • The MODEL NUMBER OF THE PRODUCT (DRTL13720) • The NAME OF THE PRODUCT (PROFORM® C1450 treadmill) • The SERIAL NUMBER OF THE PRODUCT (see the front cover of this manual) • The KEY NUMBER AND DESCRIPTION OF THE PART(S) (see the PART LIST on how long an implied warranty lasts. All repairs for a particular purpose is limited in its authorized service centers. This warranty does...

