
English Manual
Page 2
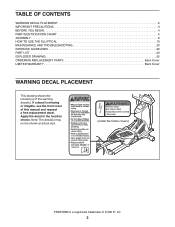
.... ! (inside the frame covers) PROFORM is missing or illegible, see the front cover of this manual and request a free replacement decal. Apply the decal in the location shown. TABLE OF CONTENTS WARNING DECAL PLACEMENT 2 IMPORTANT PRECAUTIONS 3 BEFORE YOU BEGIN 4 PART IDENTIFICATION CHART 5 ASSEMBLY 6 HOW TO USE THE ELLIPTICAL 13 MAINTENANCE AND TROUBLESHOOTING 20...
.... ! (inside the frame covers) PROFORM is missing or illegible, see the front cover of this manual and request a free replacement decal. Apply the decal in the location shown. TABLE OF CONTENTS WARNING DECAL PLACEMENT 2 IMPORTANT PRECAUTIONS 3 BEFORE YOU BEGIN 4 PART IDENTIFICATION CHART 5 ASSEMBLY 6 HOW TO USE THE ELLIPTICAL 13 MAINTENANCE AND TROUBLESHOOTING 20...
English Manual
Page 5
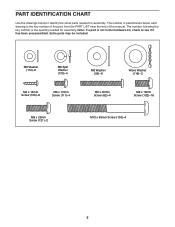
... (121)–-2 M10 x 95mm Screw (100)–-4 5 The number following the key number is the quantity needed for assembly. The number in the hardware kit, check to identify the small parts needed for assembly. Extra parts may be included. Note: If a part is the key number of the part, from the PART...
... (121)–-2 M10 x 95mm Screw (100)–-4 5 The number following the key number is the quantity needed for assembly. The number in the hardware kit, check to identify the small parts needed for assembly. Extra parts may be included. Note: If a part is the key number of the part, from the PART...
English Manual
Page 6
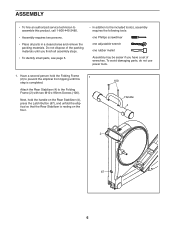
Have a second person hold the handle on the Rear Stabilizer (4), press the Latch Button (67), and unfold the elliptical so that the Rear Stabilizer is completed. Attach the Rear Stabilizer (4) to the Folding Frame (2) with two M10 x 95mm Screws (100). Do not... use power tools. 1. Next, hold the Folding Frame (2) to prevent the elliptical from tipping until you have a set of the packing materials until this product, call 1-800-445-2480. •• Assembly requires two persons. •• Place all assembly steps. •• To identify small parts, see page 5. ••...
Have a second person hold the handle on the Rear Stabilizer (4), press the Latch Button (67), and unfold the elliptical so that the Rear Stabilizer is completed. Attach the Rear Stabilizer (4) to the Folding Frame (2) with two M10 x 95mm Screws (100). Do not... use power tools. 1. Next, hold the Folding Frame (2) to prevent the elliptical from tipping until you have a set of the packing materials until this product, call 1-800-445-2480. •• Assembly requires two persons. •• Place all assembly steps. •• To identify small parts, see page 5. ••...

English Manual
Page 23
... 2 88 1 89 4 90 1 91 1 92 1 93 2 94 2 95 12 96 1 97 1 98 2 99 1 100 4 Description Large Latch Spring Latch Insert Long Latch Spring Leg Bearing Assembly Right Gel Pad Small Axle Cover Upright Bushing Small Bushing Adjustment Nut Wire Harness Flywheel M6 x 50mm Screw Frame Axle Front Frame Bushing Latch Bracket...
... 2 88 1 89 4 90 1 91 1 92 1 93 2 94 2 95 12 96 1 97 1 98 2 99 1 100 4 Description Large Latch Spring Latch Insert Long Latch Spring Leg Bearing Assembly Right Gel Pad Small Axle Cover Upright Bushing Small Bushing Adjustment Nut Wire Harness Flywheel M6 x 50mm Screw Frame Axle Front Frame Bushing Latch Bracket...

English Manual
Page 24
... Snap Ring #6 x 3/8" Screw Frame Wire Harness Ground Wire Lift Motor Wire Harness Motor Power Wire Harness M5 Washer Blue Wire White Wire User’'s Manual Assembly Tool Grease Packet Note: Specifications are not illustrated. 24 Description Key No. For information about ordering replacement parts, see the back cover of this manual...
... Snap Ring #6 x 3/8" Screw Frame Wire Harness Ground Wire Lift Motor Wire Harness Motor Power Wire Harness M5 Washer Blue Wire White Wire User’'s Manual Assembly Tool Grease Packet Note: Specifications are not illustrated. 24 Description Key No. For information about ordering replacement parts, see the back cover of this manual...


