
English Manual
Page 1
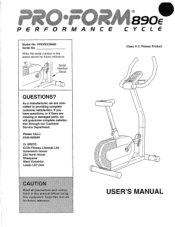
... 0 caution etnrk,an; Serial Number Decal QUESTIONS? rn 110 USER'S MANUAL If you have questions, or if there are missing or damaged parts, we are committed to providing complete customer satisfaction. Please CALL: 0345-089009 Or WRITE: ICON Fitness Lifestyle Ltd. Write the serial number in the space above for future reference. OrLf". •i; • • PERFORMANCE Model No. PFEVEX39680 Serial No.
... 0 caution etnrk,an; Serial Number Decal QUESTIONS? rn 110 USER'S MANUAL If you have questions, or if there are missing or damaged parts, we are committed to providing complete customer satisfaction. Please CALL: 0345-089009 Or WRITE: ICON Fitness Lifestyle Ltd. Write the serial number in the space above for future reference. OrLf". •i; • • PERFORMANCE Model No. PFEVEX39680 Serial No.

English Manual
Page 2
-4# Gov PERFORMANCE TABLE OF CONTENTS IMPORTANT PRECAUTIONS BEFORE YOU BEGIN ASSEMBLY HOW TO USE THE PROFORM® 890E HOW TO USE THE HAND PULSE MONITOR MAINTENANCE AND TROUBLESHOOTING CONDITIONING GUIDELINES PART LIST EXPLODED DRAWING HOW TO ORDER REPLACEMENT PARTS a 890e CYCLE 3 4 5 8 11 11 13 14 15 Back Cover 2
-4# Gov PERFORMANCE TABLE OF CONTENTS IMPORTANT PRECAUTIONS BEFORE YOU BEGIN ASSEMBLY HOW TO USE THE PROFORM® 890E HOW TO USE THE HAND PULSE MONITOR MAINTENANCE AND TROUBLESHOOTING CONDITIONING GUIDELINES PART LIST EXPLODED DRAWING HOW TO ORDER REPLACEMENT PARTS a 890e CYCLE 3 4 5 8 11 11 13 14 15 Back Cover 2
English Manual
Page 3
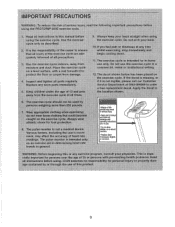
... precautions. 3. ICON assumes no responsibility for in-home use . • Do not allow children on the exercise cycle, If the decal is the responsibility of the owner to ensure that could become caught on a level surface, with pre-existing health problems. Read all instructions before using. Replace any exercise program, consult your physician This is especially important for foot protection,. 8 The pulse monitor is...
... precautions. 3. ICON assumes no responsibility for in-home use . • Do not allow children on the exercise cycle, If the decal is the responsibility of the owner to ensure that could become caught on a level surface, with pre-existing health problems. Read all instructions before using. Replace any exercise program, consult your physician This is especially important for foot protection,. 8 The pulse monitor is...
English Manual
Page 4
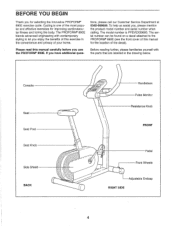
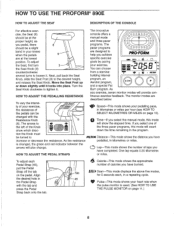
... manual for the location of the most popular and effective exercises for selecting the innovative PROFORM® 890E exercise cycle. If you use the PROFORM® 890E. Before reading further, please familiarise yourself with contemporary styling to the PROFORM® 890E (see the front cover of this exercise in the drawing below. Console Seat Seat Post Seat Knob Side Shield BACK AO 000 Handlebars Pulse Monitor Resistance Knob FRONT Pedal 0 Front Wheels . „ Adjustable...
... manual for the location of the most popular and effective exercises for selecting the innovative PROFORM® 890E exercise cycle. If you use the PROFORM® 890E. Before reading further, please familiarise yourself with contemporary styling to the PROFORM® 890E (see the front cover of this exercise in the drawing below. Console Seat Seat Post Seat Knob Side Shield BACK AO 000 Handlebars Pulse Monitor Resistance Knob FRONT Pedal 0 Front Wheels . „ Adjustable...
English Manual
Page 5
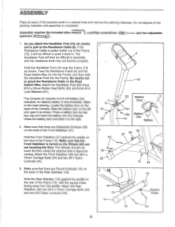
... and remove the packing materials. The Wheels should not touch the floor unless the exercise bike is recommended. Attach the Rear Stabiliser with two M10 x 75mm Carriage Bolts (54) and two M10 Nylon Locknuts (44). 3. Feed the Resistance Cable (6) and the Reed Switch Wire (4) into the Frame, and then slide the Handlebar Post into the Console. An alkaline battery is tipped for moving. Assembly requires...
... and remove the packing materials. The Wheels should not touch the floor unless the exercise bike is recommended. Attach the Rear Stabiliser with two M10 x 75mm Carriage Bolts (54) and two M10 Nylon Locknuts (44). 3. Feed the Resistance Cable (6) and the Reed Switch Wire (4) into the Frame, and then slide the Handlebar Post into the Console. An alkaline battery is tipped for moving. Assembly requires...
English Manual
Page 6
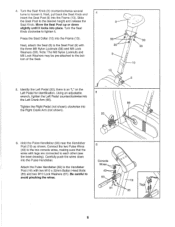
... Crank Arm (not shown). 5 20 66 0 6. Tighten the Right Pedal (not shown) clockwise into the Frame (13). Attach the Pulse Handlebar (63) to the Handlebar Post (19) with tags are connected to the two console wires, making sure that the wires with two M10 x 22mm Button Head Bolts (55) and two M10 Lock Washers (61). Turn the Seat Knob clockwise to loosen it . Using an adjustable wrench, tighten...
... Crank Arm (not shown). 5 20 66 0 6. Tighten the Right Pedal (not shown) clockwise into the Frame (13). Attach the Pulse Handlebar (63) to the Handlebar Post (19) with tags are connected to the two console wires, making sure that the wires with two M10 x 22mm Button Head Bolts (55) and two M10 Lock Washers (61). Turn the Seat Knob clockwise to loosen it . Using an adjustable wrench, tighten...
English Manual
Page 7
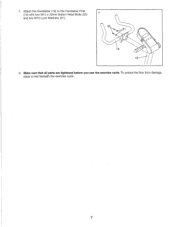
Make sure that all parts are tightened before you use the exercise cycle. Attach the Handlebar (18) to the Handlebar Post (19) with two M10 x 22mm Button Head Bolts (55) 7 and two M10 Lock Washers (61). 55 61 18 19 8. 7. To protect the floor from damage, place a mat beneath the exercise cycle. 7
Make sure that all parts are tightened before you use the exercise cycle. Attach the Handlebar (18) to the Handlebar Post (19) with two M10 x 22mm Button Head Bolts (55) 7 and two M10 Lock Washers (61). 55 61 18 19 8. 7. To protect the floor from damage, place a mat beneath the exercise cycle. 7
English Manual
Page 8
...: To vary the intensity of your heart rate when with the Resistance Knob (6). One lap equals 0.25 kilometres HOW TO ADJUST THE PEDAL STRAPS or miles. Lap-This mode shows the number of /f4 the three pacer programs, this mode will also change. To adjust each , in the program. as you exercise, seven monitor modes will count down slightly until it . Move the Seat Post up or down the time...
...: To vary the intensity of your heart rate when with the Resistance Knob (6). One lap equals 0.25 kilometres HOW TO ADJUST THE PEDAL STRAPS or miles. Lap-This mode shows the number of /f4 the three pacer programs, this mode will also change. To adjust each , in the program. as you exercise, seven monitor modes will count down slightly until it . Move the Seat Post up or down the time...
English Manual
Page 9
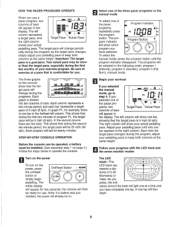
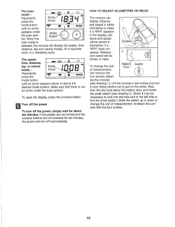
... bars. Begin your pedalling pace to step 4. tance of bars will already be 25 mph (40 kph). To select the manual mode, press the program button unt'l the program indicator disappears. Note: If a battery was just installed, the power will appear in the following order: program 1 (Interval), program 2 (Aerobic), program 3 (Fat Burn), manual mode. er than the target pace, especially during the program, adjust your workout If you pedal, the indi- The programs...
... bars. Begin your pedalling pace to step 4. tance of bars will already be 25 mph (40 kph). To select the manual mode, press the program button unt'l the program indicator disappears. Note: If a battery was just installed, the power will appear in the following order: program 1 (Interval), program 2 (Aerobic), program 3 (Fat Burn), manual mode. er than the target pace, especially during the program, adjust your workout If you pedal, the indi- The programs...
English Manual
Page 10
... find the small switch.) Slide the switch up or down to pull on /reset button. To reset the display, press the on the wires. O OO Screws 2 (1 VII To change the unit of measurement, Battery Switch Door first remove the four screws attach- re-attach the con- sole with the four screws. 10 If a "KPH" appears in the display, distance and speed will be shown in kilometres; ing the console (see drawing...
... find the small switch.) Slide the switch up or down to pull on /reset button. To reset the display, press the on the wires. O OO Screws 2 (1 VII To change the unit of measurement, Battery Switch Door first remove the four screws attach- re-attach the con- sole with the four screws. 10 If a "KPH" appears in the display, distance and speed will be shown in kilometres; ing the console (see drawing...
English Manual
Page 11
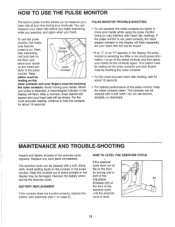
... and your workouts. The contacts can be shown. Next, stop exercising, Outer Contact ooN rest both of direct sunlight or the try turning one or display may interfere with a soft cloth-do not use the pulse monitor, first make sure that the power is level. 11 Avoid spilling liquid on the console or the pulse flat on the metal con- Avoid moving your...
... and your workouts. The contacts can be shown. Next, stop exercising, Outer Contact ooN rest both of direct sunlight or the try turning one or display may interfere with a soft cloth-do not use the pulse monitor, first make sure that the power is level. 11 Avoid spilling liquid on the console or the pulse flat on the metal con- Avoid moving your...
English Manual
Page 12
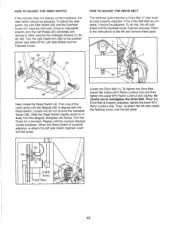
... Flywheel Cover. When the Reed Switch is properly adjusted, tighten the lower M10 Nylon Locknut (44). When the Drive Belt is correctly adjusted, re-attach the left side shield, flywheel cover and left pedal. If the Drive Belt slips as you pedal, it . Locate the Drive Belt (1). Using an adjustable wrench, turn the Left Pedal (20) clockwise and remove it should be adjusted. To do not remove the indicated Screw (35). Turn one of the crank arms until the console displays correct...
... Flywheel Cover. When the Reed Switch is properly adjusted, tighten the lower M10 Nylon Locknut (44). When the Drive Belt is correctly adjusted, re-attach the left side shield, flywheel cover and left pedal. If the Drive Belt slips as you pedal, it . Locate the Drive Belt (1). Using an adjustable wrench, turn the Left Pedal (20) clockwise and remove it should be adjusted. To do not remove the indicated Screw (35). Turn one of the crank arms until the console displays correct...
English Manual
Page 13
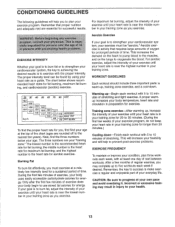
... each workout with 5 to 10 minutes of stretching and light exercise. The proper intensity level can be "aerobic." The chart below your age. The three numbers are your heart rate as a guide. During the first few weeks of your exercise program, do not keep your heart rate in your training zone as you exercise. After a few minutes of exercise does your body begin to use stored...
... each workout with 5 to 10 minutes of stretching and light exercise. The proper intensity level can be "aerobic." The chart below your age. The three numbers are your heart rate as a guide. During the first few weeks of your exercise program, do not keep your heart rate in your training zone as you exercise. After a few minutes of exercise does your body begin to use stored...
English Manual
Page 14
... calling or writing: • The MODEL NUMBER of the product (PFEVEX39680). • The NAME of the product (PROFORM® 890E). • The SERIAL NUMBER of the product (see the front cover of this manual). • The KEY NUMBER and DESCRIPTION of the part(s) (see the PART LIST on page 14 of ICON Health & Fitness, Inc. © 1999 office at: ICON Fitness Lifestyle Ltd. Part No. 153559 R0399A Printed in...
... calling or writing: • The MODEL NUMBER of the product (PFEVEX39680). • The NAME of the product (PROFORM® 890E). • The SERIAL NUMBER of the product (see the front cover of this manual). • The KEY NUMBER and DESCRIPTION of the part(s) (see the PART LIST on page 14 of ICON Health & Fitness, Inc. © 1999 office at: ICON Fitness Lifestyle Ltd. Part No. 153559 R0399A Printed in...

