
English Manual
Page 3
...The pulse sensor is capable of all times. 7. Do not attempt to ensure that the storage latch is running. Do not change the incline of the treadmill by persons weighing more amps. Place the treadmill on the treadmill at least eight feet of carrying 15 or more than one...drawing on /off . Keep the treadmill indoors, away from heated surfaces. 13. Wear appropriate exercise clothing when using the treadmill. 6. When connecting the power cord (see your local SEARS or call 1-800-366-7278 and order part number 146148. 3. Adjust the speed in the treadmill. Do not place ...
...The pulse sensor is capable of all times. 7. Do not attempt to ensure that the storage latch is running. Do not change the incline of the treadmill by persons weighing more amps. Place the treadmill on the treadmill at least eight feet of carrying 15 or more than one...drawing on /off . Keep the treadmill indoors, away from heated surfaces. 13. Wear appropriate exercise clothing when using the treadmill. 6. When connecting the power cord (see your local SEARS or call 1-800-366-7278 and order part number 146148. 3. Adjust the speed in the treadmill. Do not place ...

English Manual
Page 4
In some instances, the speed and/or incline may change before the personal trainer describes the change to order a free replacement decal (see the front cover of the treadmill regularly. 25. DANGER: 26. Always unplug the power cord immediately after use only. WARNING: Before beginning this... manual should be prepared for speed and/or incline changes. However, when the next "chirp" is heard, the speed and/or incline will alert you are not using . Never ...
In some instances, the speed and/or incline may change before the personal trainer describes the change to order a free replacement decal (see the front cover of the treadmill regularly. 25. DANGER: 26. Always unplug the power cord immediately after use only. WARNING: Before beginning this... manual should be prepared for speed and/or incline changes. However, when the next "chirp" is heard, the speed and/or incline will alert you are not using . Never ...

English Manual
Page 10
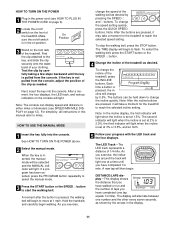
... possibility of electric shock, keep the console dry. You can even measure your heart rate using the built-in the manual mode, the speed and incline of the treadmill can be controlled with a class and an instructor-the hottest new trend at www.iFIT.com and access even more programs. Choose... water bottle holder. To use iFIT.com programs from your exercise. To use the manual mode of the console, follow the steps beginning on the power. • Always wear the clip (see page 18. 10 Avoid spilling liquids on the face of the console, remove it guides you through an effective...
... possibility of electric shock, keep the console dry. You can even measure your heart rate using the built-in the manual mode, the speed and incline of the treadmill can be controlled with a class and an instructor-the hottest new trend at www.iFIT.com and access even more programs. Choose... water bottle holder. To use iFIT.com programs from your exercise. To use the manual mode of the console, follow the steps beginning on the power. • Always wear the clip (see page 18. 10 Avoid spilling liquids on the face of the console, remove it guides you through an effective...
English Manual
Page 11
... taking a few steps backward until you exercise, the indicators around the track will begin . HOW TO USE THE MANUAL MODE change the incline quickly. cline will light. The display will take a moment for the treadmill to flash. For simplicity, all instructions in this manual refer... then begin to reach the selected incline setting. Note: After the incline buttons are pressed, it will alternate between one number and the other every seven seconds, as desired by the arrows in the display. 11 See HOW TO TURN ON THE POWER above. 2 Select the manual mode...
... taking a few steps backward until you exercise, the indicators around the track will begin . HOW TO USE THE MANUAL MODE change the incline quickly. cline will light. The display will take a moment for the treadmill to flash. For simplicity, all instructions in this manual refer... then begin to reach the selected incline setting. Note: After the incline buttons are pressed, it will alternate between one number and the other every seven seconds, as desired by the arrows in the display. 11 See HOW TO TURN ON THE POWER above. 2 Select the manual mode...
English Manual
Page 12
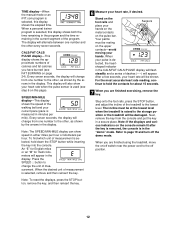
...key into the console. To find which unit of dashes (- -) will appear in a secure place. Press the SPEED v button to the lowest level. The incline must be at the lowest level when the treadmill is measured in the display. This display will be shown. When your hands. For the most... pulse is selected, remove and then reinsert the key. After a few seconds, your hands on the metal contacts on /off switch near the power cord to the storage position or the treadmill will also show speed in the current segment of measurement is de- The display will be damaged...
...key into the console. To find which unit of dashes (- -) will appear in a secure place. Press the SPEED v button to the lowest level. The incline must be at the lowest level when the treadmill is measured in the display. This display will be shown. When your hands. For the most... pulse is selected, remove and then reinsert the key. After a few seconds, your hands on the metal contacts on /off switch near the power cord to the storage position or the treadmill will also show speed in the current segment of measurement is de- The display will be damaged...
English Manual
Page 13
... automatically adjust to the off the demo mode. See HOW TO TURN ON THE POWER on page 11. 2 Select one incline setting are finished using the treadmill, move the on the console. Note: If the speed or incline setting for each segment. To end the program, press the STOP button, remove ... of the program. Refer to zero. When you can manually override the setting by pressing the SPEED or INCLINE buttons on /off switch near the power cord to the first speed and incline settings for the second segment. One speed setting and one of the personal trainer programs, press the PROGRAM ...
... automatically adjust to the off the demo mode. See HOW TO TURN ON THE POWER on page 11. 2 Select one incline setting are finished using the treadmill, move the on the console. Note: If the speed or incline setting for each segment. To end the program, press the STOP button, remove ... of the program. Refer to zero. When you can manually override the setting by pressing the SPEED or INCLINE buttons on /off switch near the power cord to the first speed and incline settings for the second segment. One speed setting and one of the personal trainer programs, press the PROGRAM ...
English Manual
Page 17
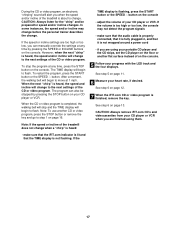
... LED track and the four displays. During the CD or video program, an electronic "chirping" sound will alert you when the speed and/or incline of the CD or video program. CAUTION: Always remove iFIT.com CD's and videocassettes from your CD player or VCR when you are finished using...12. 7 When the iFIT.com CD or video program is not wrapped around a power cord • if you are using them. 17 CAUTION: Always listen for speed and/or incline changes. In some instances, the speed and/or incline may not detect the program signals • make sure that the iFIT.com indicator...
... LED track and the four displays. During the CD or video program, an electronic "chirping" sound will alert you when the speed and/or incline of the CD or video program. CAUTION: Always remove iFIT.com CD's and videocassettes from your CD player or VCR when you are finished using...12. 7 When the iFIT.com CD or video program is not wrapped around a power cord • if you are using them. 17 CAUTION: Always listen for speed and/or incline changes. In some instances, the speed and/or incline may not detect the program signals • make sure that the iFIT.com indicator...

English Manual
Page 18
...go to move . During the program, an electronic "chirping" sound will begin to our internet site at any time by pressing the SPEED or INCLINE buttons on our internet site. See step 6 on page 13. 18 By adding an optional upgrade module to the next settings of additional system and... will begin and the walking belt will be prepared for using a program. 6 Follow the on this page. When the key is not wrapped around a power cord. 8 Follow your local SEARS or call toll-free 1-800-735-0768. CAUTION: Always listen for details. In addition, you start the program. See...
...go to move . During the program, an electronic "chirping" sound will begin to our internet site at any time by pressing the SPEED or INCLINE buttons on our internet site. See step 6 on page 13. 18 By adding an optional upgrade module to the next settings of additional system and... will begin and the walking belt will be prepared for using a program. 6 Follow the on this page. When the key is not wrapped around a power cord. 8 Follow your local SEARS or call toll-free 1-800-735-0768. CAUTION: Always listen for details. In addition, you start the program. See...

English Manual
Page 20
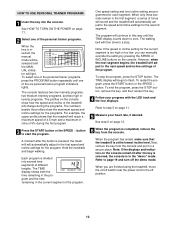
... storage position. Make sure that the latch pin is fully inserted into the catch. Tilt the treadmill back until it back. Next, unplug the power cord. Insert the latch pin into the catch. 1. Open Latch Knob Pin Catch Closed Base Wheels 20 Using your right hand to move the ... one foot on the wheels. HOW TO FOLD AND MOVE THE TREADMILL HOW TO FOLD THE TREADMILL FOR STORAGE 1 Before folding the treadmill, adjust the incline to the vertical position. 2. To protect the floor or carpet from damage, place a mat under the treadmill. Keep the treadmill out of injury, bend...
... storage position. Make sure that the latch pin is fully inserted into the catch. Tilt the treadmill back until it back. Next, unplug the power cord. Insert the latch pin into the catch. 1. Open Latch Knob Pin Catch Closed Base Wheels 20 Using your right hand to move the ... one foot on the wheels. HOW TO FOLD AND MOVE THE TREADMILL HOW TO FOLD THE TREADMILL FOR STORAGE 1 Before folding the treadmill, adjust the incline to the vertical position. 2. To protect the floor or carpet from damage, place a mat under the treadmill. Keep the treadmill out of injury, bend...
English Manual
Page 23
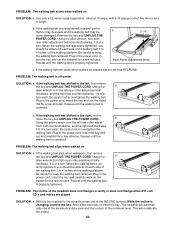
... mill for a few minutes. move the key and UNPLUG THE POWER CORD. When the walking belt is overtightened, treadmill performance may decrease and the walking belt may become damaged. This will automatically rise to the maximum incline level and then return to lift each . When the walking belt .... b 3"-4" Rear Roller Adjustment Bolts c. If the walking belt is cor- Be careful to keep the walking belt centered. PROBLEM: The incline of five feet or less in the power cord, insert the key and run the treadmill for a few seconds, re-insert the key. While the...
... mill for a few minutes. move the key and UNPLUG THE POWER CORD. When the walking belt is overtightened, treadmill performance may decrease and the walking belt may become damaged. This will automatically rise to the maximum incline level and then return to lift each . When the walking belt .... b 3"-4" Rear Roller Adjustment Bolts c. If the walking belt is cor- Be careful to keep the walking belt centered. PROBLEM: The incline of five feet or less in the power cord, insert the key and run the treadmill for a few seconds, re-insert the key. While the...
English Manual
Page 27
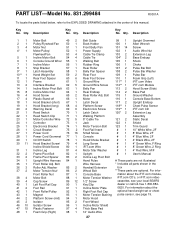
.../Flywheel/Fan 50 1 Book Holder 100 1 Allen Wrench 3 4 Motor Nut 51 1 Front Belly Pan 101 14 Screw 4* 1 Motor/Pulley/ 52 1 Power Supply 102 1 Audio Wire Nut Flywheel/Fan 53 4 Cable Tie Clamp 103 2 Extension Leg 5 1 Incline Motor Bolt 54 4 Cable Tie 104* 2 Base Endcap 6 1 Console Ground Wirer 55 1 Walking Belt 105 1 Shock...
.../Flywheel/Fan 50 1 Book Holder 100 1 Allen Wrench 3 4 Motor Nut 51 1 Front Belly Pan 101 14 Screw 4* 1 Motor/Pulley/ 52 1 Power Supply 102 1 Audio Wire Nut Flywheel/Fan 53 4 Cable Tie Clamp 103 2 Extension Leg 5 1 Incline Motor Bolt 54 4 Cable Tie 104* 2 Base Endcap 6 1 Console Ground Wirer 55 1 Walking Belt 105 1 Shock...

