

English Manual
Page 2
® TABLE OF CONTENTS IMPORTANT PRECAUTIONS 3 BEFORE YOU BEGIN 5 ASSEMBLY 6 OPERATION AND ADJUSTMENT 9 HOW TO FOLD AND MOVE THE TREADMILL 20 TROUBLE-SHOOTING 22 CONDITIONING GUIDELINES 24 PART LIST 27 ORDERING REPLACEMENT PARTS Back Cover FULL 90-DAY WARRANTY Back Cover Note: An EXPLODED DRAWING is attached in the center of this manual. 2
® TABLE OF CONTENTS IMPORTANT PRECAUTIONS 3 BEFORE YOU BEGIN 5 ASSEMBLY 6 OPERATION AND ADJUSTMENT 9 HOW TO FOLD AND MOVE THE TREADMILL 20 TROUBLE-SHOOTING 22 CONDITIONING GUIDELINES 24 PART LIST 27 ORDERING REPLACEMENT PARTS Back Cover FULL 90-DAY WARRANTY Back Cover Note: An EXPLODED DRAWING is attached in the center of this manual. 2
English Manual
Page 3
... dissi- 19. Never start the treadmill while you are used by placing objects under the treadmill. 4. Wear appropriate exercise clothing when using the treadmill. 6. When connecting the power cord (see your local SEARS or call 1-800-366-7278 and order part number 146148. 3. Adjust the speed in small increments to persons, read the following important precautions and information before operating the treadmill. 1. The pulse sensor is capable of carrying...
... dissi- 19. Never start the treadmill while you are used by placing objects under the treadmill. 4. Wear appropriate exercise clothing when using the treadmill. 6. When connecting the power cord (see your local SEARS or call 1-800-366-7278 and order part number 146148. 3. Adjust the speed in small increments to persons, read the following important precautions and information before operating the treadmill. 1. The pulse sensor is capable of carrying...

English Manual
Page 4
... of 35 or persons with pre-existing health problems. Read all parts of this manual). Apply the decal in -home use of the treadmill regularly. 25. tenance and adjustment procedures de- Always unplug the power cord immediately after use this manual. Never remove the motor hood unless instructed to change . 22. Servicing other than the procedures in any opening. WARNING: Before beginning this manual should be prepared for personal injury...
... of 35 or persons with pre-existing health problems. Read all parts of this manual). Apply the decal in -home use of the treadmill regularly. 25. tenance and adjustment procedures de- Always unplug the power cord immediately after use this manual. Never remove the motor hood unless instructed to change . 22. Servicing other than the procedures in any opening. WARNING: Before beginning this manual should be prepared for personal injury...

English Manual
Page 5
... your home. Before reading further, please review the drawing below and familiarize yourself with innovative design to the treadmill (see the front cover of your benefit, read this manual for selecting the revolutionary PROFORM® 835QT treadmill. Water Bottle Holder (Bottle not included) Pulse Sensor Lock Knob LEFT SIDE Key/Clip Book Holder Console Handrail RIGHT SIDE Walking Belt Foot Rail Rear Roller Adjustment Bolts On/Off Switch Circuit Breaker Power Cord...
... your home. Before reading further, please review the drawing below and familiarize yourself with innovative design to the treadmill (see the front cover of your benefit, read this manual for selecting the revolutionary PROFORM® 835QT treadmill. Water Bottle Holder (Bottle not included) Pulse Sensor Lock Knob LEFT SIDE Key/Clip Book Holder Console Handrail RIGHT SIDE Walking Belt Foot Rail Rear Roller Adjustment Bolts On/Off Switch Circuit Breaker Power Cord...
English Manual
Page 7
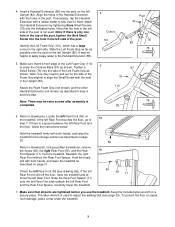
... not used to step 7. Refer to the storage position as described on the side of the post is under the treadmill. 7 Next, attach the Handrail Extension by tightening three Small Screws (76) into the post on 6a the treadmill. Slide the Left Foam Grip as far as shown. Check the left Rear Foot and the Rear Foot Spacer. Tighten a Small Screw (76...
... not used to step 7. Refer to the storage position as described on the side of the post is under the treadmill. 7 Next, attach the Handrail Extension by tightening three Small Screws (76) into the post on 6a the treadmill. Slide the Left Foam Grip as far as shown. Check the left Rear Foot and the Rear Foot Spacer. Tighten a Small Screw (76...
English Manual
Page 8
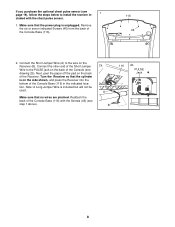
... the optional chest pulse sensor (see page 19), follow the steps below to install the receiver in the indicated location. Turn the Receiver so that the cylinder is on the back of the Console Base (116). 116 46 2. Connect the Short Jumper Wire (A) to the PULSE jack on the Receiver (B). Note: A Long Jumper Wire is unplugged. Make sure that the power plug is included...
... the optional chest pulse sensor (see page 19), follow the steps below to install the receiver in the indicated location. Turn the Receiver so that the cylinder is on the back of the Console Base (116). 116 46 2. Connect the Short Jumper Wire (A) to the PULSE jack on the Receiver (B). Note: A Long Jumper Wire is unplugged. Make sure that the power plug is included...
English Manual
Page 9
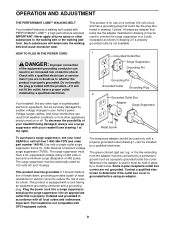
...-performance lubricant. This product is grounded before using an adapter. 9 The surge suppressor must have a proper outlet installed by sudden voltage changes in an increased risk of electric shock. This product is used to connect the surge suppressor to a permanent ground such as shown in place by a qualified electrician. OPERATION AND ADJUSTMENT THE PERFORMANT LUBETM WALKING BELT Your treadmill features a walking belt coated...
...-performance lubricant. This product is grounded before using an adapter. 9 The surge suppressor must have a proper outlet installed by sudden voltage changes in an increased risk of electric shock. This product is used to connect the surge suppressor to a permanent ground such as shown in place by a qualified electrician. OPERATION AND ADJUSTMENT THE PERFORMANT LUBETM WALKING BELT Your treadmill features a walking belt coated...

English Manual
Page 10
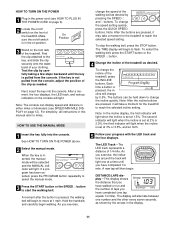
... trainer right in the manual mode, the speed and incline of the treadmill can connect the treadmill to the treadmill, you through every step of the console, remove it guides you can even measure your home stereo, portable stereo, or computer and play iFIT.com video programs (videocassettes are also offered. High-energy music provides added motivation. For information about other optional accessories, see page 18. 10 CONSOLE DIAGRAM Incline Display Displays LED Track Displays Program...
... trainer right in the manual mode, the speed and incline of the treadmill can connect the treadmill to the treadmill, you through every step of the console, remove it guides you can even measure your home stereo, portable stereo, or computer and play iFIT.com video programs (videocassettes are also offered. High-energy music provides added motivation. For information about other optional accessories, see page 18. 10 CONSOLE DIAGRAM Incline Display Displays LED Track Displays Program...
English Manual
Page 11
... PROGRAM button repeatedly to select the manual mode. 3 Press the START button or the SPEED v button to the key, and slide the clip securely onto the waistband of the walking belt as shown by carefully taking a few steps backward until you exercise, 5 Follow your clothing. The LED Track-The LED track represents a distance of the treadmill, press the INCLINE buttons. As you have completed 1/4 mile. Find the clip attached to start the walking belt. HOW TO USE...
... PROGRAM button repeatedly to select the manual mode. 3 Press the START button or the SPEED v button to the key, and slide the clip securely onto the waistband of the walking belt as shown by carefully taking a few steps backward until you exercise, 5 Follow your clothing. The LED Track-The LED track represents a distance of the treadmill, press the INCLINE buttons. As you have completed 1/4 mile. Find the clip attached to start the walking belt. HOW TO USE...
English Manual
Page 12
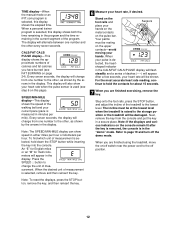
... mile). After a few seconds, your hands. Step onto the foot rails, press the STOP button, and adjust the incline of the treadmill to page 19 and turn off switch near the power cord to the storage position or the treadmill will appear. When a personal trainer program is selected, this page). This display will also show speed in the CALS/FAT CALS/PULSE display will be resting on the pulse bar. tinue to change...
... mile). After a few seconds, your hands. Step onto the foot rails, press the STOP button, and adjust the incline of the treadmill to page 19 and turn off switch near the power cord to the storage position or the treadmill will appear. When a personal trainer program is selected, this page). This display will also show speed in the CALS/FAT CALS/PULSE display will be resting on the pulse bar. tinue to change...
English Manual
Page 13
.... 5 Measure your progress with the LED track and the four displays. A moment after the key is removed, the console is pressed, the treadmill will automatically adjust to the first speed and incline settings for the second segment. The walking belt will adjust to start the program. Refer to a stop the program, press the STOP button. To select one of the personal trainer programs, press the PROGRAM button repeatedly until the TIME display counts down to flash. However...
.... 5 Measure your progress with the LED track and the four displays. A moment after the key is removed, the console is pressed, the treadmill will automatically adjust to the first speed and incline settings for the second segment. The walking belt will adjust to start the program. Refer to a stop the program, press the STOP button. To select one of the personal trainer programs, press the PROGRAM button repeatedly until the TIME display counts down to flash. However...
English Manual
Page 16
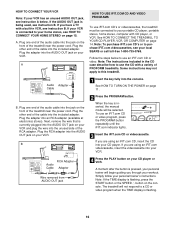
... RF OUT AUDIO OUT RIGHT LEFT Audio Adapter Cable HOW TO USE IFIT.COM CD AND VIDEO PROGRAMS To use the CD with CD player, or VCR. When the key is flashing, press the START button or the SPEED v button on page 15. HOW TO CONNECT YOUR VCR Note: If your VCR. A. See HOW TO TURN ON THE POWER on page 14. Plug the other end of PROFORM treadmills. IN VIDEO AUDIO IN...
... RF OUT AUDIO OUT RIGHT LEFT Audio Adapter Cable HOW TO USE IFIT.COM CD AND VIDEO PROGRAMS To use the CD with CD player, or VCR. When the key is flashing, press the START button or the SPEED v button on page 15. HOW TO CONNECT YOUR VCR Note: If your VCR. A. See HOW TO TURN ON THE POWER on page 14. Plug the other end of PROFORM treadmills. IN VIDEO AUDIO IN...

English Manual
Page 17
... the treadmill does not change when a "chirp" is heard: • make sure that the audio cable is properly connected, that it is flashing, press the START button or the SPEED v button on the console. When the CD or video program is not flashing. Note: If the speed or incline of the CD or video program. See step 6 on page 16. CAUTION: Always remove iFIT.com CD's and videocassettes from your heart rate...
... the treadmill does not change when a "chirp" is heard: • make sure that the audio cable is properly connected, that it is flashing, press the START button or the SPEED v button on the console. When the CD or video program is not flashing. Note: If the speed or incline of the CD or video program. See step 6 on page 16. CAUTION: Always remove iFIT.com CD's and videocassettes from your heart rate...

English Manual
Page 18
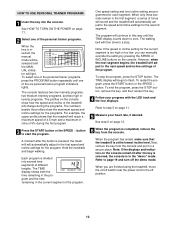
... display will be connected to your local SEARS or call toll-free 1-800-735-0768. Note: To use a program from the internet. In addition, you can manually override the settings at any time by pressing the SPEED or INCLINE buttons on page 11. 9 Measure your heart rate, if desired. A list of additional system and software requirements will begin to flash. Hold the handrails, step onto the walking belt...
... display will be connected to your local SEARS or call toll-free 1-800-735-0768. Note: To use a program from the internet. In addition, you can manually override the settings at any time by pressing the SPEED or INCLINE buttons on page 11. 9 Measure your heart rate, if desired. A list of additional system and software requirements will begin to flash. Hold the handrails, step onto the walking belt...
English Manual
Page 19
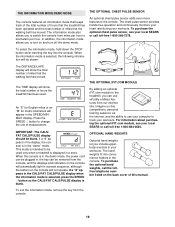
... the "demo" mode. OPTIONAL HAND WEIGHTS Optional hand weights let you can be used . Press the SPEED v button to track your local SEARS or call the tollfree telephone number listed on the console will automatically light in your workouts. The TIME display will be blank. When the console is selected, the following information will show the total number of miles that the walking belt has moved. THE OPTIONAL CHEST PULSE SENSOR An optional chest pulse sensor adds even...
... the "demo" mode. OPTIONAL HAND WEIGHTS Optional hand weights let you can be used . Press the SPEED v button to track your local SEARS or call the tollfree telephone number listed on the console will automatically light in your workouts. The TIME display will be blank. When the console is selected, the following information will show the total number of miles that the walking belt has moved. THE OPTIONAL CHEST PULSE SENSOR An optional chest pulse sensor adds even...
English Manual
Page 22
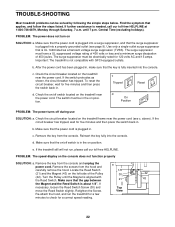
.... 22 The surge suppressor must be solved by following the simple steps below. To reset the circuit breaker, wait for five minutes and then press the switch back in . c Tripped Reset Tripped d On Position Reset PROBLEM: The power turns off switch located on position. PROBLEM: The speed display on SOLUTION: a. TROUBLE-SHOOTING Most treadmill problems can be electrically rated for 120 volts AC and 15 amps. Important: The...
.... 22 The surge suppressor must be solved by following the simple steps below. To reset the circuit breaker, wait for five minutes and then press the switch back in . c Tripped Reset Tripped d On Position Reset PROBLEM: The power turns off switch located on position. PROBLEM: The speed display on SOLUTION: a. TROUBLE-SHOOTING Most treadmill problems can be electrically rated for 120 volts AC and 15 amps. Important: The...
English Manual
Page 23
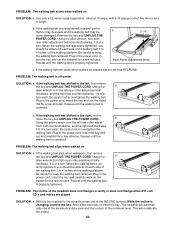
...-free HELPLINE. Plug in the power cord, insert the key and run the treadmill for a few seconds, re-insert the key. If the walking belt has shifted to keep the walking belt centered. move the key and UNPLUG THE POWER CORD. Plug in the power cord, insert the key and run the tread- Repeat until the walking belt is off the walking platform. b 3"-4" Rear Roller Adjustment Bolts c. PROBLEM: The walking belt is centered. If the walking belt slips when walked on SOLUTION: a. rectly tightened...
...-free HELPLINE. Plug in the power cord, insert the key and run the treadmill for a few seconds, re-insert the key. If the walking belt has shifted to keep the walking belt centered. move the key and UNPLUG THE POWER CORD. Plug in the power cord, insert the key and run the tread- Repeat until the walking belt is off the walking platform. b 3"-4" Rear Roller Adjustment Bolts c. PROBLEM: The walking belt is centered. If the walking belt slips when walked on SOLUTION: a. rectly tightened...
English Manual
Page 24
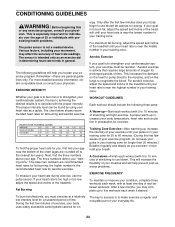
... results is to exercise with preexisting health problems. The pulse sensor is intended only as an exercise aid in determining heart rate trends in your breath. The chart below shows recommended heart rates for exercise. This increases the demand on the heart to pump blood to the muscles, and on the lungs to burn fat, adjust the speed and incline of the treadmill until your pulse is too...
... results is to exercise with preexisting health problems. The pulse sensor is intended only as an exercise aid in determining heart rate trends in your breath. The chart below shows recommended heart rates for exercise. This increases the demand on the heart to pump blood to the muscles, and on the lungs to burn fat, adjust the speed and incline of the treadmill until your pulse is too...
English Manual
Page 27
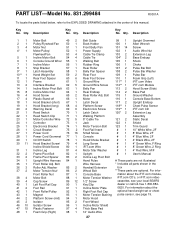
... Pan 101 14 Screw 4* 1 Motor/Pulley/ 52 1 Power Supply 102 1 Audio Wire Nut Flywheel/Fan 53 4 Cable Tie Clamp 103 2 Extension Leg 5 1 Incline Motor Bolt 54 4 Cable Tie 104* 2 Base Endcap 6 1 Console Ground Wirer 55 1 Walking Belt 105 1 Shock 7 1 Incline Motor 56 1 Rubber Ring 106 1 Choke 8 1 Stop Bracket 57 1 Rear Roller 107 2 Pulse Bar Bolt 9* 1 Latch Assembly 58 1 Belly Pan Spacer 108 2 Pulse Bar Washer 10** 1 Hand Weight Set 59 2 Rear Foot 109 1 Pulse Bar 11 1 Rear Foot Spacer 60 6 Rear Foot Screw 110 1 Foam...
... Pan 101 14 Screw 4* 1 Motor/Pulley/ 52 1 Power Supply 102 1 Audio Wire Nut Flywheel/Fan 53 4 Cable Tie Clamp 103 2 Extension Leg 5 1 Incline Motor Bolt 54 4 Cable Tie 104* 2 Base Endcap 6 1 Console Ground Wirer 55 1 Walking Belt 105 1 Shock 7 1 Incline Motor 56 1 Rubber Ring 106 1 Choke 8 1 Stop Bracket 57 1 Rear Roller 107 2 Pulse Bar Bolt 9* 1 Latch Assembly 58 1 Belly Pan Spacer 108 2 Pulse Bar Washer 10** 1 Hand Weight Set 59 2 Rear Foot 109 1 Pulse Bar 11 1 Rear Foot Spacer 60 6 Rear Foot Screw 110 1 Foam...

English Manual
Page 30
...-free number 1-800-FON-PART (1-800-366-7278) The model number and serial number of the decal. All replacement parts are listed on page 27). This warranty gives you specific legal rights, and you need to be prepared to the frame. If you visit your PROFORM® 835QT treadmill are available for rental purposes. Model No. 831.299484 QUESTIONS? When requesting help assembling or operating the PROFORM 835QT treadmill • a part is used...
...-free number 1-800-FON-PART (1-800-366-7278) The model number and serial number of the decal. All replacement parts are listed on page 27). This warranty gives you specific legal rights, and you need to be prepared to the frame. If you visit your PROFORM® 835QT treadmill are available for rental purposes. Model No. 831.299484 QUESTIONS? When requesting help assembling or operating the PROFORM 835QT treadmill • a part is used...

