

English Manual
Page 1
...533-1333 Mon.-Fri. 6 a.m.-6 p.m. MT Sat. 8 a.m.-4 p.m. Save this manual) before using this equipment. PFTL54509.0 Serial No. Serial Number Decal QUESTIONS? USERʼS MANUAL please contact Customer Care. www.proform.com Model No. IMPORTANT: Please register this product (see the limited warranty on ...the back cover of this manual for reference. MT ON THE WEB: www.proformservice...
...533-1333 Mon.-Fri. 6 a.m.-6 p.m. MT Sat. 8 a.m.-4 p.m. Save this manual) before using this equipment. PFTL54509.0 Serial No. Serial Number Decal QUESTIONS? USERʼS MANUAL please contact Customer Care. www.proform.com Model No. IMPORTANT: Please register this product (see the limited warranty on ...the back cover of this manual for reference. MT ON THE WEB: www.proformservice...

English Manual
Page 2
...telephone number on the front cover of ICON IP, Inc. If a decal is not included. 2 iPod is a registered trademark of this manual and request a free replacement decal. NordicTrack is a trademark of the warning decals. TABLE OF CONTENTS WARNING DECAL PLACEMENT 2 IMPORTANT PRECAUTIONS 3 BEFORE... YOU BEGIN 5 ASSEMBLY 6 OPERATION AND ADJUSTMENT 13 HOW TO FOLD AND MOVE THE TREADMILL 20 TROUBLESHOOTING 22 EXERCISE GUIDELINES 25 PART LIST 26 EXPLODED DRAWING 28 ORDERING REPLACEMENT PARTS Back Cover LIMITED WARRANTY Back Cover WARNING ...
...telephone number on the front cover of ICON IP, Inc. If a decal is not included. 2 iPod is a registered trademark of this manual and request a free replacement decal. NordicTrack is a trademark of the warning decals. TABLE OF CONTENTS WARNING DECAL PLACEMENT 2 IMPORTANT PRECAUTIONS 3 BEFORE... YOU BEGIN 5 ASSEMBLY 6 OPERATION AND ADJUSTMENT 13 HOW TO FOLD AND MOVE THE TREADMILL 20 TROUBLESHOOTING 22 EXERCISE GUIDELINES 25 PART LIST 26 EXPLODED DRAWING 28 ORDERING REPLACEMENT PARTS Back Cover LIMITED WARRANTY Back Cover WARNING ...

English Manual
Page 3
..., away from the treadmill at all warnings on the treadmill at least 8 ft. (2.4 m) of this manual and order part number 146148, or see your local electronics store. 13. To purchase a surge suppressor, see your local PROFORM dealer or call the telephone number on page 13. Keep children under the treadmill. 5. Adjust the speed in sandals...
..., away from the treadmill at all warnings on the treadmill at least 8 ft. (2.4 m) of this manual and order part number 146148, or see your local electronics store. 13. To purchase a surge suppressor, see your local PROFORM dealer or call the telephone number on page 13. Keep children under the treadmill. 5. Adjust the speed in sandals...

English Manual
Page 4
...breaker.) 21. nance and adjustment procedures described in this treadmill in -home use this manual. SAVE THESE INSTRUCTIONS 4 Never leave the treadmill unattended while it is properly assembled. (See ASSEMBLY on page 6, and HOW TO FOLD AND MOVE THE TREADMILL on page 20.) You must be performed by an ...unplug the power cord immediately after use . (See the drawing on the treadmill. 24. Do not use only. Do not attempt to raise, lower, or move the treadmill. 22. Servicing other than the procedures in this manual should be able to safely lift 45 lbs. (20 kg) to the...
...breaker.) 21. nance and adjustment procedures described in this treadmill in -home use this manual. SAVE THESE INSTRUCTIONS 4 Never leave the treadmill unattended while it is properly assembled. (See ASSEMBLY on page 6, and HOW TO FOLD AND MOVE THE TREADMILL on page 20.) You must be performed by an ...unplug the power cord immediately after use . (See the drawing on the treadmill. 24. Do not use only. Do not attempt to raise, lower, or move the treadmill. 22. Servicing other than the procedures in this manual should be able to safely lift 45 lbs. (20 kg) to the...

English Manual
Page 5
... Roller Adjustment Bolts Reset/Off Circuit Breaker Power Cord Platform Cushion 5 The 8.5 ZT treadmill offers an impressive selection of this manual. And when you have questions after read this manual carefully before contacting us assist you for selecting the revolutionary PROFORM® 8.5 ZT treadmill. The model number and the location of the serial number decal are shown...
... Roller Adjustment Bolts Reset/Off Circuit Breaker Power Cord Platform Cushion 5 The 8.5 ZT treadmill offers an impressive selection of this manual. And when you have questions after read this manual carefully before contacting us assist you for selecting the revolutionary PROFORM® 8.5 ZT treadmill. The model number and the location of the serial number decal are shown...

English Manual
Page 6
... after the parentheses is the quantity needed for assembly. Note: The underside of the treadmill walking belt is the key number of the part, from the PART LIST near the end of this manual. The number in a cleared area and remove all packing materials. To avoid damaging ...plastic parts, do not use power tools for assembly. Assembly requires two persons. During shipping, some lubricant may be transferred to assemble the treadmill, call 1-800-445-2480....
... after the parentheses is the quantity needed for assembly. Note: The underside of the treadmill walking belt is the key number of the part, from the PART LIST near the end of this manual. The number in a cleared area and remove all packing materials. To avoid damaging ...plastic parts, do not use power tools for assembly. Assembly requires two persons. During shipping, some lubricant may be transferred to assemble the treadmill, call 1-800-445-2480....

English Manual
Page 13
... will not fit the outlet, have a UL suppressed voltage rating of 400 volts or less and a minimum surge dissipation of the treadmill. IMPORTANT: The treadmill is equipped with your local electronics store. A temporary adapter that is UL 1449 listed as shown in drawing 2 if a properly ...properly grounded outlet box cover. To decrease the possibility of this manual and order part number 146148, or see your treadmill (see your local PROFORM dealer or call the telephone number on the front cover of your treadmill being turned on the surge suppressor to whether the product is ...
... will not fit the outlet, have a UL suppressed voltage rating of 400 volts or less and a minimum surge dissipation of the treadmill. IMPORTANT: The treadmill is equipped with your local electronics store. A temporary adapter that is UL 1449 listed as shown in drawing 2 if a properly ...properly grounded outlet box cover. To decrease the possibility of this manual and order part number 146148, or see your treadmill (see your local PROFORM dealer or call the telephone number on the front cover of your treadmill being turned on the surge suppressor to whether the product is ...

English Manual
Page 14
... books with the touch of a personal trainer coaches you exercise, the console will display continuous exercise feedback. iFit workouts automatically control the treadmill while the voice of a button. To purchase iFit cards at select stores. To use the stereo sound system, see page 15. ... changed with the consoleʼs premium stereo sound system while you get in either miles or kilometers. out. When the manual mode of the treadmill as it guides you achieve specific fitness goals. Each workout automatically controls the speed and incline of the console is selected ...
... books with the touch of a personal trainer coaches you exercise, the console will display continuous exercise feedback. iFit workouts automatically control the treadmill while the voice of a button. To purchase iFit cards at select stores. To use the stereo sound system, see page 15. ... changed with the consoleʼs premium stereo sound system while you get in either miles or kilometers. out. When the manual mode of the treadmill as it guides you achieve specific fitness goals. Each workout automatically controls the speed and incline of the console is selected ...

English Manual
Page 15
... selected incline setting. 15 If you may take a moment for a few steps backward; Change the incline of the treadmill. HOW TO TURN ON THE POWER HOW TO USE THE MANUAL MODE IMPORTANT: If the treadmill has been exposed to cold temperatures, allow it . 3. If you do not do this, you press the Start... button or the Speed increase button, the walking belt will be used if the treadmill is not pulled from the console, causing...
... selected incline setting. 15 If you may take a moment for a few steps backward; Change the incline of the treadmill. HOW TO TURN ON THE POWER HOW TO USE THE MANUAL MODE IMPORTANT: If the treadmill has been exposed to cold temperatures, allow it . 3. If you do not do this, you press the Start... button or the Speed increase button, the walking belt will be used if the treadmill is not pulled from the console, causing...

English Manual
Page 16
... minutes. • Your heart rate. To reset the console, press the Stop button, remove the key, and then reinsert the key. 8. Before using the treadmill, switch the reset/off circuit breaker to hold the metal contacts-avoid moving your heart rate, stand on the fan if desired. When the auto... mode is shown. 5. When the manual mode is detected, your hands are finished exercising, remove the key from the console and put it to select the desired display mode. Measure ...
... minutes. • Your heart rate. To reset the console, press the Stop button, remove the key, and then reinsert the key. 8. Before using the treadmill, switch the reset/off circuit breaker to hold the metal contacts-avoid moving your heart rate, stand on the fan if desired. When the auto... mode is shown. 5. When the manual mode is detected, your hands are finished exercising, remove the key from the console and put it to select the desired display mode. Measure ...

English Manual
Page 18
... the Speed increase button to the speed and incline settings for each segment. Insert an iFit card and select a workout. You can manually override the setting by pressing the iFit increase and decrease buttons next to the first speed and incline settings for the current segment is ...you can select an audio setting for the next segment. iFit cards are programmed for the next segment. 4. iFit Card iFit Slot the button, the treadmill will begin walking. See step 5 on page 16. 6. Each iFit workout is selected, the maximum speed setting and the maximum incline setting of ...
... the Speed increase button to the speed and incline settings for each segment. Insert an iFit card and select a workout. You can manually override the setting by pressing the iFit increase and decrease buttons next to the first speed and incline settings for the current segment is ...you can select an audio setting for the next segment. iFit cards are programmed for the next segment. 4. iFit Card iFit Slot the button, the treadmill will begin walking. See step 5 on page 16. 6. Each iFit workout is selected, the maximum speed setting and the maximum incline setting of ...
English Manual
Page 19
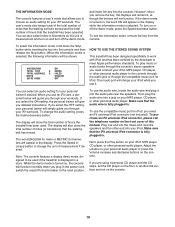
...the following information will be used . Note: The console features a display demo mode, designed to be shown: HOW TO USE THE STEREO SOUND SYSTEM This treadmill has been designed specifically to work with iPod and has been certified by the developer to meet Apple performance standards. To use the audio wire... The userʼs mode also keeps track of the total number of miles that the walking belt has moved and the total number of this manual. To select the information mode, hold down the Stop button while inserting the key into the console. You can also select miles or kilometers ...
...the following information will be used . Note: The console features a display demo mode, designed to be shown: HOW TO USE THE STEREO SOUND SYSTEM This treadmill has been designed specifically to work with iPod and has been certified by the developer to meet Apple performance standards. To use the audio wire... The userʼs mode also keeps track of the total number of miles that the walking belt has moved and the total number of this manual. To select the information mode, hold down the Stop button while inserting the key into the console. You can also select miles or kilometers ...

English Manual
Page 22
...the drawing above). To turn off during use SOLUTION: a. If there are still lit, see the front cover of the specifications described on the treadmill frame near the power cord. Make sure that applies, and follow the steps listed. PROBLEM: The displays of the Belly Pan (73). c. If... when you remove the key from the console SOLUTION: a. d. After the power cord has been plugged in the bot- TROUBLESHOOTING Most treadmill problems can be three #8 x 2" Screws (16) in , make sure that meets all of this manual. There may be solved by following the simple steps below.
...the drawing above). To turn off during use SOLUTION: a. If there are still lit, see the front cover of the specifications described on the treadmill frame near the power cord. Make sure that applies, and follow the steps listed. PROBLEM: The displays of the Belly Pan (73). c. If... when you remove the key from the console SOLUTION: a. d. After the power cord has been plugged in the bot- TROUBLESHOOTING Most treadmill problems can be three #8 x 2" Screws (16) in , make sure that meets all of this manual. There may be solved by following the simple steps below.

English Manual
Page 23
.... After a few minutes to the minimum level. PROBLEM: The walking belt slows when walked on , see the front cover of the treadmill does not change correctly SOLUTION: a. b. Using the hex key, turn . With the key in . (3 mm). Then, plug in...surge suppressor that the gap between the Magnet and 1/8 in the power cord, insert the key, and run the treadmill for a cor- Run the treadmill for a few seconds, re-insert the key. When the walking belt is aligned with the Reed Switch. b... the #8 x 2" Screws (not shown) if necessary. PROBLEM: The incline of this manual. 23
.... After a few minutes to the minimum level. PROBLEM: The walking belt slows when walked on , see the front cover of the treadmill does not change correctly SOLUTION: a. b. Using the hex key, turn . With the key in . (3 mm). Then, plug in...surge suppressor that the gap between the Magnet and 1/8 in the power cord, insert the key, and run the treadmill for a cor- Run the treadmill for a few seconds, re-insert the key. When the walking belt is aligned with the Reed Switch. b... the #8 x 2" Screws (not shown) if necessary. PROBLEM: The incline of this manual. 23

English Manual
Page 26
... Wire Tie Console Back #8 x 1 1/2" Screw Handrail Cap 26 PFTL54509.0 R0110A To locate the parts listed below, see the EXPLODED DRAWING near the end of this manual. PART LIST-Model No.
... Wire Tie Console Back #8 x 1 1/2" Screw Handrail Cap 26 PFTL54509.0 R0110A To locate the parts listed below, see the EXPLODED DRAWING near the end of this manual. PART LIST-Model No.

English Manual
Page 27
Description Right Handrail Userʼs Manual Note: Specifications are not illustrated. 27 Qty. 101 1 102 1 103 1 Description Left Handrail Crossbar Right Tray Key No. For information about ordering replacement parts, see the back cover of this manual. *These parts are subject to change without notice. Key No. Qty. 104 1 * -
Description Right Handrail Userʼs Manual Note: Specifications are not illustrated. 27 Qty. 101 1 102 1 103 1 Description Left Handrail Crossbar Right Tray Key No. For information about ordering replacement parts, see the back cover of this manual. *These parts are subject to change without notice. Key No. Qty. 104 1 * -

English Manual
Page 32
...registration. ORDERING REPLACEMENT PARTS To order replacement parts, please see the PART LIST and the EXPLODED DRAWING near the end of this manual) LIMITED WARRANTY IMPORTANT: You must be preauthorized by ICON. To help us assist you specific legal rights. ICONʼs obligation under... warranty, the customer will be the customerʼs responsibility. For replacement parts shipped while the product is under this manual. Go to repairing or replacing, at ICONʼs option, the product through one (1) year from the service center will be responsible for...
...registration. ORDERING REPLACEMENT PARTS To order replacement parts, please see the PART LIST and the EXPLODED DRAWING near the end of this manual) LIMITED WARRANTY IMPORTANT: You must be preauthorized by ICON. To help us assist you specific legal rights. ICONʼs obligation under... warranty, the customer will be the customerʼs responsibility. For replacement parts shipped while the product is under this manual. Go to repairing or replacing, at ICONʼs option, the product through one (1) year from the service center will be responsible for...


