

English Manual
Page 1
PRO•FORM® 72 Model No. As a manufacturer, we will provide immediate assistance, free of charge to providing complete customer satisfaction. TO AVOID UNNECESSARY DELAYS, PLEASE CALL DIRECT TO OUR TOLL-FREE CUSTOMER HOT LINE. Serial Number Decal O O QUESTIONS? The trained technicians on our ...Customer Hot Line will guarantee you . If you have questions, or find that there are missing or damaged parts, we are committed to you complete satisfaction through direct...
PRO•FORM® 72 Model No. As a manufacturer, we will provide immediate assistance, free of charge to providing complete customer satisfaction. TO AVOID UNNECESSARY DELAYS, PLEASE CALL DIRECT TO OUR TOLL-FREE CUSTOMER HOT LINE. Serial Number Decal O O QUESTIONS? The trained technicians on our ...Customer Hot Line will guarantee you . If you have questions, or find that there are missing or damaged parts, we are committed to you complete satisfaction through direct...

English Manual
Page 2
uphys.M1.4O,... PRO•FORM® TABLE OF CONTENTS IMPORTANT PRECAUTIONS BEFORE YOU BEGIN ASSEMBLY OPERATION AND ADJUSTMENT HOW TO FOLD AND MOVE THE TREADMILL TROUBLE-SHOOTING CONDITIONING GUIDELINES ORDERING REPLACEMENT PARTS LIMITED WARRANTY 3 4 5 7 11 12 14 Back Cover Back Cover Note: An EXPLODED DRAWING and a PART LIST are attached to the center of this ''orany.exercise program, cvn u. s.prod for future reference. Save the EXPLODED DRAWING and PART LIST for personal injury or,`propei r RNAL As ead alt 2 Inning 'this manual.
uphys.M1.4O,... PRO•FORM® TABLE OF CONTENTS IMPORTANT PRECAUTIONS BEFORE YOU BEGIN ASSEMBLY OPERATION AND ADJUSTMENT HOW TO FOLD AND MOVE THE TREADMILL TROUBLE-SHOOTING CONDITIONING GUIDELINES ORDERING REPLACEMENT PARTS LIMITED WARRANTY 3 4 5 7 11 12 14 Back Cover Back Cover Note: An EXPLODED DRAWING and a PART LIST are attached to the center of this ''orany.exercise program, cvn u. s.prod for future reference. Save the EXPLODED DRAWING and PART LIST for personal injury or,`propei r RNAL As ead alt 2 Inning 'this manual.

English Manual
Page 3
... hold the handrails or upper body arms while using the treadmill; Always remove the key and move the walking belt while the power is damaged, or if the treadmill Is not working properly. (See BEFORE YOU BEGIN on the walking belt. Do not operate the treadmill if the power cord or plug is turned off switch.) 18. Do not use the treadmill with a 14-gauge cord of high speeds. could become caught in this...
... hold the handrails or upper body arms while using the treadmill; Always remove the key and move the walking belt while the power is damaged, or if the treadmill Is not working properly. (See BEFORE YOU BEGIN on the walking belt. Do not operate the treadmill if the power cord or plug is turned off switch.) 18. Do not use the treadmill with a 14-gauge cord of high speeds. could become caught in this...
English Manual
Page 4
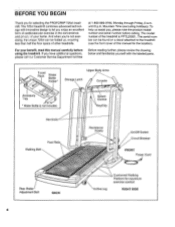
... cover of other treadmills. For your home. at 1-800-999-3756, Monday through Friday, 6 a.m. The model number of your benefit, read this manual for the location). Upper Body Arms Storage Latch Console eyi Speed Control Clip Handrails Walking Belt Foot Rails Resistance Knobs Itto Aar •;^ ,143A '1%erir On/Off Switch e Circuit Breaker FRONT Power Cord e Lit p- Rear Roller Adjustment Bolt BACK Incline Leg Cushioned Walking Platform for selecting the PROFORM® 725xt treadmill. BEFORE YOU BEGIN Thank you for maximum exercise...
... cover of other treadmills. For your home. at 1-800-999-3756, Monday through Friday, 6 a.m. The model number of your benefit, read this manual for the location). Upper Body Arms Storage Latch Console eyi Speed Control Clip Handrails Walking Belt Foot Rails Resistance Knobs Itto Aar •;^ ,143A '1%erir On/Off Switch e Circuit Breaker FRONT Power Cord e Lit p- Rear Roller Adjustment Bolt BACK Incline Leg Cushioned Walking Platform for selecting the PROFORM® 725xt treadmill. BEFORE YOU BEGIN Thank you for maximum exercise...
English Manual
Page 5
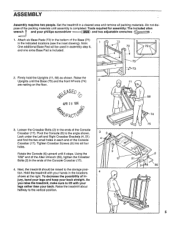
... completed. Next, the treadmill should be used in the indicated locations (see the inset drawing). Set the treadmill in the ends of injury, bend your legs and keep your back. Do not dis- To decrease the possibility of the Console Crossbar (17). 4. ASSEMBLY Assembly requires two people. Using the 7/32" end of the Allen Wrench (56), tighten the Crossbar Bolts (2) in a cleared...
... completed. Next, the treadmill should be used in the indicated locations (see the inset drawing). Set the treadmill in the ends of injury, bend your legs and keep your back. Do not dis- To decrease the possibility of the Console Crossbar (17). 4. ASSEMBLY Assembly requires two people. Using the 7/32" end of the Allen Wrench (56), tighten the Crossbar Bolts (2) in a cleared...
English Manual
Page 6
... carpet. 57 84 6 See drawing 6B. The use the treadmill. Make sure that the locking pin Is inside the storage latch, and that all parts are tightened before you use of injury, bend your legs and keep your foot on the Base, carefully tip the treadmill up until the locking pin is fully closed. 5 Storage Latch , Locking Pin 6. Hold the Left Crossbar Bracket (4) and...
... carpet. 57 84 6 See drawing 6B. The use the treadmill. Make sure that the locking pin Is inside the storage latch, and that all parts are tightened before you use of injury, bend your legs and keep your foot on the Base, carefully tip the treadmill up until the locking pin is fully closed. 5 Storage Latch , Locking Pin 6. Hold the Left Crossbar Bracket (4) and...

English Manual
Page 7
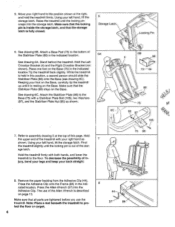
... Outlet Box Grounding Pin Treadmill Power Cord cluded) with all local codes and form. i995 (5 Your treadmill, like any other appliances Whenever the adapter is pr0Perly grounded. Contact a qualified electrician to the walking belt or the walking plat- sibility of five feet or less in accordance with your treadmill being turned on a nominal 120-volt circuit, HOW TO PLUG IN THE POWER CORD and has a grounding...
... Outlet Box Grounding Pin Treadmill Power Cord cluded) with all local codes and form. i995 (5 Your treadmill, like any other appliances Whenever the adapter is pr0Perly grounded. Contact a qualified electrician to the walking belt or the walking plat- sibility of five feet or less in accordance with your treadmill being turned on a nominal 120-volt circuit, HOW TO PLUG IN THE POWER CORD and has a grounding...
English Manual
Page 8
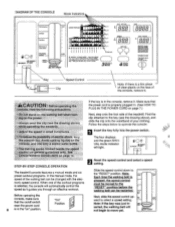
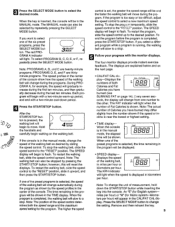
...; Reed Users Adams, Iasi. • Don? Nand on the face of the treadmill. dawn for pulse reading. nd use . STEP-BY-STEP CONSOLE OPERATION The treadmill console features a manual mode and six preset workout programs. In the manual mode, the speed of breath. ( :iiiiiii: ) 3SELECT MODE INCLINE 0 A V CD A START 'T /STOP TIME rbn n OO's u DIST. /PULSE 0 nnn APORTAMT Two pulse wows mareireeseess walirlaw. &Wm/ WMm.o. OMAnt Ira no wo.9. Find the clip attached to the "RESET...
...; Reed Users Adams, Iasi. • Don? Nand on the face of the treadmill. dawn for pulse reading. nd use . STEP-BY-STEP CONSOLE OPERATION The treadmill console features a manual mode and six preset workout programs. In the manual mode, the speed of breath. ( :iiiiiii: ) 3SELECT MODE INCLINE 0 A V CD A START 'T /STOP TIME rbn n OO's u DIST. /PULSE 0 nnn APORTAMT Two pulse wows mareireeseess walirlaw. &Wm/ WMm.o. OMAnt Ira no wo.9. Find the clip attached to the "RESET...
English Manual
Page 9
.... Press the SELECT MODE button to the "RESET" position, slide it O LIA1 displays. speed setting for English system- The higher the speed 9 The SPEED MODE button. minute programs. The speed profiles in the manual mode, change from the number shown if the speed or incline is near the lowest or highest setting. Each pro- and end with the monitor displays. Hold A START ' -f• /STOP the handrails and carefully begin to the other. When the console is...
.... Press the SELECT MODE button to the "RESET" position, slide it O LIA1 displays. speed setting for English system- The higher the speed 9 The SPEED MODE button. minute programs. The speed profiles in the manual mode, change from the number shown if the speed or incline is near the lowest or highest setting. Each pro- and end with the monitor displays. Hold A START ' -f• /STOP the handrails and carefully begin to the other. When the console is...
English Manual
Page 10
... you exercise on the sensor for another 15 seconds for a total body workout. Hold one of the incline buttons until you can be displayed in a secure place. to decrease the resistance, turn the resistance knobs clockwise; Note: If the KPH indicator be displayed. If the indicator is not displayed, lift your thumb at this mode, hold down the pulse sensor. Store the key in miles. Fully O < Pulse Sensor ) press down the START/ STOP button...
... you exercise on the sensor for another 15 seconds for a total body workout. Hold one of the incline buttons until you can be displayed in a secure place. to decrease the resistance, turn the resistance knobs clockwise; Note: If the KPH indicator be displayed. If the indicator is not displayed, lift your thumb at this mode, hold down the pulse sensor. Store the key in miles. Fully O < Pulse Sensor ) press down the START/ STOP button...
English Manual
Page 11
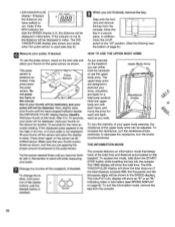
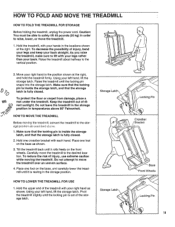
... is out of the storage latch. ay ---. Using your right hand as described above 85° Fahrenheit. ..1 HOW TO MOVE THE TREADMILL Before moving the treadmill. Storage Latch -., , Locking Pin Crossbar /Bracket 7- To protect the floor or carpet from damage, place a 1996 mat under the treadmill. HOW TO FOLD AND MOVE THE TREADMILL HOW TO FOLD THE TREADMILL FOR STORAGE Before folding the treadmill, unplug the power cord. As you raise...
... is out of the storage latch. ay ---. Using your right hand as described above 85° Fahrenheit. ..1 HOW TO MOVE THE TREADMILL Before moving the treadmill. Storage Latch -., , Locking Pin Crossbar /Bracket 7- To protect the floor or carpet from damage, place a 1996 mat under the treadmill. HOW TO FOLD AND MOVE THE TREADMILL HOW TO FOLD THE TREADMILL FOR STORAGE Before folding the treadmill, unplug the power cord. As you raise...
English Manual
Page 12
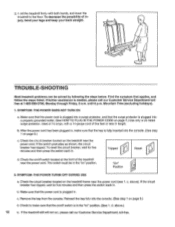
... into the console. (See step 1 on " position. (See 1. "On" Position /60 2. d. Check the circuit breaker located on the treadmill frame near the power cord. SYMPTOM: THE POWER TURNS OFF DURING USE a. O TROUBLE-SHOOTING Most treadmill problems can be in . until 6 p.m. Mountain Time (excluding holidays). 1. SYMPTOM: THE POWER DOES NOT TURN ON a. To reset the circuit breaker, wait for five minutes and then press the switch back in...
... into the console. (See step 1 on " position. (See 1. "On" Position /60 2. d. Check the circuit breaker located on the treadmill frame near the power cord. SYMPTOM: THE POWER TURNS OFF DURING USE a. O TROUBLE-SHOOTING Most treadmill problems can be in . until 6 p.m. Mountain Time (excluding holidays). 1. SYMPTOM: THE POWER DOES NOT TURN ON a. To reset the circuit breaker, wait for five minutes and then press the switch back in...
English Manual
Page 13
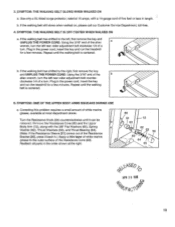
... a wrench, turn . b. Plug in length. Using the 3/16" end of the alien wrench, turn . 3. Repeat until the walking belt is centered. Turn the Resistance Knob (59) counterclockwise until it back in.) Apply a thin layer of white marine grease to the outer surface of a turn the left rear roller adjustment bolt clockwise 1/4 of the Resistance Cone (60). 0 Reattach all parts in the power cord, insert the key and run the treadmill for...
... a wrench, turn . b. Plug in length. Using the 3/16" end of the alien wrench, turn . 3. Repeat until the walking belt is centered. Turn the Resistance Knob (59) counterclockwise until it back in.) Apply a thin layer of white marine grease to the outer surface of a turn the left rear roller adjustment bolt clockwise 1/4 of the Resistance Cone (60). 0 Reattach all parts in the power cord, insert the key and run the treadmill for...
English Manual
Page 14
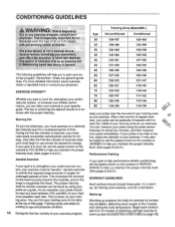
... intensity level. (See pages 8 and 9.) Performance Training Aerobic Exercise If your goal is high performance athletic conditioning, If your goal is too high or too low, adjust the intensity of your pulse using your body uses easily accessible carbohydrate calories for set the speed control on the console to PERFORMANCE to warm up mum possible heart rate. This increases the demand on the...
... intensity level. (See pages 8 and 9.) Performance Training Aerobic Exercise If your goal is high performance athletic conditioning, If your goal is too high or too low, adjust the intensity of your pulse using your body uses easily accessible carbohydrate calories for set the speed control on the console to PERFORMANCE to warm up mum possible heart rate. This increases the demand on the...

English Manual
Page 15
... balance, reach back and grasp one leg extended. Training Zone Exercise After warming up to make exercise a regular and enjoyable part of your buttocks as possible. After a few weeks of rest between workouts. Hold for both legs. Calf/Achilles Stretch With one day of your exercise program, do not keep your pulse in your training zone for several basic stretches is...
... balance, reach back and grasp one leg extended. Training Zone Exercise After warming up to make exercise a regular and enjoyable part of your buttocks as possible. After a few weeks of rest between workouts. Hold for both legs. Calf/Achilles Stretch With one day of your exercise program, do not keep your pulse in your training zone for several basic stretches is...

English Manual
Page 16
... PRODUCT (PROFORM® 725xt treadmill). • The SERIAL NUMBER OF THE PRODUCT (see the front cover of this manual). • The KEY NUMBER OF THE PART(S) (see the EXPLODED DRAWING and PART LIST attached to the center of this manual). • The DESCRIPTION OF THE PART(S) (see the EXPLODED DRAWING and PART LIST attached to be free from defects in USA © 1996 ICON Health & Fitness, Inc. ICON's obligation under normal use and service conditions...
... PRODUCT (PROFORM® 725xt treadmill). • The SERIAL NUMBER OF THE PRODUCT (see the front cover of this manual). • The KEY NUMBER OF THE PART(S) (see the EXPLODED DRAWING and PART LIST attached to the center of this manual). • The DESCRIPTION OF THE PART(S) (see the EXPLODED DRAWING and PART LIST attached to be free from defects in USA © 1996 ICON Health & Fitness, Inc. ICON's obligation under normal use and service conditions...

English Manual
Page 17
REMOVE THIS EXPLODED DRAWING AND PART LIST FROM THE MANUAL Save this EXPLODED DRAWING and PART LIST for future reference.
REMOVE THIS EXPLODED DRAWING AND PART LIST FROM THE MANUAL Save this EXPLODED DRAWING and PART LIST for future reference.

English Manual
Page 19
... 2 113 1 114 1 115 1 116 5 117 2 118 2 119 1 120 1 121 1 122 1 1 1 1 1 1 1 1 Resistance Bolt Cable Loom Upright Pivot Bolt Front Wheel Bolt/Incline Leg Bolt Wheel Spacer Upright Plug Base Pad Wheel Base Motor/Controller Wire Resistance Bracket Bolt Foot Rail Power Cord Grommet Safety Cover Screw Safety Cover Hairpin Cotter Pin Frame Base Shock Isolator Belt Guide Stabilizer Plate Roller Guard Front Roller/Pulley Walking Platform Walking Belt Platform Screw Left Rear Roller Adj. Qty. 1 8 2 2 3 2 4* 1 5 2 6* 1 7 12 8 2 9 4 10 8 11 1 12 2 13 1 14 1 15 1 16...
... 2 113 1 114 1 115 1 116 5 117 2 118 2 119 1 120 1 121 1 122 1 1 1 1 1 1 1 1 Resistance Bolt Cable Loom Upright Pivot Bolt Front Wheel Bolt/Incline Leg Bolt Wheel Spacer Upright Plug Base Pad Wheel Base Motor/Controller Wire Resistance Bracket Bolt Foot Rail Power Cord Grommet Safety Cover Screw Safety Cover Hairpin Cotter Pin Frame Base Shock Isolator Belt Guide Stabilizer Plate Roller Guard Front Roller/Pulley Walking Platform Walking Belt Platform Screw Left Rear Roller Adj. Qty. 1 8 2 2 3 2 4* 1 5 2 6* 1 7 12 8 2 9 4 10 8 11 1 12 2 13 1 14 1 15 1 16...

