
English Manual
Page 2
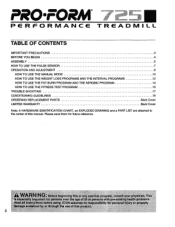
... YOU BEGIN ASSEMBLY HOW TO USE THE PULSE SENSOR OPERATION AND ADJUSTMENT HOW TO USE THE MANUAL MODE HOW TO USE THE WEIGHT LOSS PROGRAMS AND THE INTERVAL PROGRAMS HOW TO USE THE FAT BURN PROGRAM AND THE AEROBIC PROGRAM HOW TO USE THE FITNESS TEST PROGRAM TROUBLE-SHOOTING CONDITIONING GUIDELINES ORDERING REPLACEMENT PARTS LIMITED WARRANTY 3 4 5 7 8 10 12 14 15 17 18 Back Cover Back Cover Note: A HARDWARE IDENTIFICATION CHART, an EXPLODED DRAWING and a PART LIST are attached to...
... YOU BEGIN ASSEMBLY HOW TO USE THE PULSE SENSOR OPERATION AND ADJUSTMENT HOW TO USE THE MANUAL MODE HOW TO USE THE WEIGHT LOSS PROGRAMS AND THE INTERVAL PROGRAMS HOW TO USE THE FAT BURN PROGRAM AND THE AEROBIC PROGRAM HOW TO USE THE FITNESS TEST PROGRAM TROUBLE-SHOOTING CONDITIONING GUIDELINES ORDERING REPLACEMENT PARTS LIMITED WARRANTY 3 4 5 7 8 10 12 14 15 17 18 Back Cover Back Cover Note: A HARDWARE IDENTIFICATION CHART, an EXPLODED DRAWING and a PART LIST are attached to...
English Manual
Page 3
... pulse sensor is running. Never leave the treadmill unattended while it . Always remove the key and move the walking belt while the power is not working properly. (See BEFORE YOU BEGIN on the treadmill at all parts of the treadmill overheating, do so by persons weighing 250 pounds or less. 8. Never insert any object into a grounded circuit capable of high speeds. Never remove the motor hood unless Instructed...
... pulse sensor is running. Never leave the treadmill unattended while it . Always remove the key and move the walking belt while the power is not working properly. (See BEFORE YOU BEGIN on the treadmill at all parts of the treadmill overheating, do so by persons weighing 250 pounds or less. 8. Never insert any object into a grounded circuit capable of high speeds. Never remove the motor hood unless Instructed...
English Manual
Page 4
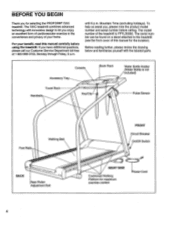
... an excellent form of cardiovascular exercise in the convenience and privacy of the treadmill is not included) Pulse Sensor li Foot Rails Walking Belt 00 BACK 00 Rear Roller Adjustment Bolt FRONT Circuit Breaker On/Off Switch 401 0 4 RIGHT SIDE Cushioned Walking Platform for maximum exercise comfort Power Cord 4 The model number of your benefit, read this manual for selecting the PROFORM 725C treadmill. The 725C treadmill combines advanced technology with the labeled parts. If...
... an excellent form of cardiovascular exercise in the convenience and privacy of the treadmill is not included) Pulse Sensor li Foot Rails Walking Belt 00 BACK 00 Rear Roller Adjustment Bolt FRONT Circuit Breaker On/Off Switch 401 0 4 RIGHT SIDE Cushioned Walking Platform for maximum exercise comfort Power Cord 4 The model number of your benefit, read this manual for selecting the PROFORM 725C treadmill. The 725C treadmill combines advanced technology with the labeled parts. If...
English Manual
Page 5
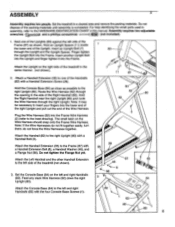
... Extension Bolt (8), a Handrail Washer (46), and a Flange Nut (98). Plug the Wire Harness (62) into the Frame. Attach the Handrail Extension (35) to the HARDWARE IDENTIFICATION CHART in assembly, refer to the Frame (87) with a Handrail Extension Screw (28). Feed any slack Wire Harness (62) down the right 3 Upright (80). For help identifying the small parts used in this manual. Hold an Upright...
... Extension Bolt (8), a Handrail Washer (46), and a Flange Nut (98). Plug the Wire Harness (62) into the Frame. Attach the Handrail Extension (35) to the HARDWARE IDENTIFICATION CHART in assembly, refer to the Frame (87) with a Handrail Extension Screw (28). Feed any slack Wire Harness (62) down the right 3 Upright (80). For help identifying the small parts used in this manual. Hold an Upright...
English Manual
Page 7
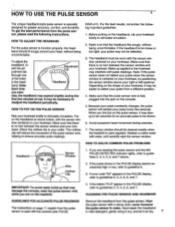
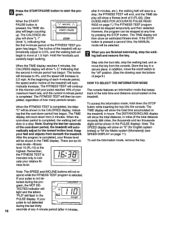
... TO SOLVE COMMON PULSE PROBLEMS CHeadband Sensor Window 1. Wire Clothes Clip 2. If the letters "PLS" appear in the PULSE display seems excessively high or low, refer to function properly, the headband should be worn with the console (see PULSE Remove the headband from the pulse sensor, please read the following important guidelines: 1. HOW TO ADJUST THE HEADBAND For the pulse sensor to guideline 5. 3. Avoid...
... TO SOLVE COMMON PULSE PROBLEMS CHeadband Sensor Window 1. Wire Clothes Clip 2. If the letters "PLS" appear in the PULSE display seems excessively high or low, refer to function properly, the headband should be worn with the console (see PULSE Remove the headband from the pulse sensor, please read the following important guidelines: 1. HOW TO ADJUST THE HEADBAND For the pulse sensor to guideline 5. 3. Avoid...

English Manual
Page 8
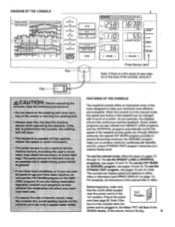
... least resistance for use a surge protector (not In- pkootmolift .,::lhei.:Oltittorovideiti:Okthe:!OttitiOdi4- Voltage surges, spikes, and noise interference can be connected to the walking belt or the walking platform. sibility of thel.eituiti.Mon4i.0000g.0040004ii electric shock. OPERATION AND ADJUSTMENT THE PERFORMANT LUBER' WALKING BELT Your treadmill features a walking belt coated with all local codes and ordinances. HOW TO PLUG IN THE POWER CORD...
... least resistance for use a surge protector (not In- pkootmolift .,::lhei.:Oltittorovideiti:Okthe:!OttitiOdi4- Voltage surges, spikes, and noise interference can be connected to the walking belt or the walking platform. sibility of thel.eituiti.Mon4i.0000g.0040004ii electric shock. OPERATION AND ADJUSTMENT THE PERFORMANT LUBER' WALKING BELT Your treadmill features a walking belt coated with all local codes and ordinances. HOW TO PLUG IN THE POWER CORD...
English Manual
Page 9
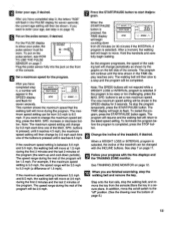
... program measures your workouts more effective and enjoyable. For simplicity, all instructions in the manual mode, the speed and incline of clear plastic on page 11). Note: If the key is in the console when the power cord is a thin sheet of the treadmill can display speed and distance in , the letters "PO" will provide continuous exercise feedback. II i 5 r. 11. 0 q 1 INSERT KEY 2 SELECT PROGRAM 3 SET WEIGHT 4 SET AGE 5 WEAR • SENSOR 6 SET MAX. A START/PAUSE STOP Key...
... program measures your workouts more effective and enjoyable. For simplicity, all instructions in the manual mode, the speed and incline of clear plastic on page 11). Note: If the key is in the console when the power cord is a thin sheet of the treadmill can display speed and distance in , the letters "PO" will provide continuous exercise feedback. II i 5 r. 11. 0 q 1 INSERT KEY 2 SELECT PROGRAM 3 SET WEIGHT 4 SET AGE 5 WEAR • SENSOR 6 SET MAX. A START/PAUSE STOP Key...

English Manual
Page 10
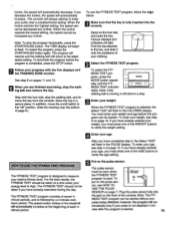
... clip attached to the key and slide it is pressed, the weight setting will then be saved in the PULSE display for three seconds. 4 Enter your weight and age are pressed, the SPEED display will light. Note: If a r--1 V WEIGHT A 1_ preset program has been selected, press the MODE button repeatedly to 10 mph. For the PULSE dis- L•001-00W/I play to start the walking belt. Plug the pulse sensor fully into the console...
... clip attached to the key and slide it is pressed, the weight setting will then be saved in the PULSE display for three seconds. 4 Enter your weight and age are pressed, the SPEED display will light. Note: If a r--1 V WEIGHT A 1_ preset program has been selected, press the MODE button repeatedly to 10 mph. For the PULSE dis- L•001-00W/I play to start the walking belt. Plug the pulse sensor fully into the console...

English Manual
Page 11
... program is controlled with the five displays and the TRAINING ZONE monitor. • CALORIES display This display shows both the distance that the walking belt has moved and the current incline of measurement, first hold down to change to show the selected incline setting. Every seven seconds, the display will change from one of measurement is pressed, the incline will be held down the STOP button while inserting the key into the console...
... program is controlled with the five displays and the TRAINING ZONE monitor. • CALORIES display This display shows both the distance that the walking belt has moved and the current incline of measurement, first hold down to change to show the selected incline setting. Every seven seconds, the display will change from one of measurement is pressed, the incline will be held down the STOP button while inserting the key into the console...

English Manual
Page 12
... is moving, it will slow to a stop. To select the WEIGHT LOSS 1 pro- MODE gram, press the MODE button. Note: If the walking belt is to the "off switch to strengthen your weight and age to build stamina. RIES display for aerobic exercise, the AEROBIC indicator will light. the current weight setting will change during the last 10 minutes. • Training Zone Monitor The training zone monitor measures the approximate TRAINING ZONES...
... is moving, it will slow to a stop. To select the WEIGHT LOSS 1 pro- MODE gram, press the MODE button. Note: If the walking belt is to the "off switch to strengthen your weight and age to build stamina. RIES display for aerobic exercise, the AEROBIC indicator will light. the current weight setting will change during the last 10 minutes. • Training Zone Monitor The training zone monitor measures the approximate TRAINING ZONES...
English Manual
Page 13
... treadmill, if desired. to a stop the walking belt, and re- In addition, move the key from the console.Store the key in the SPEED display STOP V A SPEED the program is between 5.5 mph When you want to show your age, if desired. Plug the pulse sensor fully into the jack on /off switch to ting, press the MAX. play reaches zero. imum speed setting can be - If you are finished exercising, stop the program This number...
... treadmill, if desired. to a stop the walking belt, and re- In addition, move the key from the console.Store the key in the SPEED display STOP V A SPEED the program is between 5.5 mph When you want to show your age, if desired. Plug the pulse sensor fully into the jack on /off switch to ting, press the MAX. play reaches zero. imum speed setting can be - If you are finished exercising, stop the program This number...

English Manual
Page 14
... pulse sensor, see HOW TO USE THE PULSE SENSOR on the pulse sensor. Plug the pulse sensor fully into the jack on page 10. Note: The FAT BURN and AEROBIC programs can be started. START/PAUSE ing down from 30 min- After a moment, the walking belt will begin walking. Note: If the walking belt is V mArspa pressed, the TIME display will be wom when the FAT 0- MODE WEIGHT A Enter your age, see step...
... pulse sensor, see HOW TO USE THE PULSE SENSOR on the pulse sensor. Plug the pulse sensor fully into the jack on page 10. Note: The FAT BURN and AEROBIC programs can be started. START/PAUSE ing down from 30 min- After a moment, the walking belt will begin walking. Note: If the walking belt is V mArspa pressed, the TIME display will be wom when the FAT 0- MODE WEIGHT A Enter your age, see step...
English Manual
Page 15
... attached to the latest speed setting. edly until the FIT- Enter your age, see HOW TO USE THE PULSE SENSOR on the pulse sen- The FITNESS TEST program consists of the AGE buttons to a stop if your pulse is started. 15 NESS TEST program can be started . The console will always attempt to measure your weight and age before the program is completed, press the STOP button. When the incline reaches the lowest setting...
... attached to the latest speed setting. edly until the FIT- Enter your age, see HOW TO USE THE PULSE SENSOR on the pulse sen- The FITNESS TEST program consists of the AGE buttons to a stop if your pulse is started. 15 NESS TEST program can be started . The console will always attempt to measure your weight and age before the program is completed, press the STOP button. When the incline reaches the lowest setting...
English Manual
Page 16
... to a stop the walking belt, and remove the key from the console. Hold the handrails and carefully begin to move the on/off switch to a stop the walking belt and remove the key. When the cool-down period is completed, the walking belt will show an estimated fitness level. If the STOP button is not detected during the pro- To access the information mode, hold down period, the treadmill will be stopped temporarily...
... to a stop the walking belt, and remove the key from the console. Hold the handrails and carefully begin to move the on/off switch to a stop the walking belt and remove the key. When the cool-down period is completed, the walking belt will show an estimated fitness level. If the STOP button is not detected during the pro- To access the information mode, hold down period, the treadmill will be stopped temporarily...
English Manual
Page 17
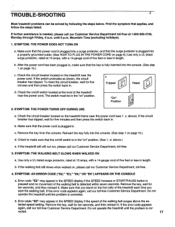
... treadmill problems can be in the "on" position. d. Error code "E2" may appear in the SPEED display if the speed of five feet or less in length. Reinsert the key fully into a properly grounded outlet. (See HOW TO PLUG IN THE POWER CORD on page 8.) Use only a UL-listed surge protector, rated at the front of five feet or less in length. If the walking belt...
... treadmill problems can be in the "on" position. d. Error code "E2" may appear in the SPEED display if the speed of five feet or less in length. Reinsert the key fully into a properly grounded outlet. (See HOW TO PLUG IN THE POWER CORD on page 8.) Use only a UL-listed surge protector, rated at the front of five feet or less in length. If the walking belt...
English Manual
Page 18
... PULSE DISPLAY on page 11. 6. Plug in the SPEED display if the walking belt is moving at a slow speed, and there is corrected. dividuais'over 200 pounds, it . If the walking belt has shifted to the left rear roller adjustment bolt counterclockwise 1/4 of the treadmill. If the error code appears again, call our toll-free Customer Service Department. If the walking belt has shifted to the right, first remove the key and UNPLUG THE POWER CORD. Using...
... PULSE DISPLAY on page 11. 6. Plug in the SPEED display if the walking belt is moving at a slow speed, and there is corrected. dividuais'over 200 pounds, it . If the walking belt has shifted to the left rear roller adjustment bolt counterclockwise 1/4 of the treadmill. If the error code appears again, call our toll-free Customer Service Department. If the walking belt has shifted to the right, first remove the key and UNPLUG THE POWER CORD. Using...

English Manual
Page 19
... fat calories for exercise by using the pulse sensgt. Begin each week if desired. After a few minutes of regular exer- This increases the demand on the heart to pump blood to the muscles, and on page 12.) Performance Training If your goal is high performance athletic conditioning, adjust the speed and incline of the treadmill until the AEROBIC indicator...
... fat calories for exercise by using the pulse sensgt. Begin each week if desired. After a few minutes of regular exer- This increases the demand on the heart to pump blood to the muscles, and on page 12.) Performance Training If your goal is high performance athletic conditioning, adjust the speed and incline of the treadmill until the AEROBIC indicator...
English Manual
Page 20
... PRODUCT (PROFORM® 725 C treadmill). • The SERIAL NUMBER OF THE PRODUCT (see the front cover of this manual). • The KEY NUMBER OF THE PART(S) (see the EXPLODED DRAWING and PART LIST attached to the center of this manual). • The DESCRIPTION OF THE PART(S) (see the EXPLODED DRAWING and PART LIST attached to any implied warranties of merchantability or fitness for a particular purpose is limited to state. ICON HEALTH & FITNESS, INC...
... PRODUCT (PROFORM® 725 C treadmill). • The SERIAL NUMBER OF THE PRODUCT (see the front cover of this manual). • The KEY NUMBER OF THE PART(S) (see the EXPLODED DRAWING and PART LIST attached to the center of this manual). • The DESCRIPTION OF THE PART(S) (see the EXPLODED DRAWING and PART LIST attached to any implied warranties of merchantability or fitness for a particular purpose is limited to state. ICON HEALTH & FITNESS, INC...

English Manual
Page 21
... key number of the part. The second number refers to the quantity used in Book Rack Screw (19)-4 \\\\\\\\\ Handrail Extension Bolt (8)-2 Save this HARDWARE IDENTIFICATION CHART, 3 EXPLODED DRAWING and PART LIST from the manual. HARDWARE IDENTIFICATION CHART The chart below each part refers to see if it has been pre-attached. O Handrail Washer (46)-2 0 Upright Spacer (11)-2 Upright Bolt (7)-4 0 Flange Nut (98)-2 O Handrail Extension Screw (28)-2 Handrail Bolt (5)-2 O 0 Console Base Screw (1)-4 C///////in assembly...
... key number of the part. The second number refers to the quantity used in Book Rack Screw (19)-4 \\\\\\\\\ Handrail Extension Bolt (8)-2 Save this HARDWARE IDENTIFICATION CHART, 3 EXPLODED DRAWING and PART LIST from the manual. HARDWARE IDENTIFICATION CHART The chart below each part refers to see if it has been pre-attached. O Handrail Washer (46)-2 0 Upright Spacer (11)-2 Upright Bolt (7)-4 0 Flange Nut (98)-2 O Handrail Extension Screw (28)-2 Handrail Bolt (5)-2 O 0 Console Base Screw (1)-4 C///////in assembly...

English Manual
Page 23
... # 1 Incline Wheel Motor Belt Motor Pulley/Flywheel/Fan Motor/Pulley/Flywheel/Fan Wire Harness Wire Harness Grommet Key/Clip Battery Cover Headband w/Clip Optic Switch Bolt Console Magnet Isolator Incline Motor Front Roller Rear Roller Left Rail Incline Leg Endcap Rear Roller Ground Wire Plastic Standoff Frame Plug Upright Optic Switch Handrail Flange Nut Console Base Hood Belly Pan Frame Right Rail Walking Platform Walking Belt Incline Spacer Front Roller Adjustment Bolt Foam Grip Wheel Nut Incline Stop Bracket Pulse Sensor Optic Sensor Wire Flange Nut Speed Optic Disk Optic Switch Bracket...
... # 1 Incline Wheel Motor Belt Motor Pulley/Flywheel/Fan Motor/Pulley/Flywheel/Fan Wire Harness Wire Harness Grommet Key/Clip Battery Cover Headband w/Clip Optic Switch Bolt Console Magnet Isolator Incline Motor Front Roller Rear Roller Left Rail Incline Leg Endcap Rear Roller Ground Wire Plastic Standoff Frame Plug Upright Optic Switch Handrail Flange Nut Console Base Hood Belly Pan Frame Right Rail Walking Platform Walking Belt Incline Spacer Front Roller Adjustment Bolt Foam Grip Wheel Nut Incline Stop Bracket Pulse Sensor Optic Sensor Wire Flange Nut Speed Optic Disk Optic Switch Bracket...

