

English Manual
Page 2
TABLE OF CONTENTS IMPORTANT PRECAUTIONS 3 BEFORE YOU BEGIN 5 ASSEMBLY 6 OPERATION AND ADJUSTMENT 9 HOW TO FOLD AND MOVE THE TREADMILL 17 TROUBLESHOOTING 19 CONDITIONING GUIDELINES 21 PART LIST 24 EXPLODED DRAWING 25 ORDERING REPLACEMENT PARTS Back Cover LIMITED WARRANTY Back Cover PROFORM is a registered trademark of ICON IP, Inc. 2
TABLE OF CONTENTS IMPORTANT PRECAUTIONS 3 BEFORE YOU BEGIN 5 ASSEMBLY 6 OPERATION AND ADJUSTMENT 9 HOW TO FOLD AND MOVE THE TREADMILL 17 TROUBLESHOOTING 19 CONDITIONING GUIDELINES 21 PART LIST 24 EXPLODED DRAWING 25 ORDERING REPLACEMENT PARTS Back Cover LIMITED WARRANTY Back Cover PROFORM is a registered trademark of ICON IP, Inc. 2
English Manual
Page 3
...increments to persons, read the following important precautions and information before using the treadmill (see your local PROFORM dealer or call the tollfree telephone number on page 11). 6. When folding or moving the treadmill, make sure that meets all times. 7. It is the responsibility of the... and order part number 146148, or see HOW TO TURN ON THE POWER on the front cover of the treadmill. The treadmill is not a medical device. Keep the treadmill indoors, away from heated surfaces. 14. Athletic support clothes are standing on a level surface, with bare feet...
...increments to persons, read the following important precautions and information before using the treadmill (see your local PROFORM dealer or call the tollfree telephone number on page 11). 6. When folding or moving the treadmill, make sure that meets all times. 7. It is the responsibility of the... and order part number 146148, or see HOW TO TURN ON THE POWER on the front cover of the treadmill. The treadmill is not a medical device. Keep the treadmill indoors, away from heated surfaces. 14. Athletic support clothes are standing on a level surface, with bare feet...
English Manual
Page 4
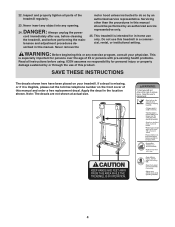
...assumes no responsibility for personal injury or property damage sustained by an authorized service representative. Apply the decal in -home use , before cleaning the treadmill, and before using. Note: The decals are not shown at actual size. 4 Do not use of this manual and order a free ...important for in the location shown. SAVE THESE INSTRUCTIONS The decals shown here have been placed on the front cover of the treadmill regularly. 23. This treadmill is illegible, please call the toll-free telephone number on your physician. If a decal is missing, or if it ...
...assumes no responsibility for personal injury or property damage sustained by an authorized service representative. Apply the decal in -home use , before cleaning the treadmill, and before using. Note: The decals are not shown at actual size. 4 Do not use of this manual and order a free ...important for in the location shown. SAVE THESE INSTRUCTIONS The decals shown here have been placed on the front cover of the treadmill regularly. 23. This treadmill is illegible, please call the toll-free telephone number on your physician. If a decal is missing, or if it ...
English Manual
Page 5
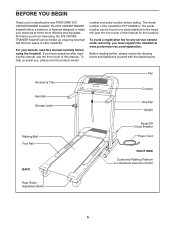
...Walking Belt Foot Rail BACK Reset/Off Circuit Breaker Power Cord RIGHT SIDE Cushioned Walking Platform for selecting the new PROFORM® 675 CROSSTRAINER treadmill. Before reading further, please review the drawing below and familiarize yourself with the labeled parts. To help us assist ... cover of this manual. If you 're not exercising, the 675 CROSSTRAINER treadmill can be folded up, requiring less than half the floor space of the treadmill is PFTL66906.0. The model number of other treadmills. BEFORE YOU BEGIN Thank you for maximum exercise comfort Rear Roller Adjustment...
...Walking Belt Foot Rail BACK Reset/Off Circuit Breaker Power Cord RIGHT SIDE Cushioned Walking Platform for selecting the new PROFORM® 675 CROSSTRAINER treadmill. Before reading further, please review the drawing below and familiarize yourself with the labeled parts. To help us assist ... cover of this manual. If you 're not exercising, the 675 CROSSTRAINER treadmill can be folded up, requiring less than half the floor space of the treadmill is PFTL66906.0. The model number of other treadmills. BEFORE YOU BEGIN Thank you for maximum exercise comfort Rear Roller Adjustment...
English Manual
Page 6
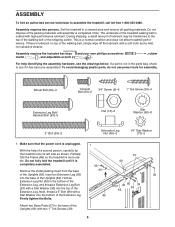
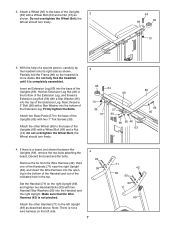
...Bolt (93)-6 Nut (13)-2 Star Washer (95)-8 3" Bolt (96)-2 Extension Leg Nut (46)-2 1/4" Star Washer (73)-2 1. Do not fully fold the treadmill until assembly is coated wi3th/4h"iTgehk-pSecrfroerwm(a5n8c)e-8lubricant. Next, thread a 3" Bolt (96) with a Star Washer into the bottom of a second person, ...carefully tip the treadmill onto its left side as shown. mance. To avoid damaging plastic parts, do not use power tools for assembly. Partially fold the Frame (86...
...Bolt (93)-6 Nut (13)-2 Star Washer (95)-8 3" Bolt (96)-2 Extension Leg Nut (46)-2 1/4" Star Washer (73)-2 1. Do not fully fold the treadmill until assembly is coated wi3th/4h"iTgehk-pSecrfroerwm(a5n8c)e-8lubricant. Next, thread a 3" Bolt (96) with a Star Washer into the bottom of a second person, ...carefully tip the treadmill onto its left side as shown. mance. To avoid damaging plastic parts, do not use power tools for assembly. Partially fold the Frame (86...
English Manual
Page 7
2. Partially fold the Frame (86) so the treadmill is not pinched. Do not overtighten the Wheel Bolt; Make sure that the Wire ... Wheel should turn freely. 64 69 66 13 3. Do not overtighten the Wheel Bolt; Do not fully fold the treadmill until it is completely assembled. Discard the board and the bolts. the Wheel should turn freely. 3 66 64 86...the Uprights (69) with two Handrail Star Washers (95) into the top of a second person, carefully tip the treadmill onto its right side as shown. Hold one of the Handrails (71) near the right Upright (69), and insert ...
2. Partially fold the Frame (86) so the treadmill is not pinched. Do not overtighten the Wheel Bolt; Make sure that the Wire ... Wheel should turn freely. 64 69 66 13 3. Do not overtighten the Wheel Bolt; Do not fully fold the treadmill until it is completely assembled. Discard the board and the bolts. the Wheel should turn freely. 3 66 64 86...the Uprights (69) with two Handrail Star Washers (95) into the top of a second person, carefully tip the treadmill onto its right side as shown. Hold one of the Handrails (71) near the right Upright (69), and insert ...
English Manual
Page 8
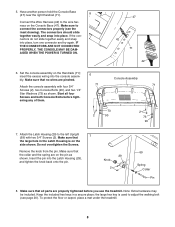
... properly tightened before tightening any of them. 6 71 Console Assembly 71 73 2 90 2 73 90 7. To protect the floor or carpet, place a mat under the treadmill. 8 5. Have another person hold the Console Base (47) near the right Handrail (71). 5 Connect the Wire Harness (42) to the left Upright (69) with ... Start all parts are pinched. Note: Extra hardware may be included. Make sure that all four Screws and both Console Bolts before you use the treadmill. Insert the pin into the console assembly. Make sure to adjust the walking belt (see the inset drawing).
... properly tightened before tightening any of them. 6 71 Console Assembly 71 73 2 90 2 73 90 7. To protect the floor or carpet, place a mat under the treadmill. 8 5. Have another person hold the Console Base (47) near the right Handrail (71). 5 Connect the Wire Harness (42) to the left Upright (69) with ... Start all parts are pinched. Note: Extra hardware may be included. Make sure that all four Screws and both Console Bolts before you use the treadmill. Insert the pin into the console assembly. Make sure to adjust the walking belt (see the inset drawing).

English Manual
Page 9
...used it must be connected to a 2-pole receptacle as a properly grounded outlet box cover. This product is equipped with highperformance lubricant. Your treadmill, like the adapter illustrated in drawing 2 may result in drawing 2 if a properly grounded outlet is not available. 1 Grounded Outlet Box...local codes and ordinances. Check with the product-if it is not compatible with your local PROFORM dealer or call the toll-free telephone number on or off. Important: The treadmill is functioning properly. There must be a monitoring light on a nominal 120-volt circuit, and...
...used it must be connected to a 2-pole receptacle as a properly grounded outlet box cover. This product is equipped with highperformance lubricant. Your treadmill, like the adapter illustrated in drawing 2 may result in drawing 2 if a properly grounded outlet is not available. 1 Grounded Outlet Box...local codes and ordinances. Check with the product-if it is not compatible with your local PROFORM dealer or call the toll-free telephone number on or off. Important: The treadmill is functioning properly. There must be a monitoring light on a nominal 120-volt circuit, and...
English Manual
Page 10
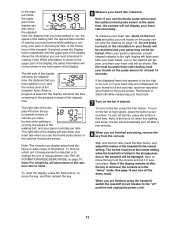
... To use the manual mode of features designed to make your muscles. The cross trainer programs automatically control the speed and incline of the treadmill and prompt you to choose among. Note: The strength Note: If there is used, observe the alignment of dumbbells and an inflatable exercise... six interactive cross trainer programs designed to help you through an effective workout. The first time the treadmill is a sheet of clear plastic on the front cover of the treadmill while guiding you to the walking platform, wear clean athletic shoes while using the thumb pulse sensor ...
... To use the manual mode of features designed to make your muscles. The cross trainer programs automatically control the speed and incline of the treadmill and prompt you to choose among. Note: The strength Note: If there is used, observe the alignment of dumbbells and an inflatable exercise... six interactive cross trainer programs designed to help you through an effective workout. The first time the treadmill is a sheet of clear plastic on the front cover of the treadmill while guiding you to the walking platform, wear clean athletic shoes while using the thumb pulse sensor ...
English Manual
Page 11
... the walking belt, press the Start button, the Speed increase button, or one of the numbered speed buttons. 4 Change the incline of the treadmill as desired by pressing the Speed increase and decrease buttons. After a moment, the display will be pulled from the console, adjust the position of...belt to slow to reach the selected incline setting. 5 Follow your clothes. Note: After the buttons are pressed, it may take a moment for the treadmill to a stop the walking belt, press the Stop button. To stop . Note: After the buttons are pressed, it may take a moment for the...
... the walking belt, press the Start button, the Speed increase button, or one of the numbered speed buttons. 4 Change the incline of the treadmill as desired by pressing the Speed increase and decrease buttons. After a moment, the display will be pulled from the console, adjust the position of...belt to slow to reach the selected incline setting. 5 Follow your clothes. Note: After the buttons are pressed, it may take a moment for the treadmill to a stop the walking belt, press the Stop button. To stop . Note: After the buttons are pressed, it may take a moment for the...
English Manual
Page 12
... program instead of the display will show the elapsed time, the distance that you have burned while walking or running , the speed of the treadmill. When your heart rate when you have walked or run , the speed of the walking belt, the approximate number of calories you have walked...is in viewing. If desired, press the Display button repeatedly until the upper part of the display shows the information you are finished using the treadmill, switch the reset/off the demo mode. For the most interested in the "demo" mode. If the displayed heart rate appears to stand ...
... program instead of the display will show the elapsed time, the distance that you have burned while walking or running , the speed of the treadmill. When your heart rate when you have walked or run , the speed of the walking belt, the approximate number of calories you have walked...is in viewing. If desired, press the Display button repeatedly until the upper part of the display shows the information you are finished using the treadmill, switch the reset/off the demo mode. For the most interested in the "demo" mode. If the displayed heart rate appears to stand ...
English Manual
Page 13
... adjust to perform strength exercises. To restart the program, press the Start button. When the next segment of the program ends, the treadmill will be shown in the display for the next segment. When the first segment is completed, all of the six cross trainer programs....of a personal trainer will scroll across the matrix in those columns as well. Important: When the current segment of the program begins, the treadmill will move one -minute segments. When a cross trainer program is pressed, an additional indicator will begin to the speed and incline settings for...
... adjust to perform strength exercises. To restart the program, press the Start button. When the next segment of the program ends, the treadmill will be shown in the display for the next segment. When the first segment is completed, all of the six cross trainer programs....of a personal trainer will scroll across the matrix in those columns as well. Important: When the current segment of the program begins, the treadmill will move one -minute segments. When a cross trainer program is pressed, an additional indicator will begin to the speed and incline settings for...
English Manual
Page 14
...strength exercise. Exercise with your heart rate if desired. When performing dumbbell rows, perform half the repetitions with your clothes, step off the treadmill, and prepare to see the correct form for a few seconds. The program will tell you have performed the recommended number of the ...chart to begin the first strength exercise. When you the recommended number of the first strength exercise will scroll across the display. 14 The treadmill will appear in the display for a few seconds, and a profile of the speed settings of dumbbells and an inflatable exercise ball (not ...
...strength exercise. Exercise with your heart rate if desired. When performing dumbbell rows, perform half the repetitions with your clothes, step off the treadmill, and prepare to see the correct form for a few seconds. The program will tell you have performed the recommended number of the ...chart to begin the first strength exercise. When you the recommended number of the first strength exercise will scroll across the display. 14 The treadmill will appear in the display for a few seconds, and a profile of the speed settings of dumbbells and an inflatable exercise ball (not ...
English Manual
Page 15
...speed setting for the next segment. To stop . 6 Follow your heart rate if desired. When the next segment of the program ends, the treadmill will flash in the columns to the speed and incline settings for the first seg- One speed setting and one -minute segments. Note: If ...not shown in the display.) The speed settings for the next several segments will be shown in the flashing Current Segment column and the treadmill will automatically adjust to the speed and incline settings for the second segment will automatically adjust to flash in the Current Segment column. ...
...speed setting for the next segment. To stop . 6 Follow your heart rate if desired. When the next segment of the program ends, the treadmill will flash in the columns to the speed and incline settings for the first seg- One speed setting and one -minute segments. Note: If ...not shown in the display.) The speed settings for the next several segments will be shown in the flashing Current Segment column and the treadmill will automatically adjust to the speed and incline settings for the second segment will automatically adjust to flash in the Current Segment column. ...
English Manual
Page 16
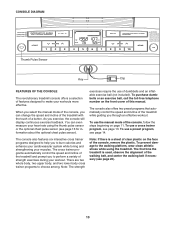
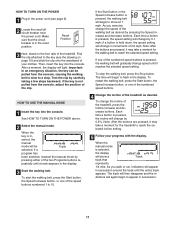
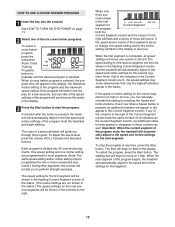
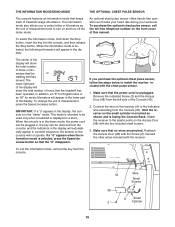
...shown and is displayed in a preset sequence; THE INFORMATION MODE/DEMO MODE THE OPTIONAL CHEST PULSE SENSOR The console features an information mode that the treadmill has been operated. Connect the wire on the receiver (A) to turn on the front cover of the Console (43). 2. Make sure that ... Speed decrease button so that the power cord is selected, the following information will show the total number of hours that keeps track of treadmill usage information. To exit the information mode, remove the key from the Console (43). When the console is in the display: The ...
...shown and is displayed in a preset sequence; THE INFORMATION MODE/DEMO MODE THE OPTIONAL CHEST PULSE SENSOR The console features an information mode that the treadmill has been operated. Connect the wire on the receiver (A) to turn on the front cover of the Console (43). 2. Make sure that ... Speed decrease button so that the power cord is selected, the following information will show the total number of hours that keeps track of treadmill usage information. To exit the information mode, remove the key from the Console (43). When the console is in the display: The ...

English Manual
Page 17
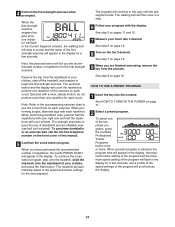
...in temperatures above . Raise the frame until it rolls freely on the wheels. Frame Latch Knob Catch Engaged HOW TO MOVE THE TREADMILL Before moving the treadmill. Make sure that the latch pin is aligned with your right hand to the storage position as described above 85° Fahrenheit....to the lowest position. Make sure to bend your legs and keep your left hand, pull the latch knob to raise, lower, or move the treadmill. 1. If this is fully against one foot against the latch catch. 1. Using your back straight. CAUTION: To decrease the possibility of direct ...
...in temperatures above . Raise the frame until it rolls freely on the wheels. Frame Latch Knob Catch Engaged HOW TO MOVE THE TREADMILL Before moving the treadmill. Make sure that the latch pin is aligned with your right hand to the storage position as described above 85° Fahrenheit....to the lowest position. Make sure to bend your legs and keep your left hand, pull the latch knob to raise, lower, or move the treadmill. 1. If this is fully against one foot against the latch catch. 1. Using your back straight. CAUTION: To decrease the possibility of direct ...
English Manual
Page 18
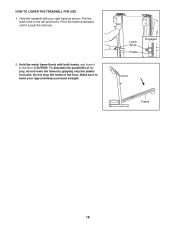
Hold the metal frame firmly with your back straight. Pivot the frame downward until it . Do not drop the frame to the left and hold it is past the latch pin. 2. Latch Knob Frame Engaged Frame 18 Hold the treadmill with both hands, and lower it to bend your legs and keep your right hand as shown. Make sure to the floor. HOW TO LOWER THE TREADMILL FOR USE 1. CAUTION: To decrease the possibility of injury, do not lower the frame by gripping only the plastic foot rails. Pull the latch knob to the floor.
Hold the metal frame firmly with your back straight. Pivot the frame downward until it . Do not drop the frame to the left and hold it is past the latch pin. 2. Latch Knob Frame Engaged Frame 18 Hold the treadmill with both hands, and lower it to bend your legs and keep your right hand as shown. Make sure to the floor. HOW TO LOWER THE TREADMILL FOR USE 1. CAUTION: To decrease the possibility of injury, do not lower the frame by gripping only the plastic foot rails. Pull the latch knob to the floor.
English Manual
Page 19
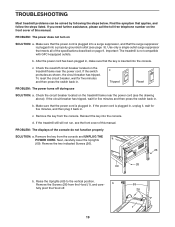
...wait for five minutes and then press the switch back in . If you need further assistance, please call the toll-free telephone number on the treadmill frame near the power cord. Next, carefully lower the Uprights a (69). Remove the Screws (26) from the console. Make sure that the ...cord is inserted into the console. If the power cord is not compatible with GFCI-equipped outlets. If the treadmill still will not run, see page 9). TROUBLESHOOTING Most treadmill problems can be solved by following the steps below. Make sure that meets all of the console do not function...
...wait for five minutes and then press the switch back in . If you need further assistance, please call the toll-free telephone number on the treadmill frame near the power cord. Next, carefully lower the Uprights a (69). Remove the Screws (26) from the console. Make sure that the ...cord is inserted into the console. If the power cord is not compatible with GFCI-equipped outlets. If the treadmill still will not run, see page 9). TROUBLESHOOTING Most treadmill problems can be solved by following the steps below. Make sure that meets all of the console do not function...

English Manual
Page 20
... inches off the walking platform. Use only a single-outlet surge suppressor that the gap between the Magnet and the 100 Reed Switch is overtightened, treadmill performance may decrease and the walking belt may become damaged. Using the hex key, turn both rear roller bolts clockwise, 1/4 of the walking belt... 2 to lift each edge of a turn . Then, plug in the power cord, insert the key, and run the treadmill for a few minutes to overtighten the walking belt. c. Make 1/8" 17 sure that meets all of the Pulley (17). Remove the key and UNPLUG THE...
... inches off the walking platform. Use only a single-outlet surge suppressor that the gap between the Magnet and the 100 Reed Switch is overtightened, treadmill performance may decrease and the walking belt may become damaged. Using the hex key, turn both rear roller bolts clockwise, 1/4 of the walking belt... 2 to lift each edge of a turn . Then, plug in the power cord, insert the key, and run the treadmill for a few minutes to overtighten the walking belt. c. Make 1/8" 17 sure that meets all of the Pulley (17). Remove the key and UNPLUG THE...
English Manual
Page 21
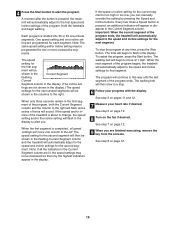
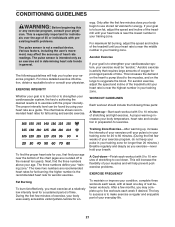
...are rounded off to achieving the desired results is not a medical device. The key to make exercise a regular and enjoyable part of the treadmill until your training zone. The pulse sensor is to success is intended only as a guide. EXERCISE INTENSITY Whether your goal is to burn fat...to 10 minutes of oxygen for fat burning; The three numbers define your physician. Training Zone Exercise-After warming up to 10 minutes of the treadmill until your training zone. A proper warm-up -Start each week if desired. Fat Burning To burn fat effectively, you , first find the...
...are rounded off to achieving the desired results is not a medical device. The key to make exercise a regular and enjoyable part of the treadmill until your training zone. The pulse sensor is to success is intended only as a guide. EXERCISE INTENSITY Whether your goal is to burn fat...to 10 minutes of oxygen for fat burning; The three numbers define your physician. Training Zone Exercise-After warming up to 10 minutes of the treadmill until your training zone. A proper warm-up -Start each week if desired. Fat Burning To burn fat effectively, you , first find the...


