
Uk Manual
Page 2
... parts immediately. 5. Inspect and properly tighten all instructions in this manual before using . The elliptical crosstrainer should not be used by or through the use of all times. 6. TABLE OF CONTENTS IMPORTANT PRECAUTIONS 2 BEFORE YOU BEGIN 3 ASSEMBLY 4 HOW TO OPERATE THE ELLIPTICAL CROSSTRAINER 8 MAINTENANCE AND TROUBLESHOOTING 20 CONDITIONING GUIDELINES 21 PART LIST 22 EXPLODED DRAWING 23 ORDERING REPLACEMENT PARTS Back Cover IMPORTANT PRECAUTIONS WARNING: To reduce the risk of heart rate...
... parts immediately. 5. Inspect and properly tighten all instructions in this manual before using . The elliptical crosstrainer should not be used by or through the use of all times. 6. TABLE OF CONTENTS IMPORTANT PRECAUTIONS 2 BEFORE YOU BEGIN 3 ASSEMBLY 4 HOW TO OPERATE THE ELLIPTICAL CROSSTRAINER 8 MAINTENANCE AND TROUBLESHOOTING 20 CONDITIONING GUIDELINES 21 PART LIST 22 EXPLODED DRAWING 23 ORDERING REPLACEMENT PARTS Back Cover IMPORTANT PRECAUTIONS WARNING: To reduce the risk of heart rate...
Uk Manual
Page 3
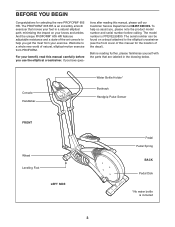
... on a decal attached to the elliptical crosstrainer (see the front cover of this manual for selecting the new PROFORM® 605 HR. To help you , please note the product model number and serial number before you have ques- Before reading further, please familiarise yourself with the parts that moves your feet in the drawing below. And the unique PROFORM® 605 HR features adjustable resistance and a state...
... on a decal attached to the elliptical crosstrainer (see the front cover of this manual for selecting the new PROFORM® 605 HR. To help you , please note the product model number and serial number before you have ques- Before reading further, please familiarise yourself with the parts that moves your feet in the drawing below. And the unique PROFORM® 605 HR features adjustable resistance and a state...
Uk Manual
Page 4
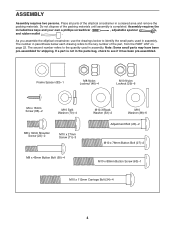
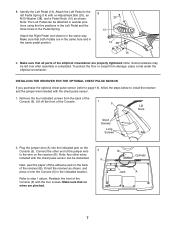
... the elliptical crosstrainer in the parts bag, check to the key number of the packing materials until assembly is not in a cleared area and remove the packing materials. Do not dispose of the part, from the PART LIST on page 22. If a part is completed. Assembly requires the included hex keys and your own a phillips screwdriver , adjustable spanner , and rubber mallet . As you assemble the elliptical crosstrainer, use...
... the elliptical crosstrainer in the parts bag, check to the key number of the packing materials until assembly is not in a cleared area and remove the packing materials. Do not dispose of the part, from the PART LIST on page 22. If a part is completed. Assembly requires the included hex keys and your own a phillips screwdriver , adjustable spanner , and rubber mallet . As you assemble the elliptical crosstrainer, use...
Uk Manual
Page 5
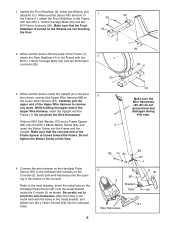
... the Upright. Make sure that the concave end of the Frame (1), attach the Rear Stabiliser (4) to the Frame with two M10 x 112mm Carriage Bolts (34) and two M10 Nylon Locknuts (29). Do not tighten the Button Screw at this time. 29 1 2 34 Make sure the Wire Harnesses (86, 87) do not get pinched and damaged during this step. 4. 1. Do...
... the Upright. Make sure that the concave end of the Frame (1), attach the Rear Stabiliser (4) to the Frame with two M10 x 112mm Carriage Bolts (34) and two M10 Nylon Locknuts (29). Do not tighten the Button Screw at this time. 29 1 2 34 Make sure the Wire Harnesses (86, 87) do not get pinched and damaged during this step. 4. 1. Do...
Uk Manual
Page 7
... assembly is completed. Refer to install the receiver and the jumper wire included with the chest pulse sensor. 1. Note: Any other end of the Console (5). Reattach the front of the elliptical crosstrainer are pinched. Attach the Right Pedal (not shown) in the indicated location. Make sure that all parts of the Console (5) with an Adjustment Bolt (20), an M10 Washer (38), and a Pedal Knob (15) as shown, and press...
... assembly is completed. Refer to install the receiver and the jumper wire included with the chest pulse sensor. 1. Note: Any other end of the Console (5). Reattach the front of the elliptical crosstrainer are pinched. Attach the Right Pedal (not shown) in the indicated location. Make sure that all parts of the Console (5) with an Adjustment Bolt (20), an M10 Washer (38), and a Pedal Knob (15) as shown, and press...

Uk Manual
Page 8
... Pulse Sensor • Always hold the handgrip pulse sensor as you exercise to your arms, shoulders, and back. HOW TO OPERATE THE ELLIPTICAL CROSSTRAINER HOW TO ADJUST THE PEDALS The motion of the pedals is recommended that you move with a continuous motion. It is deter- When the pedals are designed to add upper-body exercise to work your workouts. Pedal Disk 8 To adjust the pedals, first remove the Pedal pedal knob beneath each Pedal Knob Pedal Spring pedal...
... Pulse Sensor • Always hold the handgrip pulse sensor as you exercise to your arms, shoulders, and back. HOW TO OPERATE THE ELLIPTICAL CROSSTRAINER HOW TO ADJUST THE PEDALS The motion of the pedals is recommended that you move with a continuous motion. It is deter- When the pedals are designed to add upper-body exercise to work your workouts. Pedal Disk 8 To adjust the pedals, first remove the Pedal pedal knob beneath each Pedal Knob Pedal Spring pedal...
Uk Manual
Page 9
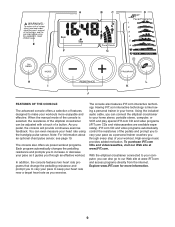
... connect the elliptical crosstrainer to increase or decrease your heart rate near a target heart rate as it guides you exercise. Note: For information about an optional chest pulse sensor, see page 19. In addition, the console features two heart rate programs that change the pedalling resistance and prompt you to vary your pace to make your workout. iFIT.com CD and video programs automatically control the resistance of your workouts more information. 9 You can also go to your heart rate using...
... connect the elliptical crosstrainer to increase or decrease your heart rate near a target heart rate as it guides you exercise. Note: For information about an optional chest pulse sensor, see page 19. In addition, the console features two heart rate programs that change the pedalling resistance and prompt you to vary your pace to make your workout. iFIT.com CD and video programs automatically control the resistance of your workouts more information. 9 You can also go to your heart rate using...
Uk Manual
Page 10
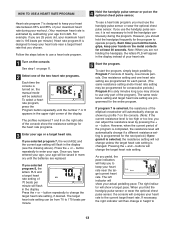
... target pace, especially during programs. E. To use iFIT.com CDs or videos, see page 12. Note: If there is used to select the feedback modes. On/Reset button-When the console is off, pressing this button will turn on which feedback mode (scan, speed, time, resistance level, calories, distance, watts, or heart rate) is a goal pace. D. There are ten resistance levels; Make sure to exercise at the same height. Warning...
... target pace, especially during programs. E. To use iFIT.com CDs or videos, see page 12. Note: If there is used to select the feedback modes. On/Reset button-When the console is off, pressing this button will turn on which feedback mode (scan, speed, time, resistance level, calories, distance, watts, or heart rate) is a goal pace. D. There are ten resistance levels; Make sure to exercise at the same height. Warning...
Uk Manual
Page 11
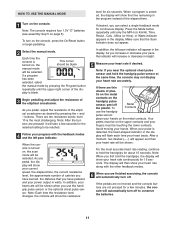
... seconds. Note: The console requires four 1.5V "D" batteries (see assembly step 5 on the metal contacts. When a program is the most accurate heart rate reading, continue to hold the handgrip pulse sensor at the same time, the console may not display your heart rate continuously for continuous display. Your palms must be on the console, press the On/Reset button or begin pedalling. 2 Select the manual mode. play is turned on , the This...
... seconds. Note: The console requires four 1.5V "D" batteries (see assembly step 5 on the metal contacts. When a program is the most accurate heart rate reading, continue to hold the handgrip pulse sensor at the same time, the console may not display your heart rate continuously for continuous display. Your palms must be on the console, press the On/Reset button or begin pedalling. 2 Select the manual mode. play is turned on , the This...
Uk Manual
Page 12
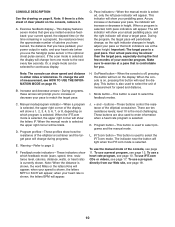
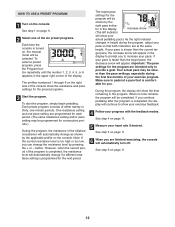
... low, you can change if a different resistance setting is faster than the current tar- To select a preset program, press the Program button repeatedly until the number 1, 2, 3, 4, 5, or 6 appears in the display. Note: If the current resistance level is comfort- When no time remains, the program will automatically turn off. See step 6 on the console. To start the program, simply begin pedalling. The target pace settings for the next...
... low, you can change if a different resistance setting is faster than the current tar- To select a preset program, press the Program button repeatedly until the number 1, 2, 3, 4, 5, or 6 appears in the display. Note: If the current resistance level is comfort- When no time remains, the program will automatically turn off. See step 6 on the console. To start the program, simply begin pedalling. The target pace settings for the next...
Uk Manual
Page 13
... from 220. To start the program, simply begin pedalling. button repeatedly to the current target heart rate. button. When you use only part of 70 beats per minute. button repeatedly to hold the handgrip pulse sensor or wear the optional chest pulse sensor, the console will flash in the display instead of twenty, one heart rate setting are 25 years old, your maximum heart rate is 195 beats per minute.) Heart rate program 8 is estimated...
... from 220. To start the program, simply begin pedalling. button repeatedly to the current target heart rate. button. When you use only part of 70 beats per minute. button repeatedly to hold the handgrip pulse sensor or wear the optional chest pulse sensor, the console will flash in the display instead of twenty, one heart rate setting are 25 years old, your maximum heart rate is 195 beats per minute.) Heart rate program 8 is estimated...
Uk Manual
Page 14
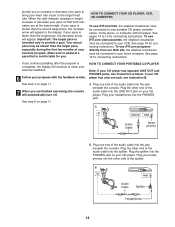
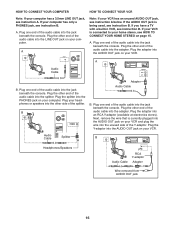
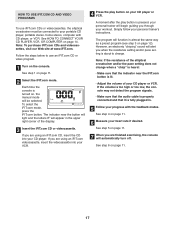
... your home computer. See step 6 on page 11. 7 When you are at a pace that is faster than the current target pace, the increase arrow will appear. To use iFIT.com videocassettes, the elliptical crosstrainer must be connected to your pace is comfortable for connecting instructions. A PHONES LINE OUT LINE OUT PHONES Audio Cable Headphones B. When the right indicator changes in the display; A. Plug the...
... your home computer. See step 6 on page 11. 7 When you are at a pace that is faster than the current target pace, the increase arrow will appear. To use iFIT.com videocassettes, the elliptical crosstrainer must be connected to your pace is comfortable for connecting instructions. A PHONES LINE OUT LINE OUT PHONES Audio Cable Headphones B. When the right indicator changes in the display; A. Plug the...
Uk Manual
Page 16
... CONNECT YOUR HOME STEREO on your home stereo, see instruction A. Plug the other end of the audio cable into the jack beneath the console. Plug one end of the audio cable into the jack beneath the console. A. Plug the adapter into the AUDIO OUT jack on page 15. Next, remove the wire that is connected to your VCR. Plug the other end of the audio cable into the jack beneath the console. Plug...
... CONNECT YOUR HOME STEREO on your home stereo, see instruction A. Plug the other end of the audio cable into the jack beneath the console. Plug one end of the audio cable into the jack beneath the console. A. Plug the adapter into the AUDIO OUT jack on page 15. Next, remove the wire that is connected to your VCR. Plug the other end of the audio cable into the jack beneath the console. Plug...
Uk Manual
Page 17
... pace setting is fully plugged in. 5 Follow your CD player or VCR. See step 6 on page 11. 2 Select the iFIT.com mode. To select the iFIT.com mode, press the iFIT.com button. The program will automatically turn off. If the volume is too high or too low, the console may not detect the program signals. • Make sure that the audio cable is properly connected and...
... pace setting is fully plugged in. 5 Follow your CD player or VCR. See step 6 on page 11. 2 Select the iFIT.com mode. To select the iFIT.com mode, press the iFIT.com button. The program will automatically turn off. If the volume is too high or too low, the console may not detect the program signals. • Make sure that the audio cable is properly connected and...
Uk Manual
Page 18
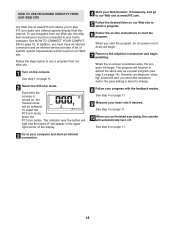
... resistance and/or the pace setting is turned on, the manual mode will be found on our Web site. When you are finished exercising, the console will begin pedalling. See step 4 on page 11. 9 Measure your computer and start an internet connection. 18 To select the iFIT.com mode, press the iFIT.com button. See HOW TO CONNECT YOUR COMPUTER on -screen countdown ends, the program will automatically turn...
... resistance and/or the pace setting is turned on, the manual mode will be found on our Web site. When you are finished exercising, the console will begin pedalling. See step 4 on page 11. 9 Measure your computer and start an internet connection. 18 To select the iFIT.com mode, press the iFIT.com button. See HOW TO CONNECT YOUR COMPUTER on -screen countdown ends, the program will automatically turn...
Uk Manual
Page 19
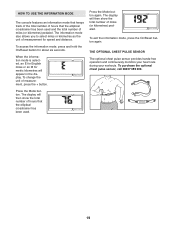
... the elliptical crosstrainer has been used and the total number of measurement for speed and distance. The information mode also allows you to select miles or kilometres as the unit of miles (or kilometres) pedaled. To change the unit of miles (or kilometres) pedaled. To exit the information mode, press the On/Reset button again. THE OPTIONAL CHEST PULSE SENSOR The optional chest pulse sensor provides hands-free operation and continuously monitors your heart rate during your workouts. Press the Mode button. Press the Mode button...
... the elliptical crosstrainer has been used and the total number of measurement for speed and distance. The information mode also allows you to select miles or kilometres as the unit of miles (or kilometres) pedaled. To change the unit of miles (or kilometres) pedaled. To exit the information mode, press the On/Reset button again. THE OPTIONAL CHEST PULSE SENSOR The optional chest pulse sensor provides hands-free operation and continuously monitors your heart rate during your workouts. Press the Mode button. Press the Mode button...
Uk Manual
Page 20
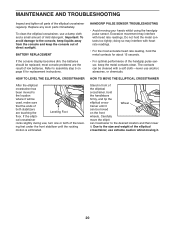
... the elliptical crosstrainer, use , turn one or both stabilizers are the result of the elliptical crosstrainer, use alcohol, abrasives, or chemicals. HANDGRIP PULSE SENSOR TROUBLESHOOTING • Avoid moving it. 20 cal crosstrainer to assembly step 5 on the front wheels. HOW TO LEVEL THE ELLIPTICAL CROSSTRAINER After the elliptical crosstrainer has been moved to the size and weight of low batteries. Do not hold the handlebars firmly, and tip the elliptical cross- Due to the location...
... the elliptical crosstrainer, use , turn one or both stabilizers are the result of the elliptical crosstrainer, use alcohol, abrasives, or chemicals. HANDGRIP PULSE SENSOR TROUBLESHOOTING • Avoid moving it. 20 cal crosstrainer to assembly step 5 on the front wheels. HOW TO LEVEL THE ELLIPTICAL CROSSTRAINER After the elliptical crosstrainer has been moved to the size and weight of low batteries. Do not hold the handlebars firmly, and tip the elliptical cross- Due to the location...
Uk Manual
Page 21
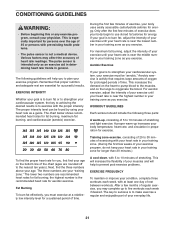
... pulse sensor is intended only as you exercise. Remember that requires large amounts of oxygen for prolonged periods of time. The chart below shows recommended heart rates for aerobic exercise. The three numbers are recommended heart rates for fat burning; The lower two numbers are your training zone as you exercise. During the first few months of regular exercise, you must be found by using your body uses...
... pulse sensor is intended only as you exercise. Remember that requires large amounts of oxygen for prolonged periods of time. The chart below shows recommended heart rates for aerobic exercise. The three numbers are recommended heart rates for fat burning; The lower two numbers are your training zone as you exercise. During the first few months of regular exercise, you must be found by using your body uses...
Uk Manual
Page 22
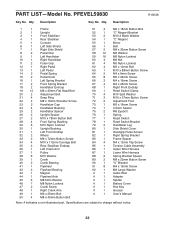
... 1 Frame Spacer 84 4 M4 x 12mm Tap Screw 85 1 Tension Cable Assembly 86 1 Upper Wire Harness 87 1 Lower Wire Harness 88 2 Spring Bracket Spacer 89 2 M8 x 22mm Button Screw 90 1 "U" Bracket 91 8 M4 x 19mm Screw 92 1 M6 Large Washer # 1 Audio Wire # 1 Adapter # 1 Splitter # 1 Battery Cover # 1 Hex Key # 1 Grease # 1 Userʼs Manual Note: # indicates a non-illustrated part. Qty. Qty. PFEVEL59830 R1003A Key No. Specifications are subject to change without notice. 22 PART LIST-Model No. Description Key No.
... 1 Frame Spacer 84 4 M4 x 12mm Tap Screw 85 1 Tension Cable Assembly 86 1 Upper Wire Harness 87 1 Lower Wire Harness 88 2 Spring Bracket Spacer 89 2 M8 x 22mm Button Screw 90 1 "U" Bracket 91 8 M4 x 19mm Screw 92 1 M6 Large Washer # 1 Audio Wire # 1 Adapter # 1 Splitter # 1 Battery Cover # 1 Hex Key # 1 Grease # 1 Userʼs Manual Note: # indicates a non-illustrated part. Qty. Qty. PFEVEL59830 R1003A Key No. Specifications are subject to change without notice. 22 PART LIST-Model No. Description Key No.
Uk Manual
Page 24
... be prepared to give the following information: • the MODEL NUMBER of the product (PFEVEL59830) • the NAME of the product (PROFORM® 605 HR elliptical crosstrainer) • the SERIAL NUMBER of the product (see the front cover of this manual) • the KEY NUMBER and DESCRIPTION of the part(s) (see page 22) PROFORM is a registered trademark of ICON Health & Fitness, Inc. ORDERING REPLACEMENT PARTS To order replacement parts, contact the ICON Health & Fitness, Ltd.
... be prepared to give the following information: • the MODEL NUMBER of the product (PFEVEL59830) • the NAME of the product (PROFORM® 605 HR elliptical crosstrainer) • the SERIAL NUMBER of the product (see the front cover of this manual) • the KEY NUMBER and DESCRIPTION of the part(s) (see page 22) PROFORM is a registered trademark of ICON Health & Fitness, Inc. ORDERING REPLACEMENT PARTS To order replacement parts, contact the ICON Health & Fitness, Ltd.

