
Uk Manual
Page 1
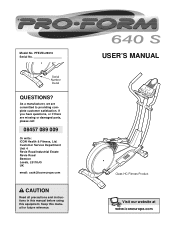
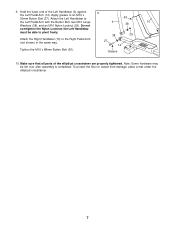
... www.iconeurope.com Serial Number Decal QUESTIONS? As a manufacturer, we are missing or damaged parts, please call: 08457 089 009 Or write: ICON Health & Fitness, Ltd. Customer Service Department Unit 4 Revie Road Industrial Estate Revie Road Beeston Leeds, LS118JG UK email: [email protected] CAUTION Read all precautions and instructions in this manual before using this manual for future reference. Model No.
... www.iconeurope.com Serial Number Decal QUESTIONS? As a manufacturer, we are missing or damaged parts, please call: 08457 089 009 Or write: ICON Health & Fitness, Ltd. Customer Service Department Unit 4 Revie Road Industrial Estate Revie Road Beeston Leeds, LS118JG UK email: [email protected] CAUTION Read all precautions and instructions in this manual before using this manual for future reference. Model No.
Uk Manual
Page 2
... pulse sensor is especially important for home use only. If you stop exercising, allow the pedals to slowly come to a stop immediately and begin cooling down. 12. WARNING: Before beginning this manual before using . Inspect and properly tighten all instructions in this or any exercise program, consult your physician. Wear appropriate exercise clothing when using the elliptical crosstrainer. 1. Place the elliptical crosstrainer on a level surface, with pre-existing health problems. Read all instructions...
... pulse sensor is especially important for home use only. If you stop exercising, allow the pedals to slowly come to a stop immediately and begin cooling down. 12. WARNING: Before beginning this manual before using . Inspect and properly tighten all instructions in this or any exercise program, consult your physician. Wear appropriate exercise clothing when using the elliptical crosstrainer. 1. Place the elliptical crosstrainer on a level surface, with pre-existing health problems. Read all instructions...
Uk Manual
Page 3
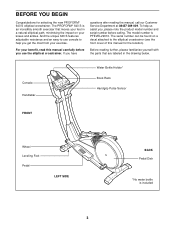
... from your exercise. The serial number can be found on your benefit, read this manual for selecting the new PROFORM® 640 S elliptical crosstrainer. And the unique 640 S features adjustable resistance and an easy-to-use console to the elliptical crosstrainer (see the front cover of this manual carefully before calling. The model number is included 3 Console Handlebar Water Bottle Holder* Book Rack Handgrip Pulse Sensor FRONT Wheel Leveling Foot Pedal LEFT SIDE...
... from your exercise. The serial number can be found on your benefit, read this manual for selecting the new PROFORM® 640 S elliptical crosstrainer. And the unique 640 S features adjustable resistance and an easy-to-use console to the elliptical crosstrainer (see the front cover of this manual carefully before calling. The model number is included 3 Console Handlebar Water Bottle Holder* Book Rack Handgrip Pulse Sensor FRONT Wheel Leveling Foot Pedal LEFT SIDE...
Uk Manual
Page 4
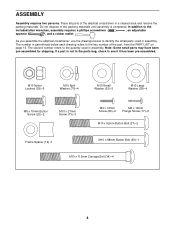
... Large Washer (38)-4 M8 x 19mm Button Screw (22)-2 M10 x 27mm Screw (71)-3 M4 x 16mm Screw (66)-2 M4 x 19mm Flange Screw (17)-6 M10 x 92mm Button Bolt (27)-2 Frame Spacer (19)-1 M10 x 88mm Button Bolt (63)-1 M10 x 112mm Carriage Bolt (34)-4 4 If a part is completed. As you assemble the elliptical crosstrainer, use the drawings below to identify the small parts used in the parts bag, check to the included allen...
... Large Washer (38)-4 M8 x 19mm Button Screw (22)-2 M10 x 27mm Screw (71)-3 M4 x 16mm Screw (66)-2 M4 x 19mm Flange Screw (17)-6 M10 x 92mm Button Bolt (27)-2 Frame Spacer (19)-1 M10 x 88mm Button Bolt (63)-1 M10 x 112mm Carriage Bolt (34)-4 4 If a part is completed. As you assemble the elliptical crosstrainer, use the drawings below to identify the small parts used in the parts bag, check to the included allen...

Uk Manual
Page 5
... avoid pinching the Wire Harnesses 2 63 70 19 82 20 1 66 5 Bracket Tube 5 81 66 81 5 Hand tighten the Button Bolt into the Frame and the Upright. Whilst another person lifts the back of the Console. Do not tighten the Button Bolt yet. 4. Whilst another person holds the Upright (2) in the bottom of the Frame (1) slightly, attach the Rear Stabiliser (4) to the...
... avoid pinching the Wire Harnesses 2 63 70 19 82 20 1 66 5 Bracket Tube 5 81 66 81 5 Hand tighten the Button Bolt into the Frame and the Upright. Whilst another person lifts the back of the Console. Do not tighten the Button Bolt yet. 4. Whilst another person holds the Upright (2) in the bottom of the Frame (1) slightly, attach the Rear Stabiliser (4) to the...

Uk Manual
Page 6
... the Console (5) in the position shown, connect the wire harness on the Upright (2). Be careful to the Upper Wire Harness (82). Slide an M10 Small Washer (53) onto an M8 x 19mm Button Screw (22), and tighten the Button Screw into the Console. Attach the Left Pedal to the left axle on page 3, if necessary). Make sure that the batteries are oriented as shown. Press the...
... the Console (5) in the position shown, connect the wire harness on the Upright (2). Be careful to the Upper Wire Harness (82). Slide an M10 Small Washer (53) onto an M8 x 19mm Button Screw (22), and tighten the Button Screw into the Console. Attach the Left Pedal to the left axle on page 3, if necessary). Make sure that the batteries are oriented as shown. Press the...
Uk Manual
Page 7
... Right Handlebar (10) to 63 the Left Pedal Arm with the Button Bolt, two M10 Large Washers (38), and an M10 Nylon Locknut (29). the Left Handlebar must be left over after assembly is completed. Hold the lower end of the elliptical crosstrainer are properly tightened. 9. Grease 10. Apply grease to an M10 x 92mm Button Bolt (27). To protect the floor or carpet...
... Right Handlebar (10) to 63 the Left Pedal Arm with the Button Bolt, two M10 Large Washers (38), and an M10 Nylon Locknut (29). the Left Handlebar must be left over after assembly is completed. Hold the lower end of the elliptical crosstrainer are properly tightened. 9. Grease 10. Apply grease to an M10 x 92mm Button Bolt (27). To protect the floor or carpet...
Uk Manual
Page 8
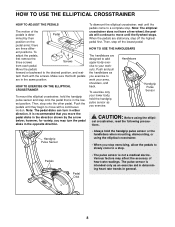
... as you exercise. cal crosstrainer, read the following precau- Various factors may turn in either direction. Move the pedals forward or backward to work your lower body, hold the handgrip pulse sensor and step onto the pedal that you move with the screws. It is recommended that is deter- To exercise only your arms, shoulders, and back. Pedals Pedal Disk • The pulse sensor is intended only as you exercise to the...
... as you exercise. cal crosstrainer, read the following precau- Various factors may turn in either direction. Move the pedals forward or backward to work your lower body, hold the handgrip pulse sensor and step onto the pedal that you move with the screws. It is recommended that is deter- To exercise only your arms, shoulders, and back. Pedals Pedal Disk • The pulse sensor is intended only as you exercise to the...
Uk Manual
Page 9
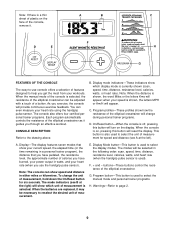
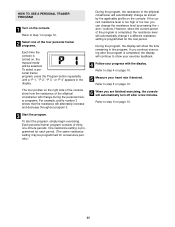
... controls the resistance of measurement, hold down the On/Reset button for speed and distance (see B at the left). Display mode indicators-These indicators show speed and distance in a personal trainer program), the distance that show how the resistance of the console, remove it guides you have pedaled, the resistance level, the approximate number of features designed to -use the handgrip pulse sensor). A. The mode indicators (see A at the right) will reset the display. when your heart rate...
... controls the resistance of measurement, hold down the On/Reset button for speed and distance (see B at the left). Display mode indicators-These indicators show speed and distance in a personal trainer program), the distance that show how the resistance of the console, remove it guides you have pedaled, the resistance level, the approximate number of features designed to -use the handgrip pulse sensor). A. The mode indicators (see A at the right) will reset the display. when your heart rate...
Uk Manual
Page 10
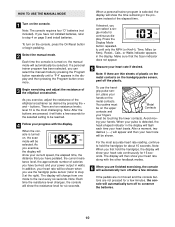
... your pulse is turned on the console, press the On/Reset button or begin pedaling. 2 Select the manual mode. If desired, you use the hand- Note: If there are ten resistance levels; For the most challenging. If the pedals are not moved and the console buttons are finished exercising, the console will then show the resistance level for the selected setting to step 5 at the right). If you have not installed batteries...
... your pulse is turned on the console, press the On/Reset button or begin pedaling. 2 Select the manual mode. If desired, you use the hand- Note: If there are ten resistance levels; For the most challenging. If the pedals are not moved and the console buttons are finished exercising, the console will then show the resistance level for the selected setting to step 5 at the right). If you have not installed batteries...
Uk Manual
Page 11
... with the display. One resistance setting is programmed for consecutive periods.) 11 HOW TO USE A PERSONAL TRAINER PROGRAM 1 Turn on page 10. 3 Start the program. The four profiles on , the manual mode will continue to step 6 on the console. To start the program, simply begin exercising. Each personal trainer program consists of the elliptical crosstrainer will show how the resistance of the program is completed, the resistance level will automatically change as shown by pressing the...
... with the display. One resistance setting is programmed for consecutive periods.) 11 HOW TO USE A PERSONAL TRAINER PROGRAM 1 Turn on page 10. 3 Start the program. The four profiles on , the manual mode will continue to step 6 on the console. To start the program, simply begin exercising. Each personal trainer program consists of the elliptical crosstrainer will show how the resistance of the program is completed, the resistance level will automatically change as shown by pressing the...
Uk Manual
Page 12
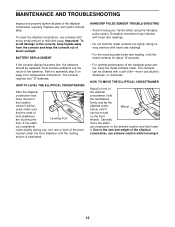
BATTERY REPLACEMENT If the console display becomes dim, the batteries should be moved on page 6 for about 15 seconds. • For optimal performance of the handgrip pulse sensor, keep the console out of low batteries. Excessive movement may interfere with heart rate readings. • For the most console problems are touching the Leveling Foot floor. Carefully move the ellipti- Due to the size and weight of the elliptical crosstrainer, use , turn one...
BATTERY REPLACEMENT If the console display becomes dim, the batteries should be moved on page 6 for about 15 seconds. • For optimal performance of the handgrip pulse sensor, keep the console out of low batteries. Excessive movement may interfere with heart rate readings. • For the most console problems are touching the Leveling Foot floor. Carefully move the ellipti- Due to the size and weight of the elliptical crosstrainer, use , turn one...
Uk Manual
Page 13
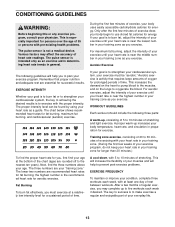
... your muscles and will help to prevent post-exercise problems. EXERCISE FREQUENCY To maintain or improve your everyday life. 13 The key to burn fat, adjust the intensity of your exercise program, do not keep your heart rate is intended only as a guide. The pulse sensor is near the middle number in your training zone as you exercise. If your goal is to success is...
... your muscles and will help to prevent post-exercise problems. EXERCISE FREQUENCY To maintain or improve your everyday life. 13 The key to burn fat, adjust the intensity of your exercise program, do not keep your heart rate is intended only as a guide. The pulse sensor is near the middle number in your training zone as you exercise. If your goal is to success is...
Uk Manual
Page 14
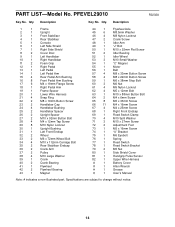
... Front Endcap 69 1 Reed Switch Clamp 70 4 M10 Split Washer 71 3 M10 x 27mm Screw 72 2 Adjustment Foot 73 1 M5 x 16mm Screw 74 1 "U" Bracket 75 1 M6 Eyebolt 76 1 Spring 77 1 Reed Switch 78 1 Reed Switch Bracket 79 2 M5 Nut 80 1 Side Shield Cover 81 1 Handgrip Pulse Sensor 82 1 Upper Wire Harness # 1 Battery Cover # 1 Allen Wrench # 1 Grease # 1 User's Manual Note: # indicates a non-illustrated part. Description Key No. PFEVEL29010 R0202A Key No. Qty. PART LIST-Model No.
... Front Endcap 69 1 Reed Switch Clamp 70 4 M10 Split Washer 71 3 M10 x 27mm Screw 72 2 Adjustment Foot 73 1 M5 x 16mm Screw 74 1 "U" Bracket 75 1 M6 Eyebolt 76 1 Spring 77 1 Reed Switch 78 1 Reed Switch Bracket 79 2 M5 Nut 80 1 Side Shield Cover 81 1 Handgrip Pulse Sensor 82 1 Upper Wire Harness # 1 Battery Cover # 1 Allen Wrench # 1 Grease # 1 User's Manual Note: # indicates a non-illustrated part. Description Key No. PFEVEL29010 R0202A Key No. Qty. PART LIST-Model No.

Uk Manual
Page 15
EXPLODED DRAWING-Model No. PFEVEL29010 R0202A 5 11 16 80 12 28 28 18 11 70 66 10 71 70 71 53 22 81 9 17 15 7 21 15 24 ...
EXPLODED DRAWING-Model No. PFEVEL29010 R0202A 5 11 16 80 12 28 28 18 11 70 66 10 71 70 71 53 22 81 9 17 15 7 21 15 24 ...
Uk Manual
Page 16
... replacement parts, call the ICON Health & Fitness, Ltd. PROFORM is a registered trademark of this manual) • the KEY NUMBER and DESCRIPTION of the part(s) (see page 14 of ICON Health & Fitness, Inc. ORDERING REPLACEMENT PARTS If you encounter any difficulties with this product, or if you need to give the following information: • the MODEL NUMBER of the product (PFEVEL29010) • the NAME of the product (PROFORM® 640 S elliptical crosstrainer) • the SERIAL NUMBER...
... replacement parts, call the ICON Health & Fitness, Ltd. PROFORM is a registered trademark of this manual) • the KEY NUMBER and DESCRIPTION of the part(s) (see page 14 of ICON Health & Fitness, Inc. ORDERING REPLACEMENT PARTS If you encounter any difficulties with this product, or if you need to give the following information: • the MODEL NUMBER of the product (PFEVEL29010) • the NAME of the product (PROFORM® 640 S elliptical crosstrainer) • the SERIAL NUMBER...

