

Uk Manual
Page 2
® TABLE OF CONTENTS IMPORTANT PRECAUTIONS 3 BEFORE YOU BEGIN 5 ASSEMBLY 6 OPERATION AND ADJUSTMENT 8 HOW TO FOLD AND MOVE THE TREADMILL 18 TROUBLE-SHOOTING 19 CONDITIONING GUIDELINES 21 PART LIST 22 HOW TO ORDER REPLACEMENT PARTS Back Cover Note: An EXPLODED DRAWING is attached in the centre of this manual. 2
® TABLE OF CONTENTS IMPORTANT PRECAUTIONS 3 BEFORE YOU BEGIN 5 ASSEMBLY 6 OPERATION AND ADJUSTMENT 8 HOW TO FOLD AND MOVE THE TREADMILL 18 TROUBLE-SHOOTING 19 CONDITIONING GUIDELINES 21 PART LIST 22 HOW TO ORDER REPLACEMENT PARTS Back Cover Note: An EXPLODED DRAWING is attached in the centre of this manual. 2
Uk Manual
Page 3
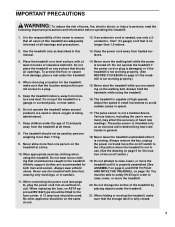
... extension cord is needed, use the treadmill with at a time. 10. Never start the treadmill while you are adequately informed of this manual. 13. Do not place the treadmill on the walking belt. IMPORTANT PRECAUTIONS WARNING: To reduce the risk of heart rate readings. It is properly assembled. (See ASSEMBLY on page 6, and HOW TO...
... extension cord is needed, use the treadmill with at a time. 10. Never start the treadmill while you are adequately informed of this manual. 13. Do not place the treadmill on the walking belt. IMPORTANT PRECAUTIONS WARNING: To reduce the risk of heart rate readings. It is properly assembled. (See ASSEMBLY on page 6, and HOW TO...
Uk Manual
Page 6
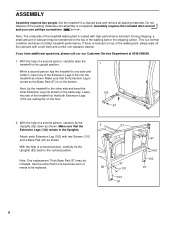
Assembly requires the included allen wrench and your own phillips screwdriver . With the help of a second person, carefully tip the Uprights (82) down as shown. Next, tip the treadmill to the vertical position. Note: The underside of a second person, carefully raise the treadmill to the upright position. This is ...two Screws (101) and a Base Pad (97) as shown. Do not dispose of the packing materials until assembly is lubricant on top of the Extension Legs (103) into the treadmill as shown. If there is completed. With the help of lubricant may be replaced. 82 97 97 101 ...
Assembly requires the included allen wrench and your own phillips screwdriver . With the help of a second person, carefully tip the Uprights (82) down as shown. Next, tip the treadmill to the vertical position. Note: The underside of a second person, carefully raise the treadmill to the upright position. This is ...two Screws (101) and a Base Pad (97) as shown. Do not dispose of the packing materials until assembly is lubricant on top of the Extension Legs (103) into the treadmill as shown. If there is completed. With the help of lubricant may be replaced. 82 97 97 101 ...
Uk Manual
Page 23
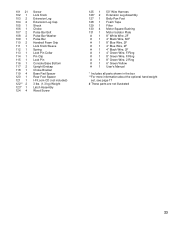
... Endcap Choke Bracket Base Pad Spacer Rear Foot Spacer I-Fit.com CD (not included) 3 lbs. (1.3 kg) Weight Latch Assembly Wood Screw 125 1 126* 2 127 1 128 1 129 1 130 4 131 1 #1 #1 #1 #1 #1 #1 #1 #1 #1 #1 50" Wire Harness Extension Leg Assembly Belly Pan Foot Foam Tape Filter Motor Square Bushing Motor Isolator Plate 8" White Wire, 2F 4" Black Wire, M/F 8" Blue...
... Endcap Choke Bracket Base Pad Spacer Rear Foot Spacer I-Fit.com CD (not included) 3 lbs. (1.3 kg) Weight Latch Assembly Wood Screw 125 1 126* 2 127 1 128 1 129 1 130 4 131 1 #1 #1 #1 #1 #1 #1 #1 #1 #1 #1 50" Wire Harness Extension Leg Assembly Belly Pan Foot Foam Tape Filter Motor Square Bushing Motor Isolator Plate 8" White Wire, 2F 4" Black Wire, M/F 8" Blue...


