

Uk Manual
Page 2
® TABLE OF CONTENTS IMPORTANT PRECAUTIONS 3 BEFORE YOU BEGIN 5 ASSEMBLY 6 OPERATION AND ADJUSTMENT 8 HOW TO FOLD AND MOVE THE TREADMILL 18 TROUBLE-SHOOTING 19 CONDITIONING GUIDELINES 21 PART LIST 22 HOW TO ORDER REPLACEMENT PARTS Back Cover Note: An EXPLODED DRAWING is attached in the centre of this manual. 2
® TABLE OF CONTENTS IMPORTANT PRECAUTIONS 3 BEFORE YOU BEGIN 5 ASSEMBLY 6 OPERATION AND ADJUSTMENT 8 HOW TO FOLD AND MOVE THE TREADMILL 18 TROUBLE-SHOOTING 19 CONDITIONING GUIDELINES 21 PART LIST 22 HOW TO ORDER REPLACEMENT PARTS Back Cover Note: An EXPLODED DRAWING is attached in the centre of this manual. 2
Uk Manual
Page 3
... not working properly.) 15. Keep the power cord away from the treadmill at a time. 10. Adjust the speed in use the treadmill with at least 2 metres of the owner to raise, lower, or move the treadmill until it is turned off switch.) 19. Do not place the treadmill on any surface that the storage latch is properly assembled. (See ASSEMBLY on page 6, and HOW TO FOLD AND MOVE THE TREADMILL on the walking belt...
... not working properly.) 15. Keep the power cord away from the treadmill at a time. 10. Adjust the speed in use the treadmill with at least 2 metres of the owner to raise, lower, or move the treadmill until it is turned off switch.) 19. Do not place the treadmill on any surface that the storage latch is properly assembled. (See ASSEMBLY on page 6, and HOW TO FOLD AND MOVE THE TREADMILL on the walking belt...
Uk Manual
Page 4
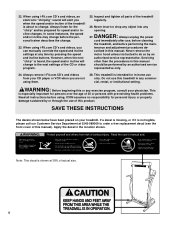
... age of 35 or persons with pre-existing health problems. Read all parts of this or any opening. Never remove the motor hood unless instructed to order a free replacement decal (see the front cover of the treadmill regularly. 26. This treadmill is heard, the speed and/or incline will alert you when the speed and/or incline of the treadmill is especially important for in any time by...
... age of 35 or persons with pre-existing health problems. Read all parts of this or any opening. Never remove the motor hood unless instructed to order a free replacement decal (see the front cover of the treadmill regularly. 26. This treadmill is heard, the speed and/or incline will alert you when the speed and/or incline of the treadmill is especially important for in any time by...
Uk Manual
Page 5
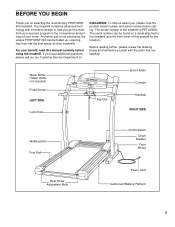
... Service Department at 0345-089009. Water Bottle Holder (bottle not included) Pulse Sensor LEFT SIDE Lock Knob Key/Clip Book Holder Console Handrail RIGHT SIDE Walking Belt Foot Rail Rear Roller Adjustment Bolts On/Off Switch Circuit Breaker Front Wheel Power Cord Cushioned Walking Platform 5 For your home. The treadmill combines advanced technology with the parts that are labelled. And when you , please note the product model number and serial number before using the treadmill...
... Service Department at 0345-089009. Water Bottle Holder (bottle not included) Pulse Sensor LEFT SIDE Lock Knob Key/Clip Book Holder Console Handrail RIGHT SIDE Walking Belt Foot Rail Rear Roller Adjustment Bolts On/Off Switch Circuit Breaker Front Wheel Power Cord Cushioned Walking Platform 5 For your home. The treadmill combines advanced technology with the parts that are labelled. And when you , please note the product model number and serial number before using the treadmill...
Uk Manual
Page 6
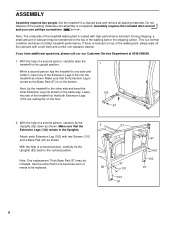
... until assembly is coated with high-performance lubricant. Next, tip the treadmill to the top of the treadmill walking belt is completed. Note: The underside of the walking belt or the shipping carton. Note: One replacement Thick Base Pad (97) may be transferred to the other side and insert the other Extension Leg (not shown) in the same way. Set the treadmill...
... until assembly is coated with high-performance lubricant. Next, tip the treadmill to the top of the treadmill walking belt is completed. Note: The underside of the walking belt or the shipping carton. Note: One replacement Thick Base Pad (97) may be transferred to the other side and insert the other Extension Leg (not shown) in the same way. Set the treadmill...
Uk Manual
Page 7
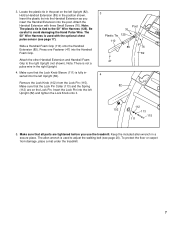
... the Handrail Extension as you use the treadmill. Make sure that the Lock Pin Collar (113) and the Spring (112) are tightened before you insert the Handrail Extension into the left Upright (82). 3. Locate the plastic tie in the right Upright. 4. Hold a Handrail Extension (85) in a secure place. Note: There is tied to adjust the walking belt (see page 17).
... the Handrail Extension as you use the treadmill. Make sure that the Lock Pin Collar (113) and the Spring (112) are tightened before you insert the Handrail Extension into the left Upright (82). 3. Locate the plastic tie in the right Upright. 4. Hold a Handrail Extension (85) in a secure place. Note: There is tied to adjust the walking belt (see page 17).
Uk Manual
Page 8
... Italy, an adapter (not included) must be 2 used between the power cord and the outlet. Plug the power cord into the socket on treadmill Two power cords are in accordance with all local codes and ordinances. Outlet Use only a power cord type H05VV-F with a conductor of at least 1mm2, with GFCI-equipped outlets. If it will not fit the outlet, have a proper outlet installed by a qualified...
... Italy, an adapter (not included) must be 2 used between the power cord and the outlet. Plug the power cord into the socket on treadmill Two power cords are in accordance with all local codes and ordinances. Outlet Use only a power cord type H05VV-F with a conductor of at least 1mm2, with GFCI-equipped outlets. If it will not fit the outlet, have a proper outlet installed by a qualified...

Uk Manual
Page 9
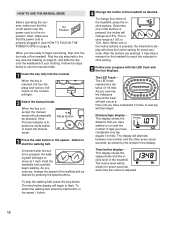
..., use the manual mode of the console, remove it. 9 With the treadmill connected to your computer, you through every step of electric shock, keep the console dry. For information about other optional accessories, see page 16. DIAGRAM OF THE CONSOLE Manual Indicator Displays LED Track Displays iFit.com Indicator Mode Button Incline Start Buttons Button Key Stop Button Speed Buttons Clip CAUTION: Before operating the console, read the following precautions. • Do not stand on the walking belt when turning on the power...
..., use the manual mode of the console, remove it. 9 With the treadmill connected to your computer, you through every step of electric shock, keep the console dry. For information about other optional accessories, see page 16. DIAGRAM OF THE CONSOLE Manual Indicator Displays LED Track Displays iFit.com Indicator Mode Button Incline Start Buttons Button Key Stop Button Speed Buttons Clip CAUTION: Before operating the console, read the following precautions. • Do not stand on the walking belt when turning on the power...
Uk Manual
Page 10
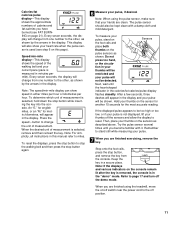
... begin exercising, step onto the foot rails of the treadmill, press the incline buttons. Distance/laps display- When you have walked or run and the number of laps you exercise, change the incline of the treadmill. Mode Button 3 Press the start button or the speed s button to the key (see HOW TO PLUG IN THE POWER CORD on the console will automatically be shown for seven seconds. To stop the walking belt, press the stop button. To restart the walking belt, press the start the walking belt. This display...
... begin exercising, step onto the foot rails of the treadmill, press the incline buttons. Distance/laps display- When you have walked or run and the number of laps you exercise, change the incline of the treadmill. Mode Button 3 Press the start button or the speed s button to the key (see HOW TO PLUG IN THE POWER CORD on the console will automatically be shown for seven seconds. To stop the walking belt, press the stop button. To restart the walking belt, press the start the walking belt. This display...
Uk Manual
Page 11
... selected, hold down the stop button while inserting the key into the console. The pulse sensor should also be detected. Step onto the foot rails, press the stop button again. 6 Measure your thumbs off the demo mode. Refer to page 17 and turn off the sensors and allow the display to reset. To determine which unit of measurement. Note: For simplicity, all instructions in minutes per hour...
... selected, hold down the stop button while inserting the key into the console. The pulse sensor should also be detected. Step onto the foot rails, press the stop button again. 6 Measure your thumbs off the demo mode. Refer to page 17 and turn off the sensors and allow the display to reset. To determine which unit of measurement. Note: For simplicity, all instructions in minutes per hour...
Uk Manual
Page 14
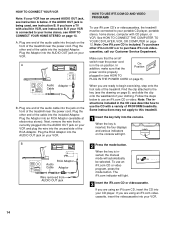
... manual RCA Adaptor Audio Cable Adaptor mode will light. Plug the other iFit.com CD's or to purchase iFit.com videocassettes, call our Customer Service Department. Plug one end of the treadmill near the power cord. Plug the Adaptor into the console. To purchase other end of your clothing. The Wire removed from iFit.com indicator will automatically be connected to your portable CD player, portable stereo, home stereo...
... manual RCA Adaptor Audio Cable Adaptor mode will light. Plug the other iFit.com CD's or to purchase iFit.com videocassettes, call our Customer Service Department. Plug one end of the treadmill near the power cord. Plug the Adaptor into the console. To purchase other end of your clothing. The Wire removed from iFit.com indicator will automatically be connected to your portable CD player, portable stereo, home stereo...
Uk Manual
Page 15
... audio cable is properly connected, that it is pressed, your workout. Keep the key in , and that the time/incline display is finished, remove the key. When you through your personal trainer will change to page 17 and turn off position. 15 To restart the program, press the start button or the speed ∆ button on page 11. 7 When the iFit.com CD or video program is not flashing. After a moment, the walking belt...
... audio cable is properly connected, that it is pressed, your workout. Keep the key in , and that the time/incline display is finished, remove the key. When you through your personal trainer will change to page 17 and turn off position. 15 To restart the program, press the start button or the speed ∆ button on page 11. 7 When the iFit.com CD or video program is not flashing. After a moment, the walking belt...
Uk Manual
Page 16
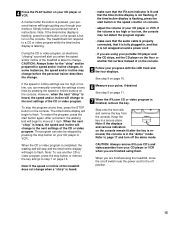
... iFit.com audio and video programs directly from our internet site, press the mode button. During the program, an electronic "chirping" sound will alert you can use even more features on page 13. The time/incline display will begin . 7 Return to the treadmill and stand on the console. To restart the program, press the start the program. You can manually override the settings at any time, press the stop and the time/incline display...
... iFit.com audio and video programs directly from our internet site, press the mode button. During the program, an electronic "chirping" sound will alert you can use even more features on page 13. The time/incline display will begin . 7 Return to the treadmill and stand on the console. To restart the program, press the start the program. You can manually override the settings at any time, press the stop and the time/incline display...

Uk Manual
Page 17
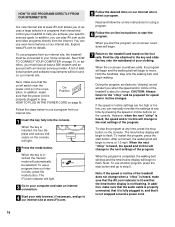
... display will show the total number of miles that the walking belt has moved. OPTIONAL HAND WEIGHTS Optional hand weights let you are finished using the treadmill, move the on and turn off the demo mode. Refer to the off the demo mode. When you include upperbody exercise in a store. When the information mode is displayed in your pulse, if desired. at 0345-089009. The chest pulse sensor offers hands-free operation and continuously monitors your heart rate...
... display will show the total number of miles that the walking belt has moved. OPTIONAL HAND WEIGHTS Optional hand weights let you are finished using the treadmill, move the on and turn off the demo mode. Refer to the off the demo mode. When you include upperbody exercise in a store. When the information mode is displayed in your pulse, if desired. at 0345-089009. The chest pulse sensor offers hands-free operation and continuously monitors your heart rate...
Uk Manual
Page 19
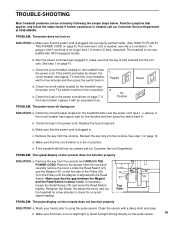
... treadmill is needed , use SOLUTION: a. b. After the power cord has been plugged in . To reset the circuit breaker, wait for five minutes and then press the switch back in , make sure that the key is fully inserted into the console. Check the on/off switch located on SOLUTION: a. above). Replace the fuse if required. b. d. e. Remove the screws from the console and UNPLUG THE POWER CORD. Retighten the Screw. Clean the sensor...
... treadmill is needed , use SOLUTION: a. b. After the power cord has been plugged in . To reset the circuit breaker, wait for five minutes and then press the switch back in , make sure that the key is fully inserted into the console. Check the on/off switch located on SOLUTION: a. above). Replace the fuse if required. b. d. e. Remove the screws from the console and UNPLUG THE POWER CORD. Retighten the Screw. Clean the sensor...
Uk Manual
Page 20
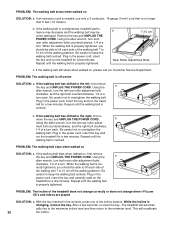
... walking belt is properly tightened. mill for a few minutes. If the walking belt has shifted to overtighten the walking belt. If the walking belt slips when walked on SOLUTION: a. Using the a allen wrench, turn both rear roller adjustment bolts counterclockwise, 1/4 of the incline buttons. Repeat until the walking belt is properly tightened. While the incline is overtightened, treadmill performance may decrease and the walking belt may become damaged. move the key and UNPLUG THE POWER CORD. Plug in the console, press one of a turn...
... walking belt is properly tightened. mill for a few minutes. If the walking belt has shifted to overtighten the walking belt. If the walking belt slips when walked on SOLUTION: a. Using the a allen wrench, turn both rear roller adjustment bolts counterclockwise, 1/4 of the incline buttons. Repeat until the walking belt is properly tightened. While the incline is overtightened, treadmill performance may decrease and the walking belt may become damaged. move the key and UNPLUG THE POWER CORD. Plug in the console, press one of a turn...

Uk Manual
Page 21
... age near the middle number in your heart rate during exercise, use the pulse sensor on the lungs to exercise with preexisting health problems. The pulse sensor is near the lowest number in your heart rate is not a medical device. A Cool-down . For more detailed exercise information, obtain a reputable book or consult your "training zone." For maximum fat burning, adjust the speed and incline of time. WORKOUT GUIDELINES Each workout should include the...
... age near the middle number in your heart rate during exercise, use the pulse sensor on the lungs to exercise with preexisting health problems. The pulse sensor is near the lowest number in your heart rate is not a medical device. A Cool-down . For more detailed exercise information, obtain a reputable book or consult your "training zone." For maximum fat burning, adjust the speed and incline of time. WORKOUT GUIDELINES Each workout should include the...
Uk Manual
Page 22
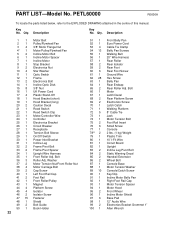
.... Bolt 36 3 Roller Adj. PART LIST-Model No. PETL60000 R0600A To locate the parts listed below, refer to the EXPLODED DRAWING attached in the centre of this manual. Qty. Bolt Motor Latch Decal Rear Platform Screw Electronics Screw Latch Catch Walking Platform 8" Cable Tie Jack Motor Tension Bolt Foot Rail Insert Small Screw Console 2 lbs. (1 kg) Weight Plastic Trim 10' I-Fit Wire Circuit Board Upright Incline Leg Pivot Bolt Static Warning Decal Handrail Extension Wheel Bolt Console Base Motor Tension Washer Console/Catch Screw Key/Clip Incline Motor...
.... Bolt 36 3 Roller Adj. PART LIST-Model No. PETL60000 R0600A To locate the parts listed below, refer to the EXPLODED DRAWING attached in the centre of this manual. Qty. Bolt Motor Latch Decal Rear Platform Screw Electronics Screw Latch Catch Walking Platform 8" Cable Tie Jack Motor Tension Bolt Foot Rail Insert Small Screw Console 2 lbs. (1 kg) Weight Plastic Trim 10' I-Fit Wire Circuit Board Upright Incline Leg Pivot Bolt Static Warning Decal Handrail Extension Wheel Bolt Console Base Motor Tension Washer Console/Catch Screw Key/Clip Incline Motor...
Uk Manual
Page 23
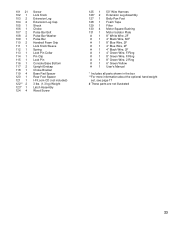
... 4 Screw Lock Knob Extension Leg Extension Leg Cap Shock Choke Pulse Bar Bolt Pulse Bar Washer Pulse Bar Handrail Foam Grip Lock Knob Sleeve Spring Lock Pin Collar Pin Clip Lock Pin Console Base Bottom Upright Endcap Choke Bracket Base Pad Spacer Rear Foot Spacer I-Fit.com CD (not included) 3 lbs. (1.3 kg) Weight Latch Assembly Wood Screw 125 1 126* 2 127 1 128 1 129 1 130 4 131 1 #1 #1 #1 #1 #1 #1 #1 #1 #1 #1 50" Wire Harness Extension Leg Assembly Belly Pan Foot Foam Tape Filter Motor...
... 4 Screw Lock Knob Extension Leg Extension Leg Cap Shock Choke Pulse Bar Bolt Pulse Bar Washer Pulse Bar Handrail Foam Grip Lock Knob Sleeve Spring Lock Pin Collar Pin Clip Lock Pin Console Base Bottom Upright Endcap Choke Bracket Base Pad Spacer Rear Foot Spacer I-Fit.com CD (not included) 3 lbs. (1.3 kg) Weight Latch Assembly Wood Screw 125 1 126* 2 127 1 128 1 129 1 130 4 131 1 #1 #1 #1 #1 #1 #1 #1 #1 #1 #1 50" Wire Harness Extension Leg Assembly Belly Pan Foot Foam Tape Filter Motor...
Uk Manual
Page 24
...; The MODEL NUMBER OF THE PRODUCT (PETL60000) • The NAME OF THE PRODUCT (PROFORM® 600 treadmill) • The SERIAL NUMBER OF THE PRODUCT (see the front cover of this manual) • The KEY NUMBER OF THE PART(S) (see the PART LIST on pages 22 and 23 and the EXPLODED DRAWING attached in the centre of this manual). Part No.162008 R0600A Printed in the centre of ICON Health & Fitness...
...; The MODEL NUMBER OF THE PRODUCT (PETL60000) • The NAME OF THE PRODUCT (PROFORM® 600 treadmill) • The SERIAL NUMBER OF THE PRODUCT (see the front cover of this manual) • The KEY NUMBER OF THE PART(S) (see the PART LIST on pages 22 and 23 and the EXPLODED DRAWING attached in the centre of this manual). Part No.162008 R0600A Printed in the centre of ICON Health & Fitness...


