

English Manual
Page 2
... OF CONTENTS WARNING DECAL PLACEMENT 2 IMPORTANT PRECAUTIONS 3 BEFORE YOU BEGIN 6 PART IDENTIFICATION CHART 7 ASSEMBLY 8 OPERATION AND ADJUSTMENT 14 HOW TO FOLD AND MOVE THE TREADMILL 20 TROUBLESHOOTING 21 EXERCISE GUIDELINES 23 PART LIST 24 EXPLODED DRAWING 25 ORDERING REPLACEMENT PARTS Back Cover... LIMITED WARRANTY Back Cover WARNING DECAL PLACEMENT This drawing shows the locations of ICON IP, Inc. 2 PROFORM is missing or illegible,...
... OF CONTENTS WARNING DECAL PLACEMENT 2 IMPORTANT PRECAUTIONS 3 BEFORE YOU BEGIN 6 PART IDENTIFICATION CHART 7 ASSEMBLY 8 OPERATION AND ADJUSTMENT 14 HOW TO FOLD AND MOVE THE TREADMILL 20 TROUBLESHOOTING 21 EXERCISE GUIDELINES 23 PART LIST 24 EXPLODED DRAWING 25 ORDERING REPLACEMENT PARTS Back Cover... LIMITED WARRANTY Back Cover WARNING DECAL PLACEMENT This drawing shows the locations of ICON IP, Inc. 2 PROFORM is missing or illegible,...

English Manual
Page 4
.... If you feel faint or if you experience pain while exercising, stop immediately and cool down. The heart rate monitor is properly assembled. (See ASSEMBLY on page 8, and HOW TO FOLD AND MOVE THE TREADMILL on page 20.) You must be performed by an authorized service representative. Do not attempt to move the...
.... If you feel faint or if you experience pain while exercising, stop immediately and cool down. The heart rate monitor is properly assembled. (See ASSEMBLY on page 8, and HOW TO FOLD AND MOVE THE TREADMILL on page 20.) You must be performed by an authorized service representative. Do not attempt to move the...

English Manual
Page 7
The number in the hardware kit, check to identify small parts used for assembly. The number following the key number is the quantity used for assembly. Extra parts may be included. #10 Star Washer (23)–-4 #10 x 3/4" Screw (8)–-6 #8 x 3/4" Screw (4)–-10 5/16" x 3/4" Screw (5)–-2 5/16" Star Washer (6)–-4 5/16" x 3" Screw (7)&#...
The number in the hardware kit, check to identify small parts used for assembly. The number following the key number is the quantity used for assembly. Extra parts may be included. #10 Star Washer (23)–-4 #10 x 3/4" Screw (8)–-6 #8 x 3/4" Screw (4)–-10 5/16" x 3/4" Screw (5)–-2 5/16" Star Washer (6)–-4 5/16" x 3" Screw (7)&#...

English Manual
Page 8
...8226; allows us to assemble this manual) and register your home, call CUSTOMER CARE (see page 7. •• Place all assembly steps. •• Assembly requires the following tools: the included hex keys •• After shipping, there may be an oily substance on the treadmill, wipe it off with... a soft cloth and a mild, non-abrasive cleaner. ASSEMBLY •• To hire a service technician to notify you of upgrades and offers Note: If you ...
...8226; allows us to assemble this manual) and register your home, call CUSTOMER CARE (see page 7. •• Place all assembly steps. •• Assembly requires the following tools: the included hex keys •• After shipping, there may be an oily substance on the treadmill, wipe it off with... a soft cloth and a mild, non-abrasive cleaner. ASSEMBLY •• To hire a service technician to notify you of upgrades and offers Note: If you ...

English Manual
Page 10
... a 3/8" Star Washer (3) into the Right Upright (33) and the Base (74); Note: There are no wires on a soft surface to avoid scratching the console assembly. Set the console assembly face down on the left side. 33 63 74 3 2 3 7 6 64 6 5 63 33 7. do not fully tighten the Screws yet. Insert a 3/8" x 3 1/4" Screw (2) with two... (not shown) in the Right Upright (33). Note: There are no wires on the left side. 6. Remove the Console Crossbar. Discard the screws. 7 C 61 C Console Assembly 10
... a 3/8" Star Washer (3) into the Right Upright (33) and the Base (74); Note: There are no wires on a soft surface to avoid scratching the console assembly. Set the console assembly face down on the left side. 33 63 74 3 2 3 7 6 64 6 5 63 33 7. do not fully tighten the Screws yet. Insert a 3/8" x 3 1/4" Screw (2) with two... (not shown) in the Right Upright (33). Note: There are no wires on the left side. 6. Remove the Console Crossbar. Discard the screws. 7 C 61 C Console Assembly 10
English Manual
Page 12
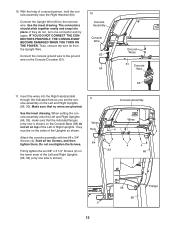
...tie from the Upright Wire. Start all ten Screws, and then tighten them. Wires Hole 64 4 4 33 Wires 4 4 4 66 2 12 58 66 Flange Console Assembly See the inset drawing. With the help of the Uprights as shown. Connect the Upright Wire (63) to the ground wire on the lower ends...together easily and snap into the Right Handrail (64) through the indicated hole as you set the con- 11 sole assembly on the sides of a second person, hold the console assembly near the Right Handrail (64). Insert the wires into place. IF YOU DO NOT CONNECT THE CONNECTORS PROPERLY, THE CONSOLE...
...tie from the Upright Wire. Start all ten Screws, and then tighten them. Wires Hole 64 4 4 33 Wires 4 4 4 66 2 12 58 66 Flange Console Assembly See the inset drawing. With the help of the Uprights as shown. Connect the Upright Wire (63) to the ground wire on the lower ends...together easily and snap into the Right Handrail (64) through the indicated hole as you set the con- 11 sole assembly on the sides of a second person, hold the console assembly near the Right Handrail (64). Insert the wires into place. IF YOU DO NOT CONNECT THE CONNECTORS PROPERLY, THE CONSOLE...
English Manual
Page 13
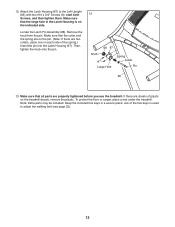
Locate the Latch Pin Assembly (68). start both Screws, and then tighten them. If there are properly tightened before you use the treadmill. Keep the included hex keys in the Latch Housing is used to the Left Upright (66) with two #10 x 3/4" Screws (8); one on each side of ... Collar Pin 66 13. Make sure that all parts are sheets of the hex keys is on the treadmill decals, remove the plastic. To protect the oor or carpet, place a mat under the treadmill. Make sure that the collar and the spring are on the pin. (Note: If there are two...
Locate the Latch Pin Assembly (68). start both Screws, and then tighten them. If there are properly tightened before you use the treadmill. Keep the included hex keys in the Latch Housing is used to the Left Upright (66) with two #10 x 3/4" Screws (8); one on each side of ... Collar Pin 66 13. Make sure that all parts are sheets of the hex keys is on the treadmill decals, remove the plastic. To protect the oor or carpet, place a mat under the treadmill. Make sure that the collar and the spring are on the pin. (Note: If there are two...

English Manual
Page 24
... Door Console Console Base Left Handrail Handrail Cap Console Crossbar Key/Clip Upright Wire Right Handrail Round Handrail Cap Left Upright Latch Housing Latch Pin Assembly Warning Decal Base Cap Thick Base Pad Thin Base Pad Upright Grommet Base User’'s Manual Note: Specifications are not illustrated. 24 For information about...
... Door Console Console Base Left Handrail Handrail Cap Console Crossbar Key/Clip Upright Wire Right Handrail Round Handrail Cap Left Upright Latch Housing Latch Pin Assembly Warning Decal Base Cap Thick Base Pad Thin Base Pad Upright Grommet Base User’'s Manual Note: Specifications are not illustrated. 24 For information about...


