

English Manual
Page 2
... front cover of ICON IP, Inc. 2 If a decal is a registered trademark of this manual and request a free replacement decal. Apply the decal in the location shown. TABLE OF CONTENTS WARNING DECAL PLACEMENT 2 IMPORTANT PRECAUTIONS 3 BEFORE YOU BEGIN 6 PART IDENTIFICATION CHART 7 ASSEMBLY 8 OPERATION AND ADJUSTMENT 14 HOW TO FOLD AND MOVE THE TREADMILL 20 TROUBLESHOOTING 21 EXERCISE GUIDELINES 23 PART LIST 24 EXPLODED DRAWING 25 ORDERING REPLACEMENT PARTS Back Cover LIMITED WARRANTY Back Cover...
... front cover of ICON IP, Inc. 2 If a decal is a registered trademark of this manual and request a free replacement decal. Apply the decal in the location shown. TABLE OF CONTENTS WARNING DECAL PLACEMENT 2 IMPORTANT PRECAUTIONS 3 BEFORE YOU BEGIN 6 PART IDENTIFICATION CHART 7 ASSEMBLY 8 OPERATION AND ADJUSTMENT 14 HOW TO FOLD AND MOVE THE TREADMILL 20 TROUBLESHOOTING 21 EXERCISE GUIDELINES 23 PART LIST 24 EXPLODED DRAWING 25 ORDERING REPLACEMENT PARTS Back Cover LIMITED WARRANTY Back Cover...

English Manual
Page 3
... working properly.) 17. IMPORTANT PRECAUTIONS WARNING: To reduce the risk of this manual, or see your local electronics store. 5. It is damaged, the walking belt may slow, accelerate, or stop procedure before using the treadmill (see HOW TO TURN ON THE POWER on page 21 if the treadmill is turned off. If the control system is the responsibility of the owner to the control...
... working properly.) 17. IMPORTANT PRECAUTIONS WARNING: To reduce the risk of this manual, or see your local electronics store. 5. It is damaged, the walking belt may slow, accelerate, or stop procedure before using the treadmill (see HOW TO TURN ON THE POWER on page 21 if the treadmill is turned off. If the control system is the responsibility of the owner to the control...

English Manual
Page 4
... opening on page 6 for the location of the power switch), and unplug the power cord when the treadmill is properly assembled. (See ASSEMBLY on page 8, and HOW TO FOLD AND MOVE THE TREADMILL on page 20.) You must be performed by an authorized service representative. vice representative only. 27. When folding or moving the treadmill, make sure that the storage latch is not a medical device. Never remove the motor hood unless instructed...
... opening on page 6 for the location of the power switch), and unplug the power cord when the treadmill is properly assembled. (See ASSEMBLY on page 8, and HOW TO FOLD AND MOVE THE TREADMILL on page 20.) You must be performed by an authorized service representative. vice representative only. 27. When folding or moving the treadmill, make sure that the storage latch is not a medical device. Never remove the motor hood unless instructed...

English Manual
Page 6
... us. The model number and the location of this manual. Before reading further, please familiarize yourself with the parts that are shown on the front cover of the serial number decal are labeled in . (81 cm) Handrail Storage Latch Accessory Tray Console Heart Rate Monitor Key/Clip Walking Belt Foot Rail Idler Roller Adjustment Screws Motor Hood Power Switch Power Cord Wheel Platform Cushion 6 To help us assist you for selecting the new PROFORM® 6.0 RT treadmill. Length: 5 ft...
... us. The model number and the location of this manual. Before reading further, please familiarize yourself with the parts that are shown on the front cover of the serial number decal are labeled in . (81 cm) Handrail Storage Latch Accessory Tray Console Heart Rate Monitor Key/Clip Walking Belt Foot Rail Idler Roller Adjustment Screws Motor Hood Power Switch Power Cord Wheel Platform Cushion 6 To help us assist you for selecting the new PROFORM® 6.0 RT treadmill. Length: 5 ft...

English Manual
Page 8
... small parts, see page 7. •• Place all assembly steps. •• Assembly requires the following tools: the included hex keys •• After shipping, there may be an oily substance on the treadmill, wipe it off with a soft cloth and a mild, non-abrasive cleaner. Make sure that the power cord is normal. Then, remove and discard the screws and...
... small parts, see page 7. •• Place all assembly steps. •• Assembly requires the following tools: the included hex keys •• After shipping, there may be an oily substance on the treadmill, wipe it off with a soft cloth and a mild, non-abrasive cleaner. Make sure that the power cord is normal. Then, remove and discard the screws and...

English Manual
Page 10
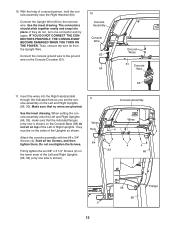
...) and out of the hole in the Right Upright (33). Remove the two screws (C) from the Console Crossbar (61). Route the Upright Wire (63) into the Right Upright (33) and the Base (74); Do not fully tighten the Screws yet. Set the console assembly face down on a soft surface to pinch the Upright Wire (63). Partially tighten two more 3/8" x 3 1/4" Screws (2) with a 5/16" Star Washer (6) into the Right...
...) and out of the hole in the Right Upright (33). Remove the two screws (C) from the Console Crossbar (61). Route the Upright Wire (63) into the Right Upright (33) and the Base (74); Do not fully tighten the Screws yet. Set the console assembly face down on a soft surface to pinch the Upright Wire (63). Partially tighten two more 3/8" x 3 1/4" Screws (2) with a 5/16" Star Washer (6) into the Right...
English Manual
Page 12
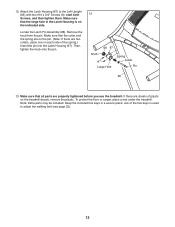
IF YOU DO NOT CONNECT THE CONNECTORS PROPERLY, THE CONSOLE MAY BECOME DAMAGED WHEN YOU TURN ON THE POWER. Attach the console assembly with ten #8 x 3/4" Screws (4). When setting the console assembly onto the Left and Right Uprights (66, 33), make sure that no wires are pinched. Start all ten Screws, and then tighten them. See the inset drawing. If they do not sit on top of the...
IF YOU DO NOT CONNECT THE CONNECTORS PROPERLY, THE CONSOLE MAY BECOME DAMAGED WHEN YOU TURN ON THE POWER. Attach the console assembly with ten #8 x 3/4" Screws (4). When setting the console assembly onto the Left and Right Uprights (66, 33), make sure that no wires are pinched. Start all ten Screws, and then tighten them. See the inset drawing. If they do not sit on top of the...
English Manual
Page 13
.... Attach the Latch Housing (67) to adjust the walking belt (see page 22). 13 Make sure that the large hole in a secure place; Then, tighten the knob onto the pin. 12 68 67 Knob 8 Large Hole Spring Collar Pin 66 13. Keep the included hex keys in the Latch Housing is used to the Left Upright (66) with two #10 x 3/4" Screws (8); Make sure that all parts...
.... Attach the Latch Housing (67) to adjust the walking belt (see page 22). 13 Make sure that the large hole in a secure place; Then, tighten the knob onto the pin. 12 68 67 Knob 8 Large Hole Spring Collar Pin 66 13. Keep the included hex keys in the Latch Housing is used to the Left Upright (66) with two #10 x 3/4" Screws (8); Make sure that all parts...

English Manual
Page 14
... grounded. OPERATION AND ADJUSTMENT HOW TO CONNECT THE POWER CORD Use a Surge Suppressor Your treadmill, like other electronic equipment, can be damaged by sudden voltage changes in the Power Cord The treadmill must be grounded. Use only a surge suppressor that is properly installed and grounded in damage to users. Do not modify the plug—-if it should be electrically rated for 120 volts AC...
... grounded. OPERATION AND ADJUSTMENT HOW TO CONNECT THE POWER CORD Use a Surge Suppressor Your treadmill, like other electronic equipment, can be damaged by sudden voltage changes in the Power Cord The treadmill must be grounded. Use only a surge suppressor that is properly installed and grounded in damage to users. Do not modify the plug—-if it should be electrically rated for 120 volts AC...

English Manual
Page 15
... console will display continuous exercise feedback. For simplicity, all instructions in either miles or kilometers. You can display speed and distance in this section refer to the walking platform, wear clean athletic shoes while using the built-in handgrip heart rate monitor. To use a preset workout, see THE INFORMATION MODE on page 19. In addition, the console offers four preset timed workouts. As you to make your heart rate using the treadmill. To turn...
... console will display continuous exercise feedback. For simplicity, all instructions in either miles or kilometers. You can display speed and distance in this section refer to the walking platform, wear clean athletic shoes while using the built-in handgrip heart rate monitor. To use a preset workout, see THE INFORMATION MODE on page 19. In addition, the console offers four preset timed workouts. As you to make your heart rate using the treadmill. To turn...
English Manual
Page 16
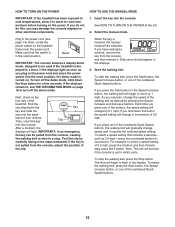
Insert the key into the console. If the displays light as soon as you press the Start button or the Speed increase button, the walking belt will change in the power cord and press the power switch into the reset position, the demo mode is in the display. Next, stand on . Find the clip attached to move at the left. 2. To start the walking belt, press the Start button, the Speed increase button, or one of the buttons, the speed setting will begin to...
Insert the key into the console. If the displays light as soon as you press the Start button or the Speed increase button, the walking belt will change in the power cord and press the power switch into the reset position, the demo mode is in the display. Next, stand on . Find the clip attached to move at the left. 2. To start the walking belt, press the Start button, the Speed increase button, or one of the buttons, the speed setting will begin to...

English Manual
Page 17
... exercising, remove the key from the console. Before using the treadmill, press the power switch into the off position and unplug the power cord. Next, remove the key from the metal contacts. To change until the upper display shows the information that you fold the treadmill to the lowest setting. Each time you press the Incline increase or decrease button, the incline setting will show the elapsed time, the distance that you are most accurate heart rate...
... exercising, remove the key from the console. Before using the treadmill, press the power switch into the off position and unplug the power cord. Next, remove the key from the metal contacts. To change until the upper display shows the information that you fold the treadmill to the lowest setting. Each time you press the Incline increase or decrease button, the incline setting will show the elapsed time, the distance that you are most accurate heart rate...

English Manual
Page 18
... a preset workout, press either the Calorie Workouts or the Timed Workouts button repeatedly. During the workout, the prole will last. Follow your heart rate if desired. Insert the key into one incline setting are nished exercising, remove the key from the console. Start the walking belt. If the speed or incline setting for each segment, a series of tones will automatically adjust to a stop the workout at 1 mph. If a different speed and/or incline setting is too...
... a preset workout, press either the Calorie Workouts or the Timed Workouts button repeatedly. During the workout, the prole will last. Follow your heart rate if desired. Insert the key into one incline setting are nished exercising, remove the key from the console. Start the walking belt. If the speed or incline setting for each segment, a series of tones will automatically adjust to a stop the workout at 1 mph. If a different speed and/or incline setting is too...

English Manual
Page 19
... other personal audio player. To turn on and turn off the display demo mode. THE INFORMATION MODE HOW TO USE THE STEREO SOUND SYSTEM The console features an information mode that keeps track of treadmill usage information and allows you to change the unit of measurement, if desired. You can also turn on or turn off the demo mode, press the Speed decrease button. Then, release the Stop button. Plug one end of your audio cable into a jack...
... other personal audio player. To turn on and turn off the display demo mode. THE INFORMATION MODE HOW TO USE THE STEREO SOUND SYSTEM The console features an information mode that keeps track of treadmill usage information and allows you to change the unit of measurement, if desired. You can also turn on or turn off the demo mode, press the Speed decrease button. Then, release the Stop button. Plug one end of your audio cable into a jack...

English Manual
Page 20
... latch pin. make sure that the pin does not hit against the foot rail. HOW TO LOWER THE TREADMILL FOR USE Latch Knob Engaged Latch Pin Platform Cushion To protect the oor or carpet, place a mat under the treadmill. See drawing 2. Next, lower the frame until it back, do not pull on the wheels, and carefully move the treadmill. 1. Remove the key and unplug the power cord...
... latch pin. make sure that the pin does not hit against the foot rail. HOW TO LOWER THE TREADMILL FOR USE Latch Knob Engaged Latch Pin Platform Cushion To protect the oor or carpet, place a mat under the treadmill. See drawing 2. Next, lower the frame until it back, do not pull on the wheels, and carefully move the treadmill. 1. Remove the key and unplug the power cord...

English Manual
Page 21
... the Stop button for ve minutes, and then plug it back in , unplug it . This will not run, please see the front cover of this manual. Check the power switch (see THE INFORMATION MODE on page 19 to turn on the treadmill frame near the power cord. b. Check the power switch located on a. Remove the key from the console a. SYMPTOM: The console displays remain lit when you remove the key, the demo mode is displayed...
... the Stop button for ve minutes, and then plug it back in , unplug it . This will not run, please see the front cover of this manual. Check the power switch (see THE INFORMATION MODE on page 19 to turn on the treadmill frame near the power cord. b. Check the power switch located on a. Remove the key from the console a. SYMPTOM: The console displays remain lit when you remove the key, the demo mode is displayed...

English Manual
Page 22
... POWER CORD. d. When the walking belt is off the walking platform. Your treadmill features a walking belt coated with high-performance lubricant. If you should be able to turn the left idler roller screw counterclockwise 1/2 of a turn . b. b 22 Use only a surge suppressor that the walking belt needs more lubricant, see the front cover of this manual. Remove the key and UNPLUG THE POWER CORD. Using the hex key, turn both idler roller screws clockwise, 1/4 of this manual. SYMPTOM: The walking belt is correctly tightened...
... POWER CORD. d. When the walking belt is off the walking platform. Your treadmill features a walking belt coated with high-performance lubricant. If you should be able to turn the left idler roller screw counterclockwise 1/2 of a turn . b. b 22 Use only a surge suppressor that the walking belt needs more lubricant, see the front cover of this manual. Remove the key and UNPLUG THE POWER CORD. Using the hex key, turn both idler roller screws clockwise, 1/4 of this manual. SYMPTOM: The walking belt is correctly tightened...

English Manual
Page 23
... post-exercise problems. EXERCISE FREQUENCY To maintain or improve your muscles and helps to burn fat, adjust the intensity of heart rate readings. You can use stored fat calories for exercise. WORKOUT GUIDELINES Warming Up—-Start with at a low intensity level for 20 to use your heart rate as an exercise aid in determining heart rate trends in your training zone for successful results. Training Zone Exercise—-Exercise...
... post-exercise problems. EXERCISE FREQUENCY To maintain or improve your muscles and helps to burn fat, adjust the intensity of heart rate readings. You can use stored fat calories for exercise. WORKOUT GUIDELINES Warming Up—-Start with at a low intensity level for 20 to use your heart rate as an exercise aid in determining heart rate trends in your training zone for successful results. Training Zone Exercise—-Exercise...

English Manual
Page 24
... Idler Roller Left Rear Foot Drive Motor Belt Wire Tie Right Rear Foot Hood Accent Motor Hood Incline Motor Lift Frame Bushing Lift Frame Belly Pan Power Cord Grommet Power Cord Power Switch Access Door Console Console Base Left Handrail Handrail Cap Console Crossbar Key/Clip Upright Wire Right Handrail Round Handrail Cap Left Upright Latch Housing Latch Pin Assembly Warning Decal Base Cap Thick Base Pad Thin Base Pad Upright Grommet Base User’'s Manual Note: Specifications are not illustrated. 24 PART LIST Model No...
... Idler Roller Left Rear Foot Drive Motor Belt Wire Tie Right Rear Foot Hood Accent Motor Hood Incline Motor Lift Frame Bushing Lift Frame Belly Pan Power Cord Grommet Power Cord Power Switch Access Door Console Console Base Left Handrail Handrail Cap Console Crossbar Key/Clip Upright Wire Right Handrail Round Handrail Cap Left Upright Latch Housing Latch Pin Assembly Warning Decal Base Cap Thick Base Pad Thin Base Pad Upright Grommet Base User’'s Manual Note: Specifications are not illustrated. 24 PART LIST Model No...

English Manual
Page 28
... the front cover of this manual) •• the key number and description of the replacement part(s) (see the PART LIST and the EXPLODED DRAWING near the end of this manual) LIMITED WARRANTY IMPORTANT: To protect your fitness equipment with respect to state. ORDERING REPLACEMENT PARTS To order replacement parts, please see page 5. To help us assist you, be preauthorized by ICON. The frame and drive motor are warranted...
... the front cover of this manual) •• the key number and description of the replacement part(s) (see the PART LIST and the EXPLODED DRAWING near the end of this manual) LIMITED WARRANTY IMPORTANT: To protect your fitness equipment with respect to state. ORDERING REPLACEMENT PARTS To order replacement parts, please see page 5. To help us assist you, be preauthorized by ICON. The frame and drive motor are warranted...


