
English Manual
Page 1
.... TO AVOID DELAYS, PLEASE CALL DIRECT TO OUR TOLLFREE CUSTOMER HOT LINE. As a manufacturer, we are missing parts, we will provide immediate assistance, free of charge to providing complete customer satisfaction. Keep this equipment. Serial Number Decal QUESTIONS? MST CAUTION Read all precautions and instructions in this manual before using this manual for future reference. CUSTOMER HOT LINE: 1-800...
.... TO AVOID DELAYS, PLEASE CALL DIRECT TO OUR TOLLFREE CUSTOMER HOT LINE. As a manufacturer, we are missing parts, we will provide immediate assistance, free of charge to providing complete customer satisfaction. Keep this equipment. Serial Number Decal QUESTIONS? MST CAUTION Read all precautions and instructions in this manual before using this manual for future reference. CUSTOMER HOT LINE: 1-800...

English Manual
Page 2
TABLE OF CONTENTS IMPORTANT PRECAUTIONS 3 BEFORE YOU BEGIN 4 ASSEMBLY 5 HOW TO USE THE ELLIPTICAL CROSSTRAINER 10 MAINTENANCE AND TROUBLE-SHOOTING 14 CONDITIONING GUIDELINES 15 PART LIST 18 EXPLODED DRAWING 19 HOW TO ORDER REPLACEMENT PARTS Back Cover LIMITED WARRANTY Back Cover 2
TABLE OF CONTENTS IMPORTANT PRECAUTIONS 3 BEFORE YOU BEGIN 4 ASSEMBLY 5 HOW TO USE THE ELLIPTICAL CROSSTRAINER 10 MAINTENANCE AND TROUBLE-SHOOTING 14 CONDITIONING GUIDELINES 15 PART LIST 18 EXPLODED DRAWING 19 HOW TO ORDER REPLACEMENT PARTS Back Cover LIMITED WARRANTY Back Cover 2

English Manual
Page 3
...- If you stop exercising, allow the pedals to slowly come to ensure that all users are adequately informed of 35 or persons with a mat beneath it in this product. 3 The elliptical crosstrainer is the responsibility of this manual before using the elliptical crosstrainer; This is especially important for foot protection. 12. lems. Read all instructions in any exercise program, consult your back. 3. ICON assumes no...
...- If you stop exercising, allow the pedals to slowly come to ensure that all users are adequately informed of 35 or persons with a mat beneath it in this product. 3 The elliptical crosstrainer is the responsibility of this manual before using the elliptical crosstrainer; This is especially important for foot protection. 12. lems. Read all instructions in any exercise program, consult your back. 3. ICON assumes no...
English Manual
Page 4
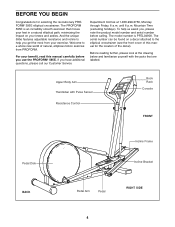
... PROFORM¨ 595E elliptical crosstrainer. Upper Body Arm Handlebar with the parts that moves your feet in a natural elliptical path, minimizing the impact on a decal attached to the elliptical crosstrainer (see the front cover of this manual carefully before calling. And the unique 595e features adjustable resistance and incline to a whole new world of natural, elliptical-motion exercise from your exercise. until 6 p.m. The model number is an incredibly smooth exerciser that are labeled. The PROFORM 595E...
... PROFORM¨ 595E elliptical crosstrainer. Upper Body Arm Handlebar with the parts that moves your feet in a natural elliptical path, minimizing the impact on a decal attached to the elliptical crosstrainer (see the front cover of this manual carefully before calling. And the unique 595e features adjustable resistance and incline to a whole new world of natural, elliptical-motion exercise from your exercise. until 6 p.m. The model number is an incredibly smooth exerciser that are labeled. The PROFORM 595E...
English Manual
Page 5
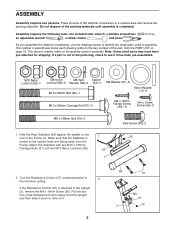
Turn the Resistance Control (57) counterclockwise to the Upright (2), remove the M4 x 16mm Screw (35). If a part is 1 26 turned so the square holes are facing away from the Upright and then slide it down to the key number of the part, from the PART LIST on the rear of the packing materials until assembly is attached to 2 the minimum setting. Assembly requires the following tools: the included allen wrench...
Turn the Resistance Control (57) counterclockwise to the Upright (2), remove the M4 x 16mm Screw (35). If a part is 1 26 turned so the square holes are facing away from the Upright and then slide it down to the key number of the part, from the PART LIST on the rear of the packing materials until assembly is attached to 2 the minimum setting. Assembly requires the following tools: the included allen wrench...
English Manual
Page 6
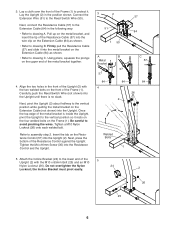
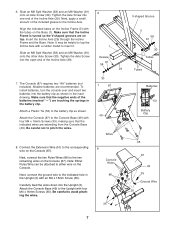
... . Attach the Incline Bracket (24) to the lower end of the Frame (1) to the vertical position while guiding the metal bracket on the upper end of the Resistance Control against the Upright. the Incline Bracket must pivot easily. 24 2 26 25 6 Connect the Extension Wire (51) to drawing A. Refer to avoid pinching the wires. Carefully push the Reed Switch Wire (not shown) into the Upright (2). Tighten...
... . Attach the Incline Bracket (24) to the lower end of the Frame (1) to the vertical position while guiding the metal bracket on the upper end of the Resistance Control against the Upright. the Incline Bracket must pivot easily. 24 2 26 25 6 Connect the Extension Wire (51) to drawing A. Refer to avoid pinching the wires. Carefully push the Reed Switch Wire (not shown) into the Upright (2). Tighten...
English Manual
Page 7
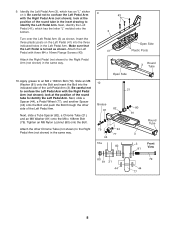
... Screw (30). To install batteries, turn the console over and insert two batteries into the Upright (2). Note: Either Pulse Wire can be helpful to tap the Incline Axle with the tubes on the Console (87). Insert the Incline Axle (29) through the Incline Frame and the Base. Attach a Plastic Tie (53) to the Upright with an M4 x 16mm Screw (35). Carefully feed the wires down into the battery...
... Screw (30). To install batteries, turn the console over and insert two batteries into the Upright (2). Note: Either Pulse Wire can be helpful to tap the Incline Axle with the tubes on the Console (87). Insert the Incline Axle (29) through the Incline Frame and the Base. Attach a Plastic Tie (53) to the Upright with an M4 x 16mm Screw (35). Carefully feed the wires down into the battery...
English Manual
Page 8
... Pedal Arm. Attach the Left Pedal with the Right Pedal Arm (not shown); Be careful not to the Right Pedal Arm (not shown) in the Left Pedal Arm. Next, slide a Spacer (44), a Pedal Wheel (77), and another Spacer (44) onto the Bolt and push the Bolt through the other Chrome Tube (not shown) to confuse the Left Pedal Arm with three M4 x 16mm Flange Screws (43). Tighten...
... Pedal Arm. Attach the Left Pedal with the Right Pedal Arm (not shown); Be careful not to the Right Pedal Arm (not shown) in the Left Pedal Arm. Next, slide a Spacer (44), a Pedal Wheel (77), and another Spacer (44) onto the Bolt and push the Bolt through the other Chrome Tube (not shown) to confuse the Left Pedal Arm with three M4 x 16mm Flange Screws (43). Tighten...
English Manual
Page 9
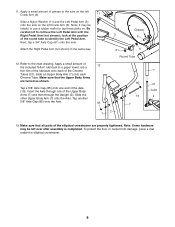
... towel; Make sure that all parts of the lubricant onto each Chrome Tube. Make sure that the Upper Body Arms are properly tightened. Be careful not to the inset drawing. look at the position of 12 the included Teflon¨ lubricant to identify the Left Pedal Arm. rub a thin film of the elliptical crosstrainer are turned as shown. Tap a 5/8Ó Axle...
... towel; Make sure that all parts of the lubricant onto each Chrome Tube. Make sure that the Upper Body Arms are properly tightened. Be careful not to the inset drawing. look at the position of 12 the included Teflon¨ lubricant to identify the Left Pedal Arm. rub a thin film of the elliptical crosstrainer are turned as shown. Tap a 5/8Ó Axle...
English Manual
Page 10
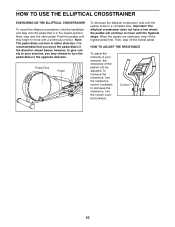
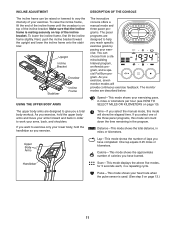
... pedals will continue to decrease the resistance, turn the control counterclockwise. When the pedals are stationary, step off the lowest pedal. HOW TO ADJUST THE RESISTANCE To adjust the intensity of the pedals can turn in either direction. to move until the pedals come to move the pedal disks in the direction shown below; Important: The elliptical crosstrainer does not have a free wheel; HOW TO USE THE ELLIPTICAL CROSSTRAINER EXERCISING ON THE ELLIPTICAL CROSSTRAINER To mount the elliptical crosstrainer...
... pedals will continue to decrease the resistance, turn the control counterclockwise. When the pedals are stationary, step off the lowest pedal. HOW TO ADJUST THE RESISTANCE To adjust the intensity of the pedals can turn in either direction. to move until the pedals come to move the pedal disks in the direction shown below; Important: The elliptical crosstrainer does not have a free wheel; HOW TO USE THE ELLIPTICAL CROSSTRAINER EXERCISING ON THE ELLIPTICAL CROSSTRAINER To mount the elliptical crosstrainer...
English Manual
Page 11
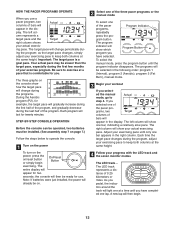
... reach specific exercise goals by pacing your heart rate when the pulse sensor is on top of the incline frame until the crossbar is used. (See step 5 on top of laps you exercise, seven monitor modes will provide continuous exercise feedback. LapÑThis mode shows the number of the incline bracket. TimeÑIf you want to exercise only your lower body, hold the upper body arms and move your arms forward...
... reach specific exercise goals by pacing your heart rate when the pulse sensor is on top of the incline frame until the crossbar is used. (See step 5 on top of laps you exercise, seven monitor modes will provide continuous exercise feedback. LapÑThis mode shows the number of the incline bracket. TimeÑIf you want to exercise only your lower body, hold the upper body arms and move your arms forward...
English Manual
Page 12
... monitor modes The LED trackÑ The LED track represents a distance of bars will be installed. (See assembly step 7 on page 7.) Follow the steps below to exercise at the same height. 4 Follow your workout If you use . ed the manual mode, go to keep both columns at a time until the program indicator disappears. The right column will show how the target pace will then be on /reset button...
... monitor modes The LED trackÑ The LED track represents a distance of bars will be installed. (See assembly step 7 on page 7.) Follow the steps below to exercise at the same height. 4 Follow your workout If you use . ed the manual mode, go to keep both columns at a time until the program indicator disappears. The right column will show how the target pace will then be on /reset button...
English Manual
Page 13
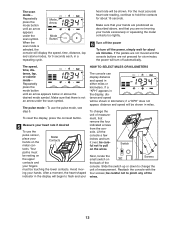
... the lower contacts. Switch Next, locate the small switch on the upper contacts and your HOW TO SELECT MILES OR KILOMETERS The console can display distance and speed in a repeating cycle. Lift the console a few inches and turn off the power, simply wait for 5 seconds each, in either miles or kilometers. The pulse modeÑTo use the pulse sensor, place your hands. The scan modeÑ Repeatedly press the mode button Mode...
... the lower contacts. Switch Next, locate the small switch on the upper contacts and your HOW TO SELECT MILES OR KILOMETERS The console can display distance and speed in a repeating cycle. Lift the console a few inches and turn off the power, simply wait for 5 seconds each, in either miles or kilometers. The pulse modeÑTo use the pulse sensor, place your hands. The scan modeÑ Repeatedly press the mode button Mode...
English Manual
Page 14
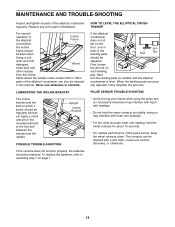
... on page 7. MAINTENANCE AND TROUBLE-SHOOTING Inspect and tighten all parts of the elliptical Incline Frame crosstrainer, the incline frame should be kept clean. Never use alcohol, abrasives, or chemicals. 14 The contacts can also be cleaned in this manner. Upright Incline Bracket CONSOLE TROUBLE-SHOOTING If the console does not function properly, the batteries should be replaced. To replace the batteries, refer to the bolt and between the...
... on page 7. MAINTENANCE AND TROUBLE-SHOOTING Inspect and tighten all parts of the elliptical Incline Frame crosstrainer, the incline frame should be kept clean. Never use alcohol, abrasives, or chemicals. 14 The contacts can also be cleaned in this manner. Upright Incline Bracket CONSOLE TROUBLE-SHOOTING If the console does not function properly, the batteries should be replaced. To replace the batteries, refer to the bolt and between the...
English Manual
Page 15
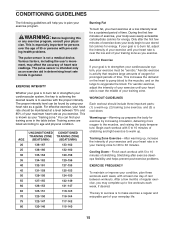
... health problems. The pulse sensor is to make exercise a regular and enjoyable part of time. If your goal is to success is not a medical device. For aerobic exercise, adjust the intensity of your everyday life. 15 The key to burn fat, adjust the intensity of your exercise until your heart rate is near the low end of your exercise until your heart rate is in your training...
... health problems. The pulse sensor is to make exercise a regular and enjoyable part of time. If your goal is to success is not a medical device. For aerobic exercise, adjust the intensity of your everyday life. 15 The key to burn fat, adjust the intensity of your exercise until your heart rate is near the low end of your exercise until your heart rate is in your training...
English Manual
Page 16
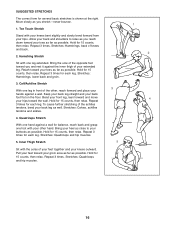
...front leg, lean forward and move your back foot flat on the floor. Quadriceps Stretch With one leg extended. Hold for each leg. Repeat 3 times. Hold for each leg. Calf/Achilles Stretch With one leg in... then relax. Hold for each leg. Stretches: Calves, achilles tendons and ankles. 4. Pull your feet toward your toes as far as possible. Move slowly as possible. Stretches: Hamstrings...shoulders to your back leg as possible. Hamstring Stretch Sit with your extended leg. Repeat 3 times for 15 counts, then relax. SUGGESTED STRETCHES The correct form for balance, reach...
...front leg, lean forward and move your back foot flat on the floor. Quadriceps Stretch With one leg extended. Hold for each leg. Repeat 3 times. Hold for each leg. Calf/Achilles Stretch With one leg in... then relax. Hold for each leg. Stretches: Calves, achilles tendons and ankles. 4. Pull your feet toward your toes as far as possible. Move slowly as possible. Stretches: Hamstrings...shoulders to your back leg as possible. Hamstring Stretch Sit with your extended leg. Repeat 3 times for 15 counts, then relax. SUGGESTED STRETCHES The correct form for balance, reach...

English Manual
Page 18
... Console Base Reed Switch/Wire Extension Wire Reed Switch Bracket Plastic Tie Reed Switch Clamp Magnet Pulse Grip Resistance Control/Cable M8 Split Washer Bumper Upright Cap 3/4Ó Axle Cap 2Ó x 3Ó Cap 1Ó x 2Ó Cap 3 1/2Ó Round Cap Rear Stabilizer Hook 3/8Ó Nylon Jam Nut 1/4Ó Eyebolt M8 Shoulder Bolt Adjustment Bracket M4 x 63.5mm Screw M5 x 6mm Screw M5 x 16mm Screw M6 x 64mm Screw Leveling Pad Pedal Bushing Pedal Wheel Pedal Wheel...
... Console Base Reed Switch/Wire Extension Wire Reed Switch Bracket Plastic Tie Reed Switch Clamp Magnet Pulse Grip Resistance Control/Cable M8 Split Washer Bumper Upright Cap 3/4Ó Axle Cap 2Ó x 3Ó Cap 1Ó x 2Ó Cap 3 1/2Ó Round Cap Rear Stabilizer Hook 3/8Ó Nylon Jam Nut 1/4Ó Eyebolt M8 Shoulder Bolt Adjustment Bracket M4 x 63.5mm Screw M5 x 6mm Screw M5 x 16mm Screw M6 x 64mm Screw Leveling Pad Pedal Bushing Pedal Wheel Pedal Wheel...
English Manual
Page 20
... that specifically set forth herein. ICON is a registered trademark of this warranty is limited in connection with the use or performance of the product or damages with respect to give the following information when calling: ¥ The MODEL NUMBER of the product (PFEL04900) ¥ The NAME of the product (PROFORM¨ 595E elliptical crosstrainer) ¥ The SERIAL NUMBER of the product (see the front cover of this manual...
... that specifically set forth herein. ICON is a registered trademark of this warranty is limited in connection with the use or performance of the product or damages with respect to give the following information when calling: ¥ The MODEL NUMBER of the product (PFEL04900) ¥ The NAME of the product (PROFORM¨ 595E elliptical crosstrainer) ¥ The SERIAL NUMBER of the product (see the front cover of this manual...

