

English Manual
Page 2
¨ TABLE OF CONTENTS IMPORTANT PRECAUTIONS 3 BEFORE YOU BEGIN 5 ASSEMBLY 6 OPERATION AND ADJUSTMENT 8 HOW TO FOLD AND MOVE THE TREADMILL 18 MAINTENANCE AND TROUBLE-SHOOTING 19 CONDITIONING GUIDELINES 21 PART LIST 23 ORDERING REPLACEMENT PARTS Back Cover FULL 90-DAY WARRANTY Back Cover Note: An EXPLODED DRAWING is attached in the center of this manual. 2
¨ TABLE OF CONTENTS IMPORTANT PRECAUTIONS 3 BEFORE YOU BEGIN 5 ASSEMBLY 6 OPERATION AND ADJUSTMENT 8 HOW TO FOLD AND MOVE THE TREADMILL 18 MAINTENANCE AND TROUBLE-SHOOTING 19 CONDITIONING GUIDELINES 21 PART LIST 23 ORDERING REPLACEMENT PARTS Back Cover FULL 90-DAY WARRANTY Back Cover Note: An EXPLODED DRAWING is attached in the center of this manual. 2
English Manual
Page 3
... not operate the treadmill if the power cord or plug is damaged, or if the treadmill is not working properly.) 14. Adjust the speed in small increments to avoid sudden jumps in sandals. 16. Athletic support clothes are recommended for the location of the on /off switch to raise, lower, or move the on /off . Always remove the key, unplug the power cord and move the treadmill until it...
... not operate the treadmill if the power cord or plug is damaged, or if the treadmill is not working properly.) 14. Adjust the speed in small increments to avoid sudden jumps in sandals. 16. Athletic support clothes are recommended for the location of the on /off switch to raise, lower, or move the on /off . Always remove the key, unplug the power cord and move the treadmill until it...

English Manual
Page 4
... age of 35 or persons with pre-existing health problems. Read all parts of the CD or video program. 24. When using iFit.com CDÕs and videos, you are not using . Never remove the motor hood unless instructed to do so by or through the use , before cleaning the treadmill, and before the personal trainer describes the change to order a free replacement decal (see the back cover of actual size. 4
... age of 35 or persons with pre-existing health problems. Read all parts of the CD or video program. 24. When using iFit.com CDÕs and videos, you are not using . Never remove the motor hood unless instructed to do so by or through the use , before cleaning the treadmill, and before the personal trainer describes the change to order a free replacement decal (see the back cover of actual size. 4
English Manual
Page 5
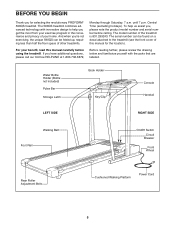
... the revolutionary PROFORM¨ 590QS treadmill. Water Bottle Holder (Bottle not included) Pulse Bar Storage Latch Book Holder Key/Clip Console Handrail LEFT SIDE RIGHT SIDE Walking Belt Foot Rail On/Off Switch Circuit Breaker Front Wheel Rear Roller Adjustment Bolts Cushioned Walking Platform Power Cord 5 If you , please note the product model number and serial number before using the treadmill. until 7 p.m. BEFORE YOU BEGIN Thank you Õre not exercising, the unique 590QS can be folded up...
... the revolutionary PROFORM¨ 590QS treadmill. Water Bottle Holder (Bottle not included) Pulse Bar Storage Latch Book Holder Key/Clip Console Handrail LEFT SIDE RIGHT SIDE Walking Belt Foot Rail On/Off Switch Circuit Breaker Front Wheel Rear Roller Adjustment Bolts Cushioned Walking Platform Power Cord 5 If you , please note the product model number and serial number before using the treadmill. until 7 p.m. BEFORE YOU BEGIN Thank you Õre not exercising, the unique 590QS can be folded up...
English Manual
Page 6
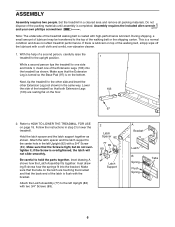
... 77 89 89 Latch Support A Bracket Latch B Spring Flush Spring Tabs 6 Lower the side of the walking belt, simply wipe off the lubricant with high-performance lubricant. Hold the latch spacer and the latch support together as shown. if the Screw is on top of the treadmill so that both Extension Legs (103) are touching the bracket and that the Extension Leg is turned so the...
... 77 89 89 Latch Support A Bracket Latch B Spring Flush Spring Tabs 6 Lower the side of the walking belt, simply wipe off the lubricant with high-performance lubricant. Hold the latch spacer and the latch support together as shown. if the Screw is on top of the treadmill so that both Extension Legs (103) are touching the bracket and that the Extension Leg is turned so the...
English Manual
Page 7
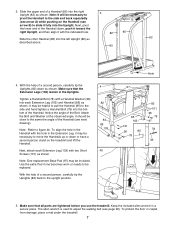
... Extension Leg, it may be helpful to pull the Handrail (85) to the side and hand tighten a Handrail Bolt (78) into the left Upright (82) as shown. It should be necessary to pivot the Handrail to adjust the walking belt (see...Upright. Next, pivot the lower end of the Bolt. Notice the angle of the Handrail down as 82 described above. 85 4. Note: Refer to be included. Use the extra Pad if one becomes worn or needs to figure 4b. It may be replaced. 3. Make sure that all parts are tightened before you use the treadmill. Tighten a Handrail Bolt (78) with two Short Screws...
... Extension Leg, it may be helpful to pull the Handrail (85) to the side and hand tighten a Handrail Bolt (78) into the left Upright (82) as shown. It should be necessary to pivot the Handrail to adjust the walking belt (see...Upright. Next, pivot the lower end of the Bolt. Notice the angle of the Handrail down as 82 described above. 85 4. Note: Refer to be included. Use the extra Pad if one becomes worn or needs to figure 4b. It may be replaced. 3. Make sure that all parts are tightened before you use the treadmill. Tighten a Handrail Bolt (78) with two Short Screws...
English Manual
Page 8
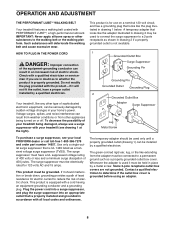
... grounded before using an adapter. 8 Plug the power cord into a surge suppressor, and plug the surge suppressor into an appropriate outlet that is used it must be used only until a properly grounded outlet (drawing 1) can result in drawing 1 below. Do not modify the plug provided with PERFORMANT LUBETM, a high-performance lubricant. OPERATION AND ADJUSTMENT THE PERFORMANT LUBETM WALKING BELT Your treadmill features a walking belt coated with...
... grounded before using an adapter. 8 Plug the power cord into a surge suppressor, and plug the surge suppressor into an appropriate outlet that is used it must be used only until a properly grounded outlet (drawing 1) can result in drawing 1 below. Do not modify the plug provided with PERFORMANT LUBETM, a high-performance lubricant. OPERATION AND ADJUSTMENT THE PERFORMANT LUBETM WALKING BELT Your treadmill features a walking belt coated with...
English Manual
Page 9
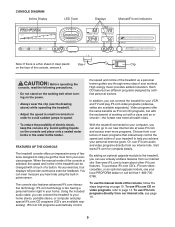
... your workout. When the manual mode of the console is selected, the speed and incline of the treadmill can also go to the treadmill, you through every step of your local PROFORM dealer or call toll-free 1-800-7350768. See www.iFit.com to your exercise program. Video programs offer the same benefits as a personal trainer guides you can connect the treadmill to learn about other iFit.com features. To use the manual mode...
... your workout. When the manual mode of the console is selected, the speed and incline of the treadmill can also go to the treadmill, you through every step of your local PROFORM dealer or call toll-free 1-800-7350768. See www.iFit.com to your exercise program. Video programs offer the same benefits as a personal trainer guides you can connect the treadmill to learn about other iFit.com features. To use the manual mode...
English Manual
Page 10
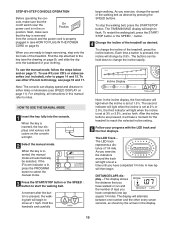
... sure that the key is removed from the console and the power cord is set at 1.5%. For simplicity, all instructions in (see page 16 and 17. If the iFit.com indicator is inserted, the manual mode will light. 2 Select the manual mode. To restart the walking belt, press the START/ STOP button or the SPEED v button. 4 Change the incline of 1/4 mile. A new lap will take a moment for the treadmill to miles. STEP-BY-STEP CONSOLE OPERATION Before operating...
... sure that the key is removed from the console and the power cord is set at 1.5%. For simplicity, all instructions in (see page 16 and 17. If the iFit.com indicator is inserted, the manual mode will light. 2 Select the manual mode. To restart the walking belt, press the START/ STOP button or the SPEED v button. 4 Change the incline of 1/4 mile. A new lap will take a moment for the treadmill to miles. STEP-BY-STEP CONSOLE OPERATION Before operating...
English Manual
Page 11
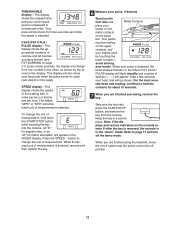
... the power cord to the off the demo mode. For the most accu- Keep the key in minutes per hour. When you are finished using the treadmill, move the on the upper contacts, and your fingers must be touching the lower contactsÑ avoid moving your hands. Step onto the foot rails, press the START/STOP button, and remove the key from one number to page 17 and turn...
... the power cord to the off the demo mode. For the most accu- Keep the key in minutes per hour. When you are finished using the treadmill, move the on the upper contacts, and your fingers must be touching the lower contactsÑ avoid moving your hands. Step onto the foot rails, press the START/STOP button, and remove the key from one number to page 17 and turn...
English Manual
Page 12
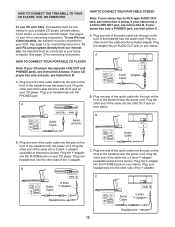
... audio cable into the jack on the front of the cable into the PHONES jack. Plug one jack, see instruction A below . HOW TO CONNECT THE TREADMILL TO YOUR CD PLAYER, VCR, OR COMPUTER To use iFit.com CDÕs, the treadmill must be connected to your VCR. To use iFit.com programs directly from our internet site, the treadmill must be connected to your headphones into a 3.5mm Y-adapter...
... audio cable into the jack on the front of the cable into the PHONES jack. Plug one jack, see instruction A below . HOW TO CONNECT THE TREADMILL TO YOUR CD PLAYER, VCR, OR COMPUTER To use iFit.com CDÕs, the treadmill must be connected to your VCR. To use iFit.com programs directly from our internet site, the treadmill must be connected to your headphones into a 3.5mm Y-adapter...
English Manual
Page 14
... console will light. HOW TO CONNECT YOUR VCR Note: If your VCR has an unused AUDIO OUT jack, see instruction A below to use an iFit.com CD or video. Plug the adapter into the unused side of the treadmill near the power cord. RF OUT CH 34 OUT When the key is properly plugged in VCR, see instruction B. To use the CD with a variety of the audio cable...
... console will light. HOW TO CONNECT YOUR VCR Note: If your VCR has an unused AUDIO OUT jack, see instruction A below to use an iFit.com CD or video. Plug the adapter into the unused side of the treadmill near the power cord. RF OUT CH 34 OUT When the key is properly plugged in VCR, see instruction B. To use the CD with a variety of the audio cable...
English Manual
Page 15
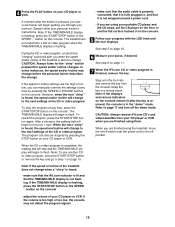
... a power cord ¥ if you are using the treadmill, move at any time by pressing the STOP button on your personal trainer will begin to flash. To restart the program, press the START/STOP button again. Refer to step 1 on page 15. If the TIME/MIN-MILE display is finished, remove the key. If the speed or incline settings are finished using your workout. Note: If the TIME/MIN-MILE display is flashing, press the START/STOP button or the SPEED v button...
... a power cord ¥ if you are using the treadmill, move at any time by pressing the STOP button on your personal trainer will begin to flash. To restart the program, press the START/STOP button again. Refer to step 1 on page 15. If the TIME/MIN-MILE display is finished, remove the key. If the speed or incline settings are finished using your workout. Note: If the TIME/MIN-MILE display is flashing, press the START/STOP button or the SPEED v button...
English Manual
Page 16
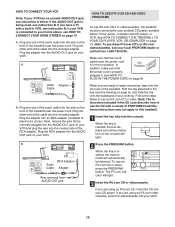
...-line instructions to start the program. Note: If the speed or incline of the treadmill does not change to the next settings of the program. In addition, you can play iFit.com audio and video programs directly from our internet site, press the PROGRAM button. Follow the steps below to use programs from our internet site. 1 Insert the key fully into the console. When the key is in (see HOW TO PLUG IN THE POWER CORD...
...-line instructions to start the program. Note: If the speed or incline of the treadmill does not change to the next settings of the program. In addition, you can play iFit.com audio and video programs directly from our internet site, press the PROGRAM button. Follow the steps below to use programs from our internet site. 1 Insert the key fully into the console. When the key is in (see HOW TO PLUG IN THE POWER CORD...
English Manual
Page 17
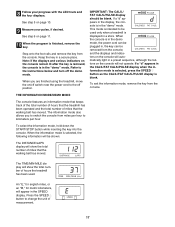
... buttons on /off switch near the power cord to the instructions below and turn off position. THE INFORMATION MODE/DEMO MODE The console features an information mode that keeps track of the total number of hours that the treadmill has been operated and the total number of miles that the walking belt has moved. Keep the key in a store. Note: If the displays and various indicators on the console remain lit after the key is removed...
... buttons on /off switch near the power cord to the instructions below and turn off position. THE INFORMATION MODE/DEMO MODE The console features an information mode that keeps track of the total number of hours that the treadmill has been operated and the total number of miles that the walking belt has moved. Keep the key in a store. Note: If the displays and various indicators on the console remain lit after the key is removed...
English Manual
Page 19
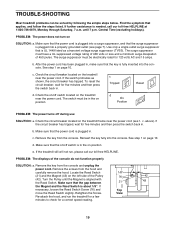
... the power cord is plugged into a properly grounded outlet (see 1. Check the circuit breaker located on /off switch is about 1/8Ó. c. c. Remove the screws from the console and unplug the power cord. Turn the Pulley until 7 p.m. TROUBLE-SHOOTING Most treadmill problems can be in . To reset the circuit breaker, wait for a correct speed reading. 19 above). See step 1 on SOLUTION: a. d. Make sure that the on the treadmill near the power cord...
... the power cord is plugged into a properly grounded outlet (see 1. Check the circuit breaker located on /off switch is about 1/8Ó. c. c. Remove the screws from the console and unplug the power cord. Turn the Pulley until 7 p.m. TROUBLE-SHOOTING Most treadmill problems can be in . To reset the circuit breaker, wait for a correct speed reading. 19 above). See step 1 on SOLUTION: a. d. Make sure that the on the treadmill near the power cord...
English Manual
Page 20
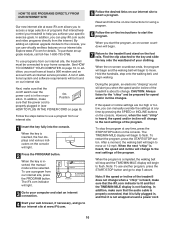
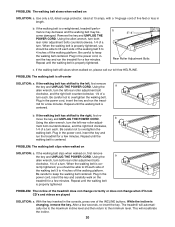
... tread- If the walking belt is changing, remove the key. Plug in the console, press one of a turn the left , first remove the key and UNPLUG THE POWER CORD. b 3ÓÐ4Ó Rear Roller Adjustment Bolts c. Using the a allen wrench, turn the left rear roller adjustment bolt clockwise, and the right bolt counterclockwise, 1/4 of the walking belt 3 to 4 inches off the walking platform. Using the a allen wrench, turn both rear roller adjustment bolts counterclockwise, 1/4 of the walking belt 3 to keep the walking belt centered. rectly tightened, you should...
... tread- If the walking belt is changing, remove the key. Plug in the console, press one of a turn the left , first remove the key and UNPLUG THE POWER CORD. b 3ÓÐ4Ó Rear Roller Adjustment Bolts c. Using the a allen wrench, turn the left rear roller adjustment bolt clockwise, and the right bolt counterclockwise, 1/4 of the walking belt 3 to 4 inches off the walking platform. Using the a allen wrench, turn both rear roller adjustment bolts counterclockwise, 1/4 of the walking belt 3 to keep the walking belt centered. rectly tightened, you should...
English Manual
Page 21
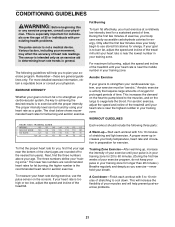
...;Start each workout with the proper intensity. This will help prevent post-exercise problems. 21 The following three parts: To find the proper heart rate for you, first find the three numbers above your muscles and will help you to burn fat, adjust the speed and incline of the treadmill until your pulse is intended only as you must be found by using your exercise program...
...;Start each workout with the proper intensity. This will help prevent post-exercise problems. 21 The following three parts: To find the proper heart rate for you, first find the three numbers above your muscles and will help you to burn fat, adjust the speed and incline of the treadmill until your pulse is intended only as you must be found by using your exercise program...
English Manual
Page 23
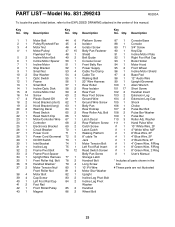
... 64 1 Rear Endcap 107 2 Pulse Bar Bolt 21 1 Reed Switch 65 2 Rear Roller Adj. Washer 24 1 Controller 68 2 Rear Platform Screw 111 1 Hand Pulse Wire 25 1 Electronics Bracket 69 2 Catch Screw # 1 10Ó White Wire, 2F 26 1 Circuit Breaker 70 1 Latch Catch # 1 4Ó White Wire, M/F 27 1 Power Cord 71 1 Walking Platform # 1 8Ó Blue Wire, 2F 28 1 Power Cord Grommet 72 5 8Ó cable Tie # 1 4Ó Blue Wire, 2F 29 1 On/Off Switch 73 1 Jack # 1 4Ó Black Wire, 2F...
... 64 1 Rear Endcap 107 2 Pulse Bar Bolt 21 1 Reed Switch 65 2 Rear Roller Adj. Washer 24 1 Controller 68 2 Rear Platform Screw 111 1 Hand Pulse Wire 25 1 Electronics Bracket 69 2 Catch Screw # 1 10Ó White Wire, 2F 26 1 Circuit Breaker 70 1 Latch Catch # 1 4Ó White Wire, M/F 27 1 Power Cord 71 1 Walking Platform # 1 8Ó Blue Wire, 2F 28 1 Power Cord Grommet 72 5 8Ó cable Tie # 1 4Ó Blue Wire, 2F 29 1 On/Off Switch 73 1 Jack # 1 4Ó Black Wire, 2F...
English Manual
Page 26
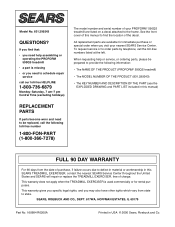
... replacement parts are listed on a decal attached to provide the following toll-free number 1-800-FON-PART (1-800-366-7278) The model number and serial number of the decal. SEARS, ROEBUCK AND CO., DEPT. 817WA, HOFFMAN ESTATES, IL 60179 Part No. 160684 R0200A Printed in this manual to find that: ¥ you visit your PROFORM¨ 590QS treadmill are available for rental purposes. This warranty gives you specific legal...
... replacement parts are listed on a decal attached to provide the following toll-free number 1-800-FON-PART (1-800-366-7278) The model number and serial number of the decal. SEARS, ROEBUCK AND CO., DEPT. 817WA, HOFFMAN ESTATES, IL 60179 Part No. 160684 R0200A Printed in this manual to find that: ¥ you visit your PROFORM¨ 590QS treadmill are available for rental purposes. This warranty gives you specific legal...


