

English Manual
Page 1
... product model number and serial number (see the drawing above for future reference. USER'S MANUAL If you have questions, or if parts are committed to providing complete customer satisfaction. MT ON THE WEB: www.proformservice.com CAUTION Read all precautions and instructions in the space...using this manual for reference. As a manufacturer, we are damaged or missing, DO NOT CONTACT THE STORE; Serial Number Decal QUESTIONS? www.proform.com Model No. please contact Customer Care. Save this equipment. Write the serial number in this manual before contacting us: CALL TOLL-FREE:...
... product model number and serial number (see the drawing above for future reference. USER'S MANUAL If you have questions, or if parts are committed to providing complete customer satisfaction. MT ON THE WEB: www.proformservice.com CAUTION Read all precautions and instructions in the space...using this manual for reference. As a manufacturer, we are damaged or missing, DO NOT CONTACT THE STORE; Serial Number Decal QUESTIONS? www.proform.com Model No. please contact Customer Care. Save this equipment. Write the serial number in this manual before contacting us: CALL TOLL-FREE:...

English Manual
Page 2
Apply the decal in the location shown. If a decal is a registered trademark of ICON IP, Inc. 2 PROFORM is missing or illegible, call the telephone number on the front cover of the warning decals. Note: The decals may not be ... 2 IMPORTANT PRECAUTIONS 3 BEFORE YOU BEGIN 5 ASSEMBLY 6 OPERATION AND ADJUSTMENT 9 HOW TO FOLD AND MOVE THE TREADMILL 17 TROUBLESHOOTING 18 EXERCISE GUIDELINES 20 PART LIST 22 EXPLODED DRAWING 24 ORDERING REPLACEMENT PARTS Back Cover LIMITED WARRANTY Back Cover WARNING DECAL PLACEMENT This drawing shows the locations of this manual and request...
Apply the decal in the location shown. If a decal is a registered trademark of ICON IP, Inc. 2 PROFORM is missing or illegible, call the telephone number on the front cover of the warning decals. Note: The decals may not be ... 2 IMPORTANT PRECAUTIONS 3 BEFORE YOU BEGIN 5 ASSEMBLY 6 OPERATION AND ADJUSTMENT 9 HOW TO FOLD AND MOVE THE TREADMILL 17 TROUBLESHOOTING 18 EXERCISE GUIDELINES 20 PART LIST 22 EXPLODED DRAWING 24 ORDERING REPLACEMENT PARTS Back Cover LIMITED WARRANTY Back Cover WARNING DECAL PLACEMENT This drawing shows the locations of this manual and request...

English Manual
Page 3
...- Use only a single-outlet surge suppressor that all users of this manual and order part number 146148, or see HOW TO TURN ON THE POWER on page 18 if the treadmill is especially important for both men and women. To protect the floor or carpet from moisture... not working properly.) 16. Wear appropriate exercise clothes when using the treadmill. 18. When connecting the power cord (see your local PROFORM dealer or call the telephone number on the treadmill at all important precautions and in damage to use the treadmill with at least 8 ft. (2.4 m) of clearance behind it and 2 ft...
...- Use only a single-outlet surge suppressor that all users of this manual and order part number 146148, or see HOW TO TURN ON THE POWER on page 18 if the treadmill is especially important for both men and women. To protect the floor or carpet from moisture... not working properly.) 16. Wear appropriate exercise clothes when using the treadmill. 18. When connecting the power cord (see your local PROFORM dealer or call the telephone number on the treadmill at all important precautions and in damage to use the treadmill with at least 8 ft. (2.4 m) of clearance behind it and 2 ft...

English Manual
Page 4
...console, causing the user to raise, lower, or move the treadmill until it is intended for the location of the treadmill regularly. Use the included dumbbells only as described in this manual. Inspect and properly tighten all parts of the circuit breaker.) 21. Always unplug the power cord... immediately after use . (See the drawing on the console when you are improperly stored, they may fall off position when the treadmill is properly assembled. (See ASSEMBLY on page...
...console, causing the user to raise, lower, or move the treadmill until it is intended for the location of the treadmill regularly. Use the included dumbbells only as described in this manual. Inspect and properly tighten all parts of the circuit breaker.) 21. Always unplug the power cord... immediately after use . (See the drawing on the console when you are improperly stored, they may fall off position when the treadmill is properly assembled. (See ASSEMBLY on page...

English Manual
Page 5
... comfort 5 The model number and the location of the serial number decal are shown on the front cover of other treadmills. For your home. ual. Fan Accessory Tray Handrail Storage Latch Dumbbells Console Pulse Sensor Key/Clip Upright Walking Belt Foot...Adjustment Bolts Reset/Off Circuit Breaker Power Cord RIGHT SIDE Cushioned Walking Platform for selecting the new PROFORM® 560 CROSSTRAINER treadmill. The 560 CROSSTRAINER treadmill combines advanced technology with the labeled parts. To help us . To avoid a registration fee for any service needed under warranty, you...
... comfort 5 The model number and the location of the serial number decal are shown on the front cover of other treadmills. For your home. ual. Fan Accessory Tray Handrail Storage Latch Dumbbells Console Pulse Sensor Key/Clip Upright Walking Belt Foot...Adjustment Bolts Reset/Off Circuit Breaker Power Cord RIGHT SIDE Cushioned Walking Platform for selecting the new PROFORM® 560 CROSSTRAINER treadmill. The 560 CROSSTRAINER treadmill combines advanced technology with the labeled parts. To help us . To avoid a registration fee for any service needed under warranty, you...
English Manual
Page 6
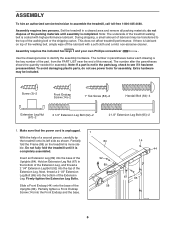
...be transferred to see if it is unplugged. 1 With the help of the 58 Uprights (84). This does not affect treadmill performance. To avoid damaging plastic parts, do not dispose of the walking belt or the shipping carton. Make sure that the power cord is completely assembled. ... Leg (89) into the top of the Uprights (84). Set the treadmill in parentheses below to assemble the treadmill, call toll-free 1-800-445-2480. The number in a cleared area and remove all packing materials; Note: If a part is completed. Note: The underside of the Extension Leg. ble. Screw...
...be transferred to see if it is unplugged. 1 With the help of the 58 Uprights (84). This does not affect treadmill performance. To avoid damaging plastic parts, do not dispose of the walking belt or the shipping carton. Make sure that the power cord is completely assembled. ... Leg (89) into the top of the Uprights (84). Set the treadmill in parentheses below to assemble the treadmill, call toll-free 1-800-445-2480. The number in a cleared area and remove all packing materials; Note: If a part is completed. Note: The underside of the Extension Leg. ble. Screw...

English Manual
Page 8
...Collar Pin 6. the large hex key is on the pin. (Note: If there are pinched. To protect the floor or carpet, place a mat under the treadmill. Connect the wire on each side of the spring.) Next, insert the pin into the Latch Housing (73). Discard the other wires included with two... the receiver so the antenna is oriented as shown and is unplugged. Make sure that all parts are sheets of the Console Base (85). 2. Remove the knob from the Console Base (85). If you use the treadmill. Attach the receiver to the indicated wire extending from the pin. Make sure that the...
...Collar Pin 6. the large hex key is on the pin. (Note: If there are pinched. To protect the floor or carpet, place a mat under the treadmill. Connect the wire on each side of the spring.) Next, insert the pin into the Latch Housing (73). Discard the other wires included with two... the receiver so the antenna is oriented as shown and is unplugged. Make sure that all parts are sheets of the Console Base (85). 2. Remove the knob from the Console Base (85). If you use the treadmill. Attach the receiver to the indicated wire extending from the pin. Make sure that the...
English Manual
Page 9
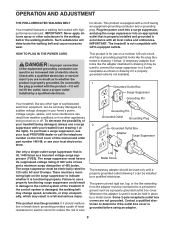
...will deteriorate the walking belt and cause excessive wear. If the control system is equipped with your treadmill (see drawing 1 at the right). This product must have a proper outlet installed by a...1 below. To decrease the possibility of elec- To purchase a surge suppressor, see your local PROFORM dealer or call the telephone number on a nominal 120-volt circuit, and has a grounding plug... that looks like any other substances to the control system of this manual and order part number 146148, or see your local electronics store. Do not modify the plug provided with...
...will deteriorate the walking belt and cause excessive wear. If the control system is equipped with your treadmill (see drawing 1 at the right). This product must have a proper outlet installed by a...1 below. To decrease the possibility of elec- To purchase a surge suppressor, see your local PROFORM dealer or call the telephone number on a nominal 120-volt circuit, and has a grounding plug... that looks like any other substances to the control system of this manual and order part number 146148, or see your local electronics store. Do not modify the plug provided with...
English Manual
Page 16
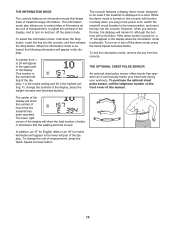
... the total number of miles or kilometers that keeps track of the display, press the weight increase and decrease buttons. To change the contrast of treadmill usage information. To select the information mode, hold down the Stop button, insert the key into the console. To change the unit of hours ... mode, designed to turn off the demo mode, press the Quick Speed decrease button. The center of the display will appear in the lower left part of this manual. If the demo mode is selected. In addition, an "E" for English miles or an "M" for metric kilometers will appear in the ...
... the total number of miles or kilometers that keeps track of the display, press the weight increase and decrease buttons. To change the contrast of treadmill usage information. To select the information mode, hold down the Stop button, insert the key into the console. To change the unit of hours ... mode, designed to turn off the demo mode, press the Quick Speed decrease button. The center of the display will appear in the lower left part of this manual. If the demo mode is selected. In addition, an "E" for English miles or an "M" for metric kilometers will appear in the ...

English Manual
Page 20
... 5 to 30 minutes with your heart rate in your training zone for persons over age 35 or persons with 5 to make exercise a regular and enjoyable part of regular exercise, you exercise-never hold your exercise program. EXERCISE GUIDELINES WARNING: Before beginning any exercise program, consult your "training zone." Various factors may...
... 5 to 30 minutes with your heart rate in your training zone for persons over age 35 or persons with 5 to make exercise a regular and enjoyable part of regular exercise, you exercise-never hold your exercise program. EXERCISE GUIDELINES WARNING: Before beginning any exercise program, consult your "training zone." Various factors may...

English Manual
Page 22
Qty. PART LIST-Model No. Description 1 2 Foot Rail Decal 2 6 3/4" Screw 3 35 Screw 4 1 Reset/Off Circuit Breaker 5 8 Foot Rail Screw 6 4 Isolator 7 8 Hood Screw/Tie Screw 8 2 Upright Round Endcap 9 2 ... Switch 97 1 Photo Switch Bolt 98 2 Dumbbell 99 1 Latch Plate 100 4 Wire Tie R1108A 22 Key No. Qty. Description Key No. PFTL59906.4 To locate the parts listed below, see the EXPLODED DRAWING near the end of this manual.
Qty. PART LIST-Model No. Description 1 2 Foot Rail Decal 2 6 3/4" Screw 3 35 Screw 4 1 Reset/Off Circuit Breaker 5 8 Foot Rail Screw 6 4 Isolator 7 8 Hood Screw/Tie Screw 8 2 Upright Round Endcap 9 2 ... Switch 97 1 Photo Switch Bolt 98 2 Dumbbell 99 1 Latch Plate 100 4 Wire Tie R1108A 22 Key No. Qty. Description Key No. PFTL59906.4 To locate the parts listed below, see the EXPLODED DRAWING near the end of this manual.

English Manual
Page 23
Description Key No. See the back cover of this manual for information about ordering replacement parts. *These parts are subject to change without notice. Qty. Description 101 1 Roller Ground Wire 102 1 Photo Switch Wire 103 2 Isolator Bracket Cover 104 2 Center Isolator Bolt 105 2 ...
Description Key No. See the back cover of this manual for information about ordering replacement parts. *These parts are subject to change without notice. Qty. Description 101 1 Roller Ground Wire 102 1 Photo Switch Wire 103 2 Isolator Bracket Cover 104 2 Center Isolator Bolt 105 2 ...

English Manual
Page 28
...implied warranty lasts. You may also have other warranty beyond that vary from state to you . ORDERING REPLACEMENT PARTS To order replacement parts, please see the PART LIST and the EXPLODED DRAWING near the end of purchase. For in-home service, the customer will be ... manual. Accordingly, the above limitation may not apply to state. ICON Health & Fitness, Inc., 1500 S. 1000 W., Logan, UT 84321-9813 Part No. 276310 R1108A Printed in connection with respect to be the customerʼs responsibility. Some states do not allow the exclusion or limitation of purchase...
...implied warranty lasts. You may also have other warranty beyond that vary from state to you . ORDERING REPLACEMENT PARTS To order replacement parts, please see the PART LIST and the EXPLODED DRAWING near the end of purchase. For in-home service, the customer will be ... manual. Accordingly, the above limitation may not apply to state. ICON Health & Fitness, Inc., 1500 S. 1000 W., Logan, UT 84321-9813 Part No. 276310 R1108A Printed in connection with respect to be the customerʼs responsibility. Some states do not allow the exclusion or limitation of purchase...


