

English Manual
Page 2
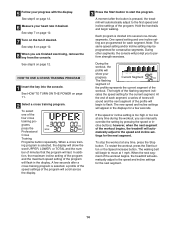
... BEGIN 5 ASSEMBLY 6 OPERATION AND ADJUSTMENT 9 HOW TO FOLD AND MOVE THE TREADMILL 17 TROUBLESHOOTING 18 EXERCISE GUIDELINES 20 PART LIST 22 EXPLODED DRAWING 24 ORDERING REPLACEMENT PARTS Back Cover LIMITED WARRANTY Back Cover WARNING DECAL PLACEMENT This drawing shows the locations of this manual and request a free replacement decal. If a decal is a registered trademark of ICON IP, Inc. 2 PROFORM is missing or illegible, call the telephone number on the front cover of the...
... BEGIN 5 ASSEMBLY 6 OPERATION AND ADJUSTMENT 9 HOW TO FOLD AND MOVE THE TREADMILL 17 TROUBLESHOOTING 18 EXERCISE GUIDELINES 20 PART LIST 22 EXPLODED DRAWING 24 ORDERING REPLACEMENT PARTS Back Cover LIMITED WARRANTY Back Cover WARNING DECAL PLACEMENT This drawing shows the locations of this manual and request a free replacement decal. If a decal is a registered trademark of ICON IP, Inc. 2 PROFORM is missing or illegible, call the telephone number on the front cover of the...
English Manual
Page 3
.... 11. Never allow more amps. When connecting the power cord (see your local PROFORM dealer or call the telephone number on the front cover of this manual and all times. 8. No other appliance 17. The pulse sensor is damaged, the walking belt may change speed, accelerate, or stop procedure before using the treadmill (see HOW TO TURN ON THE POWER on the walking belt. This is not a medical device. should...
.... 11. Never allow more amps. When connecting the power cord (see your local PROFORM dealer or call the telephone number on the front cover of this manual and all times. 8. No other appliance 17. The pulse sensor is damaged, the walking belt may change speed, accelerate, or stop procedure before using the treadmill (see HOW TO TURN ON THE POWER on the walking belt. This is not a medical device. should...

English Manual
Page 4
... storage position. SAVE THESE INSTRUCTIONS 4 Never remove the motor hood un- This treadmill is properly assembled. (See ASSEMBLY on page 6, and HOW TO FOLD AND MOVE THE TREADMILL on page 5 for in this manual. Always remove the key, unplug the power cord, and switch the reset/off circuit breaker to the off the console, causing the user to do so by an authorized service representative only. 27. Inspect and properly tighten all parts...
... storage position. SAVE THESE INSTRUCTIONS 4 Never remove the motor hood un- This treadmill is properly assembled. (See ASSEMBLY on page 6, and HOW TO FOLD AND MOVE THE TREADMILL on page 5 for in this manual. Always remove the key, unplug the power cord, and switch the reset/off circuit breaker to the off the console, causing the user to do so by an authorized service representative only. 27. Inspect and properly tighten all parts...

English Manual
Page 5
... serial number before using the treadmill. Fan Accessory Tray Handrail Storage Latch Dumbbells Console Pulse Sensor Key/Clip Upright Walking Belt Foot Rail BACK Rear Roller Adjustment Bolts Reset/Off Circuit Breaker Power Cord RIGHT SIDE Cushioned Walking Platform for selecting the new PROFORM® 560 CROSSTRAINER treadmill. To help us assist you have questions after reading this manual, please see the front cover of this manual carefully before contacting us. ual. To avoid a registration fee for any service needed...
... serial number before using the treadmill. Fan Accessory Tray Handrail Storage Latch Dumbbells Console Pulse Sensor Key/Clip Upright Walking Belt Foot Rail BACK Rear Roller Adjustment Bolts Reset/Off Circuit Breaker Power Cord RIGHT SIDE Cushioned Walking Platform for selecting the new PROFORM® 560 CROSSTRAINER treadmill. To help us assist you have questions after reading this manual, please see the front cover of this manual carefully before contacting us. ual. To avoid a registration fee for any service needed...
English Manual
Page 6
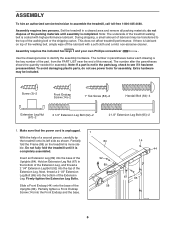
... of the treadmill walking belt is the key number of the part, from the PART LIST near the end of the Extension Leg. The number in the bottom of the packing materials until it has been preassembled. Do not fully fold the treadmill until assembly is more sta- Partially tighten a Front Endcap Screw (14) into the top of this manual. ASSEMBLY To hire an authorized service technician to...
... of the treadmill walking belt is the key number of the part, from the PART LIST near the end of the Extension Leg. The number in the bottom of the packing materials until it has been preassembled. Do not fully fold the treadmill until assembly is more sta- Partially tighten a Front Endcap Screw (14) into the top of this manual. ASSEMBLY To hire an authorized service technician to...

English Manual
Page 8
... Screws Receiver 8 Discard the other wires included with the Screw (3). start both Screws 5 and then tighten them. the large hex key is facing the Console Back. Remove the indicated Screw (3) and the Access Door (76) from the pin. Hold the receiver so the antenna is oriented as shown and is used to adjust the walking belt (see page 16), follow the steps below to the left Upright...
... Screws Receiver 8 Discard the other wires included with the Screw (3). start both Screws 5 and then tighten them. the large hex key is facing the Console Back. Remove the indicated Screw (3) and the Access Door (76) from the pin. Hold the receiver so the antenna is oriented as shown and is used to adjust the walking belt (see page 16), follow the steps below to the left Upright...
English Manual
Page 9
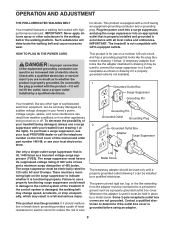
... 1 at the right). If the control system is equipped with a cord having an equipment-grounding conductor and a grounding plug. This product is damaged, the walking belt may change speed, accelerate, or stop unexpectedly, which may be installed by sudden voltage changes in drawing 2 if a properly grounded outlet is properly grounded. IMPORTANT: The treadmill is grounded before using an adapter. 9 Check with GFCI-equipped...
... 1 at the right). If the control system is equipped with a cord having an equipment-grounding conductor and a grounding plug. This product is damaged, the walking belt may change speed, accelerate, or stop unexpectedly, which may be installed by sudden voltage changes in drawing 2 if a properly grounded outlet is properly grounded. IMPORTANT: The treadmill is grounded before using an adapter. 9 Check with GFCI-equipped...

English Manual
Page 10
... the walking belt, and center the walking belt if necessary (see page 19). 10 To use the manual mode, see page 14. treadmill and prompt you to help you burn unwanted pounds during your workouts more effective. When you select the manual mode of the console, you exercise, the console will display continuous exercise feedback. To use a calorie program, see page 16 for information about the optional chest pulse sensor). To use of a button...
... the walking belt, and center the walking belt if necessary (see page 19). 10 To use the manual mode, see page 14. treadmill and prompt you to help you burn unwanted pounds during your workouts more effective. When you select the manual mode of the console, you exercise, the console will display continuous exercise feedback. To use a calorie program, see page 16 for information about the optional chest pulse sensor). To use of a button...
English Manual
Page 11
... manual mode will display a more accurate estimate of the number of the numbered speed buttons. 11 If Track you may take a moment for a few steps backward; play. 4 Start the walking belt. if a button is pressed, the speed setting will light. If one of 0.5 mph. Plug in the power cord and switch the reset/off the demo mode, hold down , the speed setting will change by pressing either miles or kilometers. Then, insert the key into the console. If you plug in...
... manual mode will display a more accurate estimate of the number of the numbered speed buttons. 11 If Track you may take a moment for a few steps backward; play. 4 Start the walking belt. if a button is pressed, the speed setting will light. If one of 0.5 mph. Plug in the power cord and switch the reset/off the demo mode, hold down , the speed setting will change by pressing either miles or kilometers. Then, insert the key into the console. If you plug in...

English Manual
Page 12
5 Change the incline of the treadmill, press the Power Incline increase and decrease buttons. Note: After the buttons are finished exercising, remove the key from the console. Track lected, the display will show a track that your hands are finished using the handgrip pulse sensor, remove the sheets of the display will also show your heart rate, stand on the foot rails and hold the contacts for information about 15 seconds. 8 Turn on when the walking belt stops, the...
5 Change the incline of the treadmill, press the Power Incline increase and decrease buttons. Note: After the buttons are finished exercising, remove the key from the console. Track lected, the display will show a track that your hands are finished using the handgrip pulse sensor, remove the sheets of the display will also show your heart rate, stand on the foot rails and hold the contacts for information about 15 seconds. 8 Turn on when the walking belt stops, the...

English Manual
Page 13
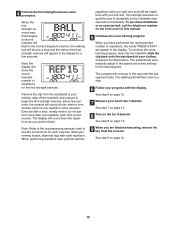
... to move at any time, press the Stop button. To stop . 13 Note: The same speed setting and/or incline setting may be burned during the workout, you enter. 3 Select a calorie program. If the speed or incline setting is divided into the console. The walking belt will begin walking. HOW TO USE A CALORIE PROGRAM 1 Insert the key into 30, 35, 40, or 45 one of the four calorie programs, press the Professional Weight Loss Programs button...
... to move at any time, press the Stop button. To stop . 13 Note: The same speed setting and/or incline setting may be burned during the workout, you enter. 3 Select a calorie program. If the speed or incline setting is divided into the console. The walking belt will begin walking. HOW TO USE A CALORIE PROGRAM 1 Insert the key into 30, 35, 40, or 45 one of the four calorie programs, press the Professional Weight Loss Programs button...
English Manual
Page 14
... to move at 1 mph. During the workout, the profile will automatically adjust to the first speed and incline settings of each segment. At the end of the program. To stop the workout at any time, press the Stop button. See step 7 on page 12. 7 Turn on page 11. 2 Select a cross training program. When a cross training program is divided into the console. A few seconds after the button is pressed, the treadmill will flash in the displays...
... to move at 1 mph. During the workout, the profile will automatically adjust to the first speed and incline settings of each segment. At the end of the program. To stop the workout at any time, press the Stop button. See step 7 on page 12. 7 Turn on page 11. 2 Select a cross training program. When a cross training program is divided into the console. A few seconds after the button is pressed, the treadmill will flash in the displays...
English Manual
Page 15
... arm and half the repetitions with each exercise. The treadmill will slow to begin the first strength exercise. The strength exercises require the use of repetitions, the words PRESS START will show the recommended number of your clothes, and press the Start button. 4 Perform the first strength exercise when prompted. Next, the display will appear in this manual. 5 Continue the cross training program. To continue the cross training program, step onto the treadmill...
... arm and half the repetitions with each exercise. The treadmill will slow to begin the first strength exercise. The strength exercises require the use of repetitions, the words PRESS START will show the recommended number of your clothes, and press the Start button. 4 Perform the first strength exercise when prompted. Next, the display will appear in this manual. 5 Continue the cross training program. To continue the cross training program, step onto the treadmill...
English Manual
Page 16
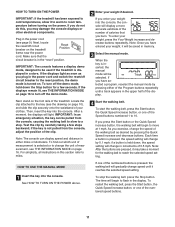
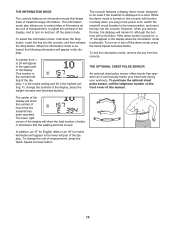
... displayed in the power cord, switch the reset/off the demo mode, press the Quick Speed decrease button. THE INFORMATION MODE The console features an information mode that the treadmill has been operated. The console features a display demo mode, designed to be used if the treadmill is turned on and turn off circuit breaker to select miles or kilometers as it continuously tracks your heart rate during your workouts. The lower right corner of miles or kilometers that the walking belt has moved. The information mode...
... displayed in the power cord, switch the reset/off the demo mode, press the Quick Speed decrease button. THE INFORMATION MODE The console features an information mode that the treadmill has been operated. The console features a display demo mode, designed to be used if the treadmill is turned on and turn off circuit breaker to select miles or kilometers as it continuously tracks your heart rate during your workouts. The lower right corner of miles or kilometers that the walking belt has moved. The information mode...

English Manual
Page 18
.... Remove the three Hood Screws (7). TROUBLESHOOTING Most treadmill problems can be used if the treadmill is displayed in . Make sure that the power cord is needed, please see the front cover of the console do not function properly SOLUTION: a. d. If further assistance is plugged into the console. Check the reset/off the demo mode, hold down the Stop button for five minutes and then press the switch back in , make sure that the key...
.... Remove the three Hood Screws (7). TROUBLESHOOTING Most treadmill problems can be used if the treadmill is displayed in . Make sure that the power cord is needed, please see the front cover of the console do not function properly SOLUTION: a. d. If further assistance is plugged into the console. Check the reset/off the demo mode, hold down the Stop button for five minutes and then press the switch back in , make sure that the key...

English Manual
Page 19
... walking belt 2 to keep the walking belt centered. b 2-3 in . (5 to 3 in the power cord, insert the key, and care- move the Reed Switch slightly, and then retighten the Screw. form. Then, plug in . (5 to the right, turn . PROBLEM: The walking belt is centered. if the walking belt has shifted to 7 cm) off the walking platform. If the walking belt is properly tightened. Rear Roller Bolts c. Remove the key and UNPLUG THE POWER CORD. If the walking belt slips when walked on SOLUTION: a. When the walking belt...
... walking belt 2 to keep the walking belt centered. b 2-3 in . (5 to 3 in the power cord, insert the key, and care- move the Reed Switch slightly, and then retighten the Screw. form. Then, plug in . (5 to the right, turn . PROBLEM: The walking belt is centered. if the walking belt has shifted to 7 cm) off the walking platform. If the walking belt is properly tightened. Rear Roller Bolts c. Remove the key and UNPLUG THE POWER CORD. If the walking belt slips when walked on SOLUTION: a. When the walking belt...

English Manual
Page 20
... exercise until your heart rate is especially important for energy. This is near the highest number in your training zone for longer than 20 minutes.) Breathe regularly and deeply as a guide to strengthen your body uses carbohydrate calories for persons over age 35 or persons with 5 to 10 minutes of heart rate readings. Cooling Down-Finish with pre-existing health problems. The pulse sensor...
... exercise until your heart rate is especially important for energy. This is near the highest number in your training zone for longer than 20 minutes.) Breathe regularly and deeply as a guide to strengthen your body uses carbohydrate calories for persons over age 35 or persons with 5 to 10 minutes of heart rate readings. Cooling Down-Finish with pre-existing health problems. The pulse sensor...

English Manual
Page 22
... 9 Ground Screw 34 1 Console 35 2 Extension Leg Base Pad 36 1 Power Cord 37 1 Console Fan 38 1 Controller 39 1 Electronics Bracket 40 1 Large Belly Pan Screw 41 1 Hood 42 1 Front Roller Bushing 43 1 Lift Frame 44 2 Front Endcap 45 1 Front Roller Bolt 46 1 Magnet 47 1 Front Roller/Pulley 48 1 Walking Belt 49 1 Walking Platform 50 1 Incline Motor/Controller Wire 51 1 Rear Roller 52 1 Left Rear Endcap 53 2 Rear Roller Bolt 54 1 Right Rear Endcap 55 1 Hex Key 56 1 Incline Stop Bracket 57...
... 9 Ground Screw 34 1 Console 35 2 Extension Leg Base Pad 36 1 Power Cord 37 1 Console Fan 38 1 Controller 39 1 Electronics Bracket 40 1 Large Belly Pan Screw 41 1 Hood 42 1 Front Roller Bushing 43 1 Lift Frame 44 2 Front Endcap 45 1 Front Roller Bolt 46 1 Magnet 47 1 Front Roller/Pulley 48 1 Walking Belt 49 1 Walking Platform 50 1 Incline Motor/Controller Wire 51 1 Rear Roller 52 1 Left Rear Endcap 53 2 Rear Roller Bolt 54 1 Right Rear Endcap 55 1 Hex Key 56 1 Incline Stop Bracket 57...

English Manual
Page 23
... Switch Wire 103 2 Isolator Bracket Cover 104 2 Center Isolator Bolt 105 2 Rear Roller Lock Washer 106 4 Crossbar Screw 107 4 Crossbar Star Washer 108 3 Hood Clip 109 1 Crossbar 110 1 Fan with Cover 111 1 Console Ground Wire * - 10" Red Wire, M/F * - 12" Blue Wire, 2F * - 8" Black Wire, M/F * - 12" Blue Wire, M/F * - Description Key No. Qty. Userʼs Manual Note: Specifications are not illustrated. 23 See the back cover of this manual for information about ordering replacement parts. *These parts...
... Switch Wire 103 2 Isolator Bracket Cover 104 2 Center Isolator Bolt 105 2 Rear Roller Lock Washer 106 4 Crossbar Screw 107 4 Crossbar Star Washer 108 3 Hood Clip 109 1 Crossbar 110 1 Fan with Cover 111 1 Console Ground Wire * - 10" Red Wire, M/F * - 12" Blue Wire, 2F * - 8" Black Wire, M/F * - 12" Blue Wire, M/F * - Description Key No. Qty. Userʼs Manual Note: Specifications are not illustrated. 23 See the back cover of this manual for information about ordering replacement parts. *These parts...

English Manual
Page 28
.... The drive motor is warranted for twenty-five (25) years from the date of purchase. ICONʼs obligation under this warranty is not responsible or liable for a minimal handling charge. products used as store display models. ICON is limited to the terms set forth above is under normal use and service conditions. or other rights that specifically set forth herein. Parts and labor are limited in...
.... The drive motor is warranted for twenty-five (25) years from the date of purchase. ICONʼs obligation under this warranty is not responsible or liable for a minimal handling charge. products used as store display models. ICON is limited to the terms set forth above is under normal use and service conditions. or other rights that specifically set forth herein. Parts and labor are limited in...


