
English Manual
Page 2
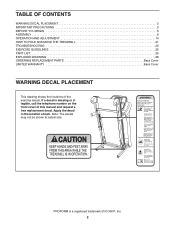
... a registered trademark of ICON IP, Inc. 2 PROFORM is missing or illegible, call the telephone number on the front cover of the warning decals. TABLE OF CONTENTS WARNING DECAL PLACEMENT 2 IMPORTANT PRECAUTIONS 3 BEFORE YOU BEGIN 5 ASSEMBLY 6 OPERATION AND ADJUSTMENT 14 HOW TO FOLD AND MOVE THE TREADMILL 21 TROUBLESHOOTING 22 EXERCISE GUIDELINES 25 PART...
... a registered trademark of ICON IP, Inc. 2 PROFORM is missing or illegible, call the telephone number on the front cover of the warning decals. TABLE OF CONTENTS WARNING DECAL PLACEMENT 2 IMPORTANT PRECAUTIONS 3 BEFORE YOU BEGIN 5 ASSEMBLY 6 OPERATION AND ADJUSTMENT 14 HOW TO FOLD AND MOVE THE TREADMILL 21 TROUBLESHOOTING 22 EXERCISE GUIDELINES 25 PART...
English Manual
Page 4
...performing the mainte- When folding or moving the treadmill, make sure that the storage latch is not in this manual should be able to safely lift 45 lbs. (20 kg) to raise, lower, or move the treadmill until it is properly assembled. (See ASSEMBLY on page 6, and HOW TO FOLD AND MOVE... THE TREADMILL on the treadmill. 24. vice representative. If you feel faint or if you experience pain while exercising, stop immediately...
...performing the mainte- When folding or moving the treadmill, make sure that the storage latch is not in this manual should be able to safely lift 45 lbs. (20 kg) to raise, lower, or move the treadmill until it is properly assembled. (See ASSEMBLY on page 6, and HOW TO FOLD AND MOVE... THE TREADMILL on the treadmill. 24. vice representative. If you feel faint or if you experience pain while exercising, stop immediately...
English Manual
Page 6
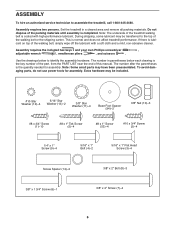
...-abrasive cleaner. To avoid damaging parts, do not use power tools for assembly. If there is lubricant on top of the walking belt or the shipping carton. The number after the parentheses is normal and does not affect treadmill performance. Note: Some small parts may be transferred to the top of... have been preassembled. The number in a cleared area and remove all packing materials. Do not dispose of this manual. Note: The underside of the treadmill walking belt is completed. Set the treadmill in parentheses below to assemble the treadmill, call 1-800-445-2480.
...-abrasive cleaner. To avoid damaging parts, do not use power tools for assembly. If there is lubricant on top of the walking belt or the shipping carton. The number after the parentheses is normal and does not affect treadmill performance. Note: Some small parts may be transferred to the top of... have been preassembled. The number in a cleared area and remove all packing materials. Do not dispose of this manual. Note: The underside of the treadmill walking belt is completed. Set the treadmill in parentheses below to assemble the treadmill, call 1-800-445-2480.
English Manual
Page 11
Attach the Crossbar to avoid scratching the console assembly. do not tighten the Screws yet. Set the console assembly face down on a soft surface to the Handrails (82, 83) with four 1/4" x 1" Screws (9); Remove the two #8 x 3/4" Screws (1). Attach the Console Frame with four #...10 x 3/4" Screws (2) and four #10 Star Washers (12); do not tighten the Screws yet. Lift off the Crossbar (107). 9 Console Assembly 1 107 10. do not overtighten the #10 x 3/4" Screws (2). Be careful not to pinch the Upright Wire (87). Tighten one #10 x 3/4" Screw (2) in...
Attach the Crossbar to avoid scratching the console assembly. do not tighten the Screws yet. Set the console assembly face down on a soft surface to the Handrails (82, 83) with four 1/4" x 1" Screws (9); Remove the two #8 x 3/4" Screws (1). Attach the Console Frame with four #...10 x 3/4" Screws (2) and four #10 Star Washers (12); do not tighten the Screws yet. Lift off the Crossbar (107). 9 Console Assembly 1 107 10. do not overtighten the #10 x 3/4" Screws (2). Be careful not to pinch the Upright Wire (87). Tighten one #10 x 3/4" Screw (2) in...
English Manual
Page 12
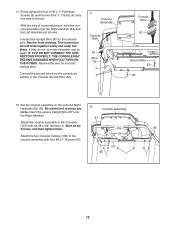
... Tie 4 3 Console Wire 87 Ground Wire 52 83 12. See the inset drawing. Remove the wire tie from the console assembly to the console wire. Be careful not to the console assembly with six #8 x 3/4" Screws (1). Firmly tighten the four 5/16" x 1" Flat Head Screws (3) and the two 5/16" x 1" Bolts (4)... (only one connector and try again. With the help of a second person, hold the console assembly near the Right Handrail (83) and the Left Handrail (not shown). Insert the excess Upright Wire (87) into place. Set the console...
... Tie 4 3 Console Wire 87 Ground Wire 52 83 12. See the inset drawing. Remove the wire tie from the console assembly to the console wire. Be careful not to the console assembly with six #8 x 3/4" Screws (1). Firmly tighten the four 5/16" x 1" Flat Head Screws (3) and the two 5/16" x 1" Bolts (4)... (only one connector and try again. With the help of a second person, hold the console assembly near the Right Handrail (83) and the Left Handrail (not shown). Insert the excess Upright Wire (87) into place. Set the console...
English Manual
Page 13
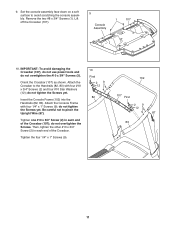
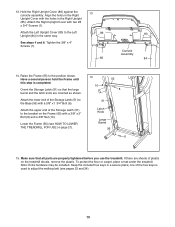
... 1 Assembly 84 14. Keep the included hex keys in the Right 13 Upright Cover with two #8 x 3/4" Screws (1). Attach the Left Upright Cover (80) to the position shown. Have a second person hold the Frame until this step is used to adjust the walking belt (see HOW TO LOWER THE TREADMILL FOR ... to the Left 86 Upright (84) in the Right Upright (85). Attach the upper end of the Storage Latch (51) to the bracket on the treadmill decals, remove the plastic. Align the holes in a secure place; Note: Extra hardware may be included. Lower the Frame (55) (see pages 23 ...
... 1 Assembly 84 14. Keep the included hex keys in the Right 13 Upright Cover with two #8 x 3/4" Screws (1). Attach the Left Upright Cover (80) to the position shown. Have a second person hold the Frame until this step is used to adjust the walking belt (see HOW TO LOWER THE TREADMILL FOR ... to the Left 86 Upright (84) in the Right Upright (85). Attach the upper end of the Storage Latch (51) to the bracket on the treadmill decals, remove the plastic. Align the holes in a secure place; Note: Extra hardware may be included. Lower the Frame (55) (see pages 23 ...


