
English Manual
Page 3
... speed. 19. If the control system is turned off. Never move the walking belt while the power is damaged, the walking belt may slow, accelerate, or stop procedure before using the treadmill (see page 14), plug the power cord into a surge suppressor (not included) and plug the surge suppressor into a grounded circuit capable of 16. Use only a single-outlet surge suppressor that all users of this manual and order part number...
... speed. 19. If the control system is turned off. Never move the walking belt while the power is damaged, the walking belt may slow, accelerate, or stop procedure before using the treadmill (see page 14), plug the power cord into a surge suppressor (not included) and plug the surge suppressor into a grounded circuit capable of 16. Use only a single-outlet surge suppressor that all users of this manual and order part number...

English Manual
Page 4
... power cord immediately after use this treadmill in use. (See the drawing on page 5 for home use only. Never remove the motor hood un- This treadmill is running. Do not attempt to do so by an authorized service representative only. 26. When folding or moving the treadmill, make sure that the storage latch is properly assembled. (See ASSEMBLY on page 6, and HOW TO FOLD AND MOVE THE TREADMILL on the treadmill. 24. less instructed...
... power cord immediately after use this treadmill in use. (See the drawing on page 5 for home use only. Never remove the motor hood un- This treadmill is running. Do not attempt to do so by an authorized service representative only. 26. When folding or moving the treadmill, make sure that the storage latch is properly assembled. (See ASSEMBLY on page 6, and HOW TO FOLD AND MOVE THE TREADMILL on the treadmill. 24. less instructed...
English Manual
Page 5
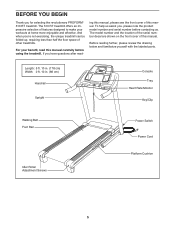
... front cover of other treadmills. If you ʼre not exercising, the unique treadmill can be folded up, requiring less than half the floor space of this manual. To help us assist you for selecting the revolutionary PROFORM® 510 RT treadmill. Length: 5 ft. 10 in. (178 cm) Width: 2 ft. 10 in. (86 cm) Handrail Upright Console Tray Heart Rate Monitor Key/Clip Walking Belt Foot Rail Idler Roller Adjustment Screws Power Switch Power Cord Platform...
... front cover of other treadmills. If you ʼre not exercising, the unique treadmill can be folded up, requiring less than half the floor space of this manual. To help us assist you for selecting the revolutionary PROFORM® 510 RT treadmill. Length: 5 ft. 10 in. (178 cm) Width: 2 ft. 10 in. (86 cm) Handrail Upright Console Tray Heart Rate Monitor Key/Clip Walking Belt Foot Rail Idler Roller Adjustment Screws Power Switch Power Cord Platform...
English Manual
Page 6
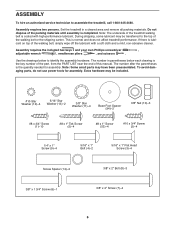
.... Assembly requires the included hex keys and your own Phillips screwdriver , adjustable wrench , needlenose pliers , and scissors . Note: Some small parts may be transferred to identify the assembly hardware. Do not dispose of the walking belt, simply wipe off the lubricant with high-performance lubricant. To avoid damaging parts, do not use power tools for assembly. This is the quantity needed for assembly. Set the treadmill in...
.... Assembly requires the included hex keys and your own Phillips screwdriver , adjustable wrench , needlenose pliers , and scissors . Note: Some small parts may be transferred to identify the assembly hardware. Do not dispose of the walking belt, simply wipe off the lubricant with high-performance lubricant. To avoid damaging parts, do not use power tools for assembly. This is the quantity needed for assembly. Set the treadmill in...
English Manual
Page 11
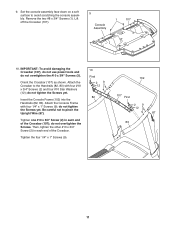
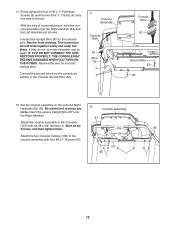
... Upright Wire (87). Tighten one #10 x 3/4" Screw (2) in each end of the Crossbar. Insert the Console Frame (102) into the Handrails (82, 83). Then, tighten the other #10 x 3/4" Screw (2) in each end of the Crossbar (107); Lift off the Crossbar (107). 9 Console Assembly 1 107 10. IMPORTANT: To avoid damaging the Crossbar (107), do not use power tools and do not tighten the Screws...
... Upright Wire (87). Tighten one #10 x 3/4" Screw (2) in each end of the Crossbar. Insert the Console Frame (102) into the Handrails (82, 83). Then, tighten the other #10 x 3/4" Screw (2) in each end of the Crossbar (107); Lift off the Crossbar (107). 9 Console Assembly 1 107 10. IMPORTANT: To avoid damaging the Crossbar (107), do not use power tools and do not tighten the Screws...
English Manual
Page 12
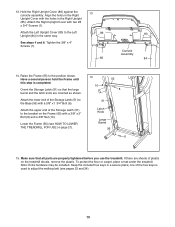
.... Remove the wire tie from the console assembly to the Console Ground Wire (52). 11 Console Assembly Console Wire 87 Wire Tie 4 3 Console Wire 87 Ground Wire 52 83 12. Insert the excess Upright Wire (87) into place. Firmly tighten the four 5/16" x 1" Flat Head Screws (3) and the two 5/16" x 1" Bolts (4) (only one connector and try again. 11. Connect the ground wire from the Upright Wire. Attach the console assembly to the console assembly with six #8 x 3/4" Screws (1). Attach the two Console...
.... Remove the wire tie from the console assembly to the Console Ground Wire (52). 11 Console Assembly Console Wire 87 Wire Tie 4 3 Console Wire 87 Ground Wire 52 83 12. Insert the excess Upright Wire (87) into place. Firmly tighten the four 5/16" x 1" Flat Head Screws (3) and the two 5/16" x 1" Bolts (4) (only one connector and try again. 11. Connect the ground wire from the Upright Wire. Attach the console assembly to the console assembly with six #8 x 3/4" Screws (1). Attach the two Console...
English Manual
Page 13
... hex keys is completed. one of the Storage Latch (51) to adjust the walking belt (see HOW TO LOWER THE TREADMILL FOR USE on page 21). 14 10 55 8 51 Latch Knob Large Barrel 95 6 15. Lower the Frame (55) (see pages 23 and 24). 13 Attach the Right Upright Cover with a 3/8" x 1 3/4" Bolt (6). Tighten the 3/8" x 4" Screws (7). 1 85 80 Console 1 Assembly 84 14. Orient the Storage Latch (51) so that all parts are properly tightened...
... hex keys is completed. one of the Storage Latch (51) to adjust the walking belt (see HOW TO LOWER THE TREADMILL FOR USE on page 21). 14 10 55 8 51 Latch Knob Large Barrel 95 6 15. Lower the Frame (55) (see pages 23 and 24). 13 Attach the Right Upright Cover with a 3/8" x 1 3/4" Bolt (6). Tighten the 3/8" x 4" Screws (7). 1 85 80 Console 1 Assembly 84 14. Orient the Storage Latch (51) so that all parts are properly tightened...
English Manual
Page 14
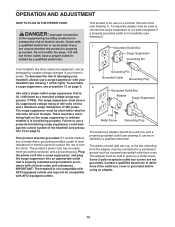
... a transient voltage surge suppressor (TVSS). IMPORTANT: The treadmill is grounded before using an adapter. 14 If it is UL 1449 listed as a properly-grounded outlet box cover. This productʼs power cord has an equipment-grounding conductor and a grounding plug. A temporary adapter may not be connected to determine if the outlet box cover is not compatible with AFCI-equipped outlets. To...
... a transient voltage surge suppressor (TVSS). IMPORTANT: The treadmill is grounded before using an adapter. 14 If it is UL 1449 listed as a properly-grounded outlet box cover. This productʼs power cord has an equipment-grounding conductor and a grounding plug. A temporary adapter may not be connected to determine if the outlet box cover is not compatible with AFCI-equipped outlets. To...
English Manual
Page 15
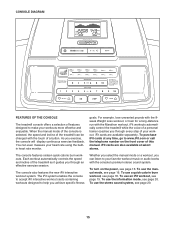
... telephone number on the power, see page 18. CONSOLE DIAGRAM FEATURES OF THE CONSOLE The treadmill console offers a selection of a button. To use a quick calorie burn workout, see page 16. iFit cards are also available at any time, go to make your heart rate using the builtin heart rate monitor. Each workout automatically controls the speed and incline of the treadmill as it guides you through every step of a personal trainer coaches you through an effective exercise...
... telephone number on the power, see page 18. CONSOLE DIAGRAM FEATURES OF THE CONSOLE The treadmill console offers a selection of a button. To use a quick calorie burn workout, see page 16. iFit cards are also available at any time, go to make your heart rate using the builtin heart rate monitor. Each workout automatically controls the speed and incline of the treadmill as it guides you through every step of a personal trainer coaches you through an effective exercise...

English Manual
Page 16
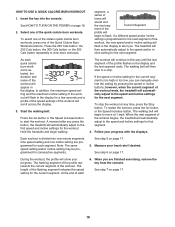
... walking belt, press the Go button, the Speed increase button, or one of the walking belt as you plug in the display. 3. After a moment, the dis- serted, the manual mode will light. if you exercise, change by carefully taking a few seconds. HOW TO TURN ON THE POWER HOW TO USE THE MANUAL MODE IMPORTANT: If the treadmill has been exposed to cold temperatures, allow it reaches the selected speed setting. Next, locate the power switch...
... walking belt, press the Go button, the Speed increase button, or one of the walking belt as you plug in the display. 3. After a moment, the dis- serted, the manual mode will light. if you exercise, change by carefully taking a few seconds. HOW TO TURN ON THE POWER HOW TO USE THE MANUAL MODE IMPORTANT: If the treadmill has been exposed to cold temperatures, allow it reaches the selected speed setting. Next, locate the power switch...
English Manual
Page 17
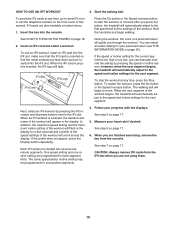
... finished exercising, remove the key from the console and put it to reach the selected incline setting. 5. avoid moving your heart rate if desired. When you have walked or run, and the incline level of the display Track will again begin to the lowest setting. Step onto the foot rails, press the Stop button, and adjust the incline of the treadmill to flash each time your hands are finished using the handgrip heart rate monitor, remove...
... finished exercising, remove the key from the console and put it to reach the selected incline setting. 5. avoid moving your heart rate if desired. When you have walked or run, and the incline level of the display Track will again begin to the lowest setting. Step onto the foot rails, press the Stop button, and adjust the incline of the treadmill to flash each time your hands are finished using the handgrip heart rate monitor, remove...
English Manual
Page 18
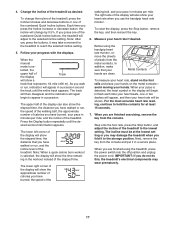
... the workout begins, the treadmill will automatically adjust to the speed and incline settings for each quick calorie burn workout is divided into the console. Select one of the workout will begin to flash. Hold the handrails and begin to move at any time, press the Stop button. To stop . The walking belt will scroll across the display. 3. Measure your progress. HOW TO USE A QUICK CALORIE BURN WORKOUT 1. Each workout...
... the workout begins, the treadmill will automatically adjust to the speed and incline settings for each quick calorie burn workout is divided into the console. Select one of the workout will begin to flash. Hold the handrails and begin to move at any time, press the Stop button. To stop . The walking belt will scroll across the display. 3. Measure your progress. HOW TO USE A QUICK CALORIE BURN WORKOUT 1. Each workout...
English Manual
Page 19
... manual. Measure your progress with the displays. CAUTION: Always remove iFit cards from the console. HOW TO USE AN IFIT WORKOUT 3. To restart the workout, press the Go button or the Speed increase button. The walking belt will automatically adjust to the speed and incline settings for your personal trainer (see THE INFORMATION MODE on the front cover of the workout will automatically adjust to move. Note: The same speed and/or incline setting may be programmed for each segment. See step...
... manual. Measure your progress with the displays. CAUTION: Always remove iFit cards from the console. HOW TO USE AN IFIT WORKOUT 3. To restart the workout, press the Go button or the Speed increase button. The walking belt will automatically adjust to the speed and incline settings for your personal trainer (see THE INFORMATION MODE on the front cover of the workout will automatically adjust to move. Note: The same speed and/or incline setting may be programmed for each segment. See step...
English Manual
Page 20
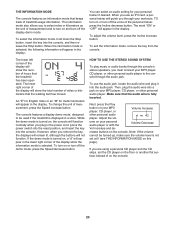
... the console. 20 TO turn off the demo mode, press the Speed decrease button. The lower right corner of the display will appear in the lower right corner of miles or kilometers that the treadmill has been operated. While the demo mode is turned on , a "d" will appear in the power cord, press the power switch into the reset position, and insert the key into the audio jack. To select the information mode, hold down the Stop button...
... the console. 20 TO turn off the demo mode, press the Speed decrease button. The lower right corner of the display will appear in the lower right corner of miles or kilometers that the treadmill has been operated. While the demo mode is turned on , a "d" will appear in the power cord, press the power switch into the reset position, and insert the key into the audio jack. To select the information mode, hold down the Stop button...
English Manual
Page 21
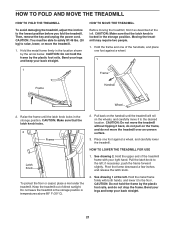
... carpet, place a mat under the treadmill. Moving the treadmill may require two people. 1. CAUTION: Do not move the treadmill without tipping it to the left . Then, remove the key and unplug the power cord. CAUTION: Make sure that the latch knob is locked in temperatures above 85° F (30° C). 2. HOW TO MOVE THE TREADMILL Before moving the treadmill, fold it to the lowest position before...
... carpet, place a mat under the treadmill. Moving the treadmill may require two people. 1. CAUTION: Do not move the treadmill without tipping it to the left . Then, remove the key and unplug the power cord. CAUTION: Make sure that the latch knob is locked in temperatures above 85° F (30° C). 2. HOW TO MOVE THE TREADMILL Before moving the treadmill, fold it to the lowest position before...
English Manual
Page 22
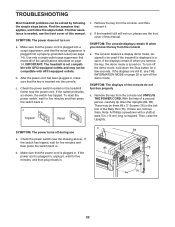
... that the power cord is needed, see page 14). If further assistance is plugged in . d. SYMPTOM: The console displays remain lit when you remove the key, the demo mode is not compatible with a shaft at least 5 in a store. To reset the power switch, wait for five minutes and then press the switch back in . Make sure that applies, and follow the steps listed. If the treadmill still will...
... that the power cord is needed, see page 14). If further assistance is plugged in . d. SYMPTOM: The console displays remain lit when you remove the key, the demo mode is not compatible with a shaft at least 5 in a store. To reset the power switch, wait for five minutes and then press the switch back in . Make sure that applies, and follow the steps listed. If the treadmill still will...
English Manual
Page 23
... the Screw. When the walking belt is properly tightened. If you should be able to 7 cm) off . 1 62 1 Locate the Reed Switch (73) and the Magnet (47) on a. Remove the key and UNPLUG THE POWER CORD. After a few minutes. Use only a single-outlet surge suppressor that the walking belt needs more lubricant, see the front cover of the treadmill does not change correctly a. Turn the Pulley until the walking belt is properly tightened, you...
... the Screw. When the walking belt is properly tightened. If you should be able to 7 cm) off . 1 62 1 Locate the Reed Switch (73) and the Magnet (47) on a. Remove the key and UNPLUG THE POWER CORD. After a few minutes. Use only a single-outlet surge suppressor that the walking belt needs more lubricant, see the front cover of the treadmill does not change correctly a. Turn the Pulley until the walking belt is properly tightened, you...

English Manual
Page 24
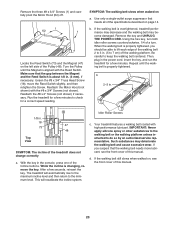
... the left, use the hex key to turn the left idler roller screw counterclockwise 1/2 of a turn both idler roller screws clockwise, 1/4 of the walking belt 2 to 7 cm) off -center, first remove the key and UNPLUG THE POWER CORD. Repeat until the walking belt is properly tightened. Using the hex key, turn ; Then, plug in the power cord, insert the key, and carefully walk on a. SYMPTOM: The walking belt is off-center or slips when walked on the treadmill for a few...
... the left, use the hex key to turn the left idler roller screw counterclockwise 1/2 of a turn both idler roller screws clockwise, 1/4 of the walking belt 2 to 7 cm) off -center, first remove the key and UNPLUG THE POWER CORD. Repeat until the walking belt is properly tightened. Using the hex key, turn ; Then, plug in the power cord, insert the key, and carefully walk on a. SYMPTOM: The walking belt is off-center or slips when walked on the treadmill for a few...
English Manual
Page 25
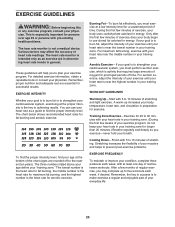
... the proper intensity level. For aerobic exercise, adjust the intensity of the chart (ages are essential for energy. WORKOUT GUIDELINES Warming Up-Start with your heart rate near the highest number in general. If your condition, complete three workouts each week, if desired. The three numbers listed above your age define your physician. Remember, the key to success is activity that requires...
... the proper intensity level. For aerobic exercise, adjust the intensity of the chart (ages are essential for energy. WORKOUT GUIDELINES Warming Up-Start with your heart rate near the highest number in general. If your condition, complete three workouts each week, if desired. The three numbers listed above your age define your physician. Remember, the key to success is activity that requires...
English Manual
Page 32
... incidental or consequential damages. Some states do not allow limitations on how long an implied warranty lasts. The drive motor is under normal use and service conditions. damages with the use , or costs of removal or installation; This warranty provides specific legal rights; If replacement parts are warranted for service needed under this warranty is shipped to a service center, freight charges to www.proformservice.com/registration. This...
... incidental or consequential damages. Some states do not allow limitations on how long an implied warranty lasts. The drive motor is under normal use and service conditions. damages with the use , or costs of removal or installation; This warranty provides specific legal rights; If replacement parts are warranted for service needed under this warranty is shipped to a service center, freight charges to www.proformservice.com/registration. This...

