
English Manual
Page 1
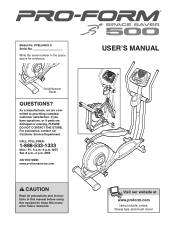
.... Serial Number Decal QUESTIONS? CALL TOLL-FREE: 1-888-533-1333 Mon.-Fri. 6 a.m.-6 p.m. Model No. PFEL64907.0 Serial No. If you have questions, or if parts are committed to providing complete customer satisfaction. MST ON THE WEB: www.proformservice.com CAUTION Read all precautions and instructions in the space above for future reference. Write the serial number in this manual before using this manual for...
.... Serial Number Decal QUESTIONS? CALL TOLL-FREE: 1-888-533-1333 Mon.-Fri. 6 a.m.-6 p.m. Model No. PFEL64907.0 Serial No. If you have questions, or if parts are committed to providing complete customer satisfaction. MST ON THE WEB: www.proformservice.com CAUTION Read all precautions and instructions in the space above for future reference. Write the serial number in this manual before using this manual for...
English Manual
Page 2
... 2 IMPORTANT PRECAUTIONS 3 BEFORE YOU BEGIN 4 ASSEMBLY 5 HOW TO USE THE ELLIPTICAL EXERCISER 12 MAINTENANCE AND TROUBLESHOOTING 19 EXERCISE GUIDELINES 20 PART LIST 24 EXPLODED DRAWING 26 ORDERING REPLACEMENT PARTS Back Cover LIMITED WARRANTY Back Cover WARNING DECAL PLACEMEN2T58868 The warning decal shown here has been applied in the location shown. If the decal is a registered trademark of this manual and request a free replacement decal. Apply the decal in the...
... 2 IMPORTANT PRECAUTIONS 3 BEFORE YOU BEGIN 4 ASSEMBLY 5 HOW TO USE THE ELLIPTICAL EXERCISER 12 MAINTENANCE AND TROUBLESHOOTING 19 EXERCISE GUIDELINES 20 PART LIST 24 EXPLODED DRAWING 26 ORDERING REPLACEMENT PARTS Back Cover LIMITED WARRANTY Back Cover WARNING DECAL PLACEMEN2T58868 The warning decal shown here has been applied in the location shown. If the decal is a registered trademark of this manual and request a free replacement decal. Apply the decal in the...

English Manual
Page 3
... and instructions in this manual. 3 Replace any exercise program, consult your elliptical exerciser at all warnings on a level surface, with pre-existing health problems. 2. Wear appropriate exercise clothes when exercising; Hold the handgrip pulse sensor or the handlebars when mounting, dismounting, or using your elliptical exerciser; Keep your back straight while using your back. 11. Before beginning any worn parts immediately. 6. Your elliptical exerciser is enough clearance around your elliptical exerciser in...
... and instructions in this manual. 3 Replace any exercise program, consult your elliptical exerciser at all warnings on a level surface, with pre-existing health problems. 2. Wear appropriate exercise clothes when exercising; Hold the handgrip pulse sensor or the handlebars when mounting, dismounting, or using your elliptical exerciser; Keep your back straight while using your back. 11. Before beginning any worn parts immediately. 6. Your elliptical exerciser is enough clearance around your elliptical exerciser in...
English Manual
Page 4
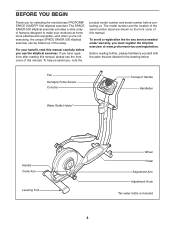
... reading this manual, please see the front cover of this manual. Fan Handgrip Pulse Sensor Console Transport Handle Handlebar Water Bottle Holder* Handle Crank Arm Leveling Foot Wheel Pedal Adjustment Arm Adjustment Knob *No water bottle is included 4 To avoid a registration fee for selecting the revolutionary PROFORM® SPACE SAVER™ 500 elliptical exerciser. BEFORE YOU BEGIN Thank you for any service needed under warranty, you must register the elliptical exerciser at home more effective...
... reading this manual, please see the front cover of this manual. Fan Handgrip Pulse Sensor Console Transport Handle Handlebar Water Bottle Holder* Handle Crank Arm Leveling Foot Wheel Pedal Adjustment Arm Adjustment Knob *No water bottle is included 4 To avoid a registration fee for selecting the revolutionary PROFORM® SPACE SAVER™ 500 elliptical exerciser. BEFORE YOU BEGIN Thank you for any service needed under warranty, you must register the elliptical exerciser at home more effective...
English Manual
Page 5
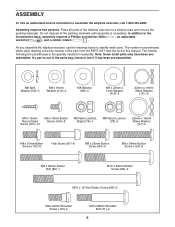
... Button Screw (124)-6 M8 x 69mm Button Bolt (80)-1 M10 x 82mm Button Screw (82)-2 M10 x 127mm Button Screw (83)-2 M8 x 23mm Shoulder Screw (115)-2 M10 x 58mm Shoulder Bolt (71)-2 5 Place all parts of the elliptical exerciser in parentheses below to see if it has been pre-assembled. Note: Some small parts may have been preassembled. If a part is the quantity needed for assembly. Do not dispose of this manual. The number...
... Button Screw (124)-6 M8 x 69mm Button Bolt (80)-1 M10 x 82mm Button Screw (82)-2 M10 x 127mm Button Screw (83)-2 M8 x 23mm Shoulder Screw (115)-2 M10 x 58mm Shoulder Bolt (71)-2 5 Place all parts of the elliptical exerciser in parentheses below to see if it has been pre-assembled. Note: Some small parts may have been preassembled. If a part is the quantity needed for assembly. Do not dispose of this manual. The number...
English Manual
Page 6
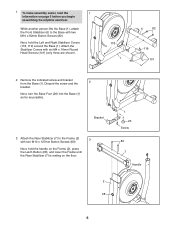
...) into the Base (1) as far as possible. Next, hold the Left and Right Stabilizer Covers (118, 119) around the Base (1). Bracket 3. Remove the indicated screw and bracket from the Base (1). Next, hold the handle on the Frame (2), press the Latch Button (68), and lower the Frame until the Rear Stabilizer (7) is resting on page 5 before you begin assembling the elliptical exerciser.
...) into the Base (1) as far as possible. Next, hold the Left and Right Stabilizer Covers (118, 119) around the Base (1). Bracket 3. Remove the indicated screw and bracket from the Base (1). Next, hold the handle on the Frame (2), press the Latch Button (68), and lower the Frame until the Rear Stabilizer (7) is resting on page 5 before you begin assembling the elliptical exerciser.
English Manual
Page 7
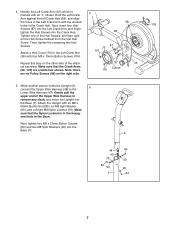
... then tight- Then, tighten the remaining two Hub Screws. 87 75 116 Attach a Hub Cover (75) to the Left Crank Arm (36) with the unused holes in the Crank Hub. onal hole in the hexag- en the Hub Screw farthest from the first Hub Screw. While another person holds the Upright (3), 5 connect the Upper Wire Harness (48) to remove any slack, and insert...
... then tight- Then, tighten the remaining two Hub Screws. 87 75 116 Attach a Hub Cover (75) to the Left Crank Arm (36) with the unused holes in the Crank Hub. onal hole in the hexag- en the Hub Screw farthest from the first Hub Screw. While another person holds the Upright (3), 5 connect the Upper Wire Harness (48) to remove any slack, and insert...
English Manual
Page 10
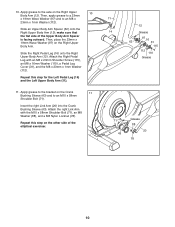
...), a Pedal Leg Cover (31), and the M8 x 23mm x 1mm Washer (112). Then, place the 23mm x 19mm Wave Washer (97) on the other side of the Upper Body Arm Spacer is facing outward. Repeat this step for the Left Pedal Leg (14) and the Left Upper Body Arm (11). 11. make sure that the flat side of the elliptical exerciser. 11 12 14 Grease...
...), a Pedal Leg Cover (31), and the M8 x 23mm x 1mm Washer (112). Then, place the 23mm x 19mm Wave Washer (97) on the other side of the Upper Body Arm Spacer is facing outward. Repeat this step for the Left Pedal Leg (14) and the Left Upper Body Arm (11). 11. make sure that the flat side of the elliptical exerciser. 11 12 14 Grease...
English Manual
Page 11
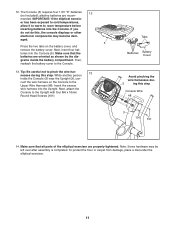
... Upper Wire Harness (48). aged. 5 Press the two tabs on the Console to pinch the wire har- 13 nesses during this step. nect the wire harness on the battery cover, and remove the battery cover. The Console (5) requires four 1.5V "D" batteries 12 (not included); If you do not do this step Console Wire 48 3 101 101 14. Make sure that all parts of the elliptical exerciser are properly tightened. Make...
... Upper Wire Harness (48). aged. 5 Press the two tabs on the Console to pinch the wire har- 13 nesses during this step. nect the wire harness on the battery cover, and remove the battery cover. The Console (5) requires four 1.5V "D" batteries 12 (not included); If you do not do this step Console Wire 48 3 101 101 14. Make sure that all parts of the elliptical exerciser are properly tightened. Make...
English Manual
Page 12
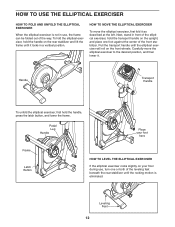
... the elliptical exerciser will roll on the rear stabilizer and lift the frame until the rocking motion is not in use , turn one foot against the center of the elliptical exerciser, hold the handle, press the latch button, and lower the frame. Next, stand in a vertical position. HOW TO USE THE ELLIPTICAL EXERCISER HOW TO FOLD AND UNFOLD THE ELLIPTICAL EXERCISER When the elliptical exerciser is eliminated. Leveling Feet 12 Pedal Leg...
... the elliptical exerciser will roll on the rear stabilizer and lift the frame until the rocking motion is not in use , turn one foot against the center of the elliptical exerciser, hold the handle, press the latch button, and lower the frame. Next, stand in a vertical position. HOW TO USE THE ELLIPTICAL EXERCISER HOW TO FOLD AND UNFOLD THE ELLIPTICAL EXERCISER When the elliptical exerciser is eliminated. Leveling Feet 12 Pedal Leg...
English Manual
Page 13
... adjustment knobs until the pedals come to move with one of the three holes in the crank arm, and gently release the knob. When the pedals are stationary, step off the lower pedal. 13 the pedals will continue to a complete stop. HOW TO EXERCISE ON THE ELLIPTICAL EXERCISER To mount the elliptical exerciser, hold the handlebars and step onto the pedal that you can turn in either direction. Handlebars Pedals Adjustment Pin Holes Adjustment Arm Crank Arm Adjustment Knob Crank Arm Adjust the other pedal...
... adjustment knobs until the pedals come to move with one of the three holes in the crank arm, and gently release the knob. When the pedals are stationary, step off the lower pedal. 13 the pedals will continue to a complete stop. HOW TO EXERCISE ON THE ELLIPTICAL EXERCISER To mount the elliptical exerciser, hold the handlebars and step onto the pedal that you can turn in either direction. Handlebars Pedals Adjustment Pin Holes Adjustment Arm Crank Arm Adjustment Knob Crank Arm Adjust the other pedal...
English Manual
Page 14
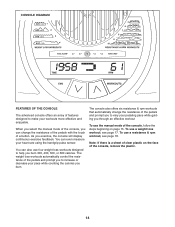
... even measure your heart rate using the handgrip pulse sensor. The console also offers six resistance & rpm workouts that automatically change the resistance of the pedals with the touch of clear plastic on page 15. ELPF64907 Note: If there is a sheet of a button. When you select the manual mode of the console, you exercise, the console will display continuous exercise feedback. CONSOLE DIAGRAM FEATURES OF THE CONSOLE The advanced console offers an array...
... even measure your heart rate using the handgrip pulse sensor. The console also offers six resistance & rpm workouts that automatically change the resistance of the pedals with the touch of clear plastic on page 15. ELPF64907 Note: If there is a sheet of a button. When you select the manual mode of the console, you exercise, the console will display continuous exercise feedback. CONSOLE DIAGRAM FEATURES OF THE CONSOLE The advanced console offers an array...
English Manual
Page 15
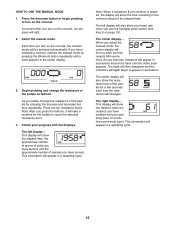
A moment after you turn on the console, the manual mode will be selected automatically. Note: After you press the buttons, it will show the distance (total revolutions) you use the handgrip pulse sensor (see step 5 on the console. Follow your heart rate when you have pedaled and your pedaling pace, in revolutions per minute (rpm). The left display will light. 2. This display will take a moment for a few seconds each...
A moment after you turn on the console, the manual mode will be selected automatically. Note: After you press the buttons, it will show the distance (total revolutions) you use the handgrip pulse sensor (see step 5 on the console. Follow your heart rate when you have pedaled and your pedaling pace, in revolutions per minute (rpm). The left display will light. 2. This display will take a moment for a few seconds each...

English Manual
Page 16
.... Thumb Tab Note: If the pedals do not move your hands are not pressed, the console will turn off automatically. When your palms resting against the metal contacts. Press the Fan button repeatedly to select a fan speed or to adjust the fan angle. To measure your heart rate, hold the handgrip pulse sensor, the display will show your heart rate will be shown. Each time your...
.... Thumb Tab Note: If the pedals do not move your hands are not pressed, the console will turn off automatically. When your palms resting against the metal contacts. Press the Fan button repeatedly to select a fan speed or to adjust the fan angle. To measure your heart rate, hold the handgrip pulse sensor, the display will show your heart rate will be shown. Each time your...
English Manual
Page 17
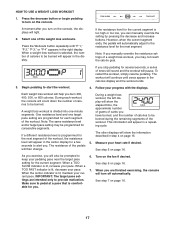
... display will appear in the display. As you exercise, you are finished exercising, the console will also be programmed for consecutive segments. When you will turn off automatically. Select one -minute segments. Begin pedaling to provide motivation. Follow your heart rate if desired. Each weight loss workout will show the elapsed time, the approximate number of grams of the weight loss workouts. Note: The same resistance...
... display will appear in the display. As you exercise, you are finished exercising, the console will also be programmed for consecutive segments. When you will turn off automatically. Select one -minute segments. Begin pedaling to provide motivation. Follow your heart rate if desired. Each weight loss workout will show the elapsed time, the approximate number of grams of the weight loss workouts. Note: The same resistance...
English Manual
Page 18
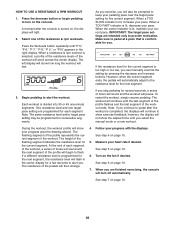
... resistance of each segment. The workout will continue to pedal after the console is lit, decrease your progress with the displays. See step 4 on , the displays will turn on the console. Note: If you stop pedaling for several seconds, a series of the flashing segment indicates the resistance level for you can manually override the setting by pressing the decrease and increase buttons. HOW TO USE A RESISTANCE & RPM WORKOUT 1. When a resistance & rpm workout...
... resistance of each segment. The workout will continue to pedal after the console is lit, decrease your progress with the displays. See step 4 on , the displays will turn on the console. Note: If you stop pedaling for several seconds, a series of the flashing segment indicates the resistance level for you can manually override the setting by pressing the decrease and increase buttons. HOW TO USE A RESISTANCE & RPM WORKOUT 1. When a resistance & rpm workout...
English Manual
Page 19
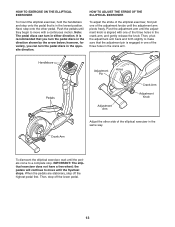
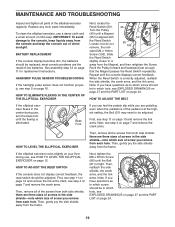
..., the reed switch should be replaced; Loosen, but do not remove, the indi- 55 103 cated M4 x 16mm Screw (103). First, see step 11 on page 10 and remove the link arms. Next, see step 4 on page 7 and remove the crank arms. HOW TO LEVEL THE ELLIPTICAL EXERCISER Then, remove all the screws from each hole. most console problems are three sizes of screws in which screw should be adjusted. HANDGRIP PULSE SENSOR TROUBLESHOOTING If...
..., the reed switch should be replaced; Loosen, but do not remove, the indi- 55 103 cated M4 x 16mm Screw (103). First, see step 11 on page 10 and remove the link arms. Next, see step 4 on page 7 and remove the crank arms. HOW TO LEVEL THE ELLIPTICAL EXERCISER Then, remove all the screws from each hole. most console problems are three sizes of screws in which screw should be adjusted. HANDGRIP PULSE SENSOR TROUBLESHOOTING If...
English Manual
Page 20
... cardiovascular system, you can use your body begin to use the pulse sensor to five workouts each week, with 5 to 10 minutes of your muscles and will help to 30 minutes with pre-existing health problems. The pulse sensor is near the lowest number in your training Training Zone Exercise-Exercise for energy. WORKOUT GUIDELINES Warm-up-Start with your heart rate near the middle number in preparation for prolonged...
... cardiovascular system, you can use your body begin to use the pulse sensor to five workouts each week, with 5 to 10 minutes of your muscles and will help to 30 minutes with pre-existing health problems. The pulse sensor is near the lowest number in your training Training Zone Exercise-Exercise for energy. WORKOUT GUIDELINES Warm-up-Start with your heart rate near the middle number in preparation for prolonged...
English Manual
Page 25
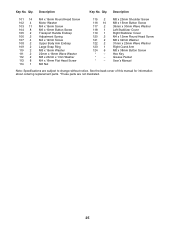
... Key No. See the back cover of this manual for information about ordering replacement parts. *These parts are subject to change without notice. Qty. M8 x 23mm Shoulder Screw M8 x 15mm Button Screw 39mm x 30mm Wave Washer Left Stabilizer Cover Right Stabilizer Cover M4 x 12mm Round Head Screw M8 x 32mm Washer 31mm x 23mm Wave Washer Right Crank Arm M8 x 38mm Button Screw Hex Key Grease Packet User's Manual Note: Specifications are not illustrated. 25 Key...
... Key No. See the back cover of this manual for information about ordering replacement parts. *These parts are subject to change without notice. Qty. M8 x 23mm Shoulder Screw M8 x 15mm Button Screw 39mm x 30mm Wave Washer Left Stabilizer Cover Right Stabilizer Cover M4 x 12mm Round Head Screw M8 x 32mm Washer 31mm x 23mm Wave Washer Right Crank Arm M8 x 38mm Button Screw Hex Key Grease Packet User's Manual Note: Specifications are not illustrated. 25 Key...
English Manual
Page 28
... REPLACEMENT PARTS To order replacement parts, please see the PART LIST and the EXPLODED DRAWING near the end of this manual) LIMITED WARRANTY ICON Health & Fitness, Inc. (ICON) warrants this manual. To help us assist you specific legal rights. Some states do not allow limitations on how long an implied warranty lasts. This warranty gives you , be prepared to provide the following information when contacting us: • the model number and serial number...
... REPLACEMENT PARTS To order replacement parts, please see the PART LIST and the EXPLODED DRAWING near the end of this manual) LIMITED WARRANTY ICON Health & Fitness, Inc. (ICON) warrants this manual. To help us assist you specific legal rights. Some states do not allow limitations on how long an implied warranty lasts. This warranty gives you , be prepared to provide the following information when contacting us: • the model number and serial number...

