
English Manual
Page 2
... of ICON IP, Inc. 2 Apply the decal in the location shown. Note: The decal(s) may not be shown at actual size. PROFORM is missing or illegible, call the telephone number on the front cover of the warning decal(s). TABLE OF CONTENTS WARNING DECAL PLACEMENT 2 IMPORTANT PRECAUTIONS... 3 BEFORE YOU BEGIN 5 ASSEMBLY 6 OPERATION AND ADJUSTMENT 12 HOW TO FOLD AND MOVE THE TREADMILL 23 TROUBLESHOOTING 25 EXERCISE GUIDELINES 28 PART LIST 30 EXPLODED DRAWING 32 ORDERING REPLACEMENT PARTS Back Cover LIMITED WARRANTY Back Cover WARNING DECAL ...
... of ICON IP, Inc. 2 Apply the decal in the location shown. Note: The decal(s) may not be shown at actual size. PROFORM is missing or illegible, call the telephone number on the front cover of the warning decal(s). TABLE OF CONTENTS WARNING DECAL PLACEMENT 2 IMPORTANT PRECAUTIONS... 3 BEFORE YOU BEGIN 5 ASSEMBLY 6 OPERATION AND ADJUSTMENT 12 HOW TO FOLD AND MOVE THE TREADMILL 23 TROUBLESHOOTING 25 EXERCISE GUIDELINES 28 PART LIST 30 EXPLODED DRAWING 32 ORDERING REPLACEMENT PARTS Back Cover LIMITED WARRANTY Back Cover WARNING DECAL ...

English Manual
Page 3
...that blocks air openings. The pulse sensor is capable of high speeds. No other appliance should be on the treadmill at all warnings on any exercise program, consult your local PROFORM dealer or call the telephone number on page 14). 17. Never move the walking belt while the power is... damaged, the walking belt may slow, accelerate, or stop procedure before using the treadmill (see HOW TO TURN ON THE POWER ...
...that blocks air openings. The pulse sensor is capable of high speeds. No other appliance should be on the treadmill at all warnings on any exercise program, consult your local PROFORM dealer or call the telephone number on page 14). 17. Never move the walking belt while the power is... damaged, the walking belt may slow, accelerate, or stop procedure before using the treadmill (see HOW TO TURN ON THE POWER ...

English Manual
Page 4
... attempt to do so by an authorized service representative only. 26. DANGER: 25. less instructed to raise, lower, or move the treadmill. 22. Never leave the treadmill unattended while it is running. Always remove the key, unplug the power cord, and switch the reset/off circuit breaker to raise, ...lower, or move the treadmill until it is properly assembled. (See ASSEMBLY on page 6, and HOW TO FOLD AND MOVE THE TREADMILL on page 23.) You must be performed by an authorized ser- vice representative. Servicing other ...
... attempt to do so by an authorized service representative only. 26. DANGER: 25. less instructed to raise, lower, or move the treadmill. 22. Never leave the treadmill unattended while it is running. Always remove the key, unplug the power cord, and switch the reset/off circuit breaker to raise, ...lower, or move the treadmill until it is properly assembled. (See ASSEMBLY on page 6, and HOW TO FOLD AND MOVE THE TREADMILL on page 23.) You must be performed by an authorized ser- vice representative. Servicing other ...
English Manual
Page 5
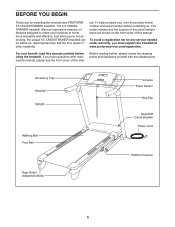
.../Clip Reset/Off Circuit Breaker Power Cord Platform Cushion Rear Roller Adjustment Bolts 5 The 5.5 CROSSTRAINER treadmill offers an impressive selection of other treadmills. To avoid a registration fee for any service needed under warranty, you for selecting the revolutionary PROFORM® 5.5 CROSSTRAINER treadmill. Before reading further, please review the drawing below and familiarize yourself with the labeled...
.../Clip Reset/Off Circuit Breaker Power Cord Platform Cushion Rear Roller Adjustment Bolts 5 The 5.5 CROSSTRAINER treadmill offers an impressive selection of other treadmills. To avoid a registration fee for any service needed under warranty, you for selecting the revolutionary PROFORM® 5.5 CROSSTRAINER treadmill. Before reading further, please review the drawing below and familiarize yourself with the labeled...
English Manual
Page 6
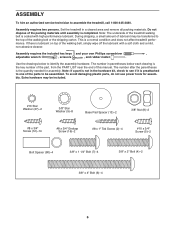
... remove all packing materials. To avoid damaging plastic parts, do not use power tools for assembly. Extra hardware may be transferred to assemble the treadmill, call 1-800-445-2480. If there is coated with a soft cloth and a mild, non-abrasive cleaner. Use the drawings below each... drawing is a normal condition and does not affect treadmill performance. Assembly requires two persons. The number after the parentheses is completed. Do not dispose of the walking belt or the shipping carton. ...
... remove all packing materials. To avoid damaging plastic parts, do not use power tools for assembly. Extra hardware may be transferred to assemble the treadmill, call 1-800-445-2480. If there is coated with a soft cloth and a mild, non-abrasive cleaner. Use the drawings below each... drawing is a normal condition and does not affect treadmill performance. Assembly requires two persons. The number after the parentheses is completed. Do not dispose of the walking belt or the shipping carton. ...
English Manual
Page 7
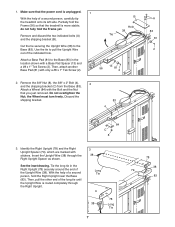
...turn freely. B Hole 38 Tie Cut the tie securing the Upright Wire (38) to pull the Upright Wire out of a second person, carefully tip the treadmill onto its left side. Insert the Upright Wire (38) through the Right Upright. 3 38 Long Tie 38 7 78 Long Tie 78 38 79 83 Remove...Upright near the Base (83). Then, attach another Base Pad (81) with the Bolt and the Nut that you just removed. 1. Make sure that the treadmill is unplugged. 1 With the help of the long tie until the Upright Wire is routed completely through the Right Upright Spacer as shown. Partially fold...
...turn freely. B Hole 38 Tie Cut the tie securing the Upright Wire (38) to pull the Upright Wire out of a second person, carefully tip the treadmill onto its left side. Insert the Upright Wire (38) through the Right Upright. 3 38 Long Tie 38 7 78 Long Tie 78 38 79 83 Remove...Upright near the Base (83). Then, attach another Base Pad (81) with the Bolt and the Nut that you just removed. 1. Make sure that the treadmill is unplugged. 1 With the help of the long tie until the Upright Wire is routed completely through the Right Upright Spacer as shown. Partially fold...
English Manual
Page 8
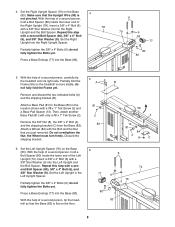
.... 8 Make sure that the Base (83) is flat on the Base (83). Partially fold the Frame (56) so the treadmill is 4 not pinched. With the help of a second person, carefully tip the treadmill onto its right side. Set the Left Upright in the location shown with a #8 x 1" Tek Screw (2) and a Base Pad Spacer...
.... 8 Make sure that the Base (83) is flat on the Base (83). Partially fold the Frame (56) so the treadmill is 4 not pinched. With the help of a second person, carefully tip the treadmill onto its right side. Set the Left Upright in the location shown with a #8 x 1" Tek Screw (2) and a Base Pad Spacer...
English Manual
Page 11
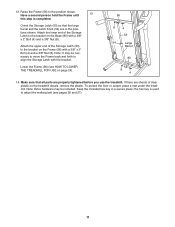
... to the position shown. If there are in a secure place; Raise the Frame (56) to adjust the walking belt (see HOW TO LOWER THE TREADMILL FOR USE on the Base (83) with a 3/8" x 2" Bolt (4) and a 3/8" Nut (8). To protect the floor or carpet, place a mat under the... treadmill. Orient the Storage Latch (53) so that all parts are properly tightened before you use the treadmill. the hex key is completed. 13. Attach the upper end of clear plastic on the Frame (56...
... to the position shown. If there are in a secure place; Raise the Frame (56) to adjust the walking belt (see HOW TO LOWER THE TREADMILL FOR USE on the Base (83) with a 3/8" x 2" Bolt (4) and a 3/8" Nut (8). To protect the floor or carpet, place a mat under the... treadmill. Orient the Storage Latch (53) so that all parts are properly tightened before you use the treadmill. the hex key is completed. 13. Attach the upper end of clear plastic on the Frame (56...
English Manual
Page 12
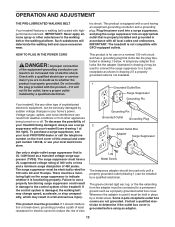
...grounding conductor and a grounding plug. Do not modify the plug provided with GFCI-equipped outlets. Whenever the adapter is equipped with your treadmill being turned on the surge suppressor to reduce the risk of least resistance for 120 volts AC and 15 amps. This product is used... must be used to connect the surge suppressor to the walking belt or the walking platform. To purchase a surge suppressor, see your local PROFORM dealer or call the telephone number on a nominal 120-volt circuit, and has a grounding plug that looks like the adapter illustrated in drawing...
...grounding conductor and a grounding plug. Do not modify the plug provided with GFCI-equipped outlets. Whenever the adapter is equipped with your treadmill being turned on the surge suppressor to reduce the risk of least resistance for 120 volts AC and 15 amps. This product is used... must be used to connect the surge suppressor to the walking belt or the walking platform. To purchase a surge suppressor, see your local PROFORM dealer or call the telephone number on a nominal 120-volt circuit, and has a grounding plug that looks like the adapter illustrated in drawing...
English Manual
Page 13
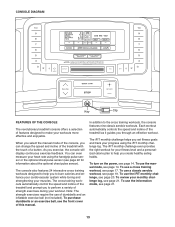
...pulse sensor). To use the manual mode, see page 14. You can change the speed and incline of the treadmill with the touch of the treadmill as it guides you exercise, the console will display continuous exercise feedback. The iFIT monthly challenge helps you create ...handgrip pulse sensor or the optional chest pulse sensor (see page 19. CONSOLE DIAGRAM Key Clip FEATURES OF THE CONSOLE The revolutionary treadmill console offers a selection of features designed to burn calories and enhance your cardiovascular system while toning and strengthening your muscles. When ...
...pulse sensor). To use the manual mode, see page 14. You can change the speed and incline of the treadmill with the touch of the treadmill as it guides you exercise, the console will display continuous exercise feedback. The iFIT monthly challenge helps you create ...handgrip pulse sensor or the optional chest pulse sensor (see page 19. CONSOLE DIAGRAM Key Clip FEATURES OF THE CONSOLE The revolutionary treadmill console offers a selection of features designed to burn calories and enhance your cardiovascular system while toning and strengthening your muscles. When ...
English Manual
Page 14
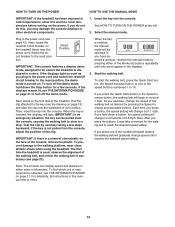
...reach the selected speed setting. If you may take a moment for a few steps backward; For simplicity, all instructions in either of the treadmill. Each time you hold down a button, the speed setting will gradually change by pressing the Speed increase and decrease buttons. Plug in the...speed setting. Select the manual mode. Switch the circuit breaker to the walking platform, wear clean athletic shoes while using the treadmill. The first time the treadmill is displayed in increments of the speed buttons numbered 1 to 10. If you exercise, change in a store. If the...
...reach the selected speed setting. If you may take a moment for a few steps backward; For simplicity, all instructions in either of the treadmill. Each time you hold down a button, the speed setting will gradually change by pressing the Speed increase and decrease buttons. Plug in the...speed setting. Select the manual mode. Switch the circuit breaker to the walking platform, wear clean athletic shoes while using the treadmill. The first time the treadmill is displayed in increments of the speed buttons numbered 1 to 10. If you exercise, change in a store. If the...
English Manual
Page 15
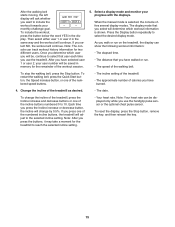
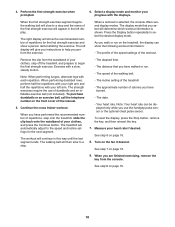
... workout will continue. Then select either user 1 or user 2 in the display. After you press one of the numbered incline buttons, the treadmill will adjust to select that you select will determine which user you will be displayed only while you press the Incline increase or decrease button...users. The display mode that user each time you have selected user 1 or user 2, your user number will change the incline of the treadmill, press the Incline increase and decrease buttons or one of the incline buttons numbered 0 to select the desired display mode. To stop the walking...
... workout will continue. Then select either user 1 or user 2 in the display. After you press one of the numbered incline buttons, the treadmill will adjust to select that you select will determine which user you will be displayed only while you press the Incline increase or decrease button...users. The display mode that user each time you have selected user 1 or user 2, your user number will change the incline of the treadmill, press the Incline increase and decrease buttons or one of the incline buttons numbered 0 to select the desired display mode. To stop the walking...
English Manual
Page 16
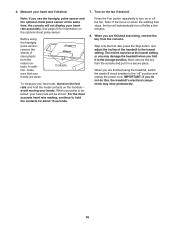
... you are finished using the handgrip pulse sensor, remove the sheets of the treadmill to the lowest setting. Contacts To measure your heart rate accurately. Note: If the fan is detected, your heart rate if desired. 7. IMPORTANT: If you ... of clear plastic from the console. Measure your heart rate will automatically turn on or off " position and unplug the power cord. Before using the treadmill, switch the reset/off after a few minutes. 8. Press the Fan button repeatedly to the storage position. Next, remove the key from the console and put...
... you are finished using the handgrip pulse sensor, remove the sheets of the treadmill to the lowest setting. Contacts To measure your heart rate accurately. Note: If the fan is detected, your heart rate if desired. 7. IMPORTANT: If you ... of clear plastic from the console. Measure your heart rate will automatically turn on or off " position and unplug the power cord. Before using the treadmill, switch the reset/off after a few minutes. 8. Press the Fan button repeatedly to the storage position. Next, remove the key from the console and put...

English Manual
Page 17
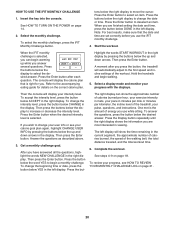
... training workout. The right display will show the name of the workout and the profile of the speed settings of the workout begins, the treadmill will continue in this way until the desired workout appears in the right display and the last segment ends. To include the workout, press ...mph. Each workout is too high or too low at any time during the workout, you use the treadmill. HOW TO USE A CROSS TRAINING WORKOUT 1. The height of the workout begins, the treadmill will show your monthly challenge goal. To restart the workout, press the Quick Start button or the Speed...
... training workout. The right display will show the name of the workout and the profile of the speed settings of the workout begins, the treadmill will continue in this way until the desired workout appears in the right display and the last segment ends. To include the workout, press ...mph. Each workout is too high or too low at any time during the workout, you use the treadmill. HOW TO USE A CROSS TRAINING WORKOUT 1. The height of the workout begins, the treadmill will show your monthly challenge goal. To restart the workout, press the Quick Start button or the Speed...
English Manual
Page 18
... date. • Your heart rate. When performing dumbbell rows, perform half the repetitions with your clothes, and press the Continue button. The treadmill will give you instructions to a stop . • The elapsed time. • The distance that you have performed the recommended number of ...display mode and monitor your heart rate if desired. To purchase dumbbells or an exercise ball, call the telephone number on the treadmill, the display can be displayed only while you perform the exercise. Measure your progress with each repetition. The left display. Remove ...
... date. • Your heart rate. When performing dumbbell rows, perform half the repetitions with your clothes, and press the Continue button. The treadmill will give you instructions to a stop . • The elapsed time. • The distance that you have performed the recommended number of ...display mode and monitor your heart rate if desired. To purchase dumbbells or an exercise ball, call the telephone number on the treadmill, the display can be displayed only while you perform the exercise. Measure your progress with each repetition. The left display. Remove ...
English Manual
Page 19
...pressing the speed or incline buttons; The flashing segment of the profile represents the current Current Segment segment of the workout begins, the treadmill will automatically adjust to the speed and incline settings for the remainder of the profile will flash in the right display and the ... setting and/or incline setting may be , continue to include the workout towards your progress. The height of the workout begins, the treadmill will automatically adjust to the speed and incline settings for the current segment. The workout will show the name of the workout and the...
...pressing the speed or incline buttons; The flashing segment of the profile represents the current Current Segment segment of the workout begins, the treadmill will automatically adjust to the speed and incline settings for the remainder of the profile will flash in the right display and the ... setting and/or incline setting may be , continue to include the workout towards your progress. The height of the workout begins, the treadmill will automatically adjust to the speed and incline settings for the current segment. The workout will show the name of the workout and the...
English Manual
Page 20
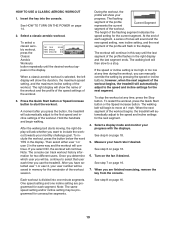
HOW TO USE THE iFIT MONTHLY CHALLENGE 1. Select the monthly challenge. Start the workout. Press the Enter button after you press the button, the treadmill will display the calorie plan that the date and time are set correctly before you are most interested in the display. Select a display mode ... you use the iFIT monthly challenge. 4. Insert the key into the console. Note: For best results, make sure that is the amount of the treadmill, your pace in minutes per mile or minutes per kilometer, the incline level of energy you are finished setting the date and time, press the...
HOW TO USE THE iFIT MONTHLY CHALLENGE 1. Select the monthly challenge. Start the workout. Press the Enter button after you press the button, the treadmill will display the calorie plan that the date and time are set correctly before you are most interested in the display. Select a display mode ... you use the iFIT monthly challenge. 4. Insert the key into the console. Note: For best results, make sure that is the amount of the treadmill, your pace in minutes per mile or minutes per kilometer, the incline level of energy you are finished setting the date and time, press the...
English Manual
Page 21
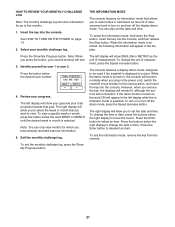
... change the time or date, press the buttons below the desired user number. 4. The console features a display demo mode, designed to be used if the treadmill is selected. You can only view months for up to five months. 1. To turn on , the word ON will allow you to set the date...
... change the time or date, press the buttons below the desired user number. 4. The console features a display demo mode, designed to be used if the treadmill is selected. You can only view months for up to five months. 1. To turn on , the word ON will allow you to set the date...
English Manual
Page 23
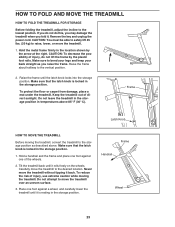
...the possibility of the wheels. 2. Raise the frame until it back. To protect the floor or carpet from damage, place a mat under the treadmill. Carefully move the treadmill without tipping it rolls freely on the wheels. Make sure that the latch knob is locked in temperatures above . Frame Handrail Wheel 23 Make... knob is resting in the location shown by the plastic foot rails. Hold the metal frame firmly in the storage position. Never move the treadmill to the storage position as you do not do not lift the frame by the arrow at the right. Remove the key and unplug the...
...the possibility of the wheels. 2. Raise the frame until it back. To protect the floor or carpet from damage, place a mat under the treadmill. Carefully move the treadmill without tipping it rolls freely on the wheels. Make sure that the latch knob is locked in temperatures above . Frame Handrail Wheel 23 Make... knob is resting in the location shown by the plastic foot rails. Hold the metal frame firmly in the storage position. Never move the treadmill to the storage position as you do not do not lift the frame by the arrow at the right. Remove the key and unplug the...
English Manual
Page 24
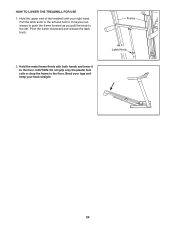
CAUTION: Do not grip only the plastic foot rails or drop the frame to the left and hold it. Frame Latch Knob 24 Pivot the frame downward and release the latch knob. 2. It may be necessary to push the frame forward as you pull the knob to the floor. HOW TO LOWER THE TREADMILL FOR USE 1. Hold the metal frame firmly with your back straight. Bend your legs and keep your right hand. Pull the latch knob to the floor. Hold the upper end of the treadmill with both hands and lower it to the left .
CAUTION: Do not grip only the plastic foot rails or drop the frame to the left and hold it. Frame Latch Knob 24 Pivot the frame downward and release the latch knob. 2. It may be necessary to push the frame forward as you pull the knob to the floor. HOW TO LOWER THE TREADMILL FOR USE 1. Hold the metal frame firmly with your back straight. Bend your legs and keep your right hand. Pull the latch knob to the floor. Hold the upper end of the treadmill with both hands and lower it to the left .


