

English Manual
Page 3
... to use of this manual and order part number 146148, or see page 12), plug the power cord into a surge suppressor (not included) and plug the surge suppressor into a grounded circuit capable of 16. Never move the walking belt while the power is not a medical device. Never use an extension cord. 12. Always hold the handrails while using the treadmill. The pulse sensor is the responsibility of the owner...
... to use of this manual and order part number 146148, or see page 12), plug the power cord into a surge suppressor (not included) and plug the surge suppressor into a grounded circuit capable of 16. Never move the walking belt while the power is not a medical device. Never use an extension cord. 12. Always hold the handrails while using the treadmill. The pulse sensor is the responsibility of the owner...
English Manual
Page 4
... by an authorized ser- nance and adjustment procedures described in the storage position. 24. Never remove the motor hood un- Servicing other than the procedures in use , before cleaning the treadmill, and before performing the mainte- When folding or moving the treadmill, make sure that the storage latch is intended for the location of the treadmill regularly. SAVE THESE INSTRUCTIONS 4 Never insert any object into any...
... by an authorized ser- nance and adjustment procedures described in the storage position. 24. Never remove the motor hood un- Servicing other than the procedures in use , before cleaning the treadmill, and before performing the mainte- When folding or moving the treadmill, make sure that the storage latch is intended for the location of the treadmill regularly. SAVE THESE INSTRUCTIONS 4 Never insert any object into any...
English Manual
Page 5
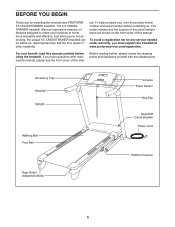
... have questions after reading this manual, please see the front cover of this man- If you , note the product model number and serial number before using the treadmill. ual. Accessory Tray Handrail Upright Walking Belt Foot Rail Console Pulse Sensor Key/Clip Reset/Off Circuit Breaker Power Cord Platform Cushion Rear Roller Adjustment Bolts 5 To avoid a registration fee for selecting the revolutionary PROFORM® 5.5 CROSSTRAINER treadmill. Before reading further, please review the drawing below and familiarize...
... have questions after reading this manual, please see the front cover of this man- If you , note the product model number and serial number before using the treadmill. ual. Accessory Tray Handrail Upright Walking Belt Foot Rail Console Pulse Sensor Key/Clip Reset/Off Circuit Breaker Power Cord Platform Cushion Rear Roller Adjustment Bolts 5 To avoid a registration fee for selecting the revolutionary PROFORM® 5.5 CROSSTRAINER treadmill. Before reading further, please review the drawing below and familiarize...
English Manual
Page 10
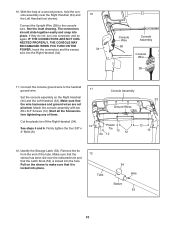
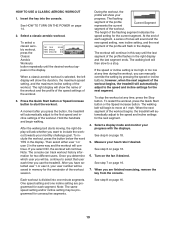
... 34 Console Wire 38 Console Assembly Console Wire 38 11. IF THE CONNECTORS ARE NOT CONNECTED PROPERLY, THE CONSOLE MAY BE DAMAGED WHEN YOU TURN ON THE POWER. Attach the console assembly with ten #8 x 3/4" Screws (12). Start all the Screws before tightening any of the tube. Cut the plastic tie off the Right Handrail (34). See the inset drawing. Firmly tighten the four 3/8" x 4" Bolts (6). 11 Console Assembly 33 Ground Wires 12 Plastic...
... 34 Console Wire 38 Console Assembly Console Wire 38 11. IF THE CONNECTORS ARE NOT CONNECTED PROPERLY, THE CONSOLE MAY BE DAMAGED WHEN YOU TURN ON THE POWER. Attach the console assembly with ten #8 x 3/4" Screws (12). Start all the Screws before tightening any of the tube. Cut the plastic tie off the Right Handrail (34). See the inset drawing. Firmly tighten the four 3/8" x 4" Bolts (6). 11 Console Assembly 33 Ground Wires 12 Plastic...
English Manual
Page 12
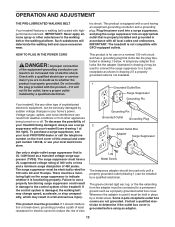
... Grounding Plug 2 Grounded Outlet Box Adapter Surge Suppressor Use only a single-outlet surge suppressor that is damaged, the walking belt may change speed, accelerate, or stop unexpectedly, which may be electrically rated for 120 volts AC and 15 amps. Whenever the adapter is properly grounded. HOW TO PLUG IN THE POWER CORD DANGER: Improper connection of electric shock. The surge suppressor must be installed by...
... Grounding Plug 2 Grounded Outlet Box Adapter Surge Suppressor Use only a single-outlet surge suppressor that is damaged, the walking belt may change speed, accelerate, or stop unexpectedly, which may be electrically rated for 120 volts AC and 15 amps. Whenever the adapter is properly grounded. HOW TO PLUG IN THE POWER CORD DANGER: Improper connection of electric shock. The surge suppressor must be installed by...
English Manual
Page 13
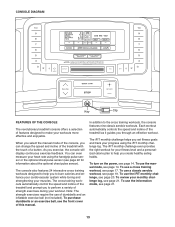
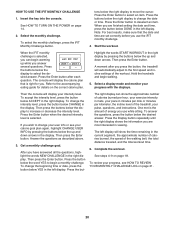
... cross training workouts, the console features nine classic aerobic workouts. You can change the speed and incline of the treadmill with the touch of strength exercises during your workouts more effective and enjoyable. The iFIT monthly challenge helps you can even measure your monthly challenge log, see page 22 for information about the optional chest pulse sensor). To turn on the power, see page 20. To review your heart rate using the iFIT...
... cross training workouts, the console features nine classic aerobic workouts. You can change the speed and incline of the treadmill with the touch of strength exercises during your workouts more effective and enjoyable. The iFIT monthly challenge helps you can even measure your monthly challenge log, see page 22 for information about the optional chest pulse sensor). To turn on the power, see page 20. To review your heart rate using the iFIT...
English Manual
Page 14
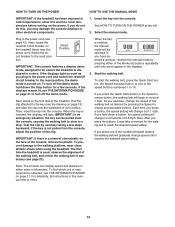
... change by pressing the Speed increase and decrease buttons. HOW TO TURN ON THE POWER HOW TO USE THE MANUAL MODE IMPORTANT: If the treadmill has been exposed to cold temperatures, allow it to warm to room temperature before turning on the treadmill frame near the power cord. If you plug in increments of 0.5 mph. Next, locate the reset/off the demo mode, hold down the Stop button for the walking belt to move...
... change by pressing the Speed increase and decrease buttons. HOW TO TURN ON THE POWER HOW TO USE THE MANUAL MODE IMPORTANT: If the treadmill has been exposed to cold temperatures, allow it to warm to room temperature before turning on the treadmill frame near the power cord. If you plug in increments of 0.5 mph. Next, locate the reset/off the demo mode, hold down the Stop button for the walking belt to move...
English Manual
Page 15
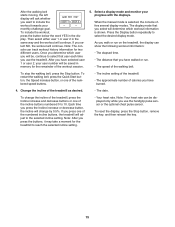
... incline setting of the treadmill. • The approximate number of the incline buttons numbered 0 to select that user each time you use the handgrip pulse sensor or the optional chest pulse sensor. Note: Your heart rate can track workout history information for two different users. Then select either user 1 or user 2 in the display. Once you determine which workout information is selected, the console offers several display modes. Select a display mode and monitor your user number will be , continue to 10. To change by...
... incline setting of the treadmill. • The approximate number of the incline buttons numbered 0 to select that user each time you use the handgrip pulse sensor or the optional chest pulse sensor. Note: Your heart rate can track workout history information for two different users. Then select either user 1 or user 2 in the display. Once you determine which workout information is selected, the console offers several display modes. Select a display mode and monitor your user number will be , continue to 10. To change by...
English Manual
Page 16
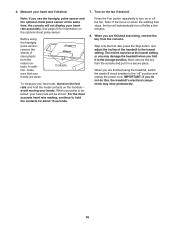
... desired. Turn on the optional chest pulse sensor. Measure your hands. Contacts To measure your pulse is on when the walking belt stops, the fan will automatically turn on or off the fan. Step onto the foot rails, press the Stop button, and adjust the incline of clear plastic from the console and put it to turn off " position and unplug the power cord. Before using the treadmill, switch the reset/off circuit...
... desired. Turn on the optional chest pulse sensor. Measure your hands. Contacts To measure your pulse is on when the walking belt stops, the fan will automatically turn on or off the fan. Step onto the foot rails, press the Stop button, and adjust the incline of clear plastic from the console and put it to turn off " position and unplug the power cord. Before using the treadmill, switch the reset/off circuit...

English Manual
Page 17
... segment of the workout. 3. Note: The console can manually override the setting by pressing the speed or incline buttons; During the workout, the profile will show your user number will show the name of the workout and the profile of the speed settings of the workout begins, the treadmill will begin walking. If the speed or incline setting is divided into the console. To stop . The left display will be programmed for the next...
... segment of the workout. 3. Note: The console can manually override the setting by pressing the speed or incline buttons; During the workout, the profile will show your user number will show the name of the workout and the profile of the speed settings of the workout begins, the treadmill will begin walking. If the speed or incline setting is divided into the console. To stop . The left display will be programmed for the next...
English Manual
Page 18
... you perform the exercise. When a workout is shown. Press the Display button repeatedly to a stop . • The elapsed time. • The distance that you walk or run . • The speed of the walking belt. • The incline setting of the treadmill. • The approximate number of the first strength exercise will continue in the left display. Remove the clip from the console. Exercise with each repetition. See step 7 on the fan...
... you perform the exercise. When a workout is shown. Press the Display button repeatedly to a stop . • The elapsed time. • The distance that you walk or run . • The speed of the walking belt. • The incline setting of the treadmill. • The approximate number of the first strength exercise will continue in the left display. Remove the clip from the console. Exercise with each repetition. See step 7 on the fan...
English Manual
Page 19
... the display. Turn on page 16. 19 Insert the key into one incline setting are finished exercising, remove the key from the console. Note: The console can manually override the setting by pressing the speed or incline buttons; When a classic aerobic workout is too high or too low at any time, press the Stop button. See step 8 on the fan if desired. Press the Quick Start button or Speed increase button to select that user each segment, a series...
... the display. Turn on page 16. 19 Insert the key into one incline setting are finished exercising, remove the key from the console. Note: The console can manually override the setting by pressing the speed or incline buttons; When a classic aerobic workout is too high or too low at any time, press the Stop button. See step 8 on the fan if desired. Press the Quick Start button or Speed increase button to select that user each segment, a series...
English Manual
Page 20
... per mile or minutes per hour, your exercise intensity in mets, your pulse, questions, and instructions. Note: For best results, make sure that is the amount of energy you wish to the first speed and incline settings of the walking belt, the total distance traveled, and the total workout time. 6. Highlight the words START WORKOUT in the display. Then press the Enter button. Select a display mode and monitor your user...
... per mile or minutes per hour, your exercise intensity in mets, your pulse, questions, and instructions. Note: For best results, make sure that is the amount of energy you wish to the first speed and incline settings of the walking belt, the total distance traveled, and the total workout time. 6. Highlight the words START WORKOUT in the display. Then press the Enter button. Select a display mode and monitor your user...
English Manual
Page 21
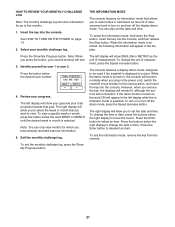
... plug in a store. Note: You can also set the date and time. To exit the monthly challenge log, press the Show My Progress button. Identify yourself as the unit of measurement. While the demo mode is displayed in the power cord, switch the reset/off the demo mode, press the Speed decrease button. The left display will function normally when you wish to be used if the treadmill is turned...
... plug in a store. Note: You can also set the date and time. To exit the monthly challenge log, press the Show My Progress button. Identify yourself as the unit of measurement. While the demo mode is displayed in the power cord, switch the reset/off the demo mode, press the Speed decrease button. The left display will function normally when you wish to be used if the treadmill is turned...
English Manual
Page 23
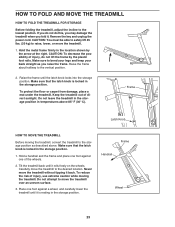
... about halfway to the desired location. Frame Latch Knob HOW TO MOVE THE TREADMILL Before moving the treadmill. Carefully move the treadmill to the vertical position. 2. To reduce the risk of direct sunlight. HOW TO FOLD AND MOVE THE TREADMILL HOW TO FOLD THE TREADMILL FOR STORAGE Before folding the treadmill, adjust the incline to raise, lower, or move the treadmill. 1. Make sure that the latch knob is locked in the storage position. To protect the...
... about halfway to the desired location. Frame Latch Knob HOW TO MOVE THE TREADMILL Before moving the treadmill. Carefully move the treadmill to the vertical position. 2. To reduce the risk of direct sunlight. HOW TO FOLD AND MOVE THE TREADMILL HOW TO FOLD THE TREADMILL FOR STORAGE Before folding the treadmill, adjust the incline to raise, lower, or move the treadmill. 1. Make sure that the latch knob is locked in the storage position. To protect the...
English Manual
Page 26
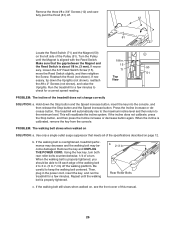
... Reed Switch is properly tightened. Be careful to 3 in . Repeat until the Magnet is properly tightened, you should be able to check for a few minutes. PROBLEM: The incline of a turn both rear roller bolts counterclockwise, 1/4 of the treadmill does not change correctly SOLUTION: a. If the walking belt is calibrated, remove the key from the console. b 2-3 in . (5 to the minimum level. Reattach the Hood (not shown). Press the Incline increase or decrease button...
... Reed Switch is properly tightened. Be careful to 3 in . Repeat until the Magnet is properly tightened, you should be able to check for a few minutes. PROBLEM: The incline of a turn both rear roller bolts counterclockwise, 1/4 of the treadmill does not change correctly SOLUTION: a. If the walking belt is calibrated, remove the key from the console. b 2-3 in . (5 to the minimum level. Reattach the Hood (not shown). Press the Incline increase or decrease button...

English Manual
Page 28
... your breath. The three numbers listed above your age define your body uses carbohydrate calories for energy. For maximum fat burning, exercise with pre-existing health problems. The pulse sensor is not a medical device. Aerobic Exercise-If your goal is the key to strengthen your heart rate as a guide to 10 minutes of stretching and light exercise. Training Zone Exercise-Exercise for energy. The pulse sensor is intended only as...
... your breath. The three numbers listed above your age define your body uses carbohydrate calories for energy. For maximum fat burning, exercise with pre-existing health problems. The pulse sensor is not a medical device. Aerobic Exercise-If your goal is the key to strengthen your heart rate as a guide to 10 minutes of stretching and light exercise. Training Zone Exercise-Exercise for energy. The pulse sensor is intended only as...

English Manual
Page 30
... Roller/Pulley 15 1/2" Wire Tie Storage Latch Latch Knob Right Foot Rail Frame Rear Roller Bracket Rear Roller Rear Foot Right Collar Hood Drive Belt Foot Rail Decal Motor Lift Frame Wire Tie Controller Ground Wire Power Cord Power Cord Grommet Controller Reed Switch Reed Switch Clip Belly Pan Left Upright Incline Motor Left Upright Spacer Base Endcap Right Upright Right Upright Spacer Bolt Spacer Base Pad Caution Decal Base Wheel Releasable Tie 8" Tie Access Door #3 x 1/4" Screw Console Left Tray Right Tray Plastic Tie Console Base Console Clamp Pulse Bar Bottom...
... Roller/Pulley 15 1/2" Wire Tie Storage Latch Latch Knob Right Foot Rail Frame Rear Roller Bracket Rear Roller Rear Foot Right Collar Hood Drive Belt Foot Rail Decal Motor Lift Frame Wire Tie Controller Ground Wire Power Cord Power Cord Grommet Controller Reed Switch Reed Switch Clip Belly Pan Left Upright Incline Motor Left Upright Spacer Base Endcap Right Upright Right Upright Spacer Bolt Spacer Base Pad Caution Decal Base Wheel Releasable Tie 8" Tie Access Door #3 x 1/4" Screw Console Left Tray Right Tray Plastic Tie Console Base Console Clamp Pulse Bar Bottom...

English Manual
Page 31
Key No. Qty. 108 4 * - * - * - Description Console Fan Screw 6" Blue Wire, 2F 4" Black Wire, M/F Userʼs Manual *These parts are subject to change without notice. 31 Specifications are not illustrated. Qty. 101 1 102 1 103 1 104 1 105 2 106 1 107 1 Description Pulse Bar Ground Wire Console Fan Right Bottom Pulse Plate Lift Motor Spacer #8 x 2" Screw Key Board Frame/Roller Ground Wire Key No.
Key No. Qty. 108 4 * - * - * - Description Console Fan Screw 6" Blue Wire, 2F 4" Black Wire, M/F Userʼs Manual *These parts are subject to change without notice. 31 Specifications are not illustrated. Qty. 101 1 102 1 103 1 104 1 105 2 106 1 107 1 Description Pulse Bar Ground Wire Console Fan Right Bottom Pulse Plate Lift Motor Spacer #8 x 2" Screw Key Board Frame/Roller Ground Wire Key No.
English Manual
Page 36
... this manual) • the key number and description of the replacement part(s) (see the front cover of this manual. damages with the use or performance of incidental or consequential damages. No other consequential damages of whatsoever nature. ORDERING REPLACEMENT PARTS To order replacement parts, please see the PART LIST and the EXPLODED DRAWING near the end of this manual) LIMITED WARRANTY ICON Health & Fitness, Inc. (ICON) warrants this product to be free...
... this manual) • the key number and description of the replacement part(s) (see the front cover of this manual. damages with the use or performance of incidental or consequential damages. No other consequential damages of whatsoever nature. ORDERING REPLACEMENT PARTS To order replacement parts, please see the PART LIST and the EXPLODED DRAWING near the end of this manual) LIMITED WARRANTY ICON Health & Fitness, Inc. (ICON) warrants this product to be free...

