
English Manual
Page 1
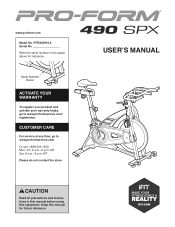
... using this manual for reference. Serial Number Decal ACTIVATE YOUR WARRANTY To register your product and activate your warranty today, go to www.proformservice.com/ registration. Or call 1-888-533-1333 Mon.–-Fri. 6 a.m.–-6 p.m. MT Please do not contact the store. www.proform.com Model No. MT Sat. 8 a.m.–-4 p.m. Keep this equipment. CAUTION Read all precautions and instructions...
... using this manual for reference. Serial Number Decal ACTIVATE YOUR WARRANTY To register your product and activate your warranty today, go to www.proformservice.com/ registration. Or call 1-888-533-1333 Mon.–-Fri. 6 a.m.–-6 p.m. MT Please do not contact the store. www.proform.com Model No. MT Sat. 8 a.m.–-4 p.m. Keep this equipment. CAUTION Read all precautions and instructions...
English Manual
Page 2
... actual size. Apply the decal in the location shown. If a decal is a registered trademark of the warning decal(s). TABLE OF CONTENTS WARNING DECAL PLACEMENT 2 IMPORTANT PRECAUTIONS 3 BEFORE YOU BEGIN 5 ASSEMBLY 6 HOW TO USE THE EXERCISE BIKE 12 FCC INFORMATION 19 EXERCISE GUIDELINES 20 PART LIST 22 EXPLODED DRAWING 23 ORDERING REPLACEMENT PARTS Back Cover LIMITED WARRANTY Back Cover WARNING DECAL PLACEMENT This drawing shows the location(s) of ICON...
... actual size. Apply the decal in the location shown. If a decal is a registered trademark of the warning decal(s). TABLE OF CONTENTS WARNING DECAL PLACEMENT 2 IMPORTANT PRECAUTIONS 3 BEFORE YOU BEGIN 5 ASSEMBLY 6 HOW TO USE THE EXERCISE BIKE 12 FCC INFORMATION 19 EXERCISE GUIDELINES 20 PART LIST 22 EXPLODED DRAWING 23 ORDERING REPLACEMENT PARTS Back Cover LIMITED WARRANTY Back Cover WARNING DECAL PLACEMENT This drawing shows the location(s) of ICON...
English Manual
Page 3
... all users of the exercise bike are adequately informed of the owner to prevent the flywheel from moisture and dust. Make sure that there is the responsibility of all parts regularly. Do not use , tighten the resistance knob completely to ensure that could become 15. To stop immediately and cool down. 3 Keep the exercise bike indoors, away from moving. 16. Reduce your exercise bike. The exercise bike should...
... all users of the exercise bike are adequately informed of the owner to prevent the flywheel from moisture and dust. Make sure that there is the responsibility of all parts regularly. Do not use , tighten the resistance knob completely to ensure that could become 15. To stop immediately and cool down. 3 Keep the exercise bike indoors, away from moving. 16. Reduce your exercise bike. The exercise bike should...
English Manual
Page 5
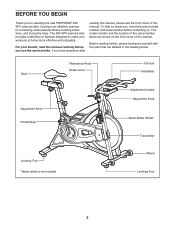
... , note the product model number and serial number before you for increasing cardiovascular fitness, building endurance, and toning the body. For your workouts at home more effective and enjoyable. Cycling is not included Wheel Leveling Foot 5 Before reading further, please familiarize yourself with the parts that are shown on the front cover of this manual. BEFORE YOU BEGIN Thank you use the exercise bike.
... , note the product model number and serial number before you for increasing cardiovascular fitness, building endurance, and toning the body. For your workouts at home more effective and enjoyable. Cycling is not included Wheel Leveling Foot 5 Before reading further, please familiarize yourself with the parts that are shown on the front cover of this manual. BEFORE YOU BEGIN Thank you use the exercise bike.
English Manual
Page 6
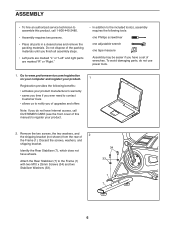
...; To hire an authorized service technician to the Frame (1) with two M10 x 25mm Screws (34) and two Stabilizer Washers (33). 34 33 1 7 6 Attach the Rear Stabilizer (7) to assemble this product, call CUSTOMER CARE (see the front cover of this manual) to notify you of upgrades and offers Note: If you have a set of wrenches. Remove the two screws, the two washers...
...; To hire an authorized service technician to the Frame (1) with two M10 x 25mm Screws (34) and two Stabilizer Washers (33). 34 33 1 7 6 Attach the Rear Stabilizer (7) to assemble this product, call CUSTOMER CARE (see the front cover of this manual) to notify you of upgrades and offers Note: If you have a set of wrenches. Remove the two screws, the two washers...

English Manual
Page 7
... Right Crank Arm (26). Identify the Right Pedal (35). 4 Using an adjustable wrench, firmly tighten the Right Pedal (35) clockwise into an adjustment hole in an adjustment hole. 4 1 23 7 3. Orient the Handlebar Post (4) as shown. 5 Locate the Adjustment Knob (23) on the front of the Frame (1). Make sure that the Adjustment Knob is firmly engaged in the Handlebar Post, and then tighten the Adjustment Knob. Discard the screws...
... Right Crank Arm (26). Identify the Right Pedal (35). 4 Using an adjustable wrench, firmly tighten the Right Pedal (35) clockwise into an adjustment hole in an adjustment hole. 4 1 23 7 3. Orient the Handlebar Post (4) as shown. 5 Locate the Adjustment Knob (23) on the front of the Frame (1). Make sure that the Adjustment Knob is firmly engaged in the Handlebar Post, and then tighten the Adjustment Knob. Discard the screws...

English Manual
Page 8
... shown. 7 Locate the Adjustment Knob (23) on the rear of the Frame (1). Loosen the Adjustment Knob and pull it outward. Then, insert the Seat Post (2) into an adjustment hole in an adjustment hole. 23 1 8 Repeat this process until the Handle is firmly engaged in the Seat Post, and then tighten the Adjustment Knob. Make sure that the Adjustment Knob is tight. 5 4 32 31 7. Move the Seat Post...
... shown. 7 Locate the Adjustment Knob (23) on the rear of the Frame (1). Loosen the Adjustment Knob and pull it outward. Then, insert the Seat Post (2) into an adjustment hole in an adjustment hole. 23 1 8 Repeat this process until the Handle is firmly engaged in the Seat Post, and then tighten the Adjustment Knob. Make sure that the Adjustment Knob is tight. 5 4 32 31 7. Move the Seat Post...

English Manual
Page 10
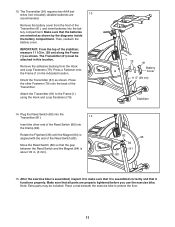
... recommended. Then, reattach the battery cover. 11 75 Battery Compartment 12. Otherwise, you insert batteries. Attach the Console (75) to room temperature before you may damage the console display or other electronic components. alkaline batteries are oriented as shown by the diagrams inside the battery compartment. Remove the battery cover from the back of the Console (75), and insert batteries into the battery compartment. IMPORTANT: If the...
... recommended. Then, reattach the battery cover. 11 75 Battery Compartment 12. Otherwise, you insert batteries. Attach the Console (75) to room temperature before you may damage the console display or other electronic components. alkaline batteries are oriented as shown by the diagrams inside the battery compartment. Remove the battery cover from the back of the Console (75), and insert batteries into the battery compartment. IMPORTANT: If the...
English Manual
Page 11
... Transmitter. Move the Reed Switch (80) so that it functions properly. After the exercise bike is assembled, inspect it to make sure that it is assembled correctly and that the gap between the Reed Switch and the Magnet (84) is aligned with the end of the Reed Switch (80) into the battery compartment. Press the other end of the Reed Switch (80). 13. Remove the battery cover from...
... Transmitter. Move the Reed Switch (80) so that it functions properly. After the exercise bike is assembled, inspect it to make sure that it is assembled correctly and that the gap between the Reed Switch and the Magnet (84) is aligned with the end of the Reed Switch (80) into the battery compartment. Press the other end of the Reed Switch (80). 13. Remove the battery cover from...
English Manual
Page 12
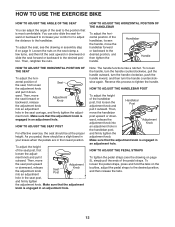
... to adjust the distance to the handlebar. HOW TO USE THE EXERCISE BIKE HOW TO ADJUST THE ANGLE OF THE SEAT You can also slide the seat forward or backward to the position that the adjustment knob is engaged in the seat carriage, and firmly tighten the adjust- Then, retighten the nuts. Then, move the seat post upward or downward, release the adjustment knob into an adjustment hole...
... to adjust the distance to the handlebar. HOW TO USE THE EXERCISE BIKE HOW TO ADJUST THE ANGLE OF THE SEAT You can also slide the seat forward or backward to the position that the adjustment knob is engaged in the seat carriage, and firmly tighten the adjust- Then, retighten the nuts. Then, move the seat post upward or downward, release the adjustment knob into an adjustment hole...
English Manual
Page 13
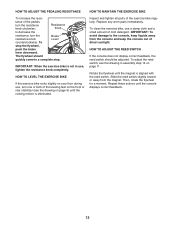
To clean the exercise bike, use , tighten the resistance knob completely. Then, rotate the flywheel for a moment. The flywheel should be adjusted. Slide the reed switch slightly toward or away from the console and keep the console out of the exercise bike regularly. IMPORTANT: When the exercise bike is not in assembly step 14 on page 5) until the console displays correct feedback. 13 Inspect and tighten all parts of direct sunlight. IMPORTANT: To...
To clean the exercise bike, use , tighten the resistance knob completely. Then, rotate the flywheel for a moment. The flywheel should be adjusted. Slide the reed switch slightly toward or away from the console and keep the console out of the exercise bike regularly. IMPORTANT: When the exercise bike is not in assembly step 14 on page 5) until the console displays correct feedback. 13 Inspect and tighten all parts of direct sunlight. IMPORTANT: To...
English Manual
Page 14
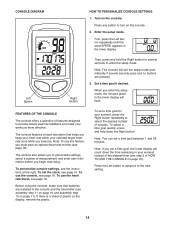
... workouts more effective. Turn on the display, remove the plastic. First, press the Left button repeatedly until the word SPEED appears in the console and the transmitter (see page 18). Note: You can set a time goal, the lower display will flash. The console also allows you to enter the setup mode. To set a time goal for several seconds pass and no buttons are installed in the lower display. Before using...
... workouts more effective. Turn on the display, remove the plastic. First, press the Left button repeatedly until the word SPEED appears in the console and the transmitter (see page 18). Note: You can set a time goal, the lower display will flash. The console also allows you to enter the setup mode. To set a time goal for several seconds pass and no buttons are installed in the lower display. Before using...
English Manual
Page 15
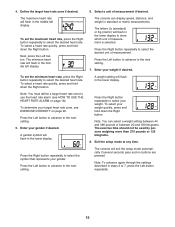
... and 180 kilograms. The exercise bike should not be used by persons weighing more than 275 pounds or 125 kilograms. 8. Exit the setup mode at any time. To select a heart rate quickly, press and hold down the Right button. Next, press the Left button. To determine your weight quickly, press and hold down the Right button. The console will flash in the lower display. Note: To advance...
... and 180 kilograms. The exercise bike should not be used by persons weighing more than 275 pounds or 125 kilograms. 8. Exit the setup mode at any time. To select a heart rate quickly, press and hold down the Right button. Next, press the Left button. To determine your weight quickly, press and hold down the Right button. The console will flash in the lower display. Note: To advance...

English Manual
Page 16
... USE THE HEART RATE ALARM on page 18), you wear an optional heart rate monitor (see page 18). Set the time. Make sure to select the correct am or pm setting when you stop pedaling, this display indicates your progress with the displays. Press the Left button to select the hour setting. Exit the clock mode at any button to turn on the console. 1. Press any button to turn on the console. First, press...
... USE THE HEART RATE ALARM on page 18), you wear an optional heart rate monitor (see page 18). Set the time. Make sure to select the correct am or pm setting when you stop pedaling, this display indicates your progress with the displays. Press the Left button to select the hour setting. Exit the clock mode at any button to turn on the console. 1. Press any button to turn on the console. First, press...
English Manual
Page 17
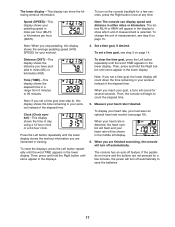
... turn on page 14. The lower display—-This display can display speed and distance in either miles or kilometers. To clear the time goal, press the Left button repeatedly until the word TIME appears in the lower display. To reset the displays, press the Left button repeatedly until the word TIME appears in viewing. When your workout instead of the elapsed time. Speed (SPEED)—-This display shows your heart rate...
... turn on page 14. The lower display—-This display can display speed and distance in either miles or kilometers. To clear the time goal, press the Left button repeatedly until the word TIME appears in the lower display. To reset the displays, press the Left button repeatedly until the word TIME appears in viewing. When your workout instead of the elapsed time. Speed (SPEED)—-This display shows your heart rate...
English Manual
Page 18
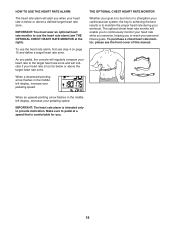
..., the key to achieving the best results is intended only to reach your personal fitness goals. To use the heart rate alarm (see THE OPTIONAL CHEST HEART RATE MONITOR at a speed that is comfortable for you when your heart rate is below or above a defined target heart rate zone. The optional chest heart rate monitor will enable you to continuously monitor your heart rate while you exercise, helping you pedal, the console will regularly...
..., the key to achieving the best results is intended only to reach your personal fitness goals. To use the heart rate alarm (see THE OPTIONAL CHEST HEART RATE MONITOR at a speed that is comfortable for you when your heart rate is below or above a defined target heart rate zone. The optional chest heart rate monitor will enable you to continuously monitor your heart rate while you exercise, helping you pedal, the console will regularly...

English Manual
Page 19
...user’'s authority to operate this equipment does cause harmful interference to radio or television reception, which the receiver is no guarantee that interference will not occur in a particular installation. This equipment generates, uses, and can be determined by turning...assure continued compliance, use only shielded interface cables when connecting to provide reasonable protection against harmful interference in a residential installation. FCC INFORMATION This equipment has been tested and found to comply with the limits for a Class B digital device, pursuant to part 15 of the ...
...user’'s authority to operate this equipment does cause harmful interference to radio or television reception, which the receiver is no guarantee that interference will not occur in a particular installation. This equipment generates, uses, and can be determined by turning...assure continued compliance, use only shielded interface cables when connecting to provide reasonable protection against harmful interference in a residential installation. FCC INFORMATION This equipment has been tested and found to comply with the limits for a Class B digital device, pursuant to part 15 of the ...
English Manual
Page 20
..., exercise with your heart rate in your breath. never hold your training zone. This is the key to the nearest ten years). Various factors may complete up increases your training zone. Training Zone Exercise—-Exercise for 20 to 10 minutes of stretching. Cooling Down—-Finish with pre-existing health problems. The heart rate monitor is to make exercise a regular and enjoyable part of your training...
..., exercise with your heart rate in your breath. never hold your training zone. This is the key to the nearest ten years). Various factors may complete up increases your training zone. Training Zone Exercise—-Exercise for 20 to 10 minutes of stretching. Cooling Down—-Finish with pre-existing health problems. The heart rate monitor is to make exercise a regular and enjoyable part of your training...
English Manual
Page 22
... Locknut M5 x 10mm Screw M5 Washer M8 Hex Nut Brake Cable M5 x 12mm Screw Seat Post Bushing M10 x 16mm Bolt Left Crank Arm Left Pedal/Strap M6 x 30mm Bolt Set M6 x 40mm Bolt Brake Pad Mount M8 Hex Nut Flat Washer M10 x 25mm Bolt Water Bottle Holder Console Bracket Screw Console Screw Console Bracket Hook and Loop Fastener Reed Switch Transmitter Clamp Clamp Screw Magnet Assembly Tool User’'s Manual Note: Specifications are not illustrated...
... Locknut M5 x 10mm Screw M5 Washer M8 Hex Nut Brake Cable M5 x 12mm Screw Seat Post Bushing M10 x 16mm Bolt Left Crank Arm Left Pedal/Strap M6 x 30mm Bolt Set M6 x 40mm Bolt Brake Pad Mount M8 Hex Nut Flat Washer M10 x 25mm Bolt Water Bottle Holder Console Bracket Screw Console Screw Console Bracket Hook and Loop Fastener Reed Switch Transmitter Clamp Clamp Screw Magnet Assembly Tool User’'s Manual Note: Specifications are not illustrated...
English Manual
Page 24
ORDERING REPLACEMENT PARTS To order replacement parts, please see the front cover of this manual) LIMITED WARRANTY IMPORTANT: To protect your fitness equipment with an extended service plan, see the PART LIST and the EXPLODED DRAWING near the end of this product to be free from defects in -home service, the customer will be responsible for a minimal trip charge. To help us assist you, be prepared...
ORDERING REPLACEMENT PARTS To order replacement parts, please see the front cover of this manual) LIMITED WARRANTY IMPORTANT: To protect your fitness equipment with an extended service plan, see the PART LIST and the EXPLODED DRAWING near the end of this product to be free from defects in -home service, the customer will be responsible for a minimal trip charge. To help us assist you, be prepared...

