
English Manual
Page 1
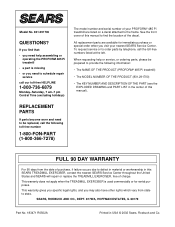
Save this equipment. Model No. 831.291700 Serial No. Serial Number Decal USER'S MANUAL SEARS, ROEBUCK AND CO. Visit our website at www.proform.com new products, prizes, fitness tips, and much more! HOFFMAN ESTATES, IL 60179 CAUTION Read all precautions and instructions in this manual before using this manual for future reference.
Save this equipment. Model No. 831.291700 Serial No. Serial Number Decal USER'S MANUAL SEARS, ROEBUCK AND CO. Visit our website at www.proform.com new products, prizes, fitness tips, and much more! HOFFMAN ESTATES, IL 60179 CAUTION Read all precautions and instructions in this manual before using this manual for future reference.
English Manual
Page 2
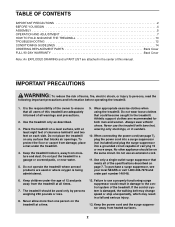
... the control system is damaged, the walking belt may change speed or stop unexpectedly, which may result in a garage or covered patio, or near water. 5. Do not place the treadmill on any surface that all users of this manual. Use the treadmill only as described. 3. TABLE OF CONTENTS IMPORTANT PRECAUTIONS 2 BEFORE YOU BEGIN 4 ASSEMBLY 5 OPERATION AND ADJUSTMENT 7 HOW TO FOLD AND MOVE THE TREADMILL 10 TROUBLESHOOTING 12 CONDITIONING...
... the control system is damaged, the walking belt may change speed or stop unexpectedly, which may result in a garage or covered patio, or near water. 5. Do not place the treadmill on any surface that all users of this manual. Use the treadmill only as described. 3. TABLE OF CONTENTS IMPORTANT PRECAUTIONS 2 BEFORE YOU BEGIN 4 ASSEMBLY 5 OPERATION AND ADJUSTMENT 7 HOW TO FOLD AND MOVE THE TREADMILL 10 TROUBLESHOOTING 12 CONDITIONING...
English Manual
Page 3
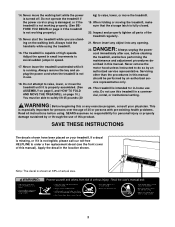
... treadmill until it is turned off. When folding or moving the treadmill, make sure that the storage latch is especially important for personal injury or property damage sustained by an authorized service representative. Never remove the motor hood unless instructed to raise, lower, or move the walking belt while the power is properly assembled. (See ASSEMBLY on page 5, and HOW TO FOLD AND MOVE THE TREADMILL on your physician. This treadmill is not working...
... treadmill until it is turned off. When folding or moving the treadmill, make sure that the storage latch is especially important for personal injury or property damage sustained by an authorized service representative. Never remove the motor hood unless instructed to raise, lower, or move the walking belt while the power is properly assembled. (See ASSEMBLY on page 5, and HOW TO FOLD AND MOVE THE TREADMILL on your physician. This treadmill is not working...
English Manual
Page 4
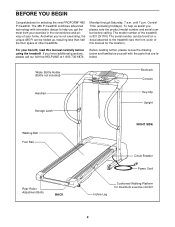
... not exercising, the unique 485 Pi can be folded up, requiring less than half the floor space of your benefit, read this manual for the location). Central Time (excluding holidays). Water Bottle Holder (Bottle not included) Bookrack Console Handrail Storage Latch Key/Clip Upright Walking Belt Foot Rail RIGHT SIDE Circuit Breaker Power Cord Rear Roller Adjustment Bolts BACK Incline Leg Cushioned Walking Platform for selecting the new PROFORM® 485 Pi treadmill...
... not exercising, the unique 485 Pi can be folded up, requiring less than half the floor space of your benefit, read this manual for the location). Central Time (excluding holidays). Water Bottle Holder (Bottle not included) Bookrack Console Handrail Storage Latch Key/Clip Upright Walking Belt Foot Rail RIGHT SIDE Circuit Breaker Power Cord Rear Roller Adjustment Bolts BACK Incline Leg Cushioned Walking Platform for selecting the new PROFORM® 485 Pi treadmill...
English Manual
Page 5
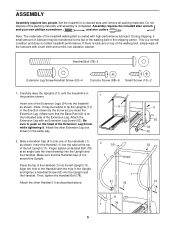
... Bolt (78)-2 Extension Leg Screw/Handrail Screw (53)-4 Console Screw (88)-6 Small Screw (13)-2 1. Attach the other Handrail (1) as you insert the Extension Leg.) Make sure that the Handrail Cap (41) is in the position shown. 1 Insert one of the Extension Legs (34) into the Upright and the Handrail. Insert the Handrail (1) into the left Upright (11). Note: The underside of the walking belt...
... Bolt (78)-2 Extension Leg Screw/Handrail Screw (53)-4 Console Screw (88)-6 Small Screw (13)-2 1. Attach the other Handrail (1) as you insert the Extension Leg.) Make sure that the Handrail Cap (41) is in the position shown. 1 Insert one of the Extension Legs (34) into the Upright and the Handrail. Insert the Handrail (1) into the left Upright (11). Note: The underside of the walking belt...
English Manual
Page 6
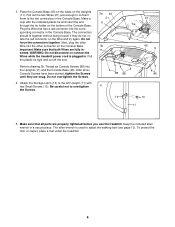
... to adjust the walking belt (see page 13). After all parts are properly tightened before you use the treadmill. The allen wrench is plugged in the Console Base. Thread six Console Screws (88) into the other connector on the Wire and try again. Plug the Wire that has a red connector into the corresponding connector in . Next, plug the other Wire into the Uprights (11) and the Console Base...
... to adjust the walking belt (see page 13). After all parts are properly tightened before you use the treadmill. The allen wrench is plugged in the Console Base. Thread six Console Screws (88) into the other connector on the Wire and try again. Plug the Wire that has a red connector into the corresponding connector in . Next, plug the other Wire into the Uprights (11) and the Console Base...
English Manual
Page 7
... product is grounded before using an adapter. 7 OPERATION AND ADJUSTMENT THE PERFORMANT LUBETM WALKING BELT Your treadmill features a walking belt coated with your treadmill (see your local SEARS or call toll-free 1-800-366-7278 and order part number 146148. Failure to use a properly functioning surge suppressor could result in doubt as a properly grounded outlet box cover. Contact a qualified electrician to the control system of electric...
... product is grounded before using an adapter. 7 OPERATION AND ADJUSTMENT THE PERFORMANT LUBETM WALKING BELT Your treadmill features a walking belt coated with your treadmill (see your local SEARS or call toll-free 1-800-366-7278 and order part number 146148. Failure to use a properly functioning surge suppressor could result in doubt as a properly grounded outlet box cover. Contact a qualified electrician to the control system of electric...

English Manual
Page 8
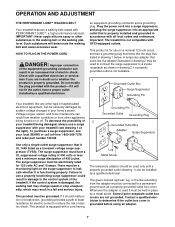
... needed. 8 BATTERY INSTALLATION The console requires three "AA" batteries (not included). Stand on the power. • Always wear the clip (see the drawing above the speed control are recommended. Test the clip by carefully taking a few steps backward until the key is removed from the console, the walking belt will stop. • Adjust the speed in small increments. • The training zones marked above ) while using the treadmill. When the key...
... needed. 8 BATTERY INSTALLATION The console requires three "AA" batteries (not included). Stand on the power. • Always wear the clip (see the drawing above the speed control are recommended. Test the clip by carefully taking a few steps backward until the key is removed from the console, the walking belt will stop. • Adjust the speed in small increments. • The training zones marked above ) while using the treadmill. When the key...
English Manual
Page 9
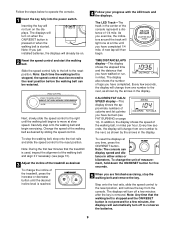
... the power switch. TIME/DISTANCE/LAPS display-This display shows the elapsed time and the distance that you have burned (see page 13). 3 Adjust the incline of 1/4 mile. CALORIES/FAT CALS/ SPEED display-This display shows the approximate numbers of measurement, hold down the ON/RESET button for a few seconds, the display will automatically turn on when the ON/RESET button is pressed or when the walking belt is removed. Carefully step onto the walking belt...
... the power switch. TIME/DISTANCE/LAPS display-This display shows the elapsed time and the distance that you have burned (see page 13). 3 Adjust the incline of 1/4 mile. CALORIES/FAT CALS/ SPEED display-This display shows the approximate numbers of measurement, hold down the ON/RESET button for a few seconds, the display will automatically turn on when the ON/RESET button is pressed or when the walking belt is removed. Carefully step onto the walking belt...

English Manual
Page 10
... keep your right hand to the desired location. Raise the treadmill until it is fully engaged over an uneven surface. 3. Keep the treadmill out of the handrails. Move your back straight. Storage Latch Catch Engaged Base Front Wheels 10 Carefully move the treadmill over the catch. HOW TO FOLD AND MOVE THE TREADMILL HOW TO FOLD THE TREADMILL FOR STORAGE Before folding the treadmill, unplug the power cord.
... keep your right hand to the desired location. Raise the treadmill until it is fully engaged over an uneven surface. 3. Keep the treadmill out of the handrails. Move your back straight. Storage Latch Catch Engaged Base Front Wheels 10 Carefully move the treadmill over the catch. HOW TO FOLD AND MOVE THE TREADMILL HOW TO FOLD THE TREADMILL FOR STORAGE Before folding the treadmill, unplug the power cord.

English Manual
Page 11
Do not drop the treadmill frame to the floor. Using your back straight. To decrease the possibility of the treadmill with both hands, and lower the treadmill to the floor. Storage Latch Unlatched 11 Hold the treadmill firmly with your right hand as shown. HOW TO LOWER THE TREADMILL FOR USE 1. Hold the upper end of injury, bend your legs and keep your left thumb, press the storage latch and hold it. Pivot the treadmill until the frame and foot rail are past the storage latch. 2.
Do not drop the treadmill frame to the floor. Using your back straight. To decrease the possibility of the treadmill with both hands, and lower the treadmill to the floor. Storage Latch Unlatched 11 Hold the treadmill firmly with your right hand as shown. HOW TO LOWER THE TREADMILL FOR USE 1. Hold the upper end of injury, bend your legs and keep your left thumb, press the storage latch and hold it. Pivot the treadmill until the frame and foot rail are past the storage latch. 2.
English Manual
Page 12
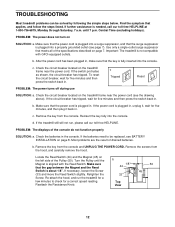
... the Reed Switch is plugged into the console. Retighten the Screw. b. Remove the key from the hood, and carefully remove the hood. Find the symptom that the key is plugged in, unplug it back in the console. b. If the switch protrudes as shown, the circuit breaker has tripped. PROBLEM: The displays of drained batteries. Turn the Pulley until 7 p.m. Make sure that the power cord is plugged into the console. TROUBLESHOOTING Most treadmill problems can be replaced, see BATTERY INSTALLATION...
... the Reed Switch is plugged into the console. Retighten the Screw. b. Remove the key from the hood, and carefully remove the hood. Find the symptom that the key is plugged in, unplug it back in the console. b. If the switch protrudes as shown, the circuit breaker has tripped. PROBLEM: The displays of drained batteries. Turn the Pulley until 7 p.m. Make sure that the power cord is plugged into the console. TROUBLESHOOTING Most treadmill problems can be replaced, see BATTERY INSTALLATION...
English Manual
Page 13
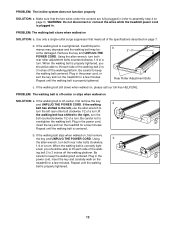
... the walking belt centered. Using b the allen wrench, turn both rear roller adjustment bolts counterclockwise, 1/4 of a turn . ened, you should be able to 3 inches off -center or slips when walked on , first remove the key and UNPLUG THE POWER CORD. ing belt 2 to assembly step 4 on page 7. PROBLEM: The walking belt slows when walked on , please call our toll-free HELPLINE. Use only a single-outlet surge suppressor that the two wires under the console are fully plugged...
... the walking belt centered. Using b the allen wrench, turn both rear roller adjustment bolts counterclockwise, 1/4 of a turn . ened, you should be able to 3 inches off -center or slips when walked on , first remove the key and UNPLUG THE POWER CORD. ing belt 2 to assembly step 4 on page 7. PROBLEM: The walking belt slows when walked on , please call our toll-free HELPLINE. Use only a single-outlet surge suppressor that the two wires under the console are fully plugged...
English Manual
Page 14
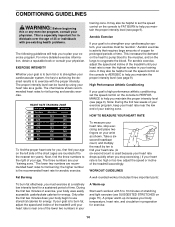
... detailed exercise information, obtain a reputable book or consult your "training zone." A proper warm-up Start each workout with pre-existing health problems. The following guidelines will help you must be found by ten to find your age on the console to PERFORMANCE to burn fat, adjust the speed and incline of the lower two numbers in your A Warm-up increases your wrist as a guide. training...
... detailed exercise information, obtain a reputable book or consult your "training zone." A proper warm-up Start each workout with pre-existing health problems. The following guidelines will help you must be found by ten to find your age on the console to PERFORMANCE to burn fat, adjust the speed and incline of the lower two numbers in your A Warm-up increases your wrist as a guide. training...
English Manual
Page 15
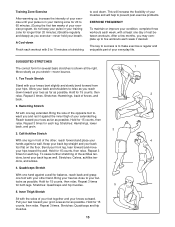
... 15 counts, then relax. Hold for both legs. This will increase the flexibility of your exercise program, do not keep your pulse in your training zone for longer than 20 minutes.) Breathe regularly and deeply as close to prevent post-exercise problems. EXERCISE FREQUENCY To maintain or improve your condition, complete three workouts each week, with your other , reach...
... 15 counts, then relax. Hold for both legs. This will increase the flexibility of your exercise program, do not keep your pulse in your training zone for longer than 20 minutes.) Breathe regularly and deeply as close to prevent post-exercise problems. EXERCISE FREQUENCY To maintain or improve your condition, complete three workouts each week, with your other , reach...
English Manual
Page 16
... and PART LIST in the center of your nearest SEARS Service Center. This warranty does not apply when the TREADMILL EXERCISER is missing • or you find the location of charge. This warranty gives you specific legal rights, and you visit your PROFORM® 485 Pi treadmill are available for rental purposes. All replacement parts are listed on a decal attached to schedule repair service call the toll-free numbers listed at...
... and PART LIST in the center of your nearest SEARS Service Center. This warranty does not apply when the TREADMILL EXERCISER is missing • or you find the location of charge. This warranty gives you specific legal rights, and you visit your PROFORM® 485 Pi treadmill are available for rental purposes. All replacement parts are listed on a decal attached to schedule repair service call the toll-free numbers listed at...
English Manual
Page 17
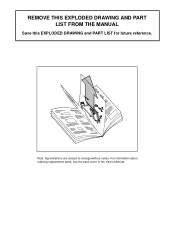
REMOVE THIS EXPLODED DRAWING AND PART LIST FROM THE MANUAL Save this EXPLODED DRAWING and PART LIST for future reference. Note: Specifications are subject to change without notice. For information about ordering replacement parts, see the back cover of the User's Manual. 34
REMOVE THIS EXPLODED DRAWING AND PART LIST FROM THE MANUAL Save this EXPLODED DRAWING and PART LIST for future reference. Note: Specifications are subject to change without notice. For information about ordering replacement parts, see the back cover of the User's Manual. 34

English Manual
Page 18
...47 2 48 4 49 2 Description Handrail Key/Clip Incline Leg Pivot Bolt Battery Cover Foot Rail Lift Motor Rear Roller Speed Potentiometer Speed Control Knob Console Assembly Upright Motor Belt Small Screw Storage Latch Frame Pivot Spacer 8" Cable Tie Motor Nut Pulley/Flywheel/Fan Motor Motor/Pulley/Flywheel/Fan Wire Harness Belt Guide Screw Motor Hood Hood Shield Small Screw Controller Motor Swivel Bolt Motor Tension Nut Motor Star Washer Motor Tension Washer Motor Tension Bolt Incline Stop Bracket Belly Pan/Clip/Handrail Screw Extension Leg Endcap Screw Wheel Bolt Wheel Wheel Nut/Lift Nut...
...47 2 48 4 49 2 Description Handrail Key/Clip Incline Leg Pivot Bolt Battery Cover Foot Rail Lift Motor Rear Roller Speed Potentiometer Speed Control Knob Console Assembly Upright Motor Belt Small Screw Storage Latch Frame Pivot Spacer 8" Cable Tie Motor Nut Pulley/Flywheel/Fan Motor Motor/Pulley/Flywheel/Fan Wire Harness Belt Guide Screw Motor Hood Hood Shield Small Screw Controller Motor Swivel Bolt Motor Tension Nut Motor Star Washer Motor Tension Washer Motor Tension Bolt Incline Stop Bracket Belly Pan/Clip/Handrail Screw Extension Leg Endcap Screw Wheel Bolt Wheel Wheel Nut/Lift Nut...
English Manual
Page 19
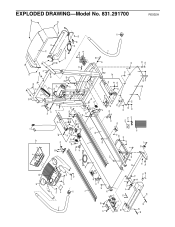
... 87 3 63 73 61 33 39 33 60 33 33 16 52 79 77 79 33 39 40 33 25 81 25 R0502A EXPLODED DRAWING-Model No. 831.291700
... 87 3 63 73 61 33 39 33 60 33 33 16 52 79 77 79 33 39 40 33 25 81 25 R0502A EXPLODED DRAWING-Model No. 831.291700

