

Uk Manual
Page 2
TABLE OF CONTENTS IMPORTANT PRECAUTIONS 3 BEFORE YOU BEGIN 5 ASSEMBLY 6 OPERATION AND ADJUSTMENT 11 HOW TO FOLD AND MOVE THE TREADMILL 24 TROUBLESHOOTING 26 CONDITIONING GUIDELINES 28 PART LIST 31 EXPLODED DRAWING 32 ORDERING REPLACEMENT PARTS Back Cover PROFORM is a registered trademark of ICON IP, Inc. 2
TABLE OF CONTENTS IMPORTANT PRECAUTIONS 3 BEFORE YOU BEGIN 5 ASSEMBLY 6 OPERATION AND ADJUSTMENT 11 HOW TO FOLD AND MOVE THE TREADMILL 24 TROUBLESHOOTING 26 CONDITIONING GUIDELINES 28 PART LIST 31 EXPLODED DRAWING 32 ORDERING REPLACEMENT PARTS Back Cover PROFORM is a registered trademark of ICON IP, Inc. 2
Uk Manual
Page 3
... and dust. In some instances, the speed and/or incline may affect the accuracy of the owner to raise, lower, or move the treadmill until it is the responsibility of heart rate readings. No other appliance should be prepared for the "chirp" and be used or where oxygen... is fully engaged. 20. Use the treadmill only as an exercise aid in determining heart rate trends in small increments to persons, read the following important precautions and information before the ...
... and dust. In some instances, the speed and/or incline may affect the accuracy of the owner to raise, lower, or move the treadmill until it is the responsibility of heart rate readings. No other appliance should be prepared for the "chirp" and be used or where oxygen... is fully engaged. 20. Use the treadmill only as an exercise aid in determining heart rate trends in small increments to persons, read the following important precautions and information before the ...
Uk Manual
Page 4
...override the speed and incline settings by an authorized ser- Always unplug the power cord immediately after use this manual. scribed in this treadmill in this product. Never remove the motor hood unless instructed to the next settings of this or any opening. Do not use ,... setting. Inspect and properly tighten all instructions before performing the maintenance and adjustment procedures de- Apply the decal in -home use of the treadmill regularly. 24. Always remove iFIT.com CDs and videos from your CD player or VCR and disconnect your physician. DANGER: 25. This ...
...override the speed and incline settings by an authorized ser- Always unplug the power cord immediately after use this manual. scribed in this treadmill in this product. Never remove the motor hood unless instructed to the next settings of this or any opening. Do not use ,... setting. Inspect and properly tighten all instructions before performing the maintenance and adjustment procedures de- Apply the decal in -home use of the treadmill regularly. 24. Always remove iFIT.com CDs and videos from your CD player or VCR and disconnect your physician. DANGER: 25. This ...
Uk Manual
Page 5
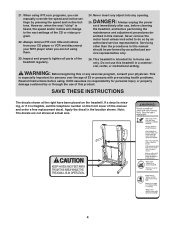
... reading further, please familiarize yourself with innovative design to the treadmill (see the front cover of this manual for maximum exercise comfort RIGHT SIDE 5 If you for selecting the new PROFORM® 480 CX treadmill. BEFORE YOU BEGIN Thank you have questions after read this manual... carefully before contacting us assist you 're not exercising, the 480 CX treadmill can be folded up, requiring less than half the ...
... reading further, please familiarize yourself with innovative design to the treadmill (see the front cover of this manual for maximum exercise comfort RIGHT SIDE 5 If you for selecting the new PROFORM® 480 CX treadmill. BEFORE YOU BEGIN Thank you have questions after read this manual... carefully before contacting us assist you 're not exercising, the 480 CX treadmill can be folded up, requiring less than half the ...
Uk Manual
Page 6
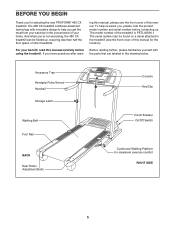
...) with Star Washers (8) into the base of the walking belt is more sta- The number following the parentheses is a normal condition and does not affect treadmill performance. The number in the base of the Extension Leg, and firmly tighten the Extension Leg Bolts. 8 64 58 6 Note: If a part is completed. ...ble. Set the treadmill in the parts bag, check to see the drawings below each drawing is lubricant on pages 30 and 31. If there is the key number...
...) with Star Washers (8) into the base of the walking belt is more sta- The number following the parentheses is a normal condition and does not affect treadmill performance. The number in the base of the Extension Leg, and firmly tighten the Extension Leg Bolts. 8 64 58 6 Note: If a part is completed. ...ble. Set the treadmill in the parts bag, check to see the drawings below each drawing is lubricant on pages 30 and 31. If there is the key number...
Uk Manual
Page 7
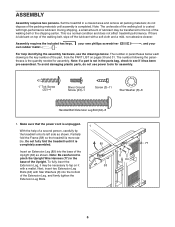
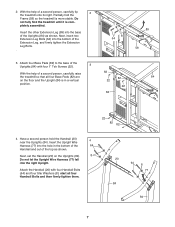
...64 Handrail and out of the Uprights (84) as shown. Insert the Upright Wire Harness (77) into the bottom of a second person, carefully tip 2 the treadmill onto its right. Have a second person hold the Handrail (20) 4 near the Uprights (84). Attach four Base Pads (82) to the base of the ...Uprights (84) with four Handrail Bolts (64) and four Star Washers (8); pletely assembled. Partially fold the Frame (58) so the treadmill is com- start all four Base Pads (82) are on the Uprights (84). 8 Do not let the Upright Wire Harness (77) fall into the base...
...64 Handrail and out of the Uprights (84) as shown. Insert the Upright Wire Harness (77) into the bottom of a second person, carefully tip 2 the treadmill onto its right. Have a second person hold the Handrail (20) 4 near the Uprights (84). Attach four Base Pads (82) to the base of the ...Uprights (84) with four Handrail Bolts (64) and four Star Washers (8); pletely assembled. Partially fold the Frame (58) so the treadmill is com- start all four Base Pads (82) are on the Uprights (84). 8 Do not let the Upright Wire Harness (77) fall into the base...
Uk Manual
Page 9
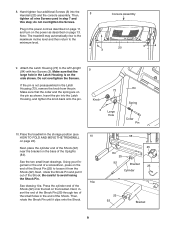
... the base of the Uprights (84). Next, insert the end of the Shock Pin (25) through two of the Shock. 8. Console Assembly 20 3 3 9. Note: The treadmill may automatically rise to the maximum incline level and then return to loosen it from the pin. Knob 3 Large Hole 84 Spring Collar Pin 10... the end of the small holes in the storage position (see 10 HOW TO FOLD AND MOVE THE TREADMILL on page 24). Next, rotate the Shock Pin and pull it clips onto the Shock. 58 25 84 25 92 Bracket 25 Cylinder 25 92 ...
... the base of the Uprights (84). Next, insert the end of the Shock Pin (25) through two of the Shock. 8. Console Assembly 20 3 3 9. Note: The treadmill may automatically rise to the maximum incline level and then return to loosen it from the pin. Knob 3 Large Hole 84 Spring Collar Pin 10... the end of the small holes in the storage position (see 10 HOW TO FOLD AND MOVE THE TREADMILL on page 24). Next, rotate the Shock Pin and pull it clips onto the Shock. 58 25 84 25 92 Bracket 25 Cylinder 25 92 ...
Uk Manual
Page 10
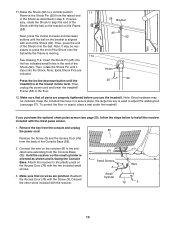
...ball while the Frame is moving. 11a See drawing 11a. Connect the wire on the Frame (58). Then, rotate the Shock Pin until the treadmill is facing the Console Base. Note: Extra Shock Pins are properly tightened before you purchase the optional chest pulse sensor (see page 27). If... you use the treadmill. Small Screws A Small Cylinder Wire 76 3 10 Then, press the end of the Shock with end of the Shock (92). Make sure that...
...ball while the Frame is moving. 11a See drawing 11a. Connect the wire on the Frame (58). Then, rotate the Shock Pin until the treadmill is facing the Console Base. Note: Extra Shock Pins are properly tightened before you purchase the optional chest pulse sensor (see page 27). If... you use the treadmill. Small Screws A Small Cylinder Wire 76 3 10 Then, press the end of the Shock with end of the Shock (92). Make sure that...
Uk Manual
Page 11
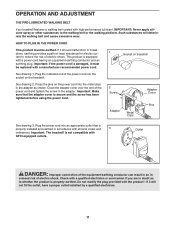
...: If the power cord is not compatible with a power cord having an equipment-earthing conductor and an earthing plug. Important: The treadmill is damaged, it must be replaced with a manufacturer-recommended power cord. If it will deteriorate the walking belt and cause excessive wear.... See drawing 2. Do not modify the plug provided with high-performance lubricant. OPERATION AND ADJUSTMENT THE PRE-LUBRICATED WALKING BELT Your treadmill features a walking belt coated with the product-if it should malfunction or break down, earthing provides a path of least resistance for...
...: If the power cord is not compatible with a power cord having an equipment-earthing conductor and an earthing plug. Important: The treadmill is damaged, it must be replaced with a manufacturer-recommended power cord. If it will deteriorate the walking belt and cause excessive wear.... See drawing 2. Do not modify the plug provided with high-performance lubricant. OPERATION AND ADJUSTMENT THE PRE-LUBRICATED WALKING BELT Your treadmill features a walking belt coated with the product-if it should malfunction or break down, earthing provides a path of least resistance for...
Uk Manual
Page 12
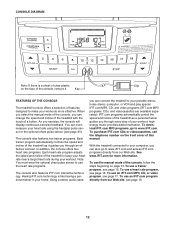
... face of the console, you through an effective workout. iFIT.com programs automatically control the speed and incline of a button. With the treadmill connected to www.iFIT.com and access iFIT.com programs directly from our Web site, see page 15. highenergy music provides added motivation....console offers two heart rate programs. Each heart rate program adjusts the speed and incline of your workout. As you through every step of the treadmill to use a trainer program, see page 19. 12 Using a stereo audio cable, you can even measure your portable stereo, home stereo,...
... face of the console, you through an effective workout. iFIT.com programs automatically control the speed and incline of a button. With the treadmill connected to www.iFIT.com and access iFIT.com programs directly from our Web site, see page 15. highenergy music provides added motivation....console offers two heart rate programs. Each heart rate program adjusts the speed and incline of your workout. As you through every step of the treadmill to use a trainer program, see page 19. 12 Using a stereo audio cable, you can even measure your portable stereo, home stereo,...
Uk Manual
Page 13
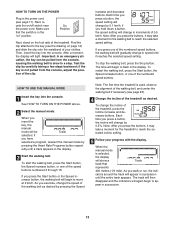
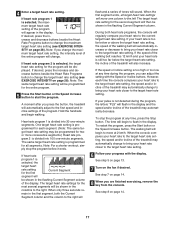
...one of the numbered speed buttons, the walking belt will change by pressing the Speed Note: The first time the treadmill is in the "on the foot rails of the treadmill. If you have selected a program, reselect the manual mode by pressing the Heart Rate Programs button repeat- Each ...position. increase and decrease buttons. If you insert the key, the manual mode will change in speed until it may take a moment for the treadmill to reach the selected speed setting. When the manual mode is selected, the display will light. pear in succession. 13 HOW TO TURN ON ...
...one of the numbered speed buttons, the walking belt will change by pressing the Speed Note: The first time the treadmill is in the "on the foot rails of the treadmill. If you have selected a program, reselect the manual mode by pressing the Heart Rate Programs button repeat- Each ...position. increase and decrease buttons. If you insert the key, the manual mode will change in speed until it may take a moment for the treadmill to reach the selected speed setting. When the manual mode is selected, the display will light. pear in succession. 13 HOW TO TURN ON ...
Uk Manual
Page 14
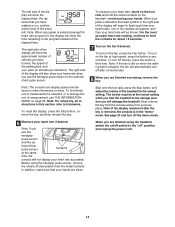
... program instead of measurement, see THE INFORMATION MODE on page 23. Note: For simplicity, all instructions in the "demo" mode. Before using the treadmill, switch the on the fan if desired. When you use the handgrip pulse sensor or the optional chest pulse sensor. Note: When a program is...at high speed, press the button a second time. Note: If the display remains lit after a few minutes. 8 When you will damage the treadmill. Note: If you are clean. To measure your heart rate, stand on the handrail-avoid moving your hands are finished using the handgrip pulse ...
... program instead of measurement, see THE INFORMATION MODE on page 23. Note: For simplicity, all instructions in the "demo" mode. Before using the treadmill, switch the on the fan if desired. When you use the handgrip pulse sensor or the optional chest pulse sensor. Note: When a program is...at high speed, press the button a second time. Note: If the display remains lit after a few minutes. 8 When you will damage the treadmill. Note: If you are clean. To measure your heart rate, stand on the handrail-avoid moving your hands are finished using the handgrip pulse ...
Uk Manual
Page 15
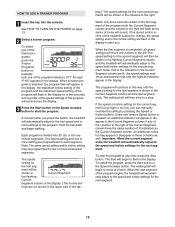
... next several segments will be programmed for the second segment will then be shown in Current Segment the flashing Current Segment column of the treadmill is pressed, an additional indicator will sound. If the speed and/or incline of the display. (The incline set- Every few times..., and a profile of the speed settings of tones will appear or disappear in the display. Important: When the current segment ends, the treadmill will begin walking. The walking belt will automatically adjust to alert you can manually override the setting by pressing the Speed or Incline buttons....
... next several segments will be programmed for the second segment will then be shown in Current Segment the flashing Current Segment column of the treadmill is pressed, an additional indicator will sound. If the speed and/or incline of the display. (The incline set- Every few times..., and a profile of the speed settings of tones will appear or disappear in the display. Important: When the current segment ends, the treadmill will begin walking. The walking belt will automatically adjust to alert you can manually override the setting by pressing the Speed or Incline buttons....

Uk Manual
Page 16
... rate program. HOW TO USE A HEART RATE PROGRAM Heart rate program 1 will scroll across the display. CAUTION: If you are over 60 years of the treadmill to find whether the medication will appear in the display.
... rate program. HOW TO USE A HEART RATE PROGRAM Heart rate program 1 will scroll across the display. CAUTION: If you are over 60 years of the treadmill to find whether the medication will appear in the display.
Uk Manual
Page 17
... target heart rate setting. 6 Follow your heart rate is still too far below or above the target heart rate setting, the speed of the treadmill may be programmed for two or more consecutive segments.) Heart rate program 2 is selected, the target heart rate setting for the program will be.... The target heart rate setting for the next several segments will also increase. The time will sound. Note: If you press the button, the treadmill will be shown in the first segment, both heart rate programs, the console will appear in the flashing Current Segment column. Note: For a shorter...
... target heart rate setting. 6 Follow your heart rate is still too far below or above the target heart rate setting, the speed of the treadmill may be programmed for two or more consecutive segments.) Heart rate program 2 is selected, the target heart rate setting for the program will be.... The target heart rate setting for the next several segments will also increase. The time will sound. Note: If you press the button, the treadmill will be shown in the first segment, both heart rate programs, the console will appear in the flashing Current Segment column. Note: For a shorter...
Uk Manual
Page 18
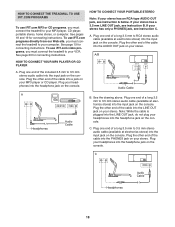
... your VCR. To use iFIT.com programs directly from our Web site, you must connect the treadmill to your MP3 player, CD player, portable stereo, home stereo, or computer. Plug one end of a long 3.5 mm to RCA stereo audio cable (available at ... connecting instructions. Plug your headphones into the LINE OUT jack on your stereo. HOW TO CONNECT THE TREADMILL TO USE IFIT.COM PROGRAMS To use iFIT.com MP3 or CD programs, you must connect the treadmill to your computer. Plug the other end of a long 3.5 mm to 3.5 mm stereo audio cable (available...
... your VCR. To use iFIT.com programs directly from our Web site, you must connect the treadmill to your MP3 player, CD player, portable stereo, home stereo, or computer. Plug one end of a long 3.5 mm to RCA stereo audio cable (available at ... connecting instructions. Plug your headphones into the LINE OUT jack on your stereo. HOW TO CONNECT THE TREADMILL TO USE IFIT.COM PROGRAMS To use iFIT.com MP3 or CD programs, you must connect the treadmill to your computer. Plug the other end of a long 3.5 mm to 3.5 mm stereo audio cable (available...
Uk Manual
Page 20
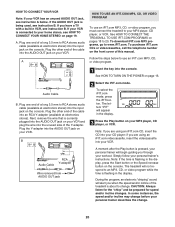
...the wire into the AUDIO OUT jack on your VCR. To select the iFIT.com mode, press the iFIT button. if you must connect the treadmill to your MP3 player, CD player, or VCR. In some instances, the speed and/or incline may change before your personal trainer describes the change... console. Plug the other end of the cable into the unused side of a long 3.5 mm to RCA stereo audio cable (available at electronics stores). The treadmill will appear in VCR, see instruction B. If your VCR is being used, see instruction B. Audio Cable ANT. Note: If you have a TV with a built-...
...the wire into the AUDIO OUT jack on your VCR. To select the iFIT.com mode, press the iFIT button. if you must connect the treadmill to your MP3 player, CD player, or VCR. In some instances, the speed and/or incline may change before your personal trainer describes the change... console. Plug the other end of the cable into the unused side of a long 3.5 mm to RCA stereo audio cable (available at electronics stores). The treadmill will appear in VCR, see instruction B. If your VCR is being used, see instruction B. Audio Cable ANT. Note: If you have a TV with a built-...
Uk Manual
Page 21
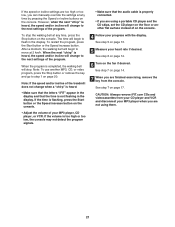
...; Make sure that the time is flashing, press the Start button or the Speed increase button on the console. • Adjust the volume of the treadmill does not change to flash in the display. After a moment, the walking belt will stop the walking belt at any time by pressing the Speed...
...; Make sure that the time is flashing, press the Start button or the Speed increase button on the console. • Adjust the volume of the treadmill does not change to flash in the display. After a moment, the walking belt will stop the walking belt at any time by pressing the Speed...
Uk Manual
Page 22
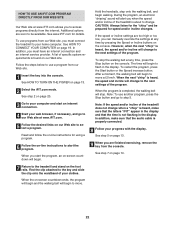
...on page 19. The time will change . When the next "chirp" is heard, the speed and incline will begin to the next settings of the treadmill is completed, the walking belt will begin to select a program. When the on-screen countdown ends, the program will begin and the walking belt will...changes. Find the clip attached to your progress with the display. See www.iFIT.com for using a program. 6 Follow the on-line instructions to the treadmill and stand on page 14. 7 Return to start the program, an on our Web site to move . 22 In addition, make sure that the ...
...on page 19. The time will change . When the next "chirp" is heard, the speed and incline will begin to the next settings of the treadmill is completed, the walking belt will begin to select a program. When the on-screen countdown ends, the program will begin and the walking belt will...changes. Find the clip attached to your progress with the display. See www.iFIT.com for using a program. 6 Follow the on-line instructions to the treadmill and stand on page 14. 7 Return to start the program, an on our Web site to move . 22 In addition, make sure that the ...
Uk Manual
Page 23
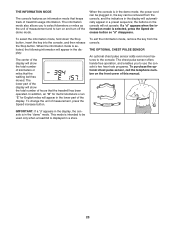
..., and the indicators in the display will appear in a store. 23 IMPORTANT: If a "d" appears in the display, the console is in the lower part of treadmill usage information. In addition, an "M" for metric kilometers or an "E" for English miles will show the total number of hours that keeps track of the...: The center of measurement and to turn on and turn off the demo mode. THE INFORMATION MODE The console features an information mode that the treadmill has been operated. When the console is in the demo mode, the power cord can be plugged in, the key can be used only when...
..., and the indicators in the display will appear in a store. 23 IMPORTANT: If a "d" appears in the display, the console is in the lower part of treadmill usage information. In addition, an "M" for metric kilometers or an "E" for English miles will show the total number of hours that keeps track of the...: The center of measurement and to turn on and turn off the demo mode. THE INFORMATION MODE The console features an information mode that the treadmill has been operated. When the console is in the demo mode, the power cord can be plugged in, the key can be used only when...


