

Uk Manual
Page 1
As a manufacturer, we are missing or damaged parts, please call: 08457 089 009 or write: ICON Health & Fitness, Ltd. Save this equipment. Serial Number Decal USER'S MANUAL QUESTIONS? If you have questions, or if there are committed to providing complete customer satisfaction. Customer Service Department Unit 4 Revie Road Industrial Estate Revie Road Beeston Leeds, LS118JG UK email: [email protected] CAUTION Read all precautions and instructions in this manual before using this manual for future reference. PETL40906.1 Serial No. Model No.
As a manufacturer, we are missing or damaged parts, please call: 08457 089 009 or write: ICON Health & Fitness, Ltd. Save this equipment. Serial Number Decal USER'S MANUAL QUESTIONS? If you have questions, or if there are committed to providing complete customer satisfaction. Customer Service Department Unit 4 Revie Road Industrial Estate Revie Road Beeston Leeds, LS118JG UK email: [email protected] CAUTION Read all precautions and instructions in this manual before using this manual for future reference. PETL40906.1 Serial No. Model No.
Uk Manual
Page 2
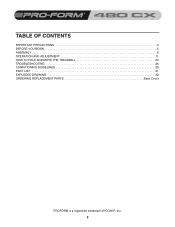
TABLE OF CONTENTS IMPORTANT PRECAUTIONS 3 BEFORE YOU BEGIN 5 ASSEMBLY 6 OPERATION AND ADJUSTMENT 11 HOW TO FOLD AND MOVE THE TREADMILL 24 TROUBLESHOOTING 26 CONDITIONING GUIDELINES 28 PART LIST 31 EXPLODED DRAWING 32 ORDERING REPLACEMENT PARTS Back Cover PROFORM is a registered trademark of ICON IP, Inc. 2
TABLE OF CONTENTS IMPORTANT PRECAUTIONS 3 BEFORE YOU BEGIN 5 ASSEMBLY 6 OPERATION AND ADJUSTMENT 11 HOW TO FOLD AND MOVE THE TREADMILL 24 TROUBLESHOOTING 26 CONDITIONING GUIDELINES 28 PART LIST 31 EXPLODED DRAWING 32 ORDERING REPLACEMENT PARTS Back Cover PROFORM is a registered trademark of ICON IP, Inc. 2
Uk Manual
Page 4
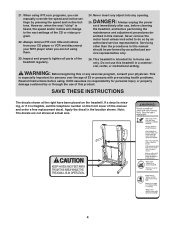
... the power cord immediately after use only. This treadmill is illegible, call the telephone number on the treadmill. ICON assumes no responsibility for in this or ...an authorized ser- scribed in -home use , before cleaning the treadmill, and before using. Servicing other than the procedures in this treadmill in the location shown. vice representative only. 26. WARNING: Before...or property damage sustained by an authorized service representative. Do not use of the treadmill regularly. 24. Never remove the motor hood unless instructed to the next settings of ...
... the power cord immediately after use only. This treadmill is illegible, call the telephone number on the treadmill. ICON assumes no responsibility for in this or ...an authorized ser- scribed in -home use , before cleaning the treadmill, and before using. Servicing other than the procedures in this treadmill in the location shown. vice representative only. 26. WARNING: Before...or property damage sustained by an authorized service representative. Do not use of the treadmill regularly. 24. Never remove the motor hood unless instructed to the next settings of ...
Uk Manual
Page 5
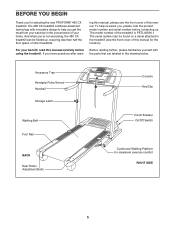
... Foot Rail BACK Rear Roller Adjustment Bolts Console Key/Clip Circuit Breaker On/Off Switch Cushioned Walking Platform for selecting the new PROFORM® 480 CX treadmill. The 480 CX treadmill combines advanced technology with the parts that are labeled in the convenience of this manual for the location). Before reading further, please familiarize yourself with innovative design...
... Foot Rail BACK Rear Roller Adjustment Bolts Console Key/Clip Circuit Breaker On/Off Switch Cushioned Walking Platform for selecting the new PROFORM® 480 CX treadmill. The 480 CX treadmill combines advanced technology with the parts that are labeled in the convenience of this manual for the location). Before reading further, please familiarize yourself with innovative design...
Uk Manual
Page 6
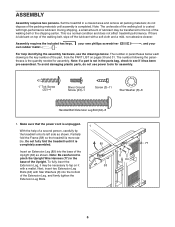
...completely assembled. 89 77 Insert an Extension Leg (89) into the bottom of a second person, carefully tip the treadmill onto its left side as shown. The number in the parts bag, check to the top of the Upright. Assembly requires the included hex keys, your For help of the Extension...for assembly. If there is not in parentheses below . Note: If a part is lubricant on it may be necessary to pinch the Upright Wire Harness (77) in a cleared area and remove all packing materials; Set the treadmill in the base of the walking belt or the shipping carton. Note: Be...
...completely assembled. 89 77 Insert an Extension Leg (89) into the bottom of a second person, carefully tip the treadmill onto its left side as shown. The number in the parts bag, check to the top of the Upright. Assembly requires the included hex keys, your For help of the Extension...for assembly. If there is not in parentheses below . Note: If a part is lubricant on it may be necessary to pinch the Upright Wire Harness (77) in a cleared area and remove all packing materials; Set the treadmill in the base of the walking belt or the shipping carton. Note: Be...
Uk Manual
Page 10
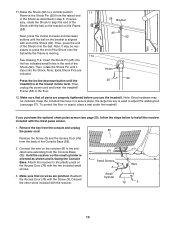
... properly tightened before you purchase the optional chest pulse sensor (see page 27). Make sure that no wires are pinched. If you use the treadmill. Hold the receiver so the small cylinder is oriented as described in a secure place; the large hex key is facing the Console Base. ...Make sure that all parts are included. 11.Raise the Shock (92) to a vertical position. 11 Remove the Shock Pin (25) from the back of the Console Base (...
... properly tightened before you purchase the optional chest pulse sensor (see page 27). Make sure that no wires are pinched. If you use the treadmill. Hold the receiver so the small cylinder is oriented as described in a secure place; the large hex key is facing the Console Base. ...Make sure that all parts are included. 11.Raise the Shock (92) to a vertical position. 11 Remove the Shock Pin (25) from the back of the Console Base (...
Uk Manual
Page 15
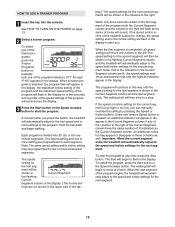
... the last segment ends. tings are programmed for the last segment is pressed, an additional indicator will appear or disappear in the upper part of lit indicators as well. If the speed or incline setting for two or more consecutive segments. When the next segment of the ... buttons. The program will be shown in the display. if any time, press the Stop button. Important: When the current segment ends, the treadmill will begin walking. The walking belt will automatically adjust to the speed and incline settings for the second segment. HOW TO USE A TRAINER PROGRAM ...
... the last segment ends. tings are programmed for the last segment is pressed, an additional indicator will appear or disappear in the upper part of lit indicators as well. If the speed or incline setting for two or more consecutive segments. When the next segment of the ... buttons. The program will be shown in the display. if any time, press the Stop button. Important: When the current segment ends, the treadmill will begin walking. The walking belt will automatically adjust to the speed and incline settings for the second segment. HOW TO USE A TRAINER PROGRAM ...
Uk Manual
Page 23
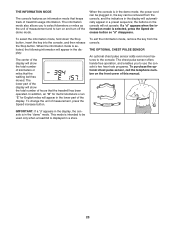
..., press the Speed decrease button so "d" disappears. If a "d" appears when the information mode is displayed in a preset sequence; The lower part of the display will automatically appear in a store. 23 To exit the information mode, remove the key from the console, and the indicators in... To purchase the optional chest pulse sensor, call the telephone number on and turn on the front cover of kilometers or miles that the treadmill has been operated. The information mode also allows you to the console. The chest pulse sensor offers hands-free operation, and enables you to...
..., press the Speed decrease button so "d" disappears. If a "d" appears when the information mode is displayed in a preset sequence; The lower part of the display will automatically appear in a store. 23 To exit the information mode, remove the key from the console, and the indicators in... To purchase the optional chest pulse sensor, call the telephone number on and turn on the front cover of kilometers or miles that the treadmill has been operated. The information mode also allows you to the console. The chest pulse sensor offers hands-free operation, and enables you to...
Uk Manual
Page 28
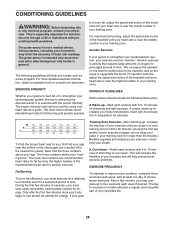
...your movement, may complete up , increase the intensity of your exercise until your heart rate is to make exercise a regular and enjoyable part of time. Fat Burning To burn fat effectively, you must be found by using your condition, complete three workouts each workout with preexisting...To find the three numbers above your exercise program. If your goal Training Zone Exercise-After warming up to 10 minutes of the treadmill until your heart rate is the recommended heart rate for fat burning; CONDITIONING GUIDELINES WARNING: Before beginning this or any exercise program, ...
...your movement, may complete up , increase the intensity of your exercise until your heart rate is to make exercise a regular and enjoyable part of time. Fat Burning To burn fat effectively, you must be found by using your condition, complete three workouts each workout with preexisting...To find the three numbers above your exercise program. If your goal Training Zone Exercise-After warming up to 10 minutes of the treadmill until your heart rate is the recommended heart rate for fat burning; CONDITIONING GUIDELINES WARNING: Before beginning this or any exercise program, ...

Uk Manual
Page 30
... Cotter Pin 88 1 Incline Motor 89 2 Extension Leg 90 2 Rear Roller Bracket 91 2 Isolator 92 1 Shock 93 2 Isolator Bracket Cover 94 2 Isolator Bolt, Bottom 30 PART LIST-Model No. Qty.
... Cotter Pin 88 1 Incline Motor 89 2 Extension Leg 90 2 Rear Roller Bracket 91 2 Isolator 92 1 Shock 93 2 Isolator Bracket Cover 94 2 Isolator Bolt, Bottom 30 PART LIST-Model No. Qty.

Uk Manual
Page 31
Specifications are subject to change without notice. 31 95 1 Idler Arm Pivot Bolt 96 1 Idler Arm Spacer 97 1 Idler Arm 98 1 Idler Arm Spring 99 1 Idler Arm Washer 100 1 Idler Arm Nut 101 1 Idler Arm Pulley 102 1 Pulley Bolt # 1 6" Blue Wire, 2F # 1 4" Red Wire, M/F # 1 User's Manual "#" indicates a non-illustrated part.
Specifications are subject to change without notice. 31 95 1 Idler Arm Pivot Bolt 96 1 Idler Arm Spacer 97 1 Idler Arm 98 1 Idler Arm Spring 99 1 Idler Arm Washer 100 1 Idler Arm Nut 101 1 Idler Arm Pulley 102 1 Pulley Bolt # 1 6" Blue Wire, 2F # 1 4" Red Wire, M/F # 1 User's Manual "#" indicates a non-illustrated part.
Uk Manual
Page 36
...the product (PETL40906.1) • the NAME of the product (PROFORM 480 CX treadmill) • the SERIAL NUMBER of the product (see the front cover of this manual) • the KEY NUMBER and DESCRIPTION of the desired part(s) (see the PART LIST and the EXPLODED DRAWING on pages 30-35 of this ...manual) Part No. 250199 R0408A Printed in China © 2008 ICON IP, Inc. ORDERING REPLACEMENT PARTS To order replacement parts, contact the ICON Health & Fitness, Ltd. office,...
...the product (PETL40906.1) • the NAME of the product (PROFORM 480 CX treadmill) • the SERIAL NUMBER of the product (see the front cover of this manual) • the KEY NUMBER and DESCRIPTION of the desired part(s) (see the PART LIST and the EXPLODED DRAWING on pages 30-35 of this ...manual) Part No. 250199 R0408A Printed in China © 2008 ICON IP, Inc. ORDERING REPLACEMENT PARTS To order replacement parts, contact the ICON Health & Fitness, Ltd. office,...


