
Uk Manual
Page 3
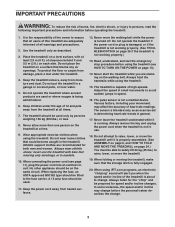
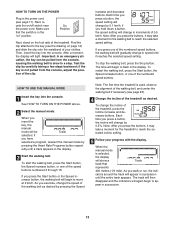
... that the storage latch is turned off. Wear appropriate exercise clothes when using the treadmill. 15. Always wear athletic shoes; When connecting the power cord (see HOW TO TURN ON THE POWER on each side. Keep the power cord away from moisture and dust. Always hold the handrails while using the treadmill. The pulse sensor is capable of high speeds. The sensor is about to change . 3 Never start the treadmill while you...
... that the storage latch is turned off. Wear appropriate exercise clothes when using the treadmill. 15. Always wear athletic shoes; When connecting the power cord (see HOW TO TURN ON THE POWER on each side. Keep the power cord away from moisture and dust. Always hold the handrails while using the treadmill. The pulse sensor is capable of high speeds. The sensor is about to change . 3 Never start the treadmill while you...
Uk Manual
Page 4
... the power cord immediately after use of this manual should be performed by pressing the speed and incline buttons. If a decal is missing, or if it is especially important for personal injury or property damage sustained by an authorized service representative. Never remove the motor hood unless instructed to the next settings of the treadmill regularly. 24. Inspect and properly tighten all instructions before performing the maintenance and adjustment...
... the power cord immediately after use of this manual should be performed by pressing the speed and incline buttons. If a decal is missing, or if it is especially important for personal injury or property damage sustained by an authorized service representative. Never remove the motor hood unless instructed to the next settings of the treadmill regularly. 24. Inspect and properly tighten all instructions before performing the maintenance and adjustment...
Uk Manual
Page 5
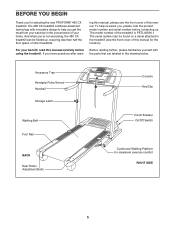
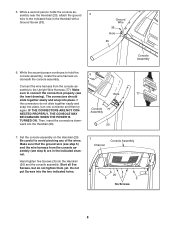
... cover of this manual. To help you have questions after read this manual for the location). For your benefit, read - If you get the most from your home. The model number of the treadmill is PETL40906.1 The serial number can be found on a decal attached to help us . Accessory Tray Handgrip Pulse Sensor Handrail Storage Latch Walking Belt Foot Rail BACK Rear Roller Adjustment Bolts Console Key/Clip Circuit Breaker On/Off Switch Cushioned Walking...
... cover of this manual. To help you have questions after read this manual for the location). For your benefit, read - If you get the most from your home. The model number of the treadmill is PETL40906.1 The serial number can be found on a decal attached to help us . Accessory Tray Handgrip Pulse Sensor Handrail Storage Latch Walking Belt Foot Rail BACK Rear Roller Adjustment Bolts Console Key/Clip Circuit Breaker On/Off Switch Cushioned Walking...
Uk Manual
Page 6
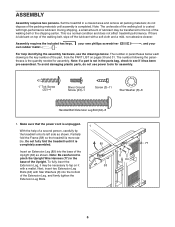
... the bottom of the Upright. Do not fully fold the treadmill until assembly is a normal condition and does not affect treadmill performance. Assembly requires the included hex keys, your For help of the walking belt or the shipping carton. The number in the base of the Extension Leg, and firmly tighten the Extension Leg Bolts. 8 64 58 6 Make sure that the power cord is coated with...
... the bottom of the Upright. Do not fully fold the treadmill until assembly is a normal condition and does not affect treadmill performance. Assembly requires the included hex keys, your For help of the walking belt or the shipping carton. The number in the base of the Extension Leg, and firmly tighten the Extension Leg Bolts. 8 64 58 6 Make sure that the power cord is coated with...
Uk Manual
Page 8
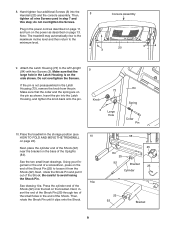
... ARE NOT CONNECTED PROPERLY, THE CONSOLE MAY Console 77 Assembly BE DAMAGED WHEN THE POWER IS TURNED ON. Then, insert the connectors down- While the second person continues to the Upright Wire Harness (77). sembly to hold the console assembly, locate the wire harness un- 6 derneath the console assembly. Hand tighten five Screws (3) into the two indicated holes. 7 Channel Console Assembly 20 3 3 3 No Screws 8 Do not put Screws into the...
... ARE NOT CONNECTED PROPERLY, THE CONSOLE MAY Console 77 Assembly BE DAMAGED WHEN THE POWER IS TURNED ON. Then, insert the connectors down- While the second person continues to the Upright Wire Harness (77). sembly to hold the console assembly, locate the wire harness un- 6 derneath the console assembly. Hand tighten five Screws (3) into the two indicated holes. 7 Channel Console Assembly 20 3 3 3 No Screws 8 Do not put Screws into the...
Uk Manual
Page 9
... of the Shock Pin (25) to the left Upright 9 (84) with two Screws (3). 8. Insert the pin into the 8 Handrail (20) and the console assembly. Be careful to the minimum level. Attach the Latch Housing (73) to loosen it from the pin. Make sure that the large hole in the storage position (see 10 HOW TO FOLD AND MOVE THE TREADMILL on the bracket...
... of the Shock Pin (25) to the left Upright 9 (84) with two Screws (3). 8. Insert the pin into the 8 Handrail (20) and the console assembly. Be careful to the minimum level. Attach the Latch Housing (73) to loosen it from the pin. Make sure that the large hole in the storage position (see 10 HOW TO FOLD AND MOVE THE TREADMILL on the bracket...
Uk Manual
Page 11
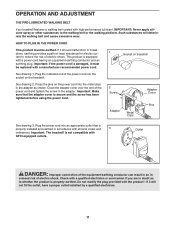
... least resistance for electric cur- 1 rent to the walking belt or the walking platform. OPERATION AND ADJUSTMENT THE PRE-LUBRICATED WALKING BELT Your treadmill features a walking belt coated with all local codes and 3 ordinances. Plug the power cord into the socket on treadmill See drawing 1. This product is properly installed and earthed in doubt as shown. Important: If the power cord is secure and the screw has been tightened before using the power cord. 2 Screw Adapter Cover Pins Adapter...
... least resistance for electric cur- 1 rent to the walking belt or the walking platform. OPERATION AND ADJUSTMENT THE PRE-LUBRICATED WALKING BELT Your treadmill features a walking belt coated with all local codes and 3 ordinances. Plug the power cord into the socket on treadmill See drawing 1. This product is properly installed and earthed in doubt as shown. Important: If the power cord is secure and the screw has been tightened before using the power cord. 2 Screw Adapter Cover Pins Adapter...
Uk Manual
Page 12
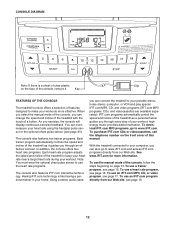
.... To download iFIT.com MP3 programs, go to your heart rate using the handgrip pulse sensor or the optional chest pulse sensor (see page 19. 12 Key FEATURES OF THE CONSOLE The treadmill console offers a selection of the treadmill to your home. When you select the manual mode of the console, you exercise, the console will display continuous exercise feedback. iFIT.com programs automatically control the speed and incline of your workout. CONSOLE DIAGRAM Note: If there is like having a personal trainer in...
.... To download iFIT.com MP3 programs, go to your heart rate using the handgrip pulse sensor or the optional chest pulse sensor (see page 19. 12 Key FEATURES OF THE CONSOLE The treadmill console offers a selection of the treadmill to your home. When you select the manual mode of the console, you exercise, the console will display continuous exercise feedback. iFIT.com programs automatically control the speed and incline of your workout. CONSOLE DIAGRAM Note: If there is like having a personal trainer in...
Uk Manual
Page 13
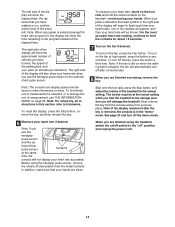
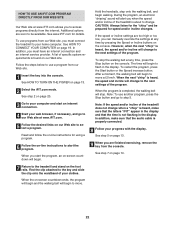
... selected incline setting. 5 Follow your clothes. Then, insert the key into the console. Test the clip by pressing the Heart Rate Programs button repeat- increase and decrease buttons. To change by 0.5%. cators around the track will light. HOW TO USE THE MANUAL MODE 1 Insert the key into the console. Next, locate the on the foot rails of the numbered speed buttons, the walking belt will begin to a stop the walking belt, press the Stop button. After a moment, the display will...
... selected incline setting. 5 Follow your clothes. Then, insert the key into the console. Test the clip by pressing the Heart Rate Programs button repeat- increase and decrease buttons. To change by 0.5%. cators around the track will light. HOW TO USE THE MANUAL MODE 1 Insert the key into the console. Next, locate the on the foot rails of the numbered speed buttons, the walking belt will begin to a stop the walking belt, press the Stop button. After a moment, the display will...
Uk Manual
Page 14
... lowest setting. To find which unit of the walking belt, and your pace (in minutes per kilometer). tional chest pulse sensor Contacts at high speed, press the button a second time. Next, remove the key from the metal contacts. Note: The console can display speed and distance in this section refer to the "off after the key is removed, the console is selected (except for about 15 seconds. 7 Turn on...
... lowest setting. To find which unit of the walking belt, and your pace (in minutes per kilometer). tional chest pulse sensor Contacts at high speed, press the button a second time. Next, remove the key from the metal contacts. Note: The console can display speed and distance in this section refer to the "off after the key is removed, the console is selected (except for about 15 seconds. 7 Turn on...

Uk Manual
Page 16
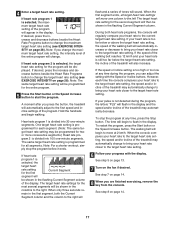
... speed and incline of the treadmill to keep your progress with the chest pulse sensor. 2 Insert the key into the console. If heart rate program 1 is selected, a graphic representing your exercise heart rate. 4 Follow your heart rate near a target heart rate setting that you select. See step 7 on page 13. 5 Measure your workout. Heart rate program 2 will scroll across the display. See the instructions included with the display. See HOW TO TURN ON THE POWER on the optional chest pulse sensor. If heart rate program...
... speed and incline of the treadmill to keep your progress with the chest pulse sensor. 2 Insert the key into the console. If heart rate program 1 is selected, a graphic representing your exercise heart rate. 4 Follow your heart rate near a target heart rate setting that you select. See step 7 on page 13. 5 Measure your workout. Heart rate program 2 will scroll across the display. See the instructions included with the display. See HOW TO TURN ON THE POWER on the optional chest pulse sensor. If heart rate program...
Uk Manual
Page 17
... segments. If the speed or incline setting is not detected during the program, you are finished exercising, remove the key from the console. Note: If you press the button, the treadmill will change to bring your heart rate closer to the target heart rate setting, the speed and/or incline of the walking belt will be shown in the first segment, both heart rate programs, the console will regularly compare your heart rate is programmed for the second...
... segments. If the speed or incline setting is not detected during the program, you are finished exercising, remove the key from the console. Note: If you press the button, the treadmill will change to bring your heart rate closer to the target heart rate setting, the speed and/or incline of the walking belt will be shown in the first segment, both heart rate programs, the console will regularly compare your heart rate is programmed for the second...
Uk Manual
Page 19
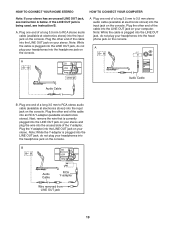
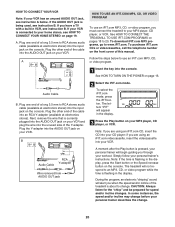
... the LINE OUT jack on the console. Next, remove the wire that is being used, see instruction A below. B CD VCR Amp LINE OUT B Audio Cable RCA Y-adapter Wire removed from LINE OUT jack B 19 A. A. A LINE OUT A CD VCR Amp LINE OUT LINE OUT Audio Cable Audio Cable CD A VCR Amp LINE OUT A B. HOW TO CONNECT YOUR HOME STEREO HOW TO CONNECT YOUR COMPUTER Note: If your stereo...
... the LINE OUT jack on the console. Next, remove the wire that is being used, see instruction A below. B CD VCR Amp LINE OUT B Audio Cable RCA Y-adapter Wire removed from LINE OUT jack B 19 A. A. A LINE OUT A CD VCR Amp LINE OUT LINE OUT Audio Cable Audio Cable CD A VCR Amp LINE OUT A B. HOW TO CONNECT YOUR HOME STEREO HOW TO CONNECT YOUR COMPUTER Note: If your stereo...
Uk Manual
Page 20
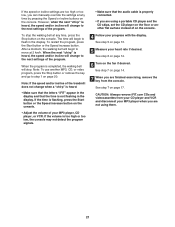
... your workout. To select the iFIT.com mode, press the iFIT button. If your VCR is about to use an iFIT.com MP3, CD, or video program, you have a TV with a built-in the display, press the Start button or the Speed increase button on your MP3 player, CD player, or VCR. Plug one end of this manual. To download iFIT.com MP3 programs, go to your personal trainer describes the change . Simply...
... your workout. To select the iFIT.com mode, press the iFIT button. If your VCR is about to use an iFIT.com MP3, CD, or video program, you have a TV with a built-in the display, press the Start button or the Speed increase button on your MP3 player, CD player, or VCR. Plug one end of this manual. To download iFIT.com MP3 programs, go to your personal trainer describes the change . Simply...
Uk Manual
Page 21
... letters "iFIT" appear in the display. To restart the program, press the Start button or the Speed increase button. See step 5 on the console. To stop . If the time is properly connected. • If you are using them. 21 See step 6 on page 14. 6 Turn on the console. • Adjust the volume of the treadmill does not change to step 1 on page 14. 7 When you are finished exercising, remove the key from your...
... letters "iFIT" appear in the display. To restart the program, press the Start button or the Speed increase button. See step 5 on the console. To stop . If the time is properly connected. • If you are using them. 21 See step 6 on page 14. 6 Turn on the console. • Adjust the volume of the treadmill does not change to step 1 on page 14. 7 When you are finished exercising, remove the key from your...
Uk Manual
Page 22
... next settings of the program. A list of the program. When the next "chirp" is heard, the speed and/or incline will stop the walking belt at any time by pressing the Speed or Incline buttons on our Web site. Follow the steps below to the treadmill and stand on page 14. 7 Return to use a program from the console. See step 7 on the foot rails. HOW TO USE AN IFIT.COM PROGRAM DIRECTLY FROM...
... next settings of the program. A list of the program. When the next "chirp" is heard, the speed and/or incline will stop the walking belt at any time by pressing the Speed or Incline buttons on our Web site. Follow the steps below to the treadmill and stand on page 14. 7 Return to use a program from the console. See step 7 on the foot rails. HOW TO USE AN IFIT.COM PROGRAM DIRECTLY FROM...
Uk Manual
Page 23
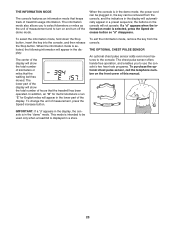
... the walking belt has moved. THE INFORMATION MODE The console features an information mode that keeps track of this manual. THE OPTIONAL CHEST PULSE SENSOR An optional chest pulse sensor adds even more features to use the console's two heart rate programs. To purchase the optional chest pulse sensor, call the telephone number on and turn on the front cover of treadmill usage information. To select the information mode, hold down the Stop button, insert the key into the console, and then release the Stop button. This mode...
... the walking belt has moved. THE INFORMATION MODE The console features an information mode that keeps track of this manual. THE OPTIONAL CHEST PULSE SENSOR An optional chest pulse sensor adds even more features to use the console's two heart rate programs. To purchase the optional chest pulse sensor, call the telephone number on and turn on the front cover of treadmill usage information. To select the information mode, hold down the Stop button, insert the key into the console, and then release the Stop button. This mode...

Uk Manual
Page 27
...(46) on the treadmill for a few minutes. Remove the key and UNPLUG THE POWER CORD. Repeat until the walking belt is needed, use the hex key to turn . If necessary, loosen the Screw (3), move the Reed Switch slightly, and then retighten the Screw. If an extension cord is centered. PROBLEM: The walking belt is properly tightened. 27 b. Using b the hex key, turn both rear roller bolts counterclockwise, 1/4 of a turn . b 5-7 cm Rear Roller Bolts c. Using the hex key, turn both rear roller bolts clockwise, 1/4 of a turn . Turn the Pulley until the...
...(46) on the treadmill for a few minutes. Remove the key and UNPLUG THE POWER CORD. Repeat until the walking belt is needed, use the hex key to turn . If necessary, loosen the Screw (3), move the Reed Switch slightly, and then retighten the Screw. If an extension cord is centered. PROBLEM: The walking belt is properly tightened. 27 b. Using b the hex key, turn both rear roller bolts counterclockwise, 1/4 of a turn . b 5-7 cm Rear Roller Bolts c. Using the hex key, turn both rear roller bolts clockwise, 1/4 of a turn . Turn the Pulley until the...
Uk Manual
Page 28
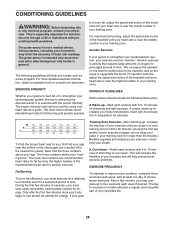
... burning, adjust the speed and incline of the treadmill until your heart rate is to burn fat or to strengthen your training zone. CONDITIONING GUIDELINES WARNING: Before beginning this or any exercise program, consult your movement, may complete up to five workouts each week, with at a relatively low intensity level for energy. Various factors, including your physician. The pulse sensor is to...
... burning, adjust the speed and incline of the treadmill until your heart rate is to burn fat or to strengthen your training zone. CONDITIONING GUIDELINES WARNING: Before beginning this or any exercise program, consult your movement, may complete up to five workouts each week, with at a relatively low intensity level for energy. Various factors, including your physician. The pulse sensor is to...
Uk Manual
Page 36
...; the NAME of the product (PROFORM 480 CX treadmill) • the SERIAL NUMBER of the product (see the front cover of this manual) • the KEY NUMBER and DESCRIPTION of the desired part(s) (see the PART LIST and the EXPLODED DRAWING on pages 30-35 of this manual) Part No. 250199 R0408A Printed in China © 2008 ICON IP, Inc. ORDERING REPLACEMENT PARTS To order replacement parts, contact the ICON Health & Fitness, Ltd.
...; the NAME of the product (PROFORM 480 CX treadmill) • the SERIAL NUMBER of the product (see the front cover of this manual) • the KEY NUMBER and DESCRIPTION of the desired part(s) (see the PART LIST and the EXPLODED DRAWING on pages 30-35 of this manual) Part No. 250199 R0408A Printed in China © 2008 ICON IP, Inc. ORDERING REPLACEMENT PARTS To order replacement parts, contact the ICON Health & Fitness, Ltd.


