

English Manual
Page 1
please contact Customer Care. CALL TOLL-FREE: 1-888-533-1333 Mon.–-Fri., 6 a.m.–-6 p.m. PFEL64910.3 Serial No. If you have questions, or if parts are damaged or missing, DO NOT CONTACT THE STORE; MT Sat. 8 a.m.–-4 p.m. USER’'S MANUAL IMPORTANT: Please register this product (see the limited warranty on ... and instructions in the space above for future reference. Write the serial number in this manual for reference. Serial Number Decal (under frame) QUESTIONS? www.proform.com Model No. Keep this manual before contacting Customer Care.
please contact Customer Care. CALL TOLL-FREE: 1-888-533-1333 Mon.–-Fri., 6 a.m.–-6 p.m. PFEL64910.3 Serial No. If you have questions, or if parts are damaged or missing, DO NOT CONTACT THE STORE; MT Sat. 8 a.m.–-4 p.m. USER’'S MANUAL IMPORTANT: Please register this product (see the limited warranty on ... and instructions in the space above for future reference. Write the serial number in this manual for reference. Serial Number Decal (under frame) QUESTIONS? www.proform.com Model No. Keep this manual before contacting Customer Care.
English Manual
Page 2
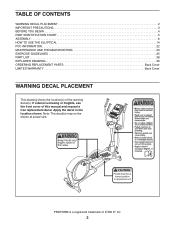
... 4 PART IDENTIFICATION CHART 5 ASSEMBLY 6 HOW TO USE THE ELLIPTICAL 14 FCC INFORMATION 22 MAINTENANCE AND TROUBLESHOOTING 23 EXERCISE GUIDELINES 25 PART LIST 28 EXPLODED DRAWING 30 ORDERING REPLACEMENT PARTS Back ...Cover LIMITED WARRANTY Back Cover WARNING DECAL PLACEMENT This drawing shows the location(s) of this manual and request a free replacement decal. Note: The decal(s) may not be shown at actual size. PROFORM...
... 4 PART IDENTIFICATION CHART 5 ASSEMBLY 6 HOW TO USE THE ELLIPTICAL 14 FCC INFORMATION 22 MAINTENANCE AND TROUBLESHOOTING 23 EXERCISE GUIDELINES 25 PART LIST 28 EXPLODED DRAWING 30 ORDERING REPLACEMENT PARTS Back ...Cover LIMITED WARRANTY Back Cover WARNING DECAL PLACEMENT This drawing shows the location(s) of this manual and request a free replacement decal. Note: The decal(s) may not be shown at actual size. PROFORM...

English Manual
Page 3
... of heart rate readings. Hold the handlebars or the handrails when mounting, dismounting, or using the elliptical. 4. Do not use only. The heart rate monitor is intended only as described in this manual... and instructions in this manual and all warnings on your elliptical before using your back. 7. The elliptical is intended for foot protection while exercising. 3. Before beginning any worn parts immediately. 8. This is the responsibility of the owner to... responsibility for persons over age 35 or persons with at all parts regularly. The elliptical does not have a freewheel;
... of heart rate readings. Hold the handlebars or the handrails when mounting, dismounting, or using the elliptical. 4. Do not use only. The heart rate monitor is intended only as described in this manual... and instructions in this manual and all warnings on your elliptical before using your back. 7. The elliptical is intended for foot protection while exercising. 3. Before beginning any worn parts immediately. 8. This is the responsibility of the owner to... responsibility for persons over age 35 or persons with at all parts regularly. The elliptical does not have a freewheel;
English Manual
Page 4
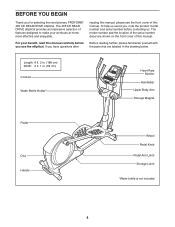
...familiarize yourself with the parts that are shown on the front cover of this manual carefully before contacting us. If you have questions after reading this manual. Length: 6 ft. 2 in. (188 cm) Width: 2 ft. 1 in the drawing below. The 405 CE REAR DRIVE elliptical provides an impressive selection... this manual. To help us assist you, note the product model number and serial number before you for selecting the revolutionary PROFORM® 405 CE REAR DRIVE elliptical. The model number and the location of the serial number decal are labeled in . (64 cm) Console Water Bottle Holder...
...familiarize yourself with the parts that are shown on the front cover of this manual carefully before contacting us. If you have questions after reading this manual. Length: 6 ft. 2 in. (188 cm) Width: 2 ft. 1 in the drawing below. The 405 CE REAR DRIVE elliptical provides an impressive selection... this manual. To help us assist you, note the product model number and serial number before you for selecting the revolutionary PROFORM® 405 CE REAR DRIVE elliptical. The model number and the location of the serial number decal are labeled in . (64 cm) Console Water Bottle Holder...

English Manual
Page 5
Extra parts may be included. M8 Split Washer (103)–-14 M8 x 25mm Washer (45)–-6 M4 x 16mm Screw (...;-8 M8 x 16mm Screw (102)–-18 M8 x 25mm Screw (113)–-2 M10 x 80mm Screw (100)–-4 5 Note: If a part is not in parentheses below to see if it has been preassembled. The number following the key number is the quantity needed for assembly. The... number in the hardware kit, check to identify the small parts needed for assembly. PART IDENTIFICATION CHART Use the drawings below each drawing is the key number of the...
Extra parts may be included. M8 Split Washer (103)–-14 M8 x 25mm Washer (45)–-6 M4 x 16mm Screw (...;-8 M8 x 16mm Screw (102)–-18 M8 x 25mm Screw (113)–-2 M10 x 80mm Screw (100)–-4 5 Note: If a part is not in parentheses below to see if it has been preassembled. The number following the key number is the quantity needed for assembly. The... number in the hardware kit, check to identify the small parts needed for assembly. PART IDENTIFICATION CHART Use the drawings below each drawing is the key number of the...
English Manual
Page 6
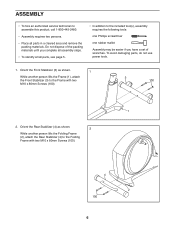
...the following tools: one Phillips screwdriver one rubber mallet Assembly may be easier if you complete all assembly steps. •• To identify small parts, see page 5. •• In addition to assemble this product, call 1-800-445-2480. •• Assembly requires two persons. •... a cleared area and remove the packing materials. Do not dispose of the packing materials until you have a set of wrenches. To avoid damaging parts, do not use power tools. 1. Orient the Front Stabilizer (3) as shown. 2 While another person lifts the Frame (1), attach the Front Stabilizer...
...the following tools: one Phillips screwdriver one rubber mallet Assembly may be easier if you complete all assembly steps. •• To identify small parts, see page 5. •• In addition to assemble this product, call 1-800-445-2480. •• Assembly requires two persons. •... a cleared area and remove the packing materials. Do not dispose of the packing materials until you have a set of wrenches. To avoid damaging parts, do not use power tools. 1. Orient the Front Stabilizer (3) as shown. 2 While another person lifts the Frame (1), attach the Front Stabilizer...
English Manual
Page 13
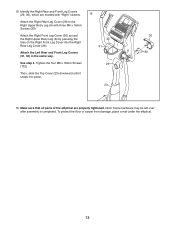
See step 4. Make sure that all parts of the elliptical are marked with three M4 x 16mm Screws (93). Attach the Left Rear and Front Leg Covers (31, 32) in the same way. Then, slide the ... Front Leg Cover into place. 15 32 31 29 23 30 6 93 16. To protect the floor or carpet from damage, place a mat under the elliptical. 13 15.
See step 4. Make sure that all parts of the elliptical are marked with three M4 x 16mm Screws (93). Attach the Left Rear and Front Leg Covers (31, 32) in the same way. Then, slide the ... Front Leg Cover into place. 15 32 31 29 23 30 6 93 16. To protect the floor or carpet from damage, place a mat under the elliptical. 13 15.

English Manual
Page 22
... in a particular installation. These limits are designed to provide reasonable protection against harmful interference in accordance with the limits for a Class B digital device, pursuant to part 15 of the following measures: •• Reorient or relocate the receiving antenna. •• Increase the separation between the equipment and the receiver. •...
... in a particular installation. These limits are designed to provide reasonable protection against harmful interference in accordance with the limits for a Class B digital device, pursuant to part 15 of the following measures: •• Reorient or relocate the receiving antenna. •• Increase the separation between the equipment and the receiver. •...

English Manual
Page 23
...sunlight. Then, retighten the M4 x 16mm Screw (93). CONSOLE TROUBLESHOOTING 93 69 74 75 Most console problems are the result of the elliptical regularly. If the console does not display your heart rate when you must first remove the Top Shield (20). Next, locate the Reed..., you use a damp cloth and a small amount of mild soap. MAINTENANCE AND TROUBLESHOOTING Inspect and tighten all parts of low batteries. Replace any worn parts immediately. To clean the elliptical, use the handgrip heart rate monitor, see step 5 on page 11 for a moment. Slide the Reed Switch...
...sunlight. Then, retighten the M4 x 16mm Screw (93). CONSOLE TROUBLESHOOTING 93 69 74 75 Most console problems are the result of the elliptical regularly. If the console does not display your heart rate when you must first remove the Top Shield (20). Next, locate the Reed..., you use a damp cloth and a small amount of mild soap. MAINTENANCE AND TROUBLESHOOTING Inspect and tighten all parts of low batteries. Replace any worn parts immediately. To clean the elliptical, use the handgrip heart rate monitor, see step 5 on page 11 for a moment. Slide the Reed Switch...
English Manual
Page 25
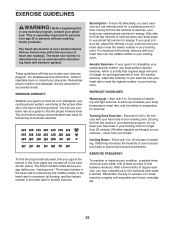
...: Before beginning this or any exercise program, consult your physician. Remember, proper nutrition and adequate rest are rounded off to make exercise a regular and enjoyable part of time. Various factors may complete up increases your everyday life. 25
...: Before beginning this or any exercise program, consult your physician. Remember, proper nutrition and adequate rest are rounded off to make exercise a regular and enjoyable part of time. Various factors may complete up increases your everyday life. 25

English Manual
Page 28
PFEL64910.3 R1111A Key No. PART LIST Key No. Qty. 1 1 2 1 3 1 4 1 5 1 6 1 7 1 8 1 9 1 10 1 11 1 12 1 13 1 14 1 15 1 16 2 17 2 18 1 19 1 20 1 21 1 22 1 23 1 24 1 25 1 26 1 27 2 28 2 29 1 30 1 ...
PFEL64910.3 R1111A Key No. PART LIST Key No. Qty. 1 1 2 1 3 1 4 1 5 1 6 1 7 1 8 1 9 1 10 1 11 1 12 1 13 1 14 1 15 1 16 2 17 2 18 1 19 1 20 1 21 1 22 1 23 1 24 1 25 1 26 1 27 2 28 2 29 1 30 1 ...

English Manual
Page 29
... 2 120 1 121 1 122 1 123 1 124 2 125 2 126 2 127 2 128 2 129 4 130 2 * –- * –- * –- Key No. For information about ordering replacement parts, see the back cover of this manual. *These parts are subject to change without notice. Small Wave Washer Adjustment Nut M5 Washer Snap Ring Left Pedal Bracket Right Pedal Bracket...
... 2 120 1 121 1 122 1 123 1 124 2 125 2 126 2 127 2 128 2 129 4 130 2 * –- * –- * –- Key No. For information about ordering replacement parts, see the back cover of this manual. *These parts are subject to change without notice. Small Wave Washer Adjustment Nut M5 Washer Snap Ring Left Pedal Bracket Right Pedal Bracket...

English Manual
Page 32
...This warranty will be responsible for commercial or rental purposes. ICON Health & Fitness, Inc., 1500 S. 1000 W., Logan, UT 84321-9813 Part No. 324847 R1111A Printed in workmanship and material, under warranty, the customer will automatically be voided if the product is used as a ...display model, if the product is authorized by ICON. or other rights that specifically set forth herein. ORDERING REPLACEMENT PARTS To order replacement parts, please see the PART LIST and the EXPLODED DRAWING near the end of this manual) LIMITED WARRANTY IMPORTANT: You must be preauthorized by...
...This warranty will be responsible for commercial or rental purposes. ICON Health & Fitness, Inc., 1500 S. 1000 W., Logan, UT 84321-9813 Part No. 324847 R1111A Printed in workmanship and material, under warranty, the customer will automatically be voided if the product is used as a ...display model, if the product is authorized by ICON. or other rights that specifically set forth herein. ORDERING REPLACEMENT PARTS To order replacement parts, please see the PART LIST and the EXPLODED DRAWING near the end of this manual) LIMITED WARRANTY IMPORTANT: You must be preauthorized by...


