
English Manual
Page 4
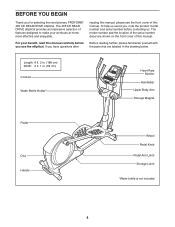
The model number and the location of the serial number decal are labeled in . (64 cm) Console Water Bottle Holder* Heart Rate Monitor Handlebar Upper Body Arm Storage Magnet Pedal Disc Handle Wheel Pedal Knob Pedal Arm Latch Storage Latch *Water bottle... see the front cover of features designed to make your benefit, read this manual carefully before contacting us assist you for selecting the revolutionary PROFORM® 405 CE REAR DRIVE elliptical. Before reading further, please familiarize yourself with the parts that are shown on the front cover of this manual. To help us . ...
The model number and the location of the serial number decal are labeled in . (64 cm) Console Water Bottle Holder* Heart Rate Monitor Handlebar Upper Body Arm Storage Magnet Pedal Disc Handle Wheel Pedal Knob Pedal Arm Latch Storage Latch *Water bottle... see the front cover of features designed to make your benefit, read this manual carefully before contacting us assist you for selecting the revolutionary PROFORM® 405 CE REAR DRIVE elliptical. Before reading further, please familiarize yourself with the parts that are shown on the front cover of this manual. To help us . ...
English Manual
Page 11
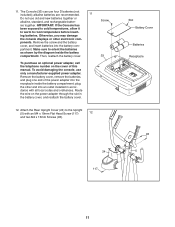
...Screw (117) 12 and two M4 x 16mm Screws (93). 24 117 Slot Battery Cover Batteries Receptacle 93 5 11 IMPORTANT: If the Console has been exposed to cold temperatures, allow it to warm to the Upright (5) with all local codes and ordinances. Remove the battery cover,...insert- ing batteries. ponents. To avoid damaging the console, use old and new batteries together or alkaline, standard, and rechargeable batter- The Console (33) can use four D batteries (not included); 11. Otherwise, you may damage the console displays or other end into an outlet installed in...
...Screw (117) 12 and two M4 x 16mm Screws (93). 24 117 Slot Battery Cover Batteries Receptacle 93 5 11 IMPORTANT: If the Console has been exposed to cold temperatures, allow it to warm to the Upright (5) with all local codes and ordinances. Remove the battery cover,...insert- ing batteries. ponents. To avoid damaging the console, use old and new batteries together or alkaline, standard, and rechargeable batter- The Console (33) can use four D batteries (not included); 11. Otherwise, you may damage the console displays or other end into an outlet installed in...
English Manual
Page 12
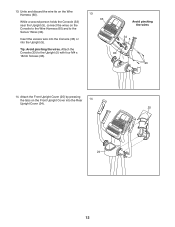
Tip: Avoid pinching the wires. Insert the excess wire into the Console (33) or into the Rear 14 Upright Cover (24). 25 24 12 Attach the Console (33) to the Sensor Wires (34). 13. Attach the Front Upright Cover (25) by pressing the tabs on the Wire Harness (60). While a second person holds the Console (33) near the Upright (5), connect the wires on the Console to the Wire Harness (60) and to the Upright (5) with four M4 x 16mm Screws (93). 13 33 Avoid pinching the wires 34 5 60 93 14. Untie and discard the wire tie on the Front Upright Cover into the Upright (5).
Tip: Avoid pinching the wires. Insert the excess wire into the Console (33) or into the Rear 14 Upright Cover (24). 25 24 12 Attach the Console (33) to the Sensor Wires (34). 13. Attach the Front Upright Cover (25) by pressing the tabs on the Wire Harness (60). While a second person holds the Console (33) near the Upright (5), connect the wires on the Console to the Wire Harness (60) and to the Upright (5) with four M4 x 16mm Screws (93). 13 33 Avoid pinching the wires 34 5 60 93 14. Untie and discard the wire tie on the Front Upright Cover into the Upright (5).
English Manual
Page 16
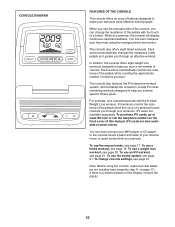
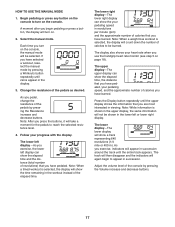
...the pedals while the voice of a personal trainer coaches you through an effective workout. To change the resistance of plastic on page 11). The console also offers eight timed workouts. Note: Before using the handgrip heart rate monitor. To purchase iFit cards, go to help you burn a set... number of calories. To use the manual mode, see page 21. CONSOLE DIAGRAM FEATURES OF THE CONSOLE The console offers an array of features designed to help you achieve specific fitness goals. When you use a weight loss workout, see page 19...
...the pedals while the voice of a personal trainer coaches you through an effective workout. To change the resistance of plastic on page 11). The console also offers eight timed workouts. Note: Before using the handgrip heart rate monitor. To purchase iFit cards, go to help you burn a set... number of calories. To use the manual mode, see page 21. CONSOLE DIAGRAM FEATURES OF THE CONSOLE The console offers an array of features designed to help you achieve specific fitness goals. When you use a weight loss workout, see page 19...
English Manual
Page 17
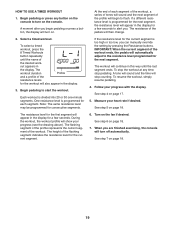
... The display also shows your pedaling speed, and the approximate number of the elapsed time. Begin pedaling or press any button on the console, the manual mode will show the your progress with the display. Press the Display button repeatedly until the upper display shows the information ... to reach the selected resistance level. 4. The lower left display can show the elapsed time and the distance (total number of the console by pressing the Resistance increase and decrease buttons. The track will then disappear and the indicators will turn on page 18). As you ...
... The display also shows your pedaling speed, and the approximate number of the elapsed time. Begin pedaling or press any button on the console, the manual mode will show the your progress with the display. Press the Display button repeatedly until the upper display shows the information ... to reach the selected resistance level. 4. The lower left display can show the elapsed time and the distance (total number of the console by pressing the Resistance increase and decrease buttons. The track will then disappear and the indicators will turn on page 18). As you ...
English Manual
Page 18
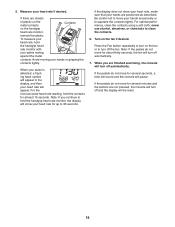
...for up to squeeze the contacts tightly. never use alcohol, abrasives, or chemicals to move for several seconds, a tone will sound and the console will turn off automatically. If the pedals do not move your hands or gripping the contacts tightly. Turn on the handgrip heart rate monitor,...clean the contacts. 6. To measure your heart rate, hold the contacts for at least 15 seconds. If there are not pressed, the console will turn off automatically. 7. For the most accurate heart rate reading, hold the handgrip heart rate monitor with your hands are finished exercising, ...
...for up to squeeze the contacts tightly. never use alcohol, abrasives, or chemicals to move for several seconds, a tone will sound and the console will turn off automatically. If the pedals do not move your hands or gripping the contacts tightly. Turn on the handgrip heart rate monitor,...clean the contacts. 6. To measure your heart rate, hold the contacts for at least 15 seconds. If there are not pressed, the console will turn off automatically. 7. For the most accurate heart rate reading, hold the handgrip heart rate monitor with your hands are finished exercising, ...
English Manual
Page 19
... consecutive segments. The resistance level for a few seconds to alert you are finished exercising, the console will then change. The resistance of the desired work- To stop the workout at any button on the console to flash. Follow your heart rate if desired. See step 5 on page 18. 19 See...each segment of the workout, a series of tones will sound and the next segment of the workout ends, the pedals will turn on the console. If the resistance level for the current segment is programmed for the current segment. One resistance level is too high or too low, you begin...
... consecutive segments. The resistance level for a few seconds to alert you are finished exercising, the console will then change. The resistance of the desired work- To stop the workout at any button on the console to flash. Follow your heart rate if desired. See step 5 on page 18. 19 See...each segment of the workout, a series of tones will sound and the next segment of the workout ends, the pedals will turn on the console. If the resistance level for the current segment is programmed for the current segment. One resistance level is too high or too low, you begin...
English Manual
Page 20
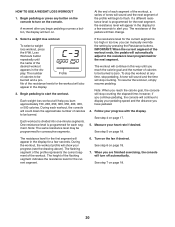
...first segment will appear in the display for a few seconds. Loss Workouts button repeatedly until you are finished exercising, the console will turn on the console to start the workout. play. Each weight loss workout will stop counting the elapsed time; A tone will sound and ...next segment. The number Profile of the desired workout appears in the display for a few seconds to alert you continue pedaling, the console will automatically adjust to the resistance level programmed for the current segment. 6. IMPORTANT: When the current segment of calories to be ...
...first segment will appear in the display for a few seconds. Loss Workouts button repeatedly until you are finished exercising, the console will turn on the console to start the workout. play. Each weight loss workout will stop counting the elapsed time; A tone will sound and ...next segment. The number Profile of the desired workout appears in the display for a few seconds to alert you continue pedaling, the console will automatically adjust to the resistance level programmed for the current segment. 6. IMPORTANT: When the current segment of calories to be ...
English Manual
Page 21
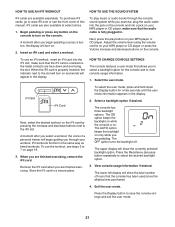
... the desired backlight option. 3. Press the Resistance decrease button repeatedly to the iFit slot. View console usage information if desired. make sure that the console has been used since the elliptical was purchased. 4. iFit Slot iFit Card Next, select the desired workout on only while you ...are available separately. To use an iFit workout, insert an iFit card into a jack on the console and into the iFit slot...
... the desired backlight option. 3. Press the Resistance decrease button repeatedly to the iFit slot. View console usage information if desired. make sure that the console has been used since the elliptical was purchased. 4. iFit Slot iFit Card Next, select the desired workout on only while you ...are available separately. To use an iFit workout, insert an iFit card into a jack on the console and into the iFit slot...
English Manual
Page 23
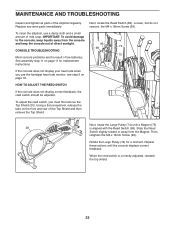
... of direct sunlight. Then, retighten the M4 x 16mm Screw (93). Next, locate the Reed Switch (69). CONSOLE TROUBLESHOOTING 93 69 74 75 Most console problems are the result of the elliptical regularly. Repeat these actions until a Magnet (75) 20 is correctly adjusted, reattach the top shield. 23 Loosen, but do not remove, the...
... of direct sunlight. Then, retighten the M4 x 16mm Screw (93). Next, locate the Reed Switch (69). CONSOLE TROUBLESHOOTING 93 69 74 75 Most console problems are the result of the elliptical regularly. Repeat these actions until a Magnet (75) 20 is correctly adjusted, reattach the top shield. 23 Loosen, but do not remove, the...
English Manual
Page 28
... Water Bottle Holder Inner Leg Cover Outer Leg Cover Right Rear Leg Cover Right Front Leg Cover Left Rear Leg Cover Left Front Leg Cover Console Sensor/Wire Handgrip Wheel Stabilizer Cap Drive Belt Right Crank Arm Left Crank Arm Leveling Foot Latch Bracket Crank Cap Long C-pin M8 x 25mm Washer...
... Water Bottle Holder Inner Leg Cover Outer Leg Cover Right Rear Leg Cover Right Front Leg Cover Left Rear Leg Cover Left Front Leg Cover Console Sensor/Wire Handgrip Wheel Stabilizer Cap Drive Belt Right Crank Arm Left Crank Arm Leveling Foot Latch Bracket Crank Cap Long C-pin M8 x 25mm Washer...


