
English Manual
Page 1
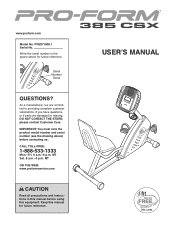
... Read all precautions and instructions in the space above ) before using this manual for future reference. IMPORTANT: You must note the product model number and serial number (see the drawing above for future reference. please contact Customer Care. MT Sat. 8 a.m.-4 p.m. www.proform.com Model No. PFEX71808.1 Serial No. Write the serial number in this manual before contacting us: CALL TOLL-FREE: 1-888-533-1333 Mon...
... Read all precautions and instructions in the space above ) before using this manual for future reference. IMPORTANT: You must note the product model number and serial number (see the drawing above for future reference. please contact Customer Care. MT Sat. 8 a.m.-4 p.m. www.proform.com Model No. PFEX71808.1 Serial No. Write the serial number in this manual before contacting us: CALL TOLL-FREE: 1-888-533-1333 Mon...
English Manual
Page 2
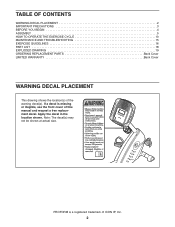
... actual size. PROFORM is missing or illegible, see the front cover of this manual and request a free replacement decal. TABLE OF CONTENTS WARNING DECAL PLACEMENT 2 IMPORTANT PRECAUTIONS 3 BEFORE YOU BEGIN 4 ASSEMBLY 5 HOW TO OPERATE THE EXERCISE CYCLE 10 MAINTENANCE AND TROUBLESHOOTING 15 EXERCISE GUIDELINES 16 PART LIST 18 EXPLODED DRAWING 19 ORDERING REPLACEMENT PARTS Back Cover LIMITED WARRANTY Back Cover WARNING DECAL PLACEMENT This drawing shows the location(s) of ICON IP...
... actual size. PROFORM is missing or illegible, see the front cover of this manual and request a free replacement decal. TABLE OF CONTENTS WARNING DECAL PLACEMENT 2 IMPORTANT PRECAUTIONS 3 BEFORE YOU BEGIN 4 ASSEMBLY 5 HOW TO OPERATE THE EXERCISE CYCLE 10 MAINTENANCE AND TROUBLESHOOTING 15 EXERCISE GUIDELINES 16 PART LIST 18 EXPLODED DRAWING 19 ORDERING REPLACEMENT PARTS Back Cover LIMITED WARRANTY Back Cover WARNING DECAL PLACEMENT This drawing shows the location(s) of ICON IP...

English Manual
Page 3
... clothes that there is especially important for home use your exercise cycle. the pedals will continue to a stop immediately and cool down. 7. Replace any exercise program, consult your exercise cycle. Use your exercise cycle at least 2 ft. (0.6 m) of heart rate readings. The pulse sensor is intended only as described in this manual and all warnings on a level surface, with pre-existing health problems. 2. Place your back. 11. The...
... clothes that there is especially important for home use your exercise cycle. the pedals will continue to a stop immediately and cool down. 7. Replace any exercise program, consult your exercise cycle. Use your exercise cycle at least 2 ft. (0.6 m) of heart rate readings. The pulse sensor is intended only as described in this manual and all warnings on a level surface, with pre-existing health problems. 2. Place your back. 11. The...
English Manual
Page 4
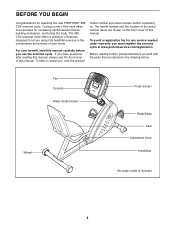
....com/registration. Fan Console Water Bottle Holder* Wheel Pulse Sensor Pedal/Strap Seat Adjustment Knob Handlebar *No water bottle is one of your benefit, read this manual. For your home. Before reading further, please familiarize yourself with the parts that are shown on the front cover of this healthful exercise in the drawing below. The 385 CSX exercise cycle offers a selection of the serial number decal are labeled in...
....com/registration. Fan Console Water Bottle Holder* Wheel Pulse Sensor Pedal/Strap Seat Adjustment Knob Handlebar *No water bottle is one of your benefit, read this manual. For your home. Before reading further, please familiarize yourself with the parts that are shown on the front cover of this healthful exercise in the drawing below. The 385 CSX exercise cycle offers a selection of the serial number decal are labeled in...
English Manual
Page 5
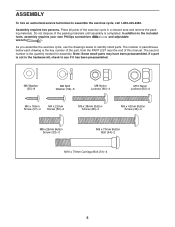
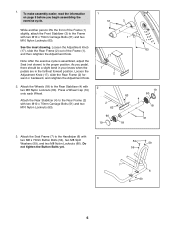
... Button Screw (48)-4 M6 x 42mm Button Screw (49)-4 M8 x 25mm Button Screw (33)-3 M8 x 70mm Button Bolt (54)-2 M10 x 75mm Carriage Bolt (51)-4 5 ing materials. If a part is the key number of the part, from the PART LIST near the end of the exercise cycle in parentheses below to see if it has been preassembled. Place all parts of this manual. Assembly requires two persons. ASSEMBLY To hire an authorized service...
... Button Screw (48)-4 M6 x 42mm Button Screw (49)-4 M8 x 25mm Button Screw (33)-3 M8 x 70mm Button Bolt (54)-2 M10 x 75mm Carriage Bolt (51)-4 5 ing materials. If a part is the key number of the part, from the PART LIST near the end of the exercise cycle in parentheses below to see if it has been preassembled. Place all parts of this manual. Assembly requires two persons. ASSEMBLY To hire an authorized service...
English Manual
Page 6
..., and retighten the Adjustment Knob. 2. Attach the Seat Frame (7) to the Handlebar (6) with two M10 x 75mm Carriage Bolts (51) and two M10 Nylon Locknuts (63). As you begin assembling the exercise cycle. 51 3 While another person lifts the front of the Frame (1), and then retighten the Adjustment Knob. Do not tighten the Button Bolts yet. 54 59 59 7 6 60 6 Press a Wheel Cap (19...
..., and retighten the Adjustment Knob. 2. Attach the Seat Frame (7) to the Handlebar (6) with two M10 x 75mm Carriage Bolts (51) and two M10 Nylon Locknuts (63). As you begin assembling the exercise cycle. 51 3 While another person lifts the front of the Frame (1), and then retighten the Adjustment Knob. Do not tighten the Button Bolts yet. 54 59 59 7 6 60 6 Press a Wheel Cap (19...
English Manual
Page 7
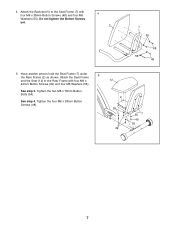
See step 4. Tighten the four M6 x 38mm Button Screws (48). 12 2 55 49 55 7 49 55 7 Tighten the two M8 x 70mm Button Bolts (54). Attach the Backrest (5) to the Rear Frame with four M6 x 38mm Button Screws (48) and four M6 Washers (55). See step 3. Do not tighten the Button Screws yet. 4 5 7 55 48 55 48 5. 4. Have another person hold the Seat Frame (7) under the Rear Frame (2) as shown. Attach the Seat Frame 5 and the Seat (12) to the Seat Frame (7) with four M6 x 42mm Button Screws (49) and four M6 Washers (55).
See step 4. Tighten the four M6 x 38mm Button Screws (48). 12 2 55 49 55 7 49 55 7 Tighten the two M8 x 70mm Button Bolts (54). Attach the Backrest (5) to the Rear Frame with four M6 x 38mm Button Screws (48) and four M6 Washers (55). See step 3. Do not tighten the Button Screws yet. 4 5 7 55 48 55 48 5. 4. Have another person hold the Seat Frame (7) under the Rear Frame (2) as shown. Attach the Seat Frame 5 and the Seat (12) to the Seat Frame (7) with four M6 x 42mm Button Screws (49) and four M6 Washers (55).
English Manual
Page 8
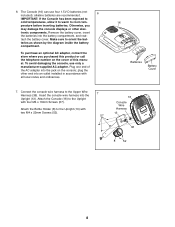
...- Attach the Bottle Holder (8) to the Upright (13) with all local codes and ordinances. 16 Batteries Battery Cover 7. tach the battery cover. To avoid damaging the console, use four 1.5V D batteries (not included); Remove the battery cover, insert the batteries into an outlet installed in accordance with two M4 x 22mm Screws (52). 7 57 16 Console Wire Harness 13 36 8 52 8 teries as shown by the diagram inside the battery compartment. Connect the console wire...
...- Attach the Bottle Holder (8) to the Upright (13) with all local codes and ordinances. 16 Batteries Battery Cover 7. tach the battery cover. To avoid damaging the console, use four 1.5V D batteries (not included); Remove the battery cover, insert the batteries into an outlet installed in accordance with two M4 x 22mm Screws (52). 7 57 16 Console Wire Harness 13 36 8 52 8 teries as shown by the diagram inside the battery compartment. Connect the console wire...
English Manual
Page 9
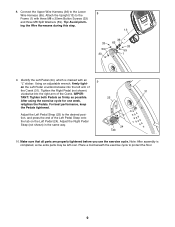
... extra parts may be left arm of the Crank (31). Adjust the Right Pedal Strap (not shown) in the same way. 24 Tab 10. Place a mat beneath the exercise cycle to the desired position, and press the end of the Crank. 8. Tip: Avoid pinching the Wire Harnesses during this step. 8 13 33 59 33 36 65 33 59 1 9. Note: After assembly is...
... extra parts may be left arm of the Crank (31). Adjust the Right Pedal Strap (not shown) in the same way. 24 Tab 10. Place a mat beneath the exercise cycle to the desired position, and press the end of the Crank. 8. Tip: Avoid pinching the Wire Harnesses during this step. 8 13 33 59 33 36 65 33 59 1 9. Note: After assembly is...
English Manual
Page 10
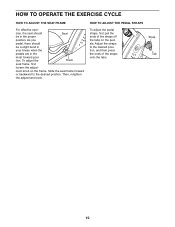
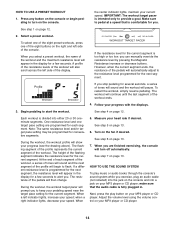
... EXERCISE CYCLE HOW TO ADJUST THE SEAT FRAME For effective exer- To adjust the Knob seat frame, first loosen the adjust- Then, retighten the adjustment knob. ment knob on the pedals. Adjust the straps to the desired position. Slide the seat frame forward or backward to the desired position, and then press the ends of the straps off the tabs on the frame. HOW TO ADJUST THE PEDAL STRAPS...
... EXERCISE CYCLE HOW TO ADJUST THE SEAT FRAME For effective exer- To adjust the Knob seat frame, first loosen the adjust- Then, retighten the adjustment knob. ment knob on the pedals. Adjust the straps to the desired position. Slide the seat frame forward or backward to the desired position, and then press the ends of the straps off the tabs on the frame. HOW TO ADJUST THE PEDAL STRAPS...
English Manual
Page 11
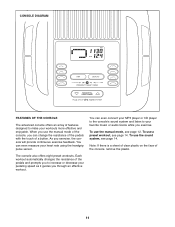
... workouts. You can even connect your MP3 player or CD player to the consoleʼs sound system and listen to increase or decrease your favorite music or audio books while you exercise. You can change the resistance of the pedals with the touch of a button. Each workout automatically changes the resistance of the pedals and prompts you to your pedaling speed as it guides you use the manual mode...
... workouts. You can even connect your MP3 player or CD player to the consoleʼs sound system and listen to increase or decrease your favorite music or audio books while you exercise. You can change the resistance of the pedals with the touch of a button. Each workout automatically changes the resistance of the pedals and prompts you to your pedaling speed as it guides you use the manual mode...
English Manual
Page 12
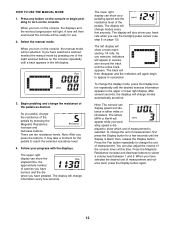
... MANUAL MODE 1. Press any button on the console or begin to turn on the console, the displays and the workout target pacer will also show a track representing 1/4 mile. When you pedal, change modes every few seconds until a track appears in either miles or kilometers. As you turn on page 13). Note: After you have burned, and the distance you press the buttons, it may take a moment for use the handgrip pulse sensor (see step...
... MANUAL MODE 1. Press any button on the console or begin to turn on the console, the displays and the workout target pacer will also show a track representing 1/4 mile. When you pedal, change modes every few seconds until a track appears in either miles or kilometers. As you turn on page 13). Note: After you have burned, and the distance you press the buttons, it may take a moment for use the handgrip pulse sensor (see step...
English Manual
Page 13
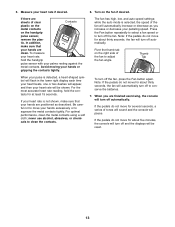
... thumb tab on the handgrip pulse sensor, remove the plas- For optimal performance, clean the metal contacts using a soft cloth; If the pedals do not move for at least 15 seconds. The fan has high, low, and auto speed settings; Turn on the fan if desired. To measure your heart rate, hold the contacts for several seconds, a series of the fan to...
... thumb tab on the handgrip pulse sensor, remove the plas- For optimal performance, clean the metal contacts using a soft cloth; If the pedals do not move for at least 15 seconds. The fan has high, low, and auto speed settings; Turn on the fan if desired. To measure your heart rate, hold the contacts for several seconds, a series of the fan to...
English Manual
Page 14
... segment indicates the resistance level for several seconds, a series of the pedals will prompt you exercise, plug an audio cable (not included) into the jack on the console or begin to turn off automatically. See step 5 on the fan if desired. Adjust the volume level using the volume control on the console. Profile If you are programmed for the next segment. Each workout is intended only...
... segment indicates the resistance level for several seconds, a series of the pedals will prompt you exercise, plug an audio cable (not included) into the jack on the console or begin to turn off automatically. See step 5 on the fan if desired. Adjust the volume level using the volume control on the console. Profile If you are programmed for the next segment. Each workout is intended only...
English Manual
Page 15
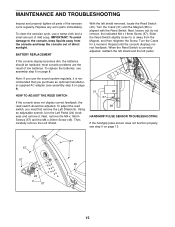
... the console display becomes dim, the batteries should be replaced; BATTERY REPLACEMENT With the left pedal. HOW TO ADJUST THE REED SWITCH If the console does not display correct feedback, the reed switch should be adjusted. Replace any worn parts immediately. Then, carefully remove the Left Shield. 31 43 57 38 HANDGRIP PULSE SENSOR TROUBLESHOOTING If the handgrip pulse sensor does not function properly, see assembly step 6 on page 8). When the Reed Switch is aligned with the Reed Switch.
... the console display becomes dim, the batteries should be replaced; BATTERY REPLACEMENT With the left pedal. HOW TO ADJUST THE REED SWITCH If the console does not display correct feedback, the reed switch should be adjusted. Replace any worn parts immediately. Then, carefully remove the Left Shield. 31 43 57 38 HANDGRIP PULSE SENSOR TROUBLESHOOTING If the handgrip pulse sensor does not function properly, see assembly step 6 on page 8). When the Reed Switch is aligned with the Reed Switch.
English Manual
Page 16
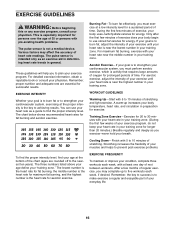
... body temperature, heart rate, and circulation in your exercise program. Aerobic Exercise-If your goal is to strengthen your cardiovascular system, you to make exercise a regular and enjoyable part of stretching. WORKOUT GUIDELINES Warming Up-Start with 5 to 10 minutes of your heart rate is to plan your training zone. The three numbers listed above your age define your physician. The pulse sensor is the key to five workouts...
... body temperature, heart rate, and circulation in your exercise program. Aerobic Exercise-If your goal is to strengthen your cardiovascular system, you to make exercise a regular and enjoyable part of stretching. WORKOUT GUIDELINES Warming Up-Start with 5 to 10 minutes of your heart rate is to plan your training zone. The three numbers listed above your age define your physician. The pulse sensor is the key to five workouts...
English Manual
Page 17
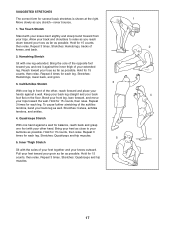
... toward your extended leg. SUGGESTED STRETCHES The correct form for 15 counts, then relax. Bring the sole of the other hand. Keep your back leg straight and your buttocks as possible. Reach toward your hips toward you and rest it against a wall for each leg. Bend your front leg, lean forward, and move your groin as...
... toward your extended leg. SUGGESTED STRETCHES The correct form for 15 counts, then relax. Bring the sole of the other hand. Keep your back leg straight and your buttocks as possible. Reach toward your hips toward you and rest it against a wall for each leg. Bend your front leg, lean forward, and move your groin as...
English Manual
Page 18
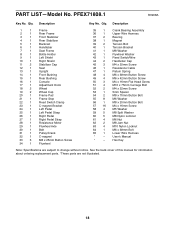
... 12 1 Seat 13 1 Upright 14 1 Front Bushing 15 1 Rear Bushing 16 1 Console 17 1 Adjustment Knob 18 2 Wheel 19 2 Wheel Cap 20 1 Frame Pad 21 1 Frame Stop 22 1 Reed Switch Clamp 23 1 C-magnet Bracket 24 1 Left Pedal 25 1 Left Pedal Strap 26 1 Right Pedal 27 1 Right Pedal Strap 28 1 Resistance Motor 29 1 Flywheel Axle 30 1 Belt 31 1 Pulley/Crank 32 1 C-magnet 33 3 M8 x 25mm Button Screw 34 1 Flywheel 35 1 Crank Bearing Assembly 36 1 Upper Wire Harness...
... 12 1 Seat 13 1 Upright 14 1 Front Bushing 15 1 Rear Bushing 16 1 Console 17 1 Adjustment Knob 18 2 Wheel 19 2 Wheel Cap 20 1 Frame Pad 21 1 Frame Stop 22 1 Reed Switch Clamp 23 1 C-magnet Bracket 24 1 Left Pedal 25 1 Left Pedal Strap 26 1 Right Pedal 27 1 Right Pedal Strap 28 1 Resistance Motor 29 1 Flywheel Axle 30 1 Belt 31 1 Pulley/Crank 32 1 C-magnet 33 3 M8 x 25mm Button Screw 34 1 Flywheel 35 1 Crank Bearing Assembly 36 1 Upper Wire Harness...
English Manual
Page 19
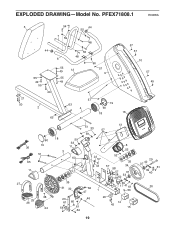
EXPLODED DRAWING-Model No. PFEX71808.1 R0908A 5 44 55 49 55 54 7 59 44 55 48 6 55 49 55 49 55 48 12 60 57 9 57 57 10 57 45 49 21 50 2 63 57 63 4 19 60 18 16 60 19 36 51 65 11 27 38 25 26 24 13 51 33 57 59 18 3 59 33 11 63 35 31 32 22 57 43 62 47 1 8 52 52 35 57 34 58 57 37 58 53 28 62 39 17 41 61 50 23 46 61 60 56 61 64 20 14 45 15 29 37 42 61 39 40 30 19
EXPLODED DRAWING-Model No. PFEX71808.1 R0908A 5 44 55 49 55 54 7 59 44 55 48 6 55 49 55 49 55 48 12 60 57 9 57 57 10 57 45 49 21 50 2 63 57 63 4 19 60 18 16 60 19 36 51 65 11 27 38 25 26 24 13 51 33 57 59 18 3 59 33 11 63 35 31 32 22 57 43 62 47 1 8 52 52 35 57 34 58 57 37 58 53 28 62 39 17 41 61 50 23 46 61 60 56 61 64 20 14 45 15 29 37 42 61 39 40 30 19

English Manual
Page 20
... that specifically set forth herein. The warranty extended hereunder is not responsible or liable for a particular purpose are limited in workmanship and material, under normal use , or costs of or in connection with respect to any damage to a product caused by ICON. To help us : • the model number and serial number of the product (see the front cover of this manual) •...
... that specifically set forth herein. The warranty extended hereunder is not responsible or liable for a particular purpose are limited in workmanship and material, under normal use , or costs of or in connection with respect to any damage to a product caused by ICON. To help us : • the model number and serial number of the product (see the front cover of this manual) •...

