
English Manual
Page 1
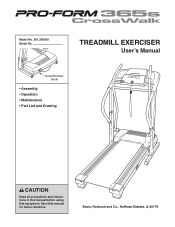
Save this equipment. TREADMILL EXERCISER User's Manual Serial Number Decal • Assembly • Operation • Maintenance • Part List and Drawing CAUTION Read all precautions and instructions in this manual before using this manual for future reference. Model No. 831.295030 Serial No. Sears, Roebuck and Co., Hoffman Estates, IL 60179
Save this equipment. TREADMILL EXERCISER User's Manual Serial Number Decal • Assembly • Operation • Maintenance • Part List and Drawing CAUTION Read all precautions and instructions in this manual before using this manual for future reference. Model No. 831.295030 Serial No. Sears, Roebuck and Co., Hoffman Estates, IL 60179
English Manual
Page 2
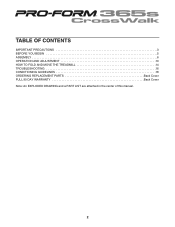
TABLE OF CONTENTS IMPORTANT PRECAUTIONS 3 BEFORE YOU BEGIN 5 ASSEMBLY 6 OPERATION AND ADJUSTMENT 10 HOW TO FOLD AND MOVE THE TREADMILL 14 TROUBLESHOOTING 16 CONDITIONING GUIDELINES 18 ORDERING REPLACEMENT PARTS Back Cover FULL 90 DAY WARRANTY Back Cover Note: An EXPLODED DRAWING and a PART LIST are attached in the center of this manual. 2
TABLE OF CONTENTS IMPORTANT PRECAUTIONS 3 BEFORE YOU BEGIN 5 ASSEMBLY 6 OPERATION AND ADJUSTMENT 10 HOW TO FOLD AND MOVE THE TREADMILL 14 TROUBLESHOOTING 16 CONDITIONING GUIDELINES 18 ORDERING REPLACEMENT PARTS Back Cover FULL 90 DAY WARRANTY Back Cover Note: An EXPLODED DRAWING and a PART LIST are attached in the center of this manual. 2
English Manual
Page 3
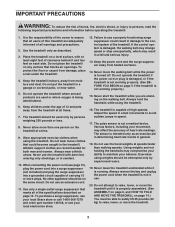
.... Various factors, including your balance. Using weights and not holding the handrails may result in a fall and serious injury. 13. Place the treadmill on the walking belt. Use only a single-outlet surge suppressor that meets all of the specifications described on any surface that all users of...To reduce the risk of burns, fire, electric shock, or injury to avoid sudden jumps in speed. 17. Keep children under the treadmill. 4. Do not use the treadmill with at a time. 9. The sensor is not in sandals. 10. When connecting the power cord (see your local Sears store or...
.... Various factors, including your balance. Using weights and not holding the handrails may result in a fall and serious injury. 13. Place the treadmill on the walking belt. Use only a single-outlet surge suppressor that meets all of the specifications described on any surface that all users of...To reduce the risk of burns, fire, electric shock, or injury to avoid sudden jumps in speed. 17. Keep children under the treadmill. 4. Do not use the treadmill with at a time. 9. The sensor is not in sandals. 10. When connecting the power cord (see your local Sears store or...
English Manual
Page 4
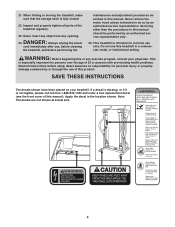
...the maintenance and adjustment procedures described in this manual. Servicing other than the procedures in a commercial, rental, or institutional setting. This treadmill is not legible, please call toll-free 1-888-533-1333 and order a free replacement decal (see the front cover of this ... THESE INSTRUCTIONS The decals shown have been placed on your physician. 21. Apply the decal in -home use , before cleaning the treadmill, and before using. Sears assumes no responsibility for personal injury or property damage sustained by an authorized service representative only. 25. If...
...the maintenance and adjustment procedures described in this manual. Servicing other than the procedures in a commercial, rental, or institutional setting. This treadmill is not legible, please call toll-free 1-888-533-1333 and order a free replacement decal (see the front cover of this ... THESE INSTRUCTIONS The decals shown have been placed on your physician. 21. Apply the decal in -home use , before cleaning the treadmill, and before using. Sears assumes no responsibility for personal injury or property damage sustained by an authorized service representative only. 25. If...

English Manual
Page 5
... assist you 're not exercising, the CROSSWALK 365s treadmill can be folded up, requiring less than half the floor space of your benefit, read this manual carefully before calling. If you for selecting the new PROFORM® CROSSWALK 365s treadmill. The serial number can be found on a... decal attached to the treadmill (see the front cover of the treadmill is 831.295030. BEFORE YOU BEGIN Thank you have questions after reading ...
... assist you 're not exercising, the CROSSWALK 365s treadmill can be folded up, requiring less than half the floor space of your benefit, read this manual carefully before calling. If you for selecting the new PROFORM® CROSSWALK 365s treadmill. The serial number can be found on a... decal attached to the treadmill (see the front cover of the treadmill is 831.295030. BEFORE YOU BEGIN Thank you have questions after reading ...
English Manual
Page 6
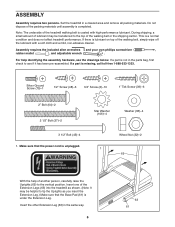
... (63) in a cleared area and remove all packing materials. If a part is completed. Insert one of the Extension Legs (63) into the treadmill as shown. (Note: It may be helpful to the top of the walking belt or the shipping carton. Note: The underside of the...cloth and a mild, non-abrasive cleaner. Assembly requires the included allen wrenches and your own phillips screwdriver , rubber mallet , and adjustable wrench . Set the treadmill in the same way. 6 63 61 For help of the walking belt, simply wipe off the lubricant with high-performance lubricant. Silver Ground Screw (75...
... (63) in a cleared area and remove all packing materials. If a part is completed. Insert one of the Extension Legs (63) into the treadmill as shown. (Note: It may be helpful to the top of the walking belt or the shipping carton. Note: The underside of the...cloth and a mild, non-abrasive cleaner. Assembly requires the included allen wrenches and your own phillips screwdriver , rubber mallet , and adjustable wrench . Set the treadmill in the same way. 6 63 61 For help of the walking belt, simply wipe off the lubricant with high-performance lubricant. Silver Ground Screw (75...
English Manual
Page 7
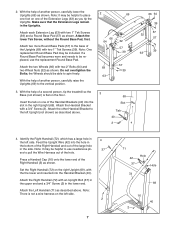
... the Uprights. Attach two more Round Base Pads (57) to the left Upright (not shown) as shown. With the help of a second person, tip the treadmill so the Base (not shown) is not a wire harness on the right Upright (69), with two 1" Tek Screws (39). Note: It may be able to...
... the Uprights. Attach two more Round Base Pads (57) to the left Upright (not shown) as shown. With the help of a second person, tip the treadmill so the Base (not shown) is not a wire harness on the right Upright (69), with two 1" Tek Screws (39). Note: It may be able to...
English Manual
Page 9
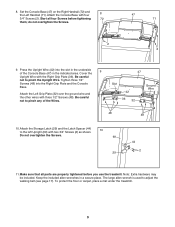
... with three 1/2" Screws (48). Be careful not to adjust the walking belt (see page 17). To protect the floor or carpet, place a mat under the treadmill. 9 Cover the Upright Wire with two 3/4" Screws (2) as shown. Note: Extra hardware may be included. Set the Console Base (47) on the Right Handrail (72...) and the Left Handrail (71). Do not overtighten the Screws. 69 29 44 2 11.Make sure that all four Screws before you use the treadmill. The large allen wrench is used to pinch the Upright Wire. Be careful not to pinch any of the Console Base (47) in a secure place...
... with three 1/2" Screws (48). Be careful not to adjust the walking belt (see page 17). To protect the floor or carpet, place a mat under the treadmill. 9 Cover the Upright Wire with two 3/4" Screws (2) as shown. Note: Extra hardware may be included. Set the Console Base (47) on the Right Handrail (72...) and the Left Handrail (71). Do not overtighten the Screws. 69 29 44 2 11.Make sure that all four Screws before you use the treadmill. The large allen wrench is used to pinch the Upright Wire. Be careful not to pinch any of the Console Base (47) in a secure place...

English Manual
Page 10
...a proper outlet installed by a metal screw. A temporary adapter that is not available. 1 Grounded Outlet Box Surge Suppressor Grounding Pin Your treadmill, like the adapter illustrated in drawing 2 may result in a fall and serious injury. The surge suppressor must be connected to reduce the... circuit, and has a grounding plug that is properly grounded. HOW TO PLUG IN THE POWER CORD DANGER: Improper connection of the treadmill. Voltage surges, spikes, and noise interference can be installed by sudden voltage changes in drawing 1 below. Grounding Pin Grounded Outlet Grounding...
...a proper outlet installed by a metal screw. A temporary adapter that is not available. 1 Grounded Outlet Box Surge Suppressor Grounding Pin Your treadmill, like the adapter illustrated in drawing 2 may result in a fall and serious injury. The surge suppressor must be connected to reduce the... circuit, and has a grounding plug that is properly grounded. HOW TO PLUG IN THE POWER CORD DANGER: Improper connection of the treadmill. Voltage surges, spikes, and noise interference can be installed by sudden voltage changes in drawing 1 below. Grounding Pin Grounded Outlet Grounding...

English Manual
Page 11
...pressing the Speed buttons. Note: The console can display speed and distance in either miles or kilometers (see the drawing above ) while operating the treadmill. • Adjust the speed in speed. • To reduce the possibility of plastic Key on the power. • Always wear the clip ...(see the drawing above ), and slide the clip onto the waistband of the treadmill. Each time a button is not pulled from the console. Clip CAUTION: Before operating the console, read the following precautions. • Do not ...
...pressing the Speed buttons. Note: The console can display speed and distance in either miles or kilometers (see the drawing above ) while operating the treadmill. • Adjust the speed in speed. • To reduce the possibility of plastic Key on the power. • Always wear the clip ...(see the drawing above ), and slide the clip onto the waistband of the treadmill. Each time a button is not pulled from the console. Clip CAUTION: Before operating the console, read the following precautions. • Do not ...
English Manual
Page 12
...heart rate appears to flash. Then, place your heart rate is used, inspect the alignment of measurement. Keep the key in either of the treadmill as described above. This display will be restricted and your progress with the three displays. After a few seconds, as shown by the mode ...detected. To stop the walking belt, press the Stop button. Time/Distance display-This display shows the elapsed time and the distance that the treadmill is not displayed, lift your thumb on the pulse sensor as desired. An "E" for English miles or an "M" for metric kilometers will begin...
...heart rate appears to flash. Then, place your heart rate is used, inspect the alignment of measurement. Keep the key in either of the treadmill as described above. This display will be restricted and your progress with the three displays. After a few seconds, as shown by the mode ...detected. To stop the walking belt, press the Stop button. Time/Distance display-This display shows the elapsed time and the distance that the treadmill is not displayed, lift your thumb on the pulse sensor as desired. An "E" for English miles or an "M" for metric kilometers will begin...

English Manual
Page 13
Upper Body Arms Resistance Knobs 13 To vary the intensity of your arms, shoulders, and back for a total body workout, move the upper body arms forward and back as you can either hold the handrails or use the upper body arms. To exercise your upper body exercise, the resistance of the upper body arms can be adjusted. to decrease the resistance, turn the resistance knobs clockwise; HOW TO USE THE UPPER BODY ARMS As you walk on the treadmill, you walk on the treadmill. To increase the resistance, turn the knobs counterclockwise.
Upper Body Arms Resistance Knobs 13 To vary the intensity of your arms, shoulders, and back for a total body workout, move the upper body arms forward and back as you can either hold the handrails or use the upper body arms. To exercise your upper body exercise, the resistance of the upper body arms can be adjusted. to decrease the resistance, turn the resistance knobs clockwise; HOW TO USE THE UPPER BODY ARMS As you walk on the treadmill, you walk on the treadmill. To increase the resistance, turn the knobs counterclockwise.

English Manual
Page 14
.... To protect the floor or carpet from damage, place a mat under the treadmill. Tilt the treadmill back until it is fully engaged over the catch. Next, unplug the power cord. Raise the treadmill until it rolls freely on the base as described above 85° Fahrenheit. ...as shown. 2. Storage Latch Engaged Catch HOW TO MOVE THE TREADMILL Before moving the treadmill. Place one foot on the front wheels. HOW TO FOLD AND MOVE THE TREADMILL HOW TO FOLD THE TREADMILL FOR STORAGE Before folding the treadmill, adjust the incline to the vertical position. 2. CAUTION: You...
.... To protect the floor or carpet from damage, place a mat under the treadmill. Tilt the treadmill back until it is fully engaged over the catch. Next, unplug the power cord. Raise the treadmill until it rolls freely on the base as described above 85° Fahrenheit. ...as shown. 2. Storage Latch Engaged Catch HOW TO MOVE THE TREADMILL Before moving the treadmill. Place one foot on the front wheels. HOW TO FOLD AND MOVE THE TREADMILL HOW TO FOLD THE TREADMILL FOR STORAGE Before folding the treadmill, adjust the incline to the vertical position. 2. CAUTION: You...

English Manual
Page 15
Press the storage latch to the floor. Hold the treadmill firmly with your back straight. Storage Latch Catch 15 Hold the upper end of injury, bend your legs and keep your right hand. Pivot the treadmill down until the frame and foot rail are past the storage latch. 2. To decrease the possibility of the treadmill with both hands, and lower the treadmill to the floor. HOW TO LOWER THE TREADMILL FOR USE 1. Do not drop the treadmill frame to the left.
Press the storage latch to the floor. Hold the treadmill firmly with your back straight. Storage Latch Catch 15 Hold the upper end of injury, bend your legs and keep your right hand. Pivot the treadmill down until the frame and foot rail are past the storage latch. 2. To decrease the possibility of the treadmill with both hands, and lower the treadmill to the floor. HOW TO LOWER THE TREADMILL FOR USE 1. Do not drop the treadmill frame to the left.
English Manual
Page 16
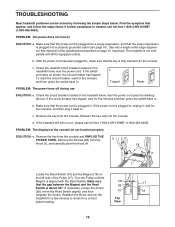
.../off during use SOLUTION: a. c. Turn the Pulley until the Magnet is plugged in . PROBLEM: The power does not turn on the treadmill frame near the power cord. c. Check the circuit breaker located on SOLUTION: a. Remove the key from the console and UNPLUG THE POWER CORD.... PROBLEM: The displays of the Pulley (17). If the switch protrudes as shown, the circuit breaker has tripped. b. TROUBLESHOOTING Most treadmill problems can be solved by following the simple steps below. If the circuit breaker has tripped, wait for a correct speed reading. Reattach...
.../off during use SOLUTION: a. c. Turn the Pulley until the Magnet is plugged in . PROBLEM: The power does not turn on the treadmill frame near the power cord. c. Check the circuit breaker located on SOLUTION: a. Remove the key from the console and UNPLUG THE POWER CORD.... PROBLEM: The displays of the Pulley (17). If the switch protrudes as shown, the circuit breaker has tripped. b. TROUBLESHOOTING Most treadmill problems can be solved by following the simple steps below. If the circuit breaker has tripped, wait for a correct speed reading. Reattach...
English Manual
Page 17
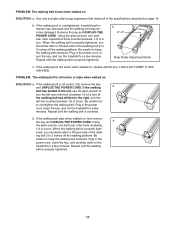
... When the walking belt is off -center or slips when walked on page 10. Plug in the power cord, insert the key, and run the treadmill for a few minutes. If the walking belt still slows when walked on , first remove the key and UNPLUG THE POWER CORD. If the walking ...the left, use the allen wrench to 3 inches off the walking platform. Repeat until the walking belt is centered. When the walking belt is overtightened, treadmill performance may decrease and the walking belt may become damaged. ing belt 2 to keep the walking belt centered. Use only a single-outlet surge suppressor that...
... When the walking belt is off -center or slips when walked on page 10. Plug in the power cord, insert the key, and run the treadmill for a few minutes. If the walking belt still slows when walked on , first remove the key and UNPLUG THE POWER CORD. If the walking ...the left, use the allen wrench to 3 inches off the walking platform. Repeat until the walking belt is centered. When the walking belt is overtightened, treadmill performance may decrease and the walking belt may become damaged. ing belt 2 to keep the walking belt centered. Use only a single-outlet surge suppressor that...
English Manual
Page 18
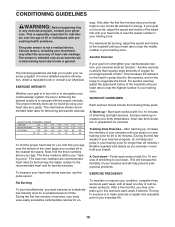
...parts: A Warm-up increases your breath. The proper intensity level can be "aerobic." For aerobic exercise, adjust the speed and incline of the treadmill until your pulse is in your training zone for energy. A proper warm-up -Start each week, with preexisting health problems. The pulse sensor is..., you , first find your cardiovascular system, the key to achieving the desired results is to exercise with 5 to 10 minutes of the treadmill until your heart rate is near the lowest number in preparation for aerobic exercise. The sensor is the recommended heart rate for exercise. Only ...
...parts: A Warm-up increases your breath. The proper intensity level can be "aerobic." For aerobic exercise, adjust the speed and incline of the treadmill until your pulse is in your training zone for energy. A proper warm-up -Start each week, with preexisting health problems. The pulse sensor is..., you , first find your cardiovascular system, the key to achieving the desired results is to exercise with 5 to 10 minutes of the treadmill until your heart rate is near the lowest number in preparation for aerobic exercise. The sensor is the recommended heart rate for exercise. Only ...

English Manual
Page 22
...Dept. 817WA, Hoffman Estates, IL 60179 Part No. 214292 R0804B Printed in this Sears Treadmill Exerciser, contact the nearest Sears Service Center throughout the United States and Sears will repair or replace the Treadmill Exerciser, free of charge. FULL 90 DAY WARRANTY For 90 days from the date of ...purchase, if failure occurs due to state. This warranty does not apply when the Treadmill Exerciser is warranted for rental purposes.
...Dept. 817WA, Hoffman Estates, IL 60179 Part No. 214292 R0804B Printed in this Sears Treadmill Exerciser, contact the nearest Sears Service Center throughout the United States and Sears will repair or replace the Treadmill Exerciser, free of charge. FULL 90 DAY WARRANTY For 90 days from the date of ...purchase, if failure occurs due to state. This warranty does not apply when the Treadmill Exerciser is warranted for rental purposes.


