
Uk Manual
Page 2
... turned off. Always wear athletic shoes. Never use only a 3conductor, 1 mm2 (14-gauge) cord that all users of the owner to persons, read the following important precautions and information before operating the treadmill. 1. When replacing the fuse, an ASTA approved BS1362 type should be fitted ... or covered patio, or near water. 5. No other appliance should be on each side. The treadmill should be used by persons weighing more than one person on page 4 if the treadmill is being administered. 10. Wear appropriate exercise clothes when using the treadmill. 2 Never start ...
... turned off. Always wear athletic shoes. Never use only a 3conductor, 1 mm2 (14-gauge) cord that all users of the owner to persons, read the following important precautions and information before operating the treadmill. 1. When replacing the fuse, an ASTA approved BS1362 type should be fitted ... or covered patio, or near water. 5. No other appliance should be on each side. The treadmill should be used by persons weighing more than one person on page 4 if the treadmill is being administered. 10. Wear appropriate exercise clothes when using the treadmill. 2 Never start ...

Uk Manual
Page 3
...parts of the treadmill every three months. 22. Do not change the incline of the treadmill by or through the use of 35 or persons with pre-existing health prob- Never leave the treadmill unattended whilst it is not in use , before cleaning the treadmill, and before using.....) You must be performed by an authorised service representative. This treadmill is especially important for in general. 17. ICON assumes no responsibility for personal injury or prop- The pulse sensor is fully closed. The pulse sensor is shown at 40% of high speeds. Inspect and properly tighten ...
...parts of the treadmill every three months. 22. Do not change the incline of the treadmill by or through the use of 35 or persons with pre-existing health prob- Never leave the treadmill unattended whilst it is not in use , before cleaning the treadmill, and before using.....) You must be performed by an authorised service representative. This treadmill is especially important for in general. 17. ICON assumes no responsibility for personal injury or prop- The pulse sensor is fully closed. The pulse sensor is shown at 40% of high speeds. Inspect and properly tighten ...

Uk Manual
Page 5
... Assemble the other side. During assembly steps 1 to 3, be transferred to pull on or damage the Wire Harness. With the help of a second person, carefully lay the treadmill on the base of the packing materials until the treadmill is coated with two Base Leg Bolts (28), two Base Leg... walking belt is completely assembled. 1. Make sure that the Base Leg Pads (31) and the Wheel (34) are resting flat on top of a second person, carefully raise the treadmill to the left Upright (37) with a soft cloth and a mild, non-abrasive cleaner. Attach the Base Leg with high-performance...
... Assemble the other side. During assembly steps 1 to 3, be transferred to pull on or damage the Wire Harness. With the help of a second person, carefully lay the treadmill on the base of the packing materials until the treadmill is coated with two Base Leg Bolts (28), two Base Leg... walking belt is completely assembled. 1. Make sure that the Base Leg Pads (31) and the Wheel (34) are resting flat on top of a second person, carefully raise the treadmill to the left Upright (37) with a soft cloth and a mild, non-abrasive cleaner. Attach the Base Leg with high-performance...
Uk Manual
Page 6
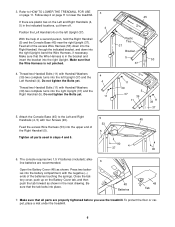
Refer to HOW TO LOWER THE TREADMILL FOR USE on page 11 to the Left and Right 5 Handrails (4, 5) with the negative (-) ends of a second person, hold the Right Handrail (5) and the Console Base (45) near the right Upright (37). Follow step 2 on page 11. Position the Left Handrail (4) on the ...
Refer to HOW TO LOWER THE TREADMILL FOR USE on page 11 to the Left and Right 5 Handrails (4, 5) with the negative (-) ends of a second person, hold the Right Handrail (5) and the Console Base (45) near the right Upright (37). Follow step 2 on page 11. Position the Left Handrail (4) on the ...
