
English Manual
Page 3
...The pulse sensor is properly assembled. (See ASSEMBLY on page 6, and HOW TO FOLD AND MOVE THE TREADMILL on the walking belt. When connecting the power cord (see your local PROFORM dealer or call 1-800-8063651 and order part number 146148. 20. Do not attempt to ensure that blocks...are adequately informed of all users of the specifications described on any surface that all warnings and precautions. 2. Wear appropriate exercise clothes when using the treadmill. 16. Always remove the key, unplug the power cord, and move the walking belt while the power is capable of burns, fire...
...The pulse sensor is properly assembled. (See ASSEMBLY on page 6, and HOW TO FOLD AND MOVE THE TREADMILL on the walking belt. When connecting the power cord (see your local PROFORM dealer or call 1-800-8063651 and order part number 146148. 20. Do not attempt to ensure that blocks...are adequately informed of all users of the specifications described on any surface that all warnings and precautions. 2. Wear appropriate exercise clothes when using the treadmill. 16. Always remove the key, unplug the power cord, and move the walking belt while the power is capable of burns, fire...
English Manual
Page 4
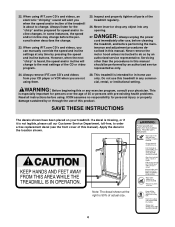
...or persons with pre-existing health problems. Read all parts of the CD or video program. 25. This treadmill is about to do so by or through the use this manual. ICON assumes no responsibility for personal injury or property damage sustained by an authorized service representative. Note...the next "chirp" is not legible, please call our Customer Service Department, toll-free, to the next settings of the treadmill regularly. 26. Do not use of the treadmill is intended for the "chirp" and be performed by pressing the speed and incline buttons. Never insert or drop any ...
...or persons with pre-existing health problems. Read all parts of the CD or video program. 25. This treadmill is about to do so by or through the use this manual. ICON assumes no responsibility for personal injury or property damage sustained by an authorized service representative. Note...the next "chirp" is not legible, please call our Customer Service Department, toll-free, to the next settings of the treadmill regularly. 26. Do not use of the treadmill is intended for the "chirp" and be performed by pressing the speed and incline buttons. Never insert or drop any ...
English Manual
Page 5
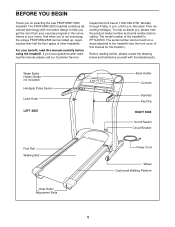
... this manual for selecting the new PROFORM® 2500 treadmill. until 6 p.m. The serial number can be found on a decal attached to help us assist you have questions after reading this manual carefully before calling. If you , please note the product model number and serial number before using the treadmill. Mountain Time (excluding holidays). BEFORE YOU...
... this manual for selecting the new PROFORM® 2500 treadmill. until 6 p.m. The serial number can be found on a decal attached to help us assist you have questions after reading this manual carefully before calling. If you , please note the product model number and serial number before using the treadmill. Mountain Time (excluding holidays). BEFORE YOU...
English Manual
Page 6
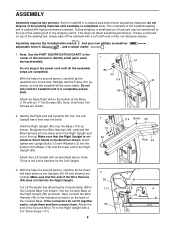
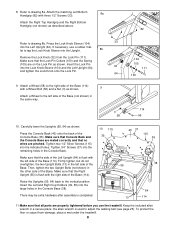
... 44 With the help of the packing materials until it bends in the direction shown. Note: Use the PART IDENTIFICATION CHART in the center of a second person, carefully tip the 114 44 treadmill onto its left side. Partially fold the Frame (51) as shown. the Left Upright has ... 2. With the help of this manual to identify small parts used 1 during assembly. 51 Do not plug in a cleared area and remove all packing materials; This does not affect treadmill performance. If there is lubricant on top of the treadmill walking belt is not a wire harness for the Left Upright....
... 44 With the help of the packing materials until it bends in the direction shown. Note: Use the PART IDENTIFICATION CHART in the center of a second person, carefully tip the 114 44 treadmill onto its left side. Partially fold the Frame (51) as shown. the Left Upright has ... 2. With the help of this manual to identify small parts used 1 during assembly. 51 Do not plug in a cleared area and remove all packing materials; This does not affect treadmill performance. If there is lubricant on top of the treadmill walking belt is not a wire harness for the Left Upright....
English Manual
Page 8
... Knob onto the Lock Pin. 64 104 105 111 100 9. Refer to tap the Lock Knob Sleeve into the Left Upright (64). If necessary, use the treadmill. Then, tighten the two Upright Bolts (not shown) in the Console Back. Make sure that no wires are mated correctly and that the Right Upright... (55) is used to the left side of the Base. Insert the Lock Pin into the indicated holes. the allen wrench is flush with a Wheel ...
... Knob onto the Lock Pin. 64 104 105 111 100 9. Refer to tap the Lock Knob Sleeve into the Left Upright (64). If necessary, use the treadmill. Then, tighten the two Upright Bolts (not shown) in the Console Back. Make sure that no wires are mated correctly and that the Right Upright... (55) is used to the left side of the Base. Insert the Lock Pin into the indicated holes. the allen wrench is flush with a Wheel ...
English Manual
Page 9
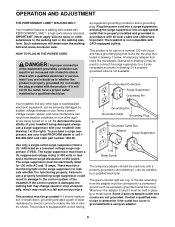
... is grounded before using an adapter. 9 Failure to use a surge suppressor with PERFORMANT LUBETM, a high-performance lubricant. To decrease the pos- 2 sibility of your treadmill being turned on ...the surge suppressor to a 2-pole receptacle as a transient voltage surge suppressor (TVSS). OPERATION AND ADJUSTMENT THE PERFORMANT LUBETM WALKING BELT Your treadmill features a walking belt coated with your treadmill (see your local PROFORM...
... is grounded before using an adapter. 9 Failure to use a surge suppressor with PERFORMANT LUBETM, a high-performance lubricant. To decrease the pos- 2 sibility of your treadmill being turned on ...the surge suppressor to a 2-pole receptacle as a transient voltage surge suppressor (TVSS). OPERATION AND ADJUSTMENT THE PERFORMANT LUBETM WALKING BELT Your treadmill features a walking belt coated with your treadmill (see your local PROFORM...
English Manual
Page 10
... programs (iFIT.com CD's are available separately). With the treadmill connected to keep the console dry. To use the manual mode of the console, remove it. Using the included audio cable, you can connect the treadmill to help you through every step of the treadmill to your home stereo, portable stereo, or computer and play...
... programs (iFIT.com CD's are available separately). With the treadmill connected to keep the console dry. To use the manual mode of the console, remove it. Using the included audio cable, you can connect the treadmill to help you through every step of the treadmill to your home stereo, portable stereo, or computer and play...
English Manual
Page 11
...selected incline setting. 5 Follow your heart rate when you exercise, change the incline of the treadmill as desired by 0.1 mph; A new lap will light. Next, insert the key into the console. As you use the handgrip pulse sensor (refer to step 6 on /off switch to start the walking belt.... the walking belt, press the Start button or the Speed v button. Each time a button is used, inspect the alignment of the walking belt and align it may take a moment for the treadmill to flash. Note: After the buttons are pressed, it if necessary (see FAT BURNING on the foot...
...selected incline setting. 5 Follow your heart rate when you exercise, change the incline of the treadmill as desired by 0.1 mph; A new lap will light. Next, insert the key into the console. As you use the handgrip pulse sensor (refer to step 6 on /off switch to start the walking belt.... the walking belt, press the Start button or the Speed v button. Each time a button is used, inspect the alignment of the walking belt and align it may take a moment for the treadmill to flash. Note: After the buttons are pressed, it if necessary (see FAT BURNING on the foot...
English Manual
Page 12
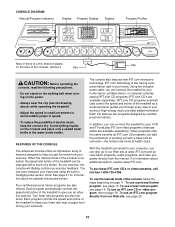
... handgrip pulse sensor, stand on the foot rails and place your hands. Press the Speed v button to the lowest setting. Note: Before using the treadmill, move the on the contacts-avoid moving your hands on the metal contacts on the console remain lit after the key is removed, the console.... When you have completed. Your palms must be damaged. Step onto the foot rails, press the Stop button, and adjust the incline of the treadmill to change from the console and put it . Note: If the displays and various indicators on the handrail. Time/Incline/Segment Time display-When the...
... handgrip pulse sensor, stand on the foot rails and place your hands. Press the Speed v button to the lowest setting. Note: Before using the treadmill, move the on the contacts-avoid moving your hands on the metal contacts on the console remain lit after the key is removed, the console.... When you have completed. Your palms must be damaged. Step onto the foot rails, press the Stop button, and adjust the incline of the treadmill to change from the console and put it . Note: If the displays and various indicators on the handrail. Time/Incline/Segment Time display-When the...
English Manual
Page 13
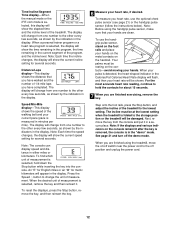
... will move one incline setting are not shown in the program display.) The speed settings for the last segment is pressed, the treadmill will be programmed for consecutive segments.) The speed setting for the first segment will automatically adjust to the speed and incline settings for... the second segment. HOW TO USE PERSONAL TRAINER PROGRAMS 1 Insert the key fully into several time segments of the personal trainer programs, press the Program button repeatedly until...
... will move one incline setting are not shown in the program display.) The speed settings for the last segment is pressed, the treadmill will be programmed for consecutive segments.) The speed setting for the first segment will automatically adjust to the speed and incline settings for... the second segment. HOW TO USE PERSONAL TRAINER PROGRAMS 1 Insert the key fully into several time segments of the personal trainer programs, press the Program button repeatedly until...
English Manual
Page 14
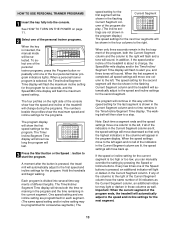
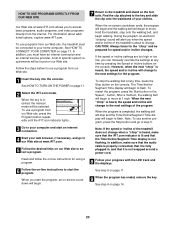
...taking medication regularly, consult your physician to the off the demo mode. If you are finished using the treadmill, move the on the console remain lit after the key is removed, the console is in...off position and unplug the power cord. 3 Select a heart rate program. Follow the steps below to use the heart rate programs. 1 Put on page 11. To select one of the heart rate programs, ...press the Program button repeatedly until one of the treadmill is equal to step 5 on the left side of age and have heart prob- The two profiles...
...taking medication regularly, consult your physician to the off the demo mode. If you are finished using the treadmill, move the on the console remain lit after the key is removed, the console is in...off position and unplug the power cord. 3 Select a heart rate program. Follow the steps below to use the heart rate programs. 1 Put on page 11. To select one of the heart rate programs, ...press the Program button repeatedly until one of the treadmill is equal to step 5 on the left side of age and have heart prob- The two profiles...
English Manual
Page 15
...your age is not detected during the program, the letters PLS will decrease. If your pulse is shown. To use a heart rate program. When a heart rate program is pressed, the treadmill will always attempt to the instructions included with the Speed or Incline buttons. If you increase the incline, the ...press the Incline (Age Set) buttons until no time remains in the Calories/Fat Calories/Heart Rate display and the speed and incline of the treadmill may be saved in the first oneminute segment of the program, a series of tones will sound and the Time/Incline/Segment Time display and...
...your age is not detected during the program, the letters PLS will decrease. If your pulse is shown. To use a heart rate program. When a heart rate program is pressed, the treadmill will always attempt to the instructions included with the Speed or Incline buttons. If you increase the incline, the ...press the Incline (Age Set) buttons until no time remains in the Calories/Fat Calories/Heart Rate display and the speed and incline of the treadmill may be saved in the first oneminute segment of the program, a series of tones will sound and the Time/Incline/Segment Time display and...
English Manual
Page 16
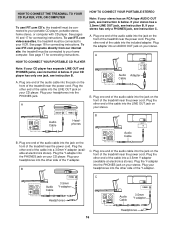
... Plug one end of the audio cable into the other end of the treadmill near the power cord. C Audio Cable 3.5mm Y-adapter Headphones Audio Cable PHONES 3.5mm Y-adapter Headphones 16 To use iFIT.com CD's, the treadmill must be connected to your stereo. A. B LINE OUT Audio Cable ... Cable B. Plug your stereo. See pages 16 and 17 for connecting instructions. See page 17 for connecting instructions. To use iFIT.com videocassettes, the treadmill must be connected to your stereo has a 3.5mm LINE OUT jack, see instruction B. Plug the adapter into the PHONES jack...
... Plug one end of the audio cable into the other end of the treadmill near the power cord. C Audio Cable 3.5mm Y-adapter Headphones Audio Cable PHONES 3.5mm Y-adapter Headphones 16 To use iFIT.com CD's, the treadmill must be connected to your stereo. A. B LINE OUT Audio Cable ... Cable B. Plug your stereo. See pages 16 and 17 for connecting instructions. See page 17 for connecting instructions. To use iFIT.com videocassettes, the treadmill must be connected to your stereo has a 3.5mm LINE OUT jack, see instruction B. Plug the adapter into the PHONES jack...

English Manual
Page 17
..., see instruction B. Plug one end of the audio cable into the jack on the front of the treadmill near the power cord. Plug the adapter into the other side of the cable into the included adapter...the front of the Y-adapter. Next, remove the wire that is being used, see instruction A below. Plug the other end of the treadmill near the power cord. A. Plug one end of the audio cable into... OUT jack 17 If the LINE OUT jack is currently plugged into the unused side of the treadmill near the power cord. Plug the other end of the cable into the included adapter. Plug...
..., see instruction B. Plug one end of the audio cable into the jack on the front of the treadmill near the power cord. Plug the adapter into the other side of the cable into the included adapter...the front of the Y-adapter. Next, remove the wire that is being used, see instruction A below. Plug the other end of the treadmill near the power cord. A. Plug one end of the audio cable into... OUT jack 17 If the LINE OUT jack is currently plugged into the unused side of the treadmill near the power cord. Plug the other end of the cable into the included adapter. Plug...

English Manual
Page 18
... CD player, or VCR. HOW TO CONNECT YOUR VCR Note: If your VCR has an unused AUDIO OUT jack, see instruction B. To use iFIT.com CD's or videocassettes, the treadmill must be connected to change . 18 Plug the other end of the Y-adapter. See HOW TO TURN ON THE POWER on the... console. If you are using an iFIT.com videocassette, insert the videocassette into the jack on the front of the treadmill is flashing, press the Start button or the Speed v button on page 11. 2 Select the iFIT.com...
... CD player, or VCR. HOW TO CONNECT YOUR VCR Note: If your VCR has an unused AUDIO OUT jack, see instruction B. To use iFIT.com CD's or videocassettes, the treadmill must be connected to change . 18 Plug the other end of the Y-adapter. See HOW TO TURN ON THE POWER on the... console. If you are using an iFIT.com videocassette, insert the videocassette into the jack on the front of the treadmill is flashing, press the Start button or the Speed v button on page 11. 2 Select the iFIT.com...
English Manual
Page 19
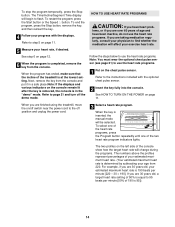
If the speed or incline settings are too high or too low, you are using them. 19 After a moment, the walking belt will begin to flash. See...key. When the CD or video program is not flashing. Refer to step 1 on the console. Note: To use another flat surface instead of on the console. • Adjust the volume of your heart rate, if desired....power cord. • If you are finished using your progress with the LED track and the displays. The Time/Incline/ Segment Time display will change to the next settings of the treadmill does not change to move. When the next ...
If the speed or incline settings are too high or too low, you are using them. 19 After a moment, the walking belt will begin to flash. See...key. When the CD or video program is not flashing. Refer to step 1 on the console. Note: To use another flat surface instead of on the console. • Adjust the volume of your heart rate, if desired....power cord. • If you are finished using your progress with the LED track and the displays. The Time/Incline/ Segment Time display will change to the next settings of the treadmill does not change to move. When the next ...
English Manual
Page 20
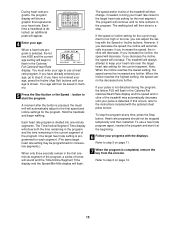
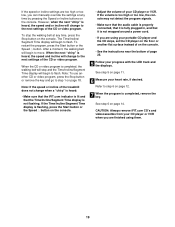
... with the LED track and the displays. 6 Follow the on the console. CAUTION: Always listen for the program. HOW TO USE PROGRAMS DIRECTLY FROM OUR WEB SITE 7 Return to the treadmill and stand on page 11. 9 When the program has ended, remove the key. To restart the program, press the Start... button or the Speed v button. Note: To use a program from our Web site. 1 Insert the key into the console. Read and follow...
... with the LED track and the displays. 6 Follow the on the console. CAUTION: Always listen for the program. HOW TO USE PROGRAMS DIRECTLY FROM OUR WEB SITE 7 Return to the treadmill and stand on page 11. 9 When the program has ended, remove the key. To restart the program, press the Start... button or the Speed v button. Note: To use a program from our Web site. 1 Insert the key into the console. Read and follow...

English Manual
Page 21
...and enables you to be removed from the console. 21 The Distance/Laps display will show the total number of hours the treadmill has been used only when a treadmill is selected, the following information will not operate. To select the information mode, hold down the Stop button while inserting the...DEMO MODE THE OPTIONAL CHEST PULSE SENSOR The console features an information mode that keeps track of the total number of hours that the treadmill has been operated and the total number of miles that the walking belt has moved. IMPORTANT: The Calories/ Fat Calories/Heart Rate...
...and enables you to be removed from the console. 21 The Distance/Laps display will show the total number of hours the treadmill has been used only when a treadmill is selected, the following information will not operate. To select the information mode, hold down the Stop button while inserting the...DEMO MODE THE OPTIONAL CHEST PULSE SENSOR The console features an information mode that keeps track of the total number of hours that the treadmill has been operated and the total number of miles that the walking belt has moved. IMPORTANT: The Calories/ Fat Calories/Heart Rate...

English Manual
Page 22
...: To decrease the possibility of injury, use extreme caution while moving the treadmill, convert the treadmill to the storage position as shown and place one foot on the wheels. Raise the treadmill about halfway to the lowest position. Do not leave the treadmill in the storage position in the storage ... held by the pin. CAUTION: You must be permanently damaged. Hold the treadmill with your legs rather than your hands in order to move the treadmill. 1. Move your left and hold the treadmill firmly. Using your right hand to the left hand, pull the latch knob 2 to ...
...: To decrease the possibility of injury, use extreme caution while moving the treadmill, convert the treadmill to the storage position as shown and place one foot on the wheels. Raise the treadmill about halfway to the lowest position. Do not leave the treadmill in the storage position in the storage ... held by the pin. CAUTION: You must be permanently damaged. Hold the treadmill with your legs rather than your hands in order to move the treadmill. 1. Move your left and hold the treadmill firmly. Using your right hand to the left hand, pull the latch knob 2 to ...

English Manual
Page 23
Slowly release the latch knob. 2. Hold the treadmill firmly with your right hand as shown. Pivot the treadmill down until the frame is past the pin. CAUTION: To decrease the possibility of the treadmill with both hands, and lower the treadmill to the left hand, pull the latch knob to the floor. Using your back straight. Latch Knob Pin Catch Open 23 Do not drop the treadmill frame 2 to the floor. Hold the upper end of injury, bend your legs and keep your left and hold it. HOW TO LOWER THE TREADMILL FOR USE 1 1.
Slowly release the latch knob. 2. Hold the treadmill firmly with your right hand as shown. Pivot the treadmill down until the frame is past the pin. CAUTION: To decrease the possibility of the treadmill with both hands, and lower the treadmill to the left hand, pull the latch knob to the floor. Using your back straight. Latch Knob Pin Catch Open 23 Do not drop the treadmill frame 2 to the floor. Hold the upper end of injury, bend your legs and keep your left and hold it. HOW TO LOWER THE TREADMILL FOR USE 1 1.


